标签:user com 调用 org 成功 print 目录 配置 接口
昨天进行了两个方法的静态代理(方法抽象),那么更多方法的静态代理会是怎样呢
现在我们在昨天实践的基础上再进行一次静态代理,昨日实践链接:
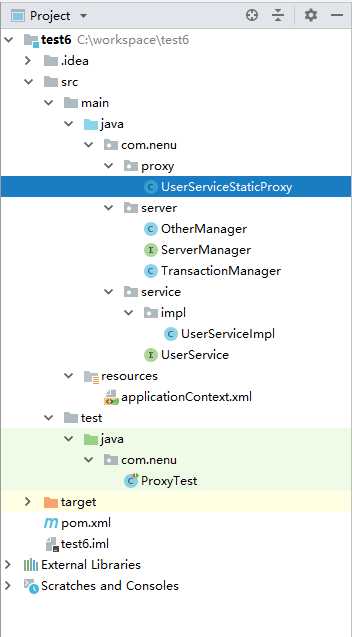
今日对应目录,所有操作对应以下操作进行:

下面我们开始今天的实践~
<?xml version="1.0" encoding="UTF-8"?>
<beans xmlns="http://www.springframework.org/schema/beans"
       xmlns:xsi="http://www.w3.org/2001/XMLSchema-instance"
       xmlns:context="http://www.springframework.org/schema/context"
       xsi:schemaLocation="http://www.springframework.org/schema/beans
    http://www.springframework.org/schema/beans/spring-beans-3.0.xsd http://www.springframework.org/schema/context https://www.springframework.org/schema/context/spring-context.xsd">

    <!-- 开启扫描 -->
    <context:component-scan base-package="com.nenu"/>

</beans>
1.UserService接口:
package com.nenu.service;

public interface UserService {
    public void add();
    public void other();
}
2.UserServiceImpl类:
package com.nenu.service.impl;

import com.nenu.service.UserService;
import org.springframework.stereotype.Component;

@Component
public class UserServiceImpl implements UserService {

    @Override
    public void add() {
        System.out.println("UserServiceImpl add……");
    }

    @Override
    public void other() {
        System.out.println("UserServiceImpl other.....");
    }

    public UserServiceImpl(){}

}
1.ServerManager接口
package com.nenu.server;

public interface ServerManager {
    public void before();
    public void after();
}
2.TransactionManager类:
package com.nenu.server;

public class TransactionManager implements ServerManager{
    public void before(){
        System.out.println("TransactionManager Before");
    }
    public void after(){
        System.out.println("TransactionManager After");
    }
}
3.OtherManager类:
package com.nenu.server;

public class OtherManager implements ServerManager{
    public void before(){
        System.out.println("OtherManager Before......");
    }
    public void after(){
        System.out.println("OtherManager After......");
    }
}
UserServiceStaticProxy类:
package com.nenu.proxy;

import com.nenu.server.ServerManager;
import com.nenu.service.UserService;

public class UserServiceStaticProxy implements UserService {
    //目标对象 - 代理谁
    private UserService target;

    //要加入记录增强,比如事物时间,加入事务控制
    private ServerManager serverManager;

    //通过构造方法来传入具体要代理的对象
    public UserServiceStaticProxy(UserService target, ServerManager serverManager){
        this.target = target;
        this.serverManager = serverManager;
    }

    @Override
    public void add() {
        //非核心业务1
        serverManager.before();
        //核心活,目标对象来做
        target.add();
        //非核心业务2
        serverManager.after();
    }

    @Override
    public void other() {
        //非核心业务1
        serverManager.before();
        //核心活,目标对象来做
        target.other();
        //非核心业务2
        serverManager.after();
    }
}
1.ProxyTest类:
package com.nenu;

import com.nenu.proxy.UserServiceStaticProxy;
import com.nenu.server.OtherManager;
import com.nenu.server.ServerManager;
import com.nenu.server.TransactionManager;
import com.nenu.service.UserService;
import org.junit.Test;
import org.springframework.context.ApplicationContext;
import org.springframework.context.support.ClassPathXmlApplicationContext;

public class ProxyTest {
    @Test
    public void UserTest(){
        //1.配置容器
        ApplicationContext applicationContext =
                new ClassPathXmlApplicationContext("applicationContext.xml");

        //2.取出容器中bean
        UserService target =
                (UserService) applicationContext.getBean("userServiceImpl");

        //3.创建一个代理对象

        //3-1 创建非核心业务增强对象
        ServerManager serverManager1 = new TransactionManager();
        ServerManager serverManager2 = new OtherManager();
        //3-2 创建代理对象
        UserServiceStaticProxy proxy = new UserServiceStaticProxy(target, serverManager1);
        proxy = new UserServiceStaticProxy(proxy, serverManager2);

        //4.调用
        proxy.add();
        proxy.other();
    }
}
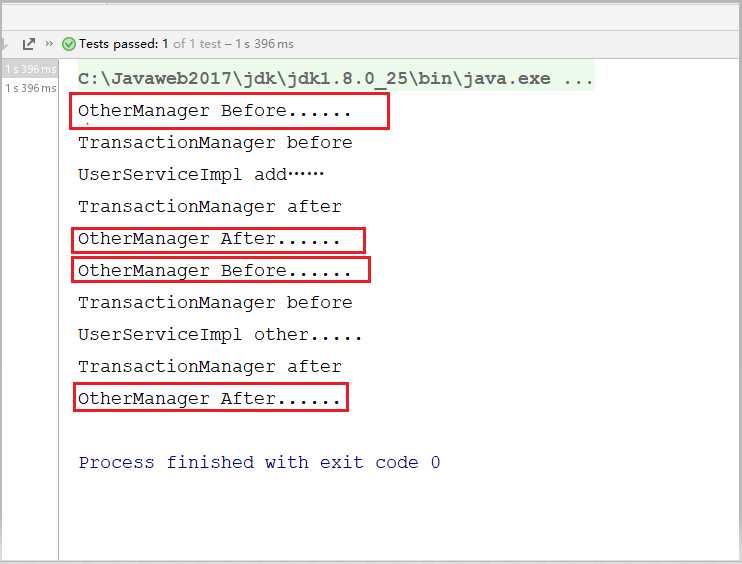
2.测试

如上图,在昨天的基础上OtherManager类的方法代理就添加成功了
成功!!!
标签:user com 调用 org 成功 print 目录 配置 接口
原文地址:https://www.cnblogs.com/yangf428/p/12319394.html