标签:channels 采样 现在 http 默认 structure lte build 变形
论文地址:https://link.zhihu.com/?target=https%3A//arxiv.org/pdf/1911.08947.pdf
github:https://github.com/MhLiao/DB
捣鼓DB有一段时间了,年前开始就训练了。
刚开始是训练死活不收敛,训练ic15数据集也不收敛,官方数据集都不收敛??不由怀疑肯定是哪里搞错了。我的是cuda8的,pytorch1.1还是1.2的,怀疑可能是一定是需要cuda10,
于是冒着重装系统的危险捣鼓双cuda,首先升级驱动418,之前是384,cuda10需要驱动418,418也向下兼容cuda8.一顿操作倒是很顺利,/usr/local/下面是cuda-8.0 cuda-10.0 还有一个软链接,想用哪一个就修改一下软链接就可以了。
于是欢快的用anconda装pytorch-cuda10版本的。现在装的是pytorch 1.3.1 py3.7_cuda10.0.130_cudnn7.6.3_0 pytorch;之前敲装pytorch默认安装cuda10.1的pytorch版本,但是运行DB报错,报cuda的问题,弄了很久,发现我本地是10.0版本的,然后试着找cuda10.0版本的pytorch,找到,装好再运行就不报错了。
但是不收敛的问题依旧存在,不知道咋搞的。后来看源码数据处理那块,发现是会去掉最后一位,因为ic15数据标签格式是:
?58,80,191,71,194,114,61,123,fusionopolis
147,21,176,21,176,36,147,36,###
去掉最后一位的文本内容,而我的数据集只有坐标,并且有4个点有14个点的。
在data->image_dataset.py line71
num_points = math.floor((len(line) - 1) / 2) * 2 ###去掉“-”就可以
还有line41
gt_path=[self.data_dir[i]+‘/train_gts/‘+timg.strip().replace(".jpg","")+‘.txt‘ for timg in image_list] ##.replace(".jpg","")表示gt与img名字一样
然后训练我40多万的数据集,训练几天loss维持在1左右吧,测试也可以而且测其他的文本鲁棒性也很好。
有一个问题是这些都是4个点,也支持轮廓点的,需要加--polygon 但是加了这个效果不好,后面再看看。
CUDA_VISIBLE_DEVICES=0 python demo.py DB-master/experiments/seg_detector/merge_data_resnet50_deform_thre-SRC.yaml --visualize --resume /DB-master/myfile/model_epoch_13_minibatch_396000-20200220 --image_path /data_2/everyday/0220/snapshot13.png --polygon --box_thresh 0.35
还可以加一个参数--image_short_side,默认是736,这个参数需要是32的倍数。
***************************************************************************************************示例1:*******************************************************************

***************************************************************************************************示例2:*******************************************************************
***************************************************************************************************示例3:*******************************************************************
作者的源码实在是太复杂了啊,直接看蒙圈了。各种动态类啊,动态创建啊,不好调试啊,断点不好跟踪。
源码我是看了很久吧,靠近一个月,加上春节疫情这段时间在家,效率很不高,特别是碰到看不懂的。
我现在都不明白哪个类是什么时候就创建好了的,我只是把每个文件都看的很熟了。
比如文件夹concern里面有个config.py
class State:
    def __init__(self, autoload=True, default=None):
        self.autoload = autoload
        self.default = default
class StateMeta(type):
    def __new__(mcs, name, bases, attrs):
    ....
class Configurable(metaclass=StateMeta):
....然后后面所有的类都是继承Configurable这个类。ヾ(?`Д′?),metaclass是叫元类的一个东东,https://www.cnblogs.com/yssjun/p/9832526.html
所有的类都是通过getattr(self, name)这个玩意动态创建,之所以要动态创建,是为了方面配置yaml可以多做实验,可以对于我们就看起来懵逼了。看yaml文件:
import:
    - 'experiments/seg_detector/base_totaltext.yaml'
package: []
define:
  - name: 'Experiment'
    class: Experiment
    structure:
        class: Structure
        builder:
            class: Builder
            model: SegDetectorModel
            model_args:
                backbone: deformable_resnet50
                decoder: SegDetector
                decoder_args:
                    adaptive: True
                    in_channels: [256, 512, 1024, 2048]
                    k: 50
                loss_class: L1BalanceCELoss
        representer:
            class: SegDetectorRepresenter
            max_candidates: 1000
        measurer:
            class: QuadMeasurer
        visualizer:
            class: SegDetectorVisualizer
    train:
        class: TrainSettings
        data_loader:
            class: DataLoader
...
各种类,程序运行的时候都是读取的这些来创建与初始化类的。
数据处理经过了7个步骤对应7个类!需要经过什么处理在base_***.ymal和base.ymal指定数据处理的类和参数,比如yaml文件中:
 processes:
        - class: AugmentDetectionData
          augmenter_args:
              - ['Fliplr', 0.5]
              - {'cls': 'Affine', 'rotate': [-10, 10]}
              - ['Resize', [0.5, 3.0]]
          only_resize: False
          keep_ratio: False
        - class: RandomCropData
          size: [640, 640]
          max_tries: 10
        - class: MakeICDARData
        - class: MakeSegDetectionData
        - class: MakeBorderMap
        - class: NormalizeImage
        - class: FilterKeys
          superfluous: ['polygons', 'filename', 'shape', 'ignore_tags', 'is_training']
读源码的时候我并不知道在哪里创建与初始化了这些类,后面再看吧。我只是在data->image_dataset.py文件的def getitem(self, index, retry=0):函数打断点:
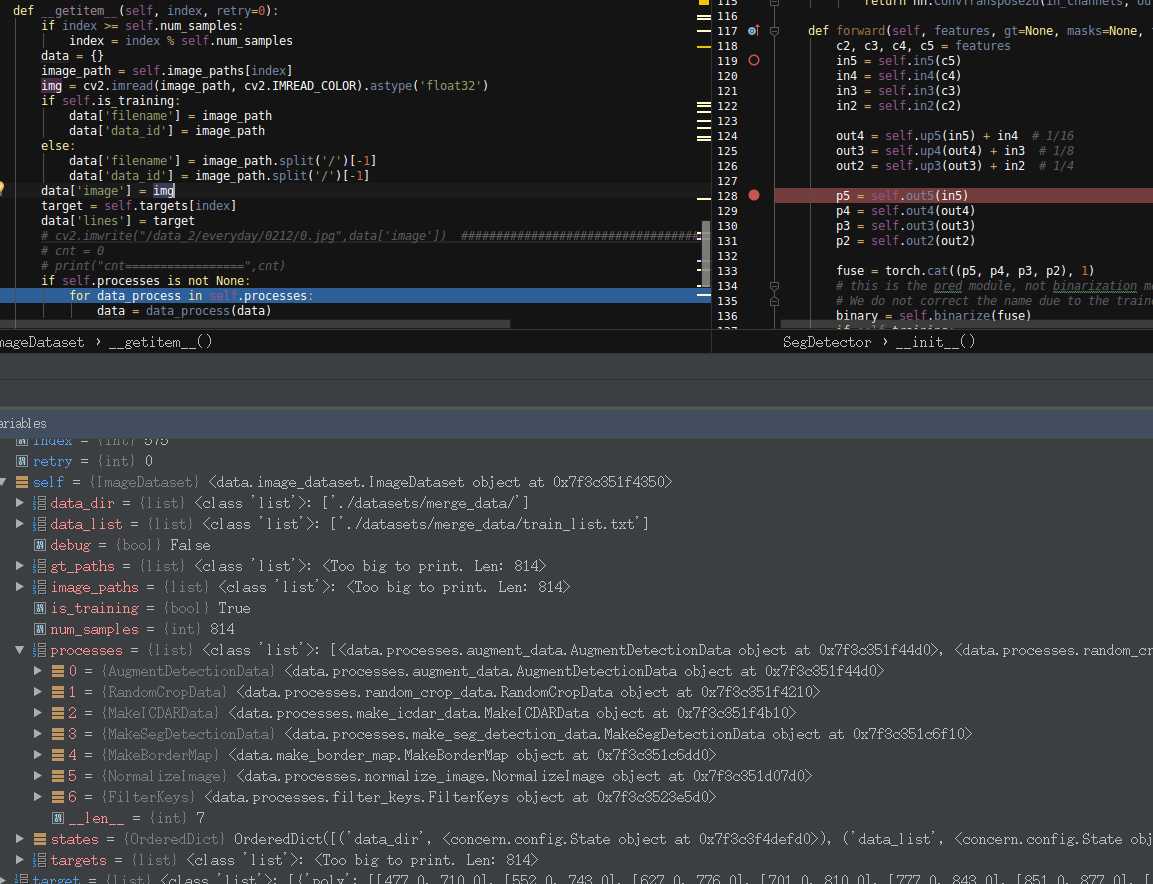
可以看到,循环在预处理,一个接这一个。想看哪个就提前去哪个类打上断点。
其中,make_border_map.py这个是为了做threshold的标签的,没有看懂,但是看效果图是高亮文字块边缘,其余部分都赋值0.3,后面再说这块东西。
data文件夹下面有一些py文件和data文件夹下面的processes文件夹下面的py貌似是一样的,实际运行的时候发现有些运行的是data下面的py有些是processes文件夹下面的,懵圈+10086
trainer.py里面的一个函数:
def train_step(self, model, optimizer, batch, epoch, step, **kwards):
        optimizer.zero_grad()
        results = model.forward(batch, training=True)
....
results = model.forward(batch, training=True)后面是跑到哪里呢?
然后我看这个model怎么初始化的,该文件上面:
def init_model(self):
        model = self.structure.builder.build(
            self.device, self.experiment.distributed, self.experiment.local_rank)
        return model
然后:
structure->Builder的build函数如下:
 def build(self, device, distributed=False, local_rank: int = 0):

        Model = getattr(structure.model,self.model)
        model = Model(self.model_args, device,
                      distributed=distributed, local_rank=local_rank)
        return model
---structure.model在yaml文件中指定:
model: SegDetectorModel
所以我就去找类SegDetectorModel
class SegDetectorModel(nn.Module):
    def __init__(self, args, device, distributed: bool = False, local_rank: int = 0):
        super(SegDetectorModel, self).__init__()
        from decoders.seg_detector_loss import SegDetectorLossBuilder

        self.model = BasicModel(args)
再继续:
class BasicModel(nn.Module):
    def __init__(self, args):
        nn.Module.__init__(self)

        self.backbone = getattr(backbones, args['backbone'])(**args.get('backbone_args', {}))
        self.decoder = getattr(decoders, args['decoder'])(**args.get('decoder_args', {}))

    def forward(self, data, *args, **kwargs):
        returbone: den self.decoder(self.backbone(data), *args, **kwargs)
上面的:在yaml文件中写了:
backbone: deformable_resnet50
decoder: SegDetector
所以return self.decoder(self.backbone(data), *args, **kwargs) 这一句就跑了两个类里面的forward()函数
总结:results = model.forward(batch, training=True)执行步骤是:
step1:
SegDetectorModel下面的forward:
if isinstance(batch, dict):
data = batch[‘image‘].to(self.device)
else:
data = batch.to(self.device)
data = data.float()
pred = self.model(data, training=self.training)
step2:
然后调用 BasicModel的forward:
backbone就是deformable_resnet50
decoder就是SegDetector
def forward(self, data, *args, **kwargs):
return self.decoder(self.backbone(data), *args, **kwargs)
step3:resnet50的forward ##self.backbone(data) == resnet50
step4:SegDetector的forward ##self.decoder == SegDetector
我就是先在一个类中打断点,然后我感觉接下来是跑到这个类的forward函数,就在这打断点,这样是可以的,我就是这么摸索出来的。
所以摸索出网络的大概:
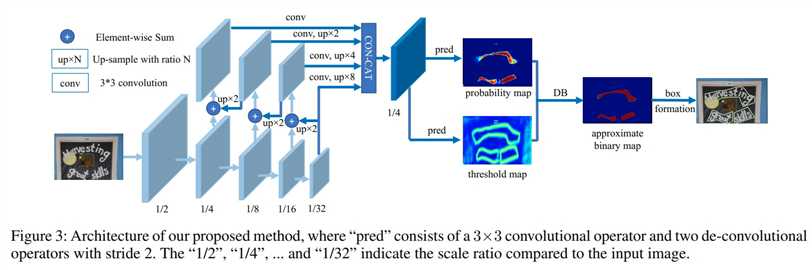
先是通过resnet+可变形卷积得到feature_map X2,X3,X4,X5
然后送到SegDetector的forward函数,一顿卷积-池化-上采样-bn-relu,累加合并
        c2, c3, c4, c5 = features
        in5 = self.in5(c5)
        in4 = self.in4(c4)
        in3 = self.in3(c3)
        in2 = self.in2(c2)

        out4 = self.up5(in5) + in4  # 1/16
        out3 = self.up4(out4) + in3  # 1/8
        out2 = self.up3(out3) + in2  # 1/4

        p5 = self.out5(in5)
        p4 = self.out4(out4)
        p3 = self.out3(out3)
        p2 = self.out2(out2)
        fuse = torch.cat((p5, p4, p3, p2), 1)
p5,p4,p3,p2的尺寸都是[n,64,160,160],fuse的尺寸是[n,256,160,160];再然后:
binary = self.binarize(fuse)
thresh = self.thresh(fuse)
再一顿卷积、bn、relu、反卷积、sigmoid操作得到binary,其尺寸是[n,1,640,640]和输入尺寸一样
再一顿卷积、bn、relu、上采样、sigmoid操作得到thresh,其尺寸是[n,1,640,640]和输入尺寸一样
再计算:
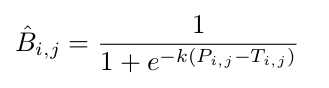
thresh_binary = torch.reciprocal(1 + torch.exp(-self.k * (binary - thresh))) 论文中的那个公式(如上公式)
后面就是loss约束,L1BalanceCELoss
    def forward(self, pred, batch):
        bce_loss = self.bce_loss(pred['binary'], batch['gt'], batch['mask'])
        metrics = dict(bce_loss=bce_loss)
        if 'thresh' in pred:
            l1_loss, l1_metric = self.l1_loss(pred['thresh'], batch['thresh_map'], batch['thresh_mask'])
            dice_loss = self.dice_loss(pred['thresh_binary'], batch['gt'], batch['mask'])
            metrics['thresh_loss'] = dice_loss
            loss = dice_loss + self.l1_scale * l1_loss + bce_loss * self.bce_scale
            metrics.update(**l1_metric)
        else:
            loss = bce_loss
        return loss, metrics
可以看到,binary与thresh_binary都是用的gt
thresh用的thresh_map
DB:Real-time Scene Text Detection with Differentiable Binarization 一些问题
标签:channels 采样 现在 http 默认 structure lte build 变形
原文地址:https://www.cnblogs.com/yanghailin/p/12337543.html