标签:vrrp sys 重构 pen 系统服务 replicat 执行 src 推荐
MySQL高可用之MHA(VIP向外网提供服务)在MySQL高可用集群之MHA的环境中,因为有master1、还有一台备主(master2),IP地址不同,如果master1宕机了,备主(master2)向外网提供服务提供服务,却没有稳定的一个IP地址向外网提供服务,所以必须要引入VIP来向外网提供服务。
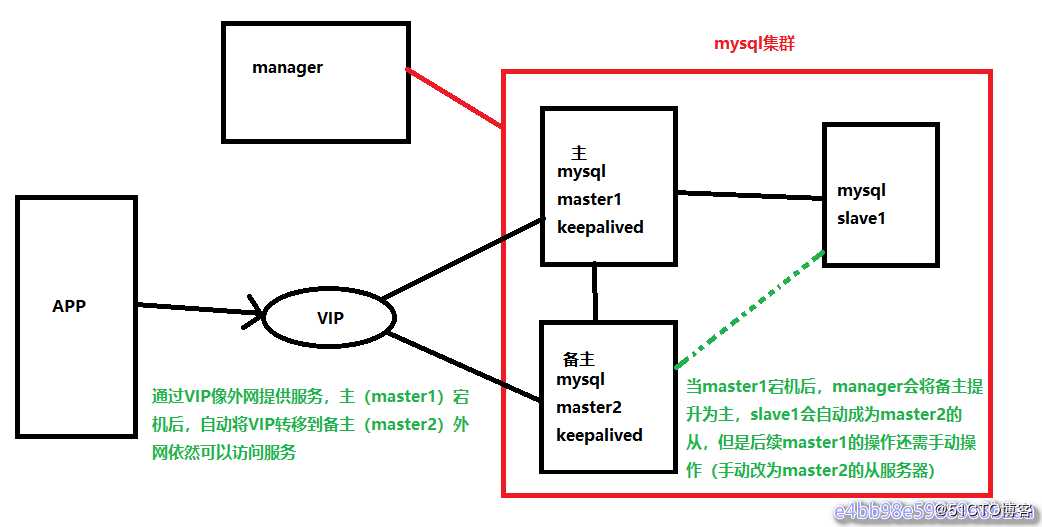
实验环境基于上一个博客(MySQL高可用集群之MHA)部署:
| 主机 | 操作系统 | IP地址 |
|---|---|---|
| master1+keepalived | CentOS 7.3 | 192.168.1.1(VIP:192.168.1.100) |
| master2(备主)+keepalived | CentOS 7.3 | 192.168.1.8(VIP:192.168.1.100) |
| slave1 | CentOS 7.3 | 192.168.1.9 |
| manager | CentOS 7.3 | 192.168.1.3 |
案例中关闭防火墙、selinux
# systemctl stop firewalld
# setenforce 0下载软件进行并进行安装(两台master,准确的说一台是master,另外一台是备选master,在没有切换以前是slave)
在安装keepalived之前,先将环境还原成master1为主,master2和slave1为master1的从:
关闭master2的服务
[root@master2 ~]# systemctl stop mysqld查看master1的状态:
[root@master1 ~]# mysql -uroot -p123.com -e "show master status"开启master2的服务,设置为master1的从服务器
[root@master2 ~]# systemctl start mysqld
[root@master2 ~]# mysql -uroot -p123.com
mysql> change master to master_host=‘192.168.1.1‘,master_port=3306,master_log_file=‘myssql-bin.000002‘,master_log_pos=154,master_user=‘mharep‘,master_password=‘123.com‘;
mysql> start slave;
mysql> show slave status\G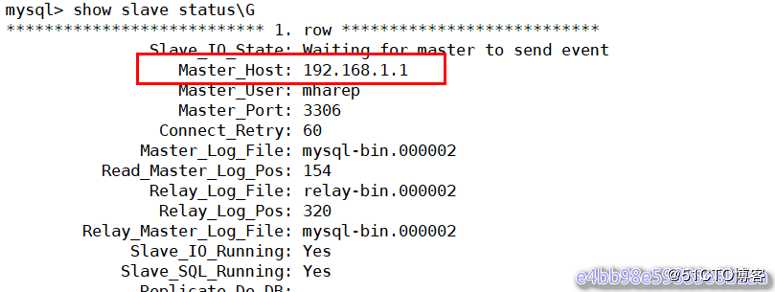
启动MHA
[root@manager ~]# rm -f /masterha/app1/app1.failover.complete
[root@manager ~]# nohup masterha_manager --conf=/etc/masterha/app1.cnf &> /tmp/mha_manager.log &
[root@manager ~]#  masterha_check_status --conf=/etc/masterha/app1.cnf
app1 (pid:26410) is running(0:PING_OK), master:192.168.1.1
在master1和master2上安装软件包keepalived 安装keepalived软件包与服务控制 在编译安装Keepalived之前,必须先安装内核开发包kernel-devel以及openssl-devel、popt-devel等支持库。(master1、master2)
# yum -y install kernel-devle popt-devel openssl-devel若没有安装则通过rpm或yum工具进行安装
编译安装Keepalived (master1、master2)
使用指定的linux内核位置对keepalived进行配置,并将安装路径指定为根目录,这样就无需额外创建链接文件了,配置完成后,依次执行make、make install进行安装。
# cd /usr/local/src
# wget https://www.keepalived.org/software/keepalived-2.0.20.tar.gz
# tar zxf keepalived-2.0.20.tar.gz
# cd keepalived-2.0.20/
# ./configure --prefix=/ && make && make install
# systemctl enable keepalived
使用keepalived服务
执行make install操作之后,会自动生成/etc/init.d/keepalived脚本文件,但还需要手动添加为系统服务,这样就可以使用service、chkconfig工具来对keepalived服务程序进行管理了。
针对keepalived的防火墙规则:
策略:
# firewall-cmd --direct --permanent --add-rule ipv4 filter OUTPUT 0 --in-interface ens33 --destination 224.0.0.18 --protocol vrrp -j ACCEPT
# firewall-cmd --direct --permanent --add-rule ipv4 filter INPUT 0 --in-interface ens33 --destination 224.0.0.18 --protocol vrrp -j ACCEPT
# firewall-cmd --reload
或关闭:
# systemctl stop firewalld
修改Keepalived的配置文件(在master1上配置)
[root@master1 keepalived-2.0.20]# vim /etc/keepalived/keepalived.conf
! Configuration File for keepalived

global_defs {
   router_id LVS_DEVEL1
}

vrrp_instance VI_1 {
    state BACKUP
    interface ens33
    virtual_router_id 51
    priority 100
    advert_int 1
    authentication {
        auth_type PASS
        auth_pass 1111
    }
    virtual_ipaddress {
        192.168.1.100
    }
}
在候选master上配置(master2)
[root@master2 keepalived-2.0.20]# vim /etc/keepalived/keepalived.conf
! Configuration File for keepalived

global_defs {
   router_id LVS_DEVEL2
}

vrrp_instance VI_1 {
    state BACKUP
    interface ens33
    virtual_router_id 51
    priority 50
    advert_int 1
    authentication {
        auth_type PASS
        auth_pass 1111
    }
    virtual_ipaddress {
        192.168.1.100
    }
}
启动keepalived服务,在master上启动并查看日志
[root@master1 keepalived-2.0.20]# systemctl start keepalived
[root@master1 keepalived-2.0.20]# ps -ef |grep keep
[root@master1 keepalived-2.0.20]# ip a |grep 100
[root@master1 keepalived-2.0.20]# tail -f /var/log/messages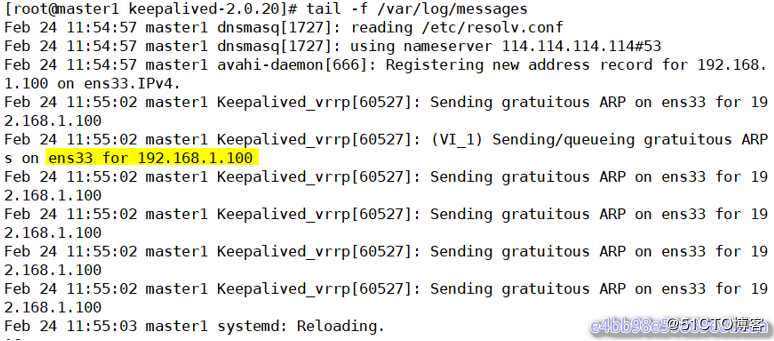
在另外一台服务器,候选master(master2)上启动keepalived服务,并观察
[root@master2 keepalived-2.0.20]# systemctl start keepalived
[root@master2 keepalived-2.0.20]# tail -f /var/log/messages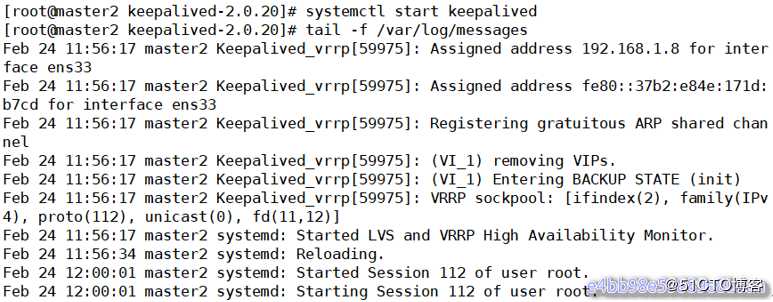
keepalived已经配置成功
注意:上面两台服务器的keepalived都设置为了BACKUP模式,在keepalived中有2种模式,分别是master->backup模式和backup->backup模式。这两种模式有很大区别。
- 在master->backup模式下,一旦主库宕机,虚拟ip会自动漂移到从库,当主库修复后,keepalived启动后,还会把虚拟ip抢占过来,即使设置了非抢占模式(nopreempt)抢占ip的动作也会发生。
- 在backup->backup模式下,当主库宕机后虚拟ip会自动漂移到从库上,当原主库恢复和keepalived服务启动后,并不会抢占新主的虚拟ip,即使是优先级高于从库的优先级别,也不会发生抢占。为了减少ip漂移次数,通常是把修复好的主库当做新的备库。
MHA引入keepalived(MySQL服务进程挂掉时通过MHA 停止keepalived): 要想把keepalived服务引入MHA,我们只需要修改切换时触发的脚本文件master_ip_failover即可,在该脚本中添加在master发生宕机时对keepalived的处理。
编辑脚本/scripts/master_ip_failover,修改后如下。
[root@manager ~]# cp /scripts/master_ip_failover /scripts/master_ip_failover.bak
[root@manager ~]# cd /scripts/
[root@manager scripts]# vi master_ip_failover
#!/usr/bin/env perl

use strict;
use warnings FATAL => ‘all‘;

use Getopt::Long;

my (
    $command,$ssh_user,$orig_master_host,$orig_master_ip,$orig_master_port, $new_master_host,$new_master_ip,$new_master_port
);

my $vip = ‘192.168.1.100‘;       //VIP地址
my $ssh_start_vip = "systemctl start keepalived.service";     //启动
my $ssh_stop_vip = "systemctl stop keepalived.service";     //停止

GetOptions(
    ‘command=s‘          => \$command,
    ‘ssh_user=s‘         => \$ssh_user,
    ‘orig_master_host=s‘ => \$orig_master_host,
    ‘orig_master_ip=s‘   => \$orig_master_ip,
    ‘orig_master_port=i‘ => \$orig_master_port,
    ‘new_master_host=s‘  => \$new_master_host,
    ‘new_master_ip=s‘    => \$new_master_ip,
    ‘new_master_port=i‘  => \$new_master_port,
);

exit &main();

sub main {

print "\n\nIN SCRIPT TEST====$ssh_stop_vip==$ssh_start_vip===\n\n";

    if ( $command eq "stop" || $command eq "stopssh" ) {

        my $exit_code = 1;
        eval {
            print "Disabling the VIP on old master: $orig_master_host \n";
            &stop_vip();
            $exit_code = 0;
        };
        if ($@) {
            warn "Got Error: $@\n";
            exit $exit_code;
        }
        exit $exit_code;
    }
    elsif ( $command eq "start" ) {

        my $exit_code = 10;
        eval {
            print "Enabling the VIP - $vip on the new master - $new_master_host \n";
            &start_vip();
            $exit_code = 0;
        };
        if ($@) {
            warn $@;
            exit $exit_code;
        }
        exit $exit_code;
    }
    elsif ( $command eq "status" ) {
        print "Checking the Status of the script.. OK \n";
        #`ssh $ssh_user\@cluster1 \" $ssh_start_vip \"`;
        exit 0;
    }
    else {
        &usage();
        exit 1;
    }
}

# A simple system call that enable the VIP on the new master
sub start_vip() {
    `ssh $ssh_user\@$new_master_host \" $ssh_start_vip \"`;
}
# A simple system call that disable the VIP on the old_master
sub stop_vip() {
     return 0  unless  ($ssh_user);
    `ssh $ssh_user\@$orig_master_host \" $ssh_stop_vip \"`;
}

sub usage {
    print
    "Usage: master_ip_failover --command=start|stop|stopssh|status --orig_master_host=host --orig_master_ip=ip --orig_master_port=port --new_master_host=host --new_master_ip=ip --new_master_port=port\n";
}
[root@manager scripts]# chmod +x /scripts/master_ip_failover  //增加执行权限
接下来在/etc/masterha/app1.cnf中调用故障切换脚本:
停止MHA:
[root@manager scripts]# masterha_stop --conf=/etc/masterha/app1.cnf

在配置文件/etc/masterha/app1.cnf 中启用下面的参数(在[server default下面添加])
[root@manager scripts]# vim /etc/masterha/app1.cnf
master_ip_failover_script=/scripts/master_ip_failover

启动MHA:
[root@manager scripts]# nohup masterha_manager --conf=/etc/masterha/app1.cnf &> /tmp/mha_manager.log &
[root@manager scripts]#  masterha_check_status --conf=/etc/masterha/app1.cnf
app1 (pid:25971) is running(0:PING_OK), master:192.168.1.1

再检查集群状态,看是否会报错
[root@manager scripts]# masterha_check_repl --conf=/etc/masterha/app1.cnf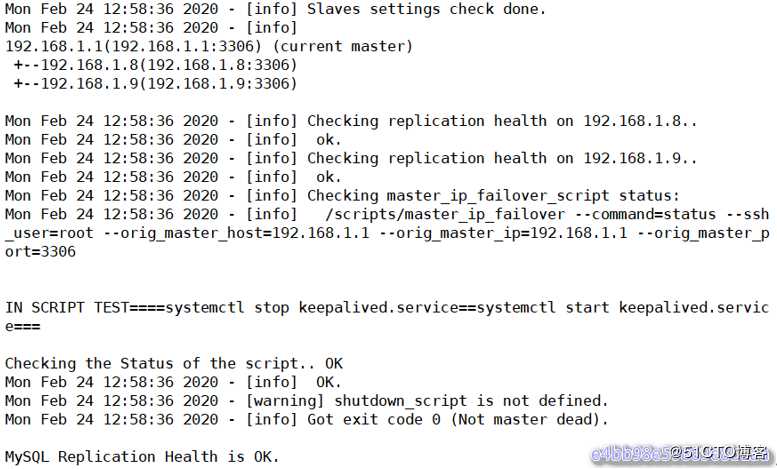
可以看见已经没有报错了。 /scripts/master_ip_failover添加或者修改的内容意思是当主库数据库发生故障时,会触发MHA切换,MHA Manager会停掉主库上的keepalived服务,触发虚拟ip漂移到备选从库,从而完成切换。 当然可以在keepalived里面引入脚本,这个脚本监控mysql是否正常运行,如果不正常,则调用该脚本杀掉keepalived进程(参考MySQL 高可用性keepalived+mysql双主)。
测试: 在master1上停止mysqld服务 到slave1查看slave的状态:
[root@master1 keepalived-2.0.20]# systemctl stop mysqld
[root@slave1 ~]#  mysql -uroot -p123.com -e "show slave status\G"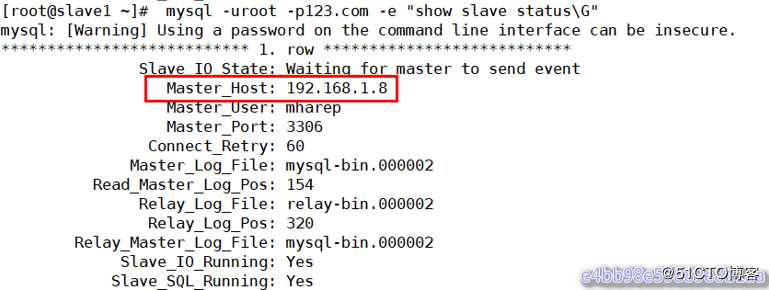
从上图可以看出slave指向了新的master服务器192.168.1.8(master2)(在故障切换前指向的是192.168.1.1(master1))
查看VIP绑定:
在master1上查看vip绑定
[root@master1 keepalived-2.0.20]# ip a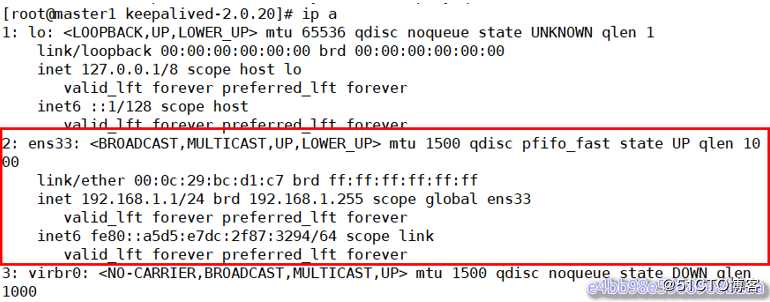
在master2上查看VIP绑定
[root@master2 keepalived-2.0.20]# ip a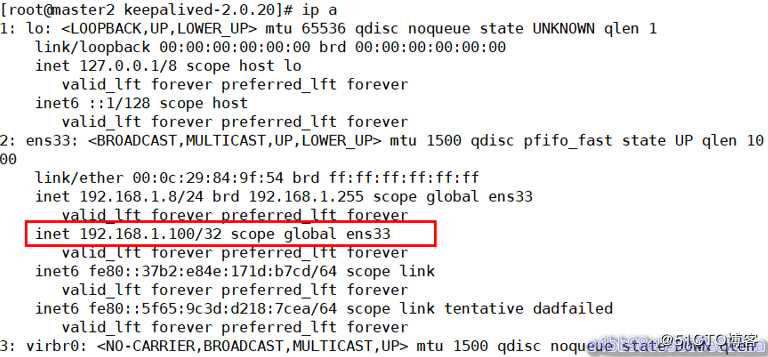
从上面的显示结果可以看出vip地址漂移到了192.168.1.8 主从切换后续工作
重构: 重构就是主挂了,切换到备主上,备主变成了主,因此重构的一种方案原主库修复成一个新的slave
主库切换后,把原主库修复成新从库,原主库数据文件完整的情况下,可通过以下方式找出最后执行的CHANGE MASTER命令:
[root@manager scripts]# grep "CHANGE MASTER TO MASTER" /masterha/app1/manager.log |tail -1
Mon Feb 24 13:00:18 2020 - [info]  All other slaves should start replication from here. Statement should be: CHANGE MASTER TO MASTER_HOST=‘192.168.1.8‘, MASTER_PORT=3306, MASTER_LOG_FILE=‘mysql-bin.000002‘, MASTER_LOG_POS=154, MASTER_USER=‘mharep‘, MASTER_PASSWORD=‘xxx‘;
将192.168.1.1(master1)修复成192.168.1.8(master2)的从库:
mysql> CHANGE MASTER TO MASTER_HOST=‘192.168.1.8‘, MASTER_PORT=3306, MASTER_LOG_FILE=‘mysql-bin.000002‘, MASTER_LOG_POS=154, MASTER_USER=‘mharep‘, MASTER_PASSWORD=‘123.com‘;
mysql> start slave;
mysql> show slave status\G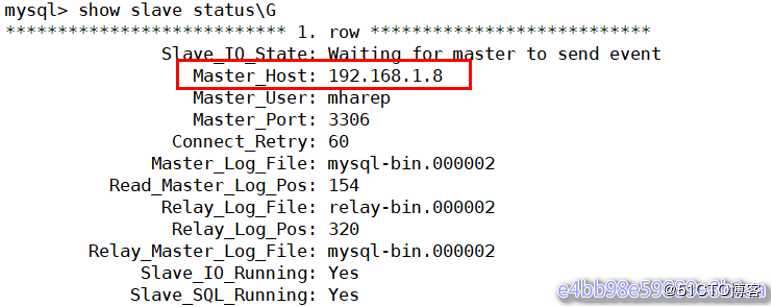
启动mha manager:
[root@manager scripts]# rm -f /masterha/app1/app1.failover.complete
[root@manager scripts]# nohup masterha_manager --conf=/etc/masterha/app1.cnf --igonre_fail_on_start &> /tmp/mha_manager.log &
[1] 27249
[root@manager scripts]# masterha_check_status --conf=/etc/masterha/app1.cnf
app1 (pid:27249) is running(0:PING_OK), master:192.168.1.8
[root@manager scripts]# masterha_check_repl --conf=/etc/masterha/app1.cnf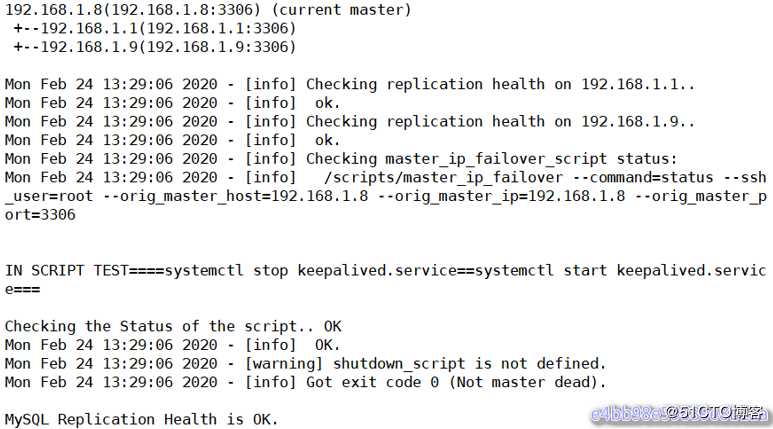
但是为了防止脑裂(当两台高可用服务器在指定的时间内,无法互相检测到对方心跳而各自启动故障转移功能,取得了资源以及服务的所有权,而此时的两台高可用服务器对都还活着并作正常运行,这样就会导致同一个服务在两端同时启动而发生冲突的严重问题,最严重的就是两台主机同时占用一个VIP的地址(类似双端导入概念),当用户写入数据的时候可能会分别写入到两端,这样可能会导致服务器两端的数据不一致或造成数据的丢失,这种情况就称为裂脑,也有的人称之为分区集群或者大脑垂直分隔)推荐生产环境采用脚本的方式来管理虚拟ip,而不是使用keepalived来完成。
通过脚本的方式管理VIP。这里是修改/scripts/master_ip_failover,也可以使用其他的语言完成,比如php语言。使用php脚本编写的failover这里就不介绍了。修改完成后内容如下,而且如果使用脚本管理vip的话,需要手动在master服务器上绑定一个vip
关闭上一个案例的keepalived服务(master1、master2)# systemctl stop keepalived
因为现在192.168.1.8(master2)是主,所以要在现在的主上绑定VIP
[root@master2 ~]# ifconfig ens33:0 192.168.1.100/24
[root@master2 ~]# ifconfig ens33:0
在mha-manager上修改/scripts/ master_ip_failover,内容如下
[root@manager scripts]# vim master_ip_failover
 12 my $vip = ‘192.168.1.100‘;
 13 my $key = ‘0‘;
 14 my $ssh_start_vip = "/sbin/ifconfig ens33:$key $vip";
 15 my $ssh_stop_vip = "/sbin/ifconfig ens33:$key down";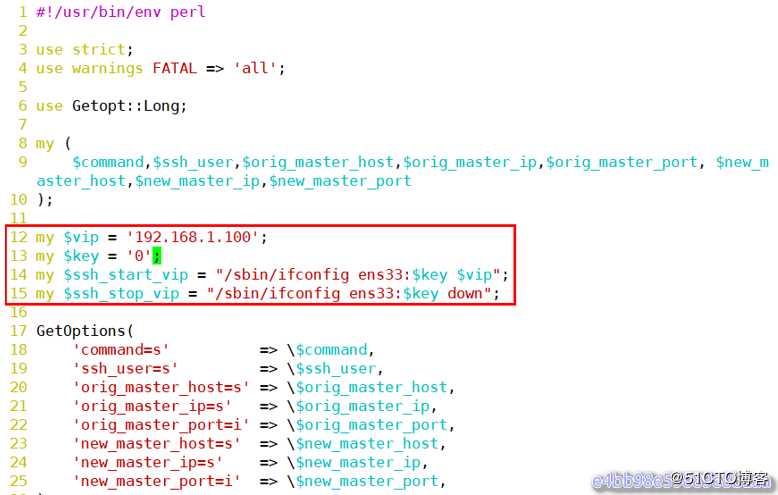
集群配置文件:
[root@manager scripts]# vim /etc/masterha/app1.cnf
master_ip_failover_script=/scripts/master_ip_failover
停止MHA:
[root@manager scripts]# masterha_stop --conf=/etc/masterha/app1.cnf启动MHA:
[root@manager scripts]# nohup masterha_manager --conf=/etc/masterha/app1.cnf &> /tmp/mha_manager.log &
[1] 28588
再检查集群状态,看是否会报错
[root@manager scripts]# masterha_check_status --conf=/etc/masterha/app1.cnf
app1 (pid:28588) is running(0:PING_OK), master:192.168.1.8
测试:
在master(master2)上停掉mysql服务
[root@master2 ~]# systemctl stop mysqld到slave1查看slave状态:
[root@slave1 ~]# mysql -uroot -p123.com -e "show slave status\G"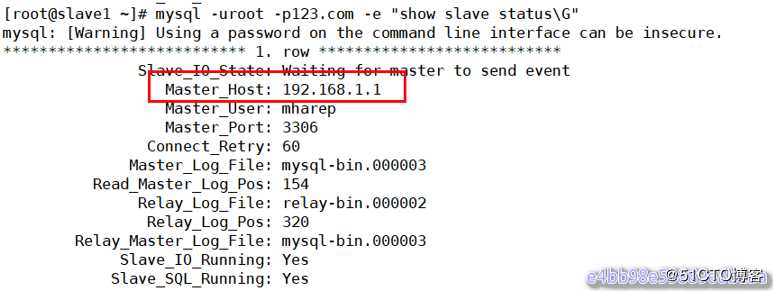
从上图可以看出slave指向了新的master服务器(192.168.1.1)
查看VIP:
[root@master1 ~]# ip a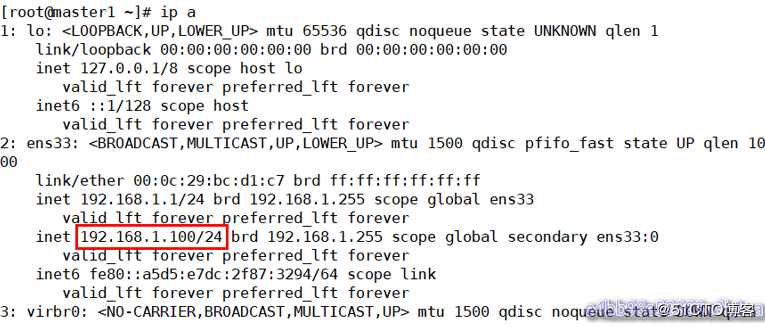
[root@master2 ~]# ip a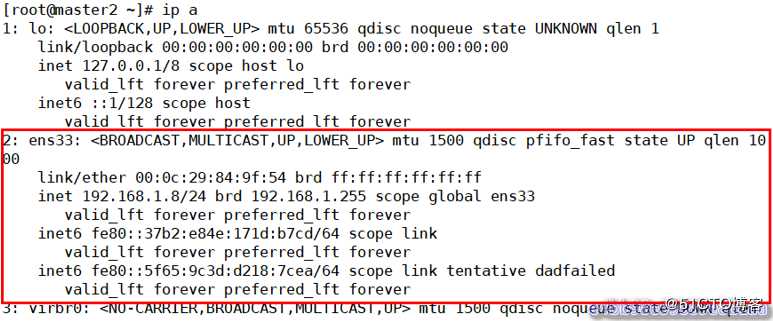
使用VIP访问mysql:
[root@master1 ~]# mysql -umanager -p123.com -h192.168.1.100 -P3306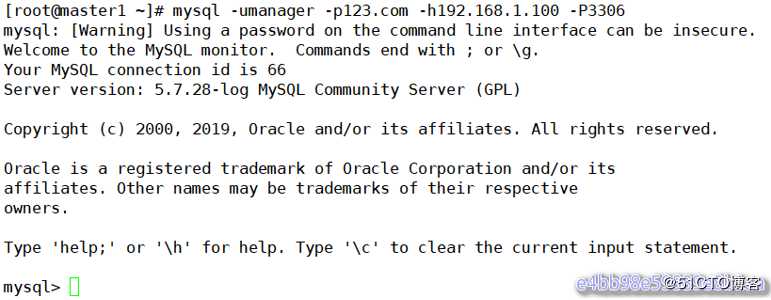
从上图可以看到master2(原来的master)释放了VIP,master1(新的master)接管了VIP地址 主从切换后续工作 主库切换后,把原主库修复成新从库,相关操作请参考前面相关操作。为了防止脑裂发生,推荐生产环境采用脚本的方式来管理虚拟ip,而不是使用keepalived来完成。到此为止,基本MHA集群已经配置完毕。
MHA软件由两部分组成,Manager工具包和Node工具包,具体的说明如下。
Manager工具包主要包括以下几个工具:
Node工具包(这些工具通常由MHA Manager的脚本触发,无需人为操作)主要包括以下几个工具:
# IT明星不是梦 #MySQL高可用集群之MHA (使用VIP向外网提供稳定服务)
标签:vrrp sys 重构 pen 系统服务 replicat 执行 src 推荐
原文地址:https://blog.51cto.com/14638500/2473358