标签:package 不同的 请求 作用 http请求 程序员 框架 笔记 外链

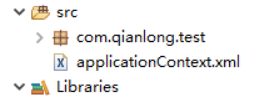
在src文件夹中新建一个配置文件applicationContext.xml文件,至于上面的配置就去官网上面查吧,文件内容中配置了bean就可以在java代码中使用。
applicationContext.xml文件的位置一般都放在src下面。
注意:文件名是定死的,不能变。

<?xml version="1.0" encoding="UTF-8"?>
<beans xmlns="http://www.springframework.org/schema/beans"
    xmlns:xsi="http://www.w3.org/2001/XMLSchema-instance"
    xmlns:p="http://www.springframework.org/schema/p"
    xsi:schemaLocation="http://www.springframework.org/schema/beans
    http://www.springframework.org/schema/beans/spring-beans.xsd">
    <!-- 注册bean:下面的注册,相当于在代码中写的  -->
   <!--  ISomeService someservice=new SomeServiceImpl(); -->
    <bean id="someService" class="com.qianlong.test.SomeServiceImpl"></bean>
</beans>
然后写几个方法
public interface ISomeService {
    void doSome();
}
public class SomeServiceImpl implements ISomeService {
@Override
public void doSome() {
System.out.print("hello");
}
}然后写测试类,在这里分别不使用spring容器和使用spring容器拿到someService。
public class Test {
public static void main(String[] args) {
    //不适用spring容器(缺点:SomeServiceImpl这个类,完全耦合到了测试类)
    //ISomeService someService=new SomeServiceImpl();
    //someService.doSome();

    //使用spring容器:创建容器
    ApplicationContext ac=new ClassPathXmlApplicationContext("applicationContext.xml");
    ISomeService iSomeService=(ISomeService) ac.getBean("someService");
    iSomeService.doSome();
}
}
可以从d盘加载配置文件applicationContext.xml文件,首先把配置文件放在d盘的位置。
//从d盘加载配置文件
    //创建容器
    ApplicationContext ac=new FileSystemXmlApplicationContext("D:/spring/applicationContext.xml");
    ISomeService someService1=(ISomeService) ac.getBean("someService");
    someService1.doSome();
可以直接使用beanFactory容器
//直接使用beanFactory容器
    BeanFactory bf=new XmlBeanFactory(new ClassPathResource("applicationContext.xml"));
    ISomeService service=(ISomeService) bf.getBean("someService");
    service.doSome();
结果都可以new出来SomeServiceImpl这个对象并且调用这个对象的方法。
bean的装配就是bean对象的创建,容器根据代码要求创建bean对象后再传递给代码的过程,成为bean的装配。代码通过getBean()方式从容器获取指定的bean实例,容器首先会调用bean类的无参构造器,创建控制的实例对象。
使用工厂模式创建bean实例,就会使工厂类与要创建的bean类耦合到一起。
先写一个工厂类,这里工厂类返回一个SomeServiceImpl类。
public class SomeFactory {
    public ISomeService getSomeService() {
        return new SomeServiceImpl();
    }
}
然后把这个工厂类写入bean中。
 <!--把someFactory工厂类注入bean中  -->
   <bean id="someFactory" class="com.qianlong.test.SomeFactory"></bean>
容器先得到工厂,然后工厂再生产出想要的类。
但是这样写的话工厂类和测试类又耦合到了一起,所以不能这样写。
//动态工厂装配bean
    ApplicationContext ac=new ClassPathXmlApplicationContext("applicationContext.xml");
    SomeFactory factory=(SomeFactory) ac.getBean("someFactory");
    ISomeService service=factory.getSomeService();
    service.doSome();
应该怎么写?
applicationContext.xml文件
 <!--把someFactory工厂类注入bean中  -->
   <bean id="someFactory" class="com.qianlong.test.SomeFactory"></bean>
   <!-- 表明someService对象是由someFactory这个工厂Bean的getSomeService方法创建的 -->
    <bean id="someService" factory-bean="someFactory" factory-method="getSomeService"></bean>
测试类
//动态工厂装配bean
    //创建容器
    ApplicationContext ac=new ClassPathXmlApplicationContext("applicationContext.xml");
    //容器中的工厂bean创建处service类
    ISomeService service=(ISomeService) ac.getBean("someService");
service.doSome();生成someService类的静态工厂类
public class SomeFactory {
    public static ISomeService getSomeService() {
        return new SomeServiceImpl();
    }
}
在applicationContext.xml文件中写入bean
 <!-- 表明someService对象是由这个SomeFactory静态工厂Bean的getSomeService方法创建的 -->
    <bean id="someService" class="com.qianlong.test.SomeFactory" factory-method="getSomeService"></bean>
然后创建容器,再由容器中的静态工厂bean创建service类
//创建容器
    ApplicationContext ac=new ClassPathXmlApplicationContext("applicationContext.xml");
    ISomeService service=(ISomeService) ac.getBean("someService");
service.doSome();当通过spring容器创建一个bean实例时,还可以通过scope属性,为bean指定特定的作用域,spring支持5种作用域。
singleton,单例模式,即在整个spring容器中,使用singleton定义的bean是单例的,只有一个实例。bean默认是单例模式。
global session,每个全局的HTTP session对应一个Bean实例。
例如
 <!-- prototype 原型模式   使用时才由容器创建
        singleton-->
<bean id="someService" class="com.qianlong.test.SomeServiceImpl" scope="prototype"></bean>bean后处理器是一种特殊的bean,容器中所有的bean在初始化时,都会自动执行bean后处理器的两个方法,由于该bean是由其他bean自动调用执行,不是程序员手工调用,所以这个bean不需要id属性。
写一个类实现BeanPostProcessor接口,并重写方法。
public class MyBeanPostProcessor implements BeanPostProcessor {
    //bean:当前正在被初始化的bean
    //beanName:当前正被初始化的bean的id
    //在当前bean的所有属性均被初始化完毕之前  执行该方法
    @Override
    public Object postProcessAfterInitialization(Object bean, String beanName) throws BeansException {
        System.out.println("执行bean后处理器的before方法");
        return bean;
    }
    //在当前bean的所有属性均被初始化完毕之前  执行该方法
    @Override
    public Object postProcessBeforeInitialization(Object bean, String beanName) throws BeansException {
        System.out.println("执行bean后处理器的after方法");
        return null;
    }
}
在xml中注入bean
<!-- 注册bean后处理器 -->
    <bean class="com.qianlong.test.MyBeanPostProcessor"></bean>
    <bean id="someService" class="com.qianlong.test.SomeServiceImpl"></bean>
然后在测试类中使用容器创建bean时,会先执行bean后处理器的两个方法,然后在创建someService对象成功。
ApplicationContext ac=new ClassPathXmlApplicationContext("applicationContext.xml");
    ISomeService service=(ISomeService) ac.getBean("someService");
    System.out.println(service);
打印结果会先打印bean后处理器的方法,然后再打印service对象。

可以为bean定制初始化后的生命行为,也可以为bean定制销毁前的生命行为。
public class SomeServiceImpl implements ISomeService {
    @Override
    public void doSome() {
        System.out.print("hello");
    }

    public void beanInit() {
        System.out.println("bean刚被初始化");
    }
    public void preDestroy() {
        System.out.println("bean要被销毁了");
    }
}
在xml指定初始化和销毁是哪两个方法
<bean id="someService" class="com.qianlong.test.SomeServiceImpl"
     init-method="beanInit" destroy-method="preDestroy"></bean>
使用容器创建bean并关闭容器,写测试类
ApplicationContext ac=new ClassPathXmlApplicationContext("applicationContext.xml");
    ISomeService service=(ISomeService) ac.getBean("someService");
    service.doSome();
    /**
     * 若要看到销毁方法的执行,需要两个条件
     * bean需要是singleton单例的
     * 手工将容器关闭
     * ApplicationContext没有close方法,但是它的实现类ClassPathXmlApplicationContext有close方法
     */
    ((ClassPathXmlApplicationContext)ac).close();
写一个实体类,然后再xml文件中写入信息,最后使用容器创建该实体对象并且打印,会打印出xml写入的信息。
public class Student {
    private String name;
    private Integer age;
}
<bean id="student" class="com.qianlong.test.Student">
<property name="name" value="张三"></property>
<property name="age" value="18"></property>
</bean>测试类
ApplicationContext ac=new ClassPathXmlApplicationContext("applicationContext.xml");
    Student student=(Student) ac.getBean("student");
    System.out.println(student);
打印结果

那么问题来了,如果student实体类中有一个属性是对象,那这个对象在xml中如何赋值?
比如说
public class Student {
    private String name;
    private Integer age;
    private School school;
}
先注入School到bean中,然后在student的bean下的property中使用ref属性指向school的bean的id即可。
<bean id="school" class="com.qianlong.test.School"></bean>

    <bean id="student" class="com.qianlong.test.Student">
        <property name="name" value="张三"></property>
        <property name="age" value="18"></property>
        <property name="school" ref="school"></property>
</bean>给实体类写一个构造器
public class Student {
    private String name;
    private Integer age;
    public Student() {
    }

    public Student(String name, Integer age) {
        super();
        this.name = name;
        this.age = age;
    }
}
在xml中注入信息
<bean id="student" class="com.qianlong.test.Student">
        <constructor-arg name="name" value="李四"></constructor-arg>
        <constructor-arg name="age" value="30"></constructor-arg>
    </bean>
测试类
ApplicationContext ac=new ClassPathXmlApplicationContext("applicationContext.xml");
    Student student=(Student) ac.getBean("student");
    System.out.println(student);
student类
public class Student {
    private String name;
    private Integer age;
    private School school;
}
school类
public class School {
    private String name;
}
xml配置
<bean id="mySchool" class="com.qianlong.test.School" p:name="北京大学"></bean>

    <bean id="student" class="com.qianlong.test.Student" p:name="王五" p:age="33" p:school-ref="mySchool"></bean>
测试类
ApplicationContext ac=new ClassPathXmlApplicationContext("applicationContext.xml");
    Student student=(Student) ac.getBean("student");
    System.out.println(student);
p命名空间设值注入的支持是

和上面的p命名空间一样的道理,在applicationContext.xml文件中引入c命名空间的支持就可以了,然后和p命名空间同样的使用方式。这里省略不讲了。
c命名空间设值注入支持

基于注解的注入需要aop jar包底层的支持,在applicationContext.xml文件的约束中需要添加context约束。
http://www.springframework.org/schema/context
http://www.springframework.org/schema/context/spring-context.xsd 1 <?xml version="1.0" encoding="utf-8"?>
2 <beans xmlns="http://www.springframework.org/schema/beans"
3 xmlns:xsi="http://www.w3.org/2001/XMLSchema-instance"
4 xmlns:context="http://www.springframework.org/schema/context"
5 xmlns:aop="http://www.springframework.org/schema/aop"
6 xmlns:tx="http://www.springframework.org/schema/tx"
7 xsi:schemaLocation="http://www.springframework.org/schema/beans
8 http://www.springframework.org/schema/beans/spring-beans.xsd
9 http://www.springframework.org/schema/context
10 http://www.springframework.org/schema/context/spring-context.xsd
11 http://www.springframework.org/schema/aop
12 http://www.springframework.org/schema/aop/spring-aop.xsd
13 http://www.springframework.org/schema/tx
14 http://www.springframework.org/schema/tx/spring-tx.xsd">
15
16 </beans>加上包扫描注解内容
<context:component-scan base-package="com.qianlong.test"></context:component-scan>@Component("myStudent") //表明当前类为组件,容器创建的这个组件名称为myStudent,相当于bean的id属性
//与本注解具有相同意义的注解还有三个
//@Reponsitory 注解在Dao
//@Service 注解在service
//@Controller 注解在controller
@Scope("prototype") //设置bean的作用范围,默认是singleton
public class Student {
@Value("张三") //为name属性赋值
private String name;
@Value("23")
private Integer age;然后进行测试
ApplicationContext ac=new ClassPathXmlApplicationContext("applicationContext.xml");
    Student student=(Student) ac.getBean("myStudent");
    System.out.println(student);
student类
@Component("myStudent") //表明当前类为组件,容器创建的这个组件名称为myStudent,相当于bean的id属性
public class Student {
    @Value("张三")    //为name属性赋值
    private String name;
    @Value("23")
    private Integer age;
    @Resource
    private School school;
}
school类
@Component("mySchool")
public class School {
    @Value("清华大学")
    private String name;
}
同样,xml文件加上包扫描之后才能识别上面的注解,上面已经说过,这里忽略。
直接测试
ApplicationContext ac=new ClassPathXmlApplicationContext("applicationContext.xml");
    Student student=(Student) ac.getBean("myStudent");
    System.out.println(student);
把上面的@Resource注解换成@Autowired也可以达到上述的效果。
写一个student实体类,这里需要加上带参构造器,xml包扫描。
public class Student {
    public Student(String name, Integer age) {
        super();
        this.name = name;
        this.age = age;
    }
写一个JavaConfig类
@Configuration  //表明当前POJO类将被当作配置文件来使用,即spring容器
public class JavaConfig {
    @Bean(name="mySchool")  //表明当前方法的返回值为一个bean对象
    public School mySchoolCreator() {
        return new School("清华大学");//school实体类需要加上构造器
    }

    @Bean(name="myStudent")
    public Student getStudent() {
        return new Student("赵六", 18);
    }
}
上面@Bean注解后面name的值是创建的bean对象名称,然后测试
ApplicationContext ac=new ClassPathXmlApplicationContext("applicationContext.xml");
    Student student=(Student) ac.getBean("myStudent");
    System.out.println(student);
然后会打印出学生的信息。
aop其实就是面向切面编程,切入到执行主业务的方法中然后加入交叉逻辑业务。
aop面向切面编程的底层就是由jdk的动态代理模式实现的。
先写接口和实现类
public interface SomeService {
    void doSome();
    String doSecond();
}
public class SomeServiceImpl implements SomeService {
@Override
public void doSome() {
System.out.println("执行了doSome方法");
}
@Override
public String doSecond() {
System.out.println("执行了doSecond方法");
return "China";
}
}在测试类中写jdk动态代理,在invoke方法中写想要实现的交叉逻辑。
public class Test {
public static void main(String[] args) {
    SomeService target=new SomeServiceImpl();
    //代理模式实现交叉业务逻辑切入到主业务中
    SomeService proxy=(SomeService) Proxy.newProxyInstance(
            target.getClass().getClassLoader(), target.getClass().getInterfaces(),
            new InvocationHandler() {
                //交叉业务逻辑是在invoke方法里完成的
                @Override
                public Object invoke(Object proxy, Method method, Object[] args) throws Throwable {
                    System.out.println("开启事务");
                    Object result=method.invoke(target, args);
                    System.out.println("开启日志");
                    return result;
                }
            });
    proxy.doSecond();
}
}
执行结果

定义前置通知,需要实现MethodBeforeAdvice接口,该接口中有一个方法before(),会在目标方法执行之前执行。
和上面一样,准备好接口和实现类。
public interface SomeService {
    void doSome();
    String doSecond();
}
public class SomeServiceImpl implements SomeService {
@Override
public void doSome() {
System.out.println("执行了doSome方法");
}
}写前置通知,就是写一个类实现MethodBeforeAdvice接口,在该类中写前置内容。
//前置通知
public class MyMethodBeforeAdvice implements MethodBeforeAdvice {
    //该方法在目标方法执行之前先执行
    //arg0:目标方法
    //arg1:目标方法的参数列表
    //arg2:目标对象
    @Override
    public void before(Method arg0, Object[] arg1, Object arg2) throws Throwable {
        System.out.println("目标方法执行之前执行:对目标对象的增强代码就是写在这里的");
    }
}
在applicationContext.xml文件中配置(目标对象、前置通知、代理对象,其中代理对象关联了前两者,最后由容器创建代理对象进行调用即可)
        <!-- 目标对象 -->
    <bean id="someService" class="com.qianlong.test.SomeServiceImpl"></bean>
        <!-- 通知:前置通知     注册到bean中,id属性值是自己起的名字-->
      <bean id="beforeAdvice" class="com.qianlong.test.MyMethodBeforeAdvice"></bean>

      <!-- 代理对象的生成:注意这里的ProxyFactoryBean不是代理类,而是代理对象生成器 -->
      <bean id="serviceProxy" class="org.springframework.aop.framework.ProxyFactoryBean">
      <property name="target" ref="someService"></property>
          <!-- 可以不写下面的接口,因为默认会自动检测到目标类所实现的所有接口 -->
      <property name="interfaces" value="com.qianlong.test.SomeService"></property>
      <property name="interceptorNames" value="beforeAdvice"></property>
      </bean>
测试类
public static void main(String[] args) {
    ApplicationContext ac=new ClassPathXmlApplicationContext("applicationContext.xml");
    //这里是得到代理类的bean
    SomeService service=(SomeService) ac.getBean("serviceProxy");
    service.doSome();
}
打印结果

定义后置通知,需要实现接口AfterReturningAdvice,该接口中有一个方法afterReturning(),会在目标方法执行之后执行。
这里和前置通知的操作一样,只不过替换了目标对象为后置通知的类。测试类写法相同,测试结果如下
//后置通知  虽然可以获取到目标方法的返回值,但是不能改变
public class MyAfterReturningAdvice implements AfterReturningAdvice {
    //arg0:目标方法返回值
    @Override
    public void afterReturning(Object arg0, Method arg1, Object[] arg2, Object arg3) throws Throwable {
        System.out.println("目标方法执行之后执行");
    }
}
<!-- 目标对象 -->
<bean id="someService" class="com.qianlong.test.SomeServiceImpl"></bean>
<!-- 通知:前置通知 注册到bean中,id属性值是自己起的名字-->
<bean id="afterAdvice" class="com.qianlong.test.MyAfterReturningAdvice"></bean>
<!-- 代理对象的生成:注意这里的ProxyFactoryBean不是代理类,而是代理对象生成器 -->
<bean id="serviceProxy" class="org.springframework.aop.framework.ProxyFactoryBean">
<property name="target" ref="someService"></property>
<property name="interfaces" value="com.qianlong.test.SomeService"></property>
<property name="interceptorNames" value="afterAdvice"></property>
</bean>
定义环绕通知,需要实现接口MethodInterceptor。
public class MyMethodInterceptor implements MethodInterceptor {
    @Override
    public Object invoke(MethodInvocation invocation) throws Throwable {
        System.out.println("目标方法执行之前");
        //调用目标方法
        Object result=invocation.proceed();
        System.out.println("目标方法执行之后");
        return result;
    }
}
xml配置bean
 <!-- 目标对象 -->
    <bean id="someService" class="com.qianlong.test.SomeServiceImpl"></bean>
        <!-- 通知:环绕通知     注册到bean中,id属性值是自己起的名字-->
      <bean id="aroundAdvice" class="com.qianlong.test.MyMethodInterceptor"></bean>

      <!-- 代理对象的生成:注意这里的ProxyFactoryBean不是代理类,而是代理对象生成器 -->
      <bean id="serviceProxy" class="org.springframework.aop.framework.ProxyFactoryBean">
      <property name="target" ref="someService"></property>
      <property name="interfaces" value="com.qianlong.test.SomeService"></property>
      <property name="interceptorNames" value="aroundAdvice"></property>
测试
ApplicationContext ac=new ClassPathXmlApplicationContext("applicationContext.xml");
    //这里是得到代理类的bean
    SomeService service=(SomeService) ac.getBean("serviceProxy");
    service.doSome();
运行结果

学习时间有限,以后有时间再进行补充。
标签:package 不同的 请求 作用 http请求 程序员 框架 笔记 外链
原文地址:https://www.cnblogs.com/fantongxue/p/12443447.html