标签:style blog http io color ar os for sp
接触WPF也有两个多月了,有了一定的理论基础和项目经验,现在打算写一个系列,做出来一个WPF的控件库。一方面可以加强自己的水平,另一方面可以给正在学习WPF的同行一个参考。本人水平有限,难免有一些错误,望各位指出!
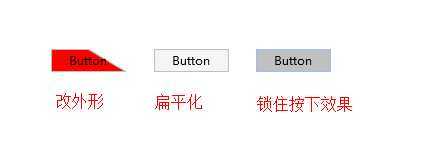
先上图看看各种效果:

这个Button是我继承系统Button后扩展的,主要实现了:可设置悬浮和按下时的背景,可改变形状,并可设置按钮按下后保持锁定状态等功能。
这个Button我命名为XButton,扩展的所有属性我都会以X开头命名。好了,具体的东西看代码吧!
先来Xaml的:
 1 <ResourceDictionary
 2     xmlns="http://schemas.microsoft.com/winfx/2006/xaml/presentation"
 3     xmlns:x="http://schemas.microsoft.com/winfx/2006/xaml"
 4     xmlns:ctrl="clr-namespace:KAN.WPF.XCtrl.Controls">
 5     <Style x:Key="{x:Type ctrl:XButton}" TargetType="{x:Type ctrl:XButton}">
 6         <Style.Resources>
 7             <ResourceDictionary Source="/KAN.WPF.Xctrl;component/Themes/CommonStyle.xaml"/>
 8         </Style.Resources>
 9         <Setter Property="FocusVisualStyle" Value="{StaticResource StyleFocusVisual}"/>
10         <Setter Property="Background" Value="White"/>
11         <Setter Property="BorderBrush" Value="Silver"/>
12         <Setter Property="BorderThickness" Value="1"/>
13         <Setter Property="Control.Template">
14             <Setter.Value>
15                 <ControlTemplate TargetType="{x:Type ctrl:XButton}">
16                     <!--定义视觉树-->
17                     <Grid>
18                         <Border BorderBrush="{TemplateBinding BorderBrush}" BorderThickness="{TemplateBinding BorderThickness}">
19                             <!--这里的Path就是用来实现各种外形的-->
20                             <Path x:Name="bdrButton"
21                                    Data="{Binding XShape, RelativeSource={RelativeSource TemplatedParent}}"
22                                    Stroke="{Binding XStrokeBrush, RelativeSource={RelativeSource TemplatedParent}}"
23                                    StrokeThickness="{Binding XStrokeThickness, RelativeSource={RelativeSource TemplatedParent}}"
24                                    Stretch="Fill" RenderTransformOrigin="0.5,0.5" Fill="{TemplateBinding Control.Background}">
25                                 <Path.RenderTransform>
26                                     <TransformGroup>
27                                         <ScaleTransform/>
28                                         <SkewTransform/>
29                                         <RotateTransform/>
30                                         <TranslateTransform/>
31                                     </TransformGroup>
32                                 </Path.RenderTransform>
33                             </Path>
34                         </Border>
35                         <ContentPresenter Name="contentPresenter" ContentTemplate="{TemplateBinding ContentControl.ContentTemplate}"
36                                           ContentStringFormat="{TemplateBinding ContentControl.ContentStringFormat}" Focusable="False" RecognizesAccessKey="True"
37                                           SnapsToDevicePixels="{TemplateBinding UIElement.SnapsToDevicePixels}" Content="{TemplateBinding ContentControl.Content}"
38                                           HorizontalAlignment="Center" VerticalAlignment="Center" />
39                     </Grid>
40                     <!--设置触发器-->
41                     <ControlTemplate.Triggers>
42                         <!--鼠标移动上去时-->
43                         <Trigger Property="UIElement.IsMouseOver" Value="True" >
44                             <Setter TargetName="bdrButton" Value="{Binding XMoverBrush, RelativeSource={RelativeSource TemplatedParent}}" Property="Path.Fill" />
45                         </Trigger>
46                         <!--鼠标按下去时-->
47                         <Trigger Property="ButtonBase.IsPressed" Value="True">
48                             <Setter TargetName="bdrButton" Value="{Binding XEnterBrush, RelativeSource={RelativeSource TemplatedParent}}" Property="Path.Fill" />
49                         </Trigger>
50                         <!--禁用Button时-->
51                         <Trigger Property="IsEnabled" Value="false">
52                             <Setter TargetName="bdrButton" Value="{Binding XUnEnabledBrush, RelativeSource={RelativeSource TemplatedParent}}" Property="Path.Fill" />
53                         </Trigger>
54                         <!--如果设置了锁住按下的状态的属性,那么当按下时-->
55                         <MultiTrigger>
56                             <MultiTrigger.Conditions>
57                                 <Condition Property="IsFocused" Value="True"/>
58                                 <Condition Property="XIsFoucedBrushLock" Value="True"/>
59                             </MultiTrigger.Conditions>
60                             <MultiTrigger.Setters>
61                                 <Setter TargetName="bdrButton" Value="{Binding XEnterBrush, RelativeSource={RelativeSource TemplatedParent}}" Property="Path.Fill" />
62                             </MultiTrigger.Setters>
63                         </MultiTrigger>
64                     </ControlTemplate.Triggers>
65                 </ControlTemplate>
66             </Setter.Value>
67         </Setter>
68     </Style>
69 </ResourceDictionary>
其中的StyleFocusVisual是用来定义按Tab到这个控件上的样式的,代码如下:
 1 <ResourceDictionary xmlns="http://schemas.microsoft.com/winfx/2006/xaml/presentation"
 2                     xmlns:x="http://schemas.microsoft.com/winfx/2006/xaml">
 3     <Style x:Key="StyleFocusVisual">
 4         <Setter Property="Control.Template">
 5             <Setter.Value>
 6                 <ControlTemplate>
 7                     <Border Margin="0" BorderBrush="#FF9FBDF4" BorderThickness="1"/>
 8                 </ControlTemplate>
 9             </Setter.Value>
10         </Setter>
11     </Style>
12 </ResourceDictionary>
接下来是CS的:
  1 using System;
  2 using System.Windows;
  3 using System.Windows.Controls;
  4 using System.Windows.Media;
  5 using System.Windows.Shapes;
  6 using System.Windows.Media.Imaging;
  7
  8 namespace KAN.WPF.XCtrl.Controls
  9 {
 10     /// <summary>
 11     /// 扩展按钮:可设置悬浮和按下时的背景,可改变形状,并可设置按钮按下后保持锁定状态
 12     /// </summary>
 13     public class XButton : Button
 14     {
 15         #region 依赖属性
 16         public static readonly DependencyProperty XMoverBrushProperty;//鼠标经过时的画刷
 17         public static readonly DependencyProperty XEnterBrushProperty;//鼠标按下时的画刷
 18         public static readonly DependencyProperty XUnEnabledBrushProperty;//禁用时的画刷
 19         public static readonly DependencyProperty XIsFoucedBrushLockProperty;//是否得到焦点时锁住画刷
 20         public static readonly DependencyProperty XShapeProperty;//外形的路径
 21         public static readonly DependencyProperty XStrokeBrushProperty;//外形的路径着色
 22         public static readonly DependencyProperty XStrokeThicknessProperty;//外形的路径粗细(默认为0,因为有Border边框,所以要设这个值,要先把BorderThickness设为0)
 23         #endregion
 24
 25         #region 内部方法
 26         /// <summary>
 27         /// 静态构造方法
 28         /// </summary>
 29         static XButton()
 30         {
 31             //注册依赖属性
 32             XButton.XMoverBrushProperty = DependencyProperty.Register("XMoverBrush", typeof(Brush), typeof(XButton),
 33                 new PropertyMetadata(Brushes.WhiteSmoke));
 34             XButton.XEnterBrushProperty = DependencyProperty.Register("XEnterBrush", typeof(Brush), typeof(XButton),
 35                 new PropertyMetadata(Brushes.Silver));
 36             XButton.XUnEnabledBrushProperty = DependencyProperty.Register("XUnEnabledBrush", typeof(Brush), typeof(XButton),
 37                 new PropertyMetadata(Brushes.Silver));
 38             XButton.XStrokeBrushProperty = DependencyProperty.Register("XStrokeBrush", typeof(Brush), typeof(XButton),
 39                 new PropertyMetadata(Brushes.Silver));
 40             XButton.XStrokeThicknessProperty = DependencyProperty.Register("XStrokeThickness", typeof(Double), typeof(XButton),
 41                 new PropertyMetadata(0.0));
 42             XButton.XIsFoucedBrushLockProperty = DependencyProperty.Register("XIsFoucedBrushLock", typeof(bool), typeof(XButton),
 43                 new PropertyMetadata(false));
 44             XButton.XShapeProperty = DependencyProperty.Register("XShape", typeof(string), typeof(XButton),
 45                 new PropertyMetadata("M 0 0 L 0 0 L 100 0 L 100 100 L 0 100 Z"));
 46             FrameworkElement.DefaultStyleKeyProperty.OverrideMetadata(typeof(XButton), new FrameworkPropertyMetadata(typeof(XButton)));
 47         }
 48         #endregion
 49
 50         #region 公布属性
 51         /// <summary>
 52         /// 公布属性XMoverBrush(鼠标经过时的画刷)
 53         /// </summary>
 54         public Brush XMoverBrush
 55         {
 56             get
 57             {
 58                 return base.GetValue(XButton.XMoverBrushProperty) as Brush;
 59             }
 60             set
 61             {
 62                 base.SetValue(XButton.XMoverBrushProperty, value);
 63             }
 64         }
 65
 66         /// <summary>
 67         /// 公布属性XMoverBrush(鼠标按下时的画刷)
 68         /// </summary>
 69         public Brush XEnterBrush
 70         {
 71             get
 72             {
 73                 return base.GetValue(XButton.XEnterBrushProperty) as Brush;
 74             }
 75             set
 76             {
 77                 base.SetValue(XButton.XEnterBrushProperty, value);
 78             }
 79         }
 80
 81         /// <summary>
 82         /// 公布属性XUnEnabledBrush(禁用时的画刷)
 83         /// </summary>
 84         public Brush XUnEnabledBrush
 85         {
 86             get
 87             {
 88                 return base.GetValue(XButton.XUnEnabledBrushProperty) as Brush;
 89             }
 90             set
 91             {
 92                 base.SetValue(XButton.XUnEnabledBrushProperty, value);
 93             }
 94         }
 95
 96         /// <summary>
 97         /// 公布属性XIsFoucedBrushLock(是否得到焦点时锁住画刷)
 98         /// </summary>
 99         public bool XIsFoucedBrushLock
100         {
101             get
102             {
103                 return (bool)base.GetValue(XButton.XIsFoucedBrushLockProperty);
104             }
105             set
106             {
107                 base.SetValue(XButton.XIsFoucedBrushLockProperty, value);
108             }
109         }
110
111         /// <summary>
112         /// 公布属性XShape(外形的路径)
113         /// </summary>
114         public String XShape
115         {
116             get
117             {
118                 return base.GetValue(XButton.XShapeProperty) as String;
119             }
120             set
121             {
122                 base.SetValue(XButton.XShapeProperty, value);
123             }
124         }
125
126         /// <summary>
127         /// 公布属性XStrokeBrush(外形的路径着色)
128         /// </summary>
129         public Brush XStrokeBrush
130         {
131             get
132             {
133                 return base.GetValue(XButton.XStrokeBrushProperty) as Brush;
134             }
135             set
136             {
137                 base.SetValue(XButton.XStrokeBrushProperty, value);
138             }
139         }
140
141         /// <summary>
142         /// 公布属性XStrokeThickness(外形的路径粗细)
143         /// </summary>
144         public Double XStrokeThickness
145         {
146             get
147             {
148                 return (Double)base.GetValue(XButton.XStrokeThicknessProperty);
149             }
150             set
151             {
152                 base.SetValue(XButton.XStrokeThicknessProperty, value);
153             }
154         }
155         #endregion
156     }
157 }
看了代码上的注释应该都能明白吧!要是有不明白的可以留言。
至于源代码,我之后会整理几个控件后一起发上来的!
标签:style blog http io color ar os for sp
原文地址:http://www.cnblogs.com/QinYK/p/4075020.html