标签:判断 @Value author scope rom points manager 默认 多项目
现在的好多项目都是基于APP移动端以及前后端分离的项目,之前基于Session的前后端放到一起的项目已经慢慢失宠并淡出我们视线,尤其是当基于SpringCloud的微服务架构以及Vue、React单页面应用流行起来后,情况更甚。为此基于前后端分离的项目用户认证也受到众人关注的一个焦点,不同以往的基于Session用户认证,基于Token的用户认证是目前主流选择方案(至于什么是Token认证,网上有相关的资料,大家可以看看),而且基于Java的两大认证框架有Apache Shiro和SpringSecurity,我在此就不讨论孰优孰劣的,大家可自行百度看看,本文主要讨论的是基于SpringSecurity的用户认证。
创建三个项目第一个项目awbeci-ssb是主项目包含两个子项目awbeci-ssb-api和awbeci-ssb-core,并且引入相关SpringSecurity jar包,如下所示:
下面是我的项目目录结构,代码我会在最后放出来
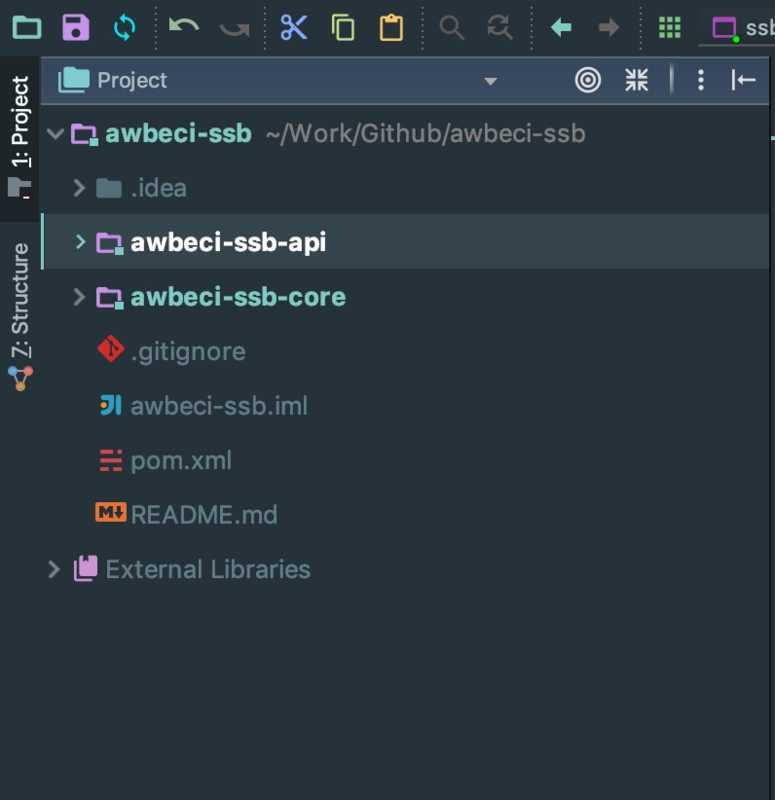
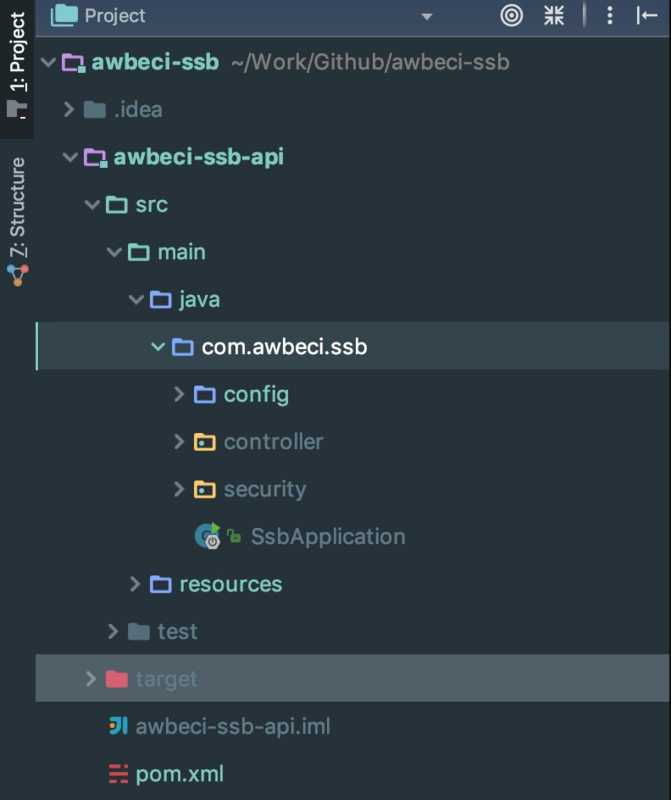
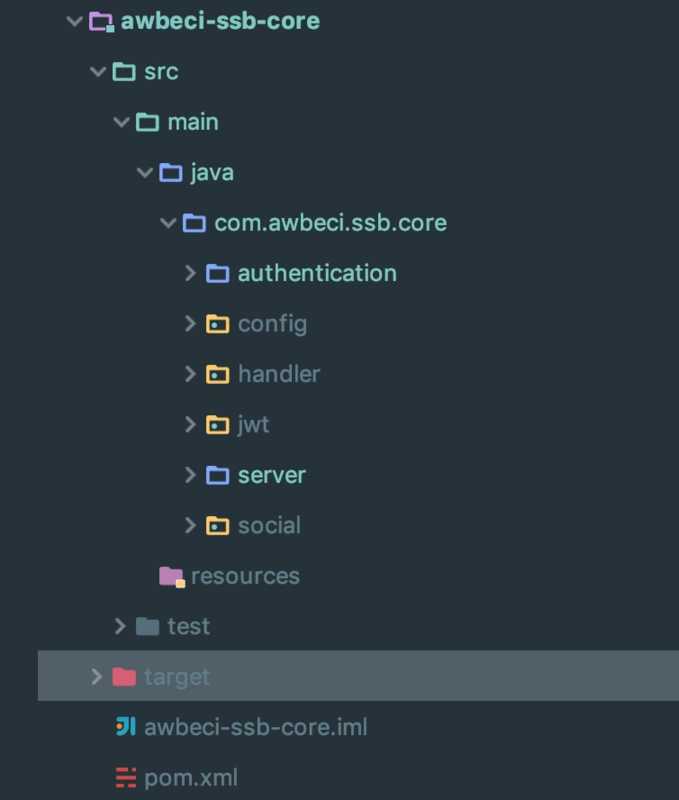
资源服务一般是配置用户名密码或者手机号验证码、社交登录等等用户认证方式的配置以及一些静态文件地址和相关请求地址设置要不要认证等等作用。
认证服务是配置认证使用的方式,如Redis、JWT等等,还有一个就是设置ClientId和ClientSecret,只有正确的ClientId和ClientSecret才能获取Token。
一个继承AuthorizationServerConfigurerAdapter的SsbAuthorizationServerConfig作为认证服务类和一个继承ResourceServerConfigurerAdapter的
SsbResourceServerConfig资源服务类,这两个类实现好,大概已经完成50%了,代码如下:
@Configuration
@EnableAuthorizationServer
public class SsbAuthorizationServerConfig extends AuthorizationServerConfigurerAdapter {

    @Autowired
    private UserDetailsService userDetailsService;

    @Autowired
    public SsbAuthorizationServerConfig(UserDetailsService userDetailsService) {
        this.userDetailsService = userDetailsService;
    }

    @Override
    public void configure(AuthorizationServerEndpointsConfigurer endpoints) throws Exception {
        endpoints.userDetailsService(userDetailsService);
    }

    @Override
    public void configure(ClientDetailsServiceConfigurer clients) throws Exception {
        clients.inMemory()//配置内存中,也可以是数据库
                .withClient("awbeci")//clientid
                .secret("awbeci-secret")
                .accessTokenValiditySeconds(3600)//token有效时间秒
                .authorizedGrantTypes("refresh_token", "password", "authorization_code")//token模式
                .scopes("all")//限制允许的权限配置
                .and()//下面配置第二个应用(不知道动态的是怎么配置的,那就不能使用内存模式,应该使用数据库模式来吧)
                .withClient("test")
                .scopes("testSc")
                .accessTokenValiditySeconds(7200)
                .scopes("all");
    }
}

@Configuration
@EnableResourceServer
public class SsbResourceServerConfig extends ResourceServerConfigurerAdapter {

    @Autowired
    protected AuthenticationSuccessHandler ssbAuthenticationSuccessHandler;

    @Autowired
    protected AuthenticationFailureHandler ssbAuthenticationFailureHandler;

    @Autowired
    private SmsCodeAuthenticationSecurityConfig smsCodeAuthenticationSecurityConfig;

    @Override
    public void configure(HttpSecurity http) throws Exception {
        // 所以在我们的app登录的时候我们只要提交的action,不要跳转到登录页
             http.formLogin()
                //登录页面,app用不到
                //.loginPage("/authentication/login")
                //登录提交action,app会用到
                // 用户名登录地址
                .loginProcessingUrl("/form/token")
                //成功处理器 返回Token
                .successHandler(ssbAuthenticationSuccessHandler)
                //失败处理器
                .failureHandler(ssbAuthenticationFailureHandler);
             http
                // 手机验证码登录
                .apply(smsCodeAuthenticationSecurityConfig)
                .and()
                .authorizeRequests()
                //手机验证码登录地址
                .antMatchers("/mobile/token", "/email/token")
                .permitAll()
                .and()
                .authorizeRequests()
                .antMatchers(
                        "/register",
                        "/social/**",
                        "/**/*.js",
                        "/**/*.css",
                        "/**/*.jpg",
                        "/**/*.png",
                        "/**/*.woff2",
                        "/code/image")
                .permitAll()//以上的请求都不需要认证
                .anyRequest()
                .authenticated()
                .and()
                .csrf().disable();
    }
}
配置好之后,下面我可以正式开始使用SpringSecurity OAuth配置用户名和密码登录,也就是表单登录,SpringSecurity默认有Form登录和Basic登录,我们已经在
SsbResourceServerConfig类的configure方法上面设置了 http.formLogin()也就是表单登录,也就是这里的用户名密码登录,默认情况下SpringSecurity已经实现了表单登录的封装了,所以我们只要设置成功之后返回的Token就好,我们创建一个继承SavedRequestAwareAuthenticationSuccessHandler的SsbAuthenticationSuccessHandler类,代码如下:
@Component("ssbAuthenticationSuccessHandler")
public class SsbAuthenticationSuccessHandler extends SavedRequestAwareAuthenticationSuccessHandler {

    @Autowired
    private ObjectMapper objectMapper;

    @Autowired
    private ClientDetailsService clientDetailsService;

    @Autowired
    private AuthorizationServerTokenServices authorizationServerTokenServices;
    /*
     * (non-Javadoc)
     *
     * @see org.springframework.security.web.authentication.
     * AuthenticationSuccessHandler#onAuthenticationSuccess(javax.servlet.http.
     * HttpServletRequest, javax.servlet.http.HttpServletResponse,
     * org.springframework.security.core.Authentication)
     */
    @Override
    public void onAuthenticationSuccess(HttpServletRequest request,
                                        HttpServletResponse response,
                                        Authentication authentication) throws IOException, ServletException {
        String header = request.getHeader("Authorization");
        String name = authentication.getName();
        String password = (String) authentication.getCredentials();
        if (header == null || !header.startsWith("Basic ")) {
            throw new UnapprovedClientAuthenticationException("请求头中无client信息");
        }

        String[] tokens = extractAndDecodeHeader(header, request);
        assert tokens.length == 2;
        String clientId = tokens[0];
        String clientSecret = tokens[1];

        ClientDetails clientDetails = clientDetailsService.loadClientByClientId(clientId);

        if (clientDetails == null) {
            throw new UnapprovedClientAuthenticationException("clientId对应的配置信息不存在:" + clientId);
        } else if (!StringUtils.equals(clientDetails.getClientSecret(), clientSecret)) {
            throw new UnapprovedClientAuthenticationException("clientSecret不匹配:" + clientId);
        }

        TokenRequest tokenRequest = new TokenRequest(MapUtils.EMPTY_MAP, clientId, clientDetails.getScope(), "custom");

        OAuth2Request oAuth2Request = tokenRequest.createOAuth2Request(clientDetails);

        OAuth2Authentication oAuth2Authentication = new OAuth2Authentication(oAuth2Request, authentication);

        OAuth2AccessToken token = authorizationServerTokenServices.createAccessToken(oAuth2Authentication);
        response.setContentType("application/json;charset=UTF-8");
        response.getWriter().write(objectMapper.writeValueAsString(token));
    }

    private String[] extractAndDecodeHeader(String header, HttpServletRequest request) throws IOException {

        byte[] base64Token = header.substring(6).getBytes("UTF-8");
        byte[] decoded;
        try {
            decoded = Base64.decode(base64Token);
        } catch (IllegalArgumentException e) {
            throw new BadCredentialsException("Failed to decode basic authentication token");
        }
        String token = new String(decoded, "UTF-8");
        int delim = token.indexOf(":");
        if (delim == -1) {
            throw new BadCredentialsException("Invalid basic authentication token");
        }
        return new String[] { token.substring(0, delim), token.substring(delim + 1) };
    }
}
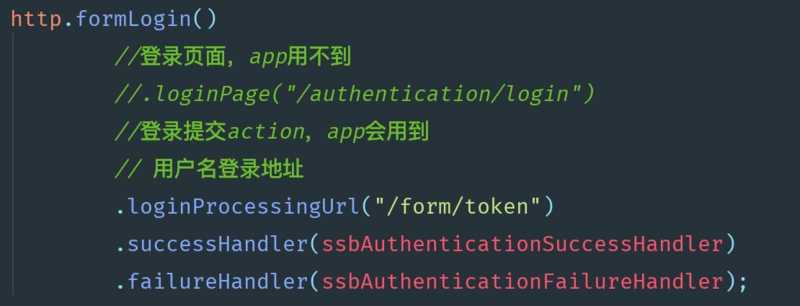
这样就可以成功的返回Token给前端,然后我们必须放开/form/token请求地址,我们已经在SsbResourceServerConfig类的configure方法放行了,并且设置成功处理类
ssbAuthenticationSuccessHandler方法,和失败处理类ssbAuthenticationFailureHandler如下所示:
下面我们就用PostMan测试下看是否成功,不过在这之前我们还要创建一个基于UserDetailsService的ApiUserDetailsService类,这个类的使用是从数据库中查询认证的用户信息,这里我们就没有从数据库中查询,但是你要知道这个类是做什么用的,代码如下:
@Component
public class ApiUserDetailsService implements UserDetailsService{

    private Logger logger = LoggerFactory.getLogger(getClass());

    @Autowired
    private PasswordEncoder passwordEncoder;

    /*
     * (non-Javadoc)
     *
     * @see org.springframework.security.core.userdetails.UserDetailsService#
     * loadUserByUsername(java.lang.String)
     */
    // 这里的username 可以是username、mobile、email
    public UserDetails loadUserByUsername(String username) throws UsernameNotFoundException {
        logger.info("表单登录用户名:" + username);
        return buildUser(username);
    }

    private SocialUser buildUser(String userId) {
        // 根据用户名查找用户信息
        //根据查找到的用户信息判断用户是否被冻结
        String password = passwordEncoder.encode("123456");
        logger.info("数据库密码是:" + password);
        return new SocialUser(userId, password,
                true, true, true, true,
                AuthorityUtils.commaSeparatedStringToAuthorityList("admin,ROLE_USER"));
    }
}


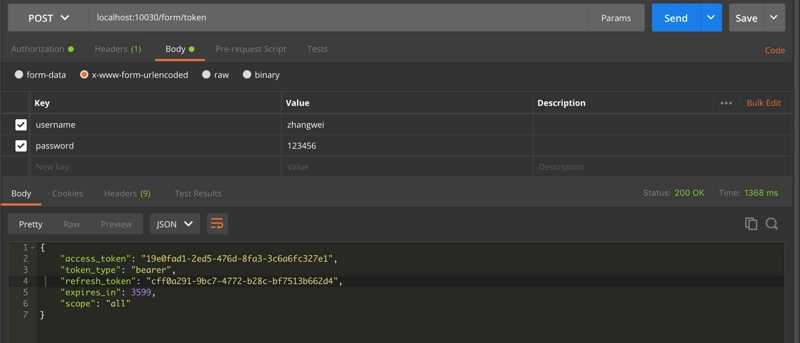
这样用户名密码登录就成功了!下面我们来处理手机号验证码登录获取token。
首先要配置redis,我们把验证码放到redis里面(注意,发送验证码其实就是往redis里面保存一条记录,这个我就不详细说了),配置如下所示:
spring.redis.host=127.0.0.1
spring.redis.password=zhangwei
spring.redis.port=6379
# 连接超时时间(毫秒)
spring.redis.timeout=30000
设置好之后,我们要创建四个类
1.基于AbstractAuthenticationToken的SmsCodeAuthenticationToken类,存放token用户信息类

2.基于AbstractAuthenticationProcessingFilter的SmsCodeAuthenticationFilter类,这是个过滤器,把请求的参数如手机号、验证码获取到,并构造Authentication

3.基于AuthenticationProvider的SmsCodeAuthenticationProvider类,这个类就是验证你手机号和验证码是否正确,并返回Authentication

4.基于SecurityConfigurerAdapter的SmsCodeAuthenticationSecurityConfig类,这个类是承上启下的使用,把上面三个类配置到这里面并放到资源服务里面让它起使用
下面我们来一个一个解析这四个类。

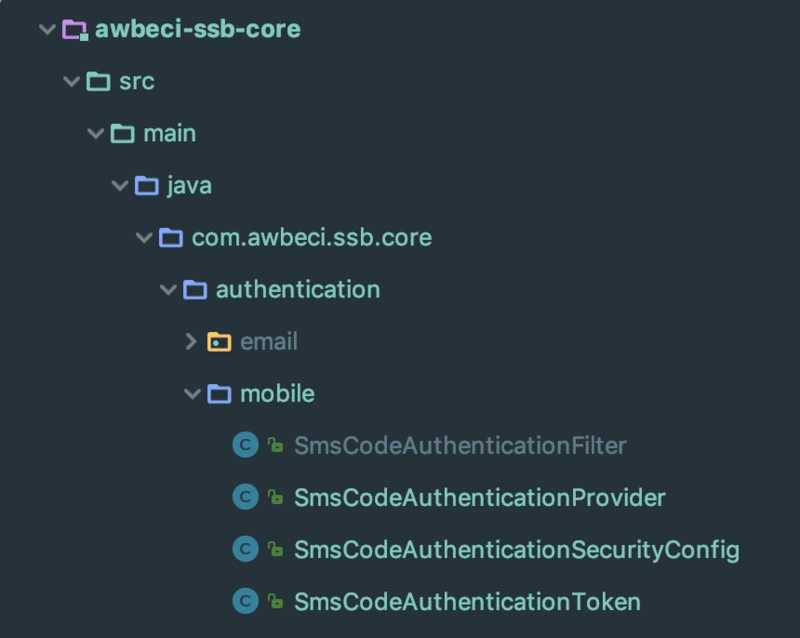
(1)、SmsCodeAuthenticationToken类,代码如下 :
// 用户基本信息存储类
public class SmsCodeAuthenticationToken extends AbstractAuthenticationToken{

    // 用户信息全部放在这里面,如用户名,手机号,密码等
    private final Object principal;
    //这里保存的证书信息,如密码,验证码等
    private Object credentials;

    //构造未认证之前用户信息
    SmsCodeAuthenticationToken(Object principal, Object credentials) {
        super(null);
        this.principal = principal;
        this.credentials = credentials;
        this.setAuthenticated(false);
    }

    //构造已认证用户信息
    SmsCodeAuthenticationToken(Object principal,
                               Object credentials,
                               Collection<? extends GrantedAuthority> authorities) {
        super(authorities);
        this.principal = principal;
        this.credentials = credentials;
        super.setAuthenticated(true); // must use super, as we override
    }

    public Object getCredentials() {
        return this.credentials;
    }

    public Object getPrincipal() {
        return this.principal;
    }

    public void setAuthenticated(boolean isAuthenticated) throws IllegalArgumentException {
        if (isAuthenticated) {
            throw new IllegalArgumentException("Cannot set this token to trusted - use constructor which takes a GrantedAuthority list instead");
        }
        super.setAuthenticated(false);
    }

    @Override
    public void eraseCredentials() {
        super.eraseCredentials();
    }
}
(2)、SmsCodeAuthenticationFilter类,代码如下
//短信验证码拦截器
public class SmsCodeAuthenticationFilter extends AbstractAuthenticationProcessingFilter {

    private boolean postOnly = true;

    // 手机号参数变量
    private String mobileParameter = "mobile";
    private String smsCode = "smsCode";

    SmsCodeAuthenticationFilter() {
        super(new AntPathRequestMatcher("/mobile/token", "POST"));
    }

    /**
     * 添加未认证用户认证信息,然后在provider里面进行正式认证
     *
     * @param httpServletRequest
     * @param httpServletResponse
     * @return
     * @throws AuthenticationException
     * @throws IOException
     * @throws ServletException
     */
    public Authentication attemptAuthentication(HttpServletRequest httpServletRequest, HttpServletResponse httpServletResponse)
            throws AuthenticationException, IOException, ServletException {
        if (postOnly && !httpServletRequest.getMethod().equals("POST")) {
            throw new AuthenticationServiceException("Authentication method not supported: " + httpServletRequest.getMethod());
        }

        String mobile = obtainMobile(httpServletRequest);
        String smsCode = obtainSmsCode(httpServletRequest);

    //todo:验证短信验证码2
        if (mobile == null) {
            mobile = "";
        }

        mobile = mobile.trim();

        SmsCodeAuthenticationToken authRequest = new SmsCodeAuthenticationToken(mobile, smsCode);
        // Allow subclasses to set the "details" property
        setDetails(httpServletRequest, authRequest);
        return this.getAuthenticationManager().authenticate(authRequest);
    }

    /**
     * 获取手机号
     */
    private String obtainMobile(HttpServletRequest request) {
        return request.getParameter(mobileParameter);
    }

    private String obtainSmsCode(HttpServletRequest request) {
        return request.getParameter(smsCode);
    }

    private void setDetails(HttpServletRequest request, SmsCodeAuthenticationToken authRequest) {
        authRequest.setDetails(authenticationDetailsSource.buildDetails(request));
    }

    public void setMobileParameter(String usernameParameter) {
        Assert.hasText(usernameParameter, "Username parameter must not be empty or null");
        this.mobileParameter = usernameParameter;
    }

    public void setPostOnly(boolean postOnly) {
        this.postOnly = postOnly;
    }

    public final String getMobileParameter() {
        return mobileParameter;
    }
}
(3)、SmsCodeAuthenticationProvider类,代码如下
//用户认证所在类
public class SmsCodeAuthenticationProvider implements AuthenticationProvider {

   private RedisTemplate<Object, Object> redisTemplate;

    // 注意这里的userdetailservice ,因为SmsCodeAuthenticationProvider类没有@Component
    // 所以这里不能加@Autowire,只能通过外面设置才行
    private UserDetailsService userDetailsService;

    @Bean
    public PasswordEncoder passwordEncoder() {
        return new BCryptPasswordEncoder();
    }

    /**
     * 在这里认证用户信息
     * @param authentication
     * @return
     * @throws AuthenticationException
     */
    public Authentication authenticate(Authentication authentication) throws AuthenticationException {
        SmsCodeAuthenticationToken authenticationToken = (SmsCodeAuthenticationToken) authentication;
//        String mobile = (String) authenticationToken.getPrincipal();
        String mobile = authentication.getName();
        String smsCode = (String) authenticationToken.getCredentials();

        //从redis中获取该手机号的验证码
        String smsCodeFromRedis = (String) redisTemplate.opsForValue().get(mobile);
        if(!smsCode.equals(smsCodeFromRedis)){
            throw new InternalAuthenticationServiceException("手机验证码不正确");
        }

        UserDetails user = userDetailsService.loadUserByUsername(mobile);
        if (user == null) {
            throw new InternalAuthenticationServiceException("无法获取用户信息");
        }

        SmsCodeAuthenticationToken authenticationResult = new SmsCodeAuthenticationToken(user,null, user.getAuthorities());
        authenticationResult.setDetails(authenticationToken.getDetails());
        return authenticationResult;
    }

    public boolean supports(Class<?> authentication) {
        return SmsCodeAuthenticationToken.class.isAssignableFrom(authentication);
    }

    public UserDetailsService getUserDetailsService() {
        return userDetailsService;
    }

    public void setUserDetailsService(UserDetailsService userDetailsService) {
        this.userDetailsService = userDetailsService;
    }

    public RedisTemplate<Object, Object> getRedisTemplate() {
        return redisTemplate;
    }

    public void setRedisTemplate(RedisTemplate<Object, Object> redisTemplate) {
        this.redisTemplate = redisTemplate;
    }
}
(4)、SmsCodeAuthenticationSecurityConfig类,代码如下
@Component
public class SmsCodeAuthenticationSecurityConfig extends SecurityConfigurerAdapter<DefaultSecurityFilterChain, HttpSecurity> {

    @Autowired
    private AuthenticationSuccessHandler ssbAuthenticationSuccessHandler;

    @Autowired
    private AuthenticationFailureHandler ssbAuthenticationFailureHandler;

    @Autowired
    private UserDetailsService userDetailsService;

    @Autowired
    private RedisTemplate<Object, Object> redisTemplate;

    @Override
    public void configure(HttpSecurity http) throws Exception {

        SmsCodeAuthenticationFilter smsCodeAuthenticationFilter = new SmsCodeAuthenticationFilter();
        smsCodeAuthenticationFilter.setAuthenticationManager(http.getSharedObject(AuthenticationManager.class));
        smsCodeAuthenticationFilter.setAuthenticationSuccessHandler(ssbAuthenticationSuccessHandler);
        smsCodeAuthenticationFilter.setAuthenticationFailureHandler(ssbAuthenticationFailureHandler);

        SmsCodeAuthenticationProvider smsCodeDaoAuthenticationProvider = new SmsCodeAuthenticationProvider();
        smsCodeDaoAuthenticationProvider.setUserDetailsService(userDetailsService);
        smsCodeDaoAuthenticationProvider.setRedisTemplate(redisTemplate);
        http.authenticationProvider(smsCodeDaoAuthenticationProvider)
                .addFilterAfter(smsCodeAuthenticationFilter, UsernamePasswordAuthenticationFilter.class);
    }
}
上面 代码都有注解我就不详细讲了,好了我们再来测试下看看是否成功:
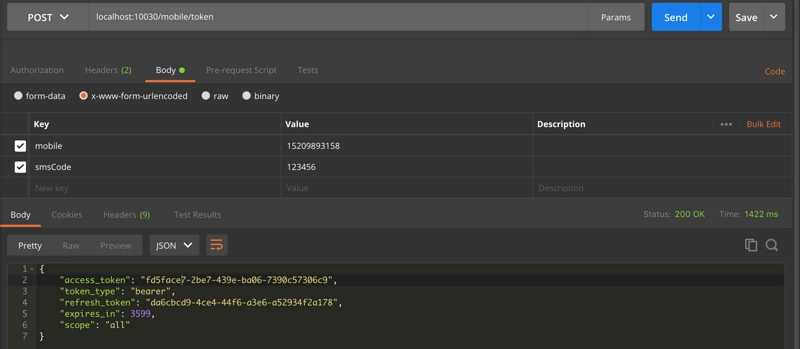
好了,手机号验证码用户认证也成功了!
邮箱验证码登录和上面手机号验证码登录差不多,你们自己试着写一下。
这是拓展功能,不需要的同学可以忽略。
我们改造一下SsbAuthorizationServerConfig类,以支持Redis保存token,如下
@Autowired
private TokenStore redisTokenStore;

@Override
public void configure(AuthorizationServerEndpointsConfigurer endpoints) throws Exception {

        //使用Redis作为Token的存储
        endpoints
                .tokenStore(redisTokenStore)
                .userDetailsService(userDetailsService);
}
然后再新建一下RedisTokenStoreConfig类
@Configuration
@ConditionalOnProperty(prefix = "ssb.security.oauth2", name = "storeType", havingValue = "redis")
public class RedisTokenStoreConfig {

    @Autowired
    private RedisConnectionFactory redisConnectionFactory;

    @Bean
    public TokenStore redisTokenStore(){
        return new RedisTokenStore(redisConnectionFactory);
    }

}
在application.properties里面添加
ssb.security.oauth2.storeType=redis
好了,我们测试下
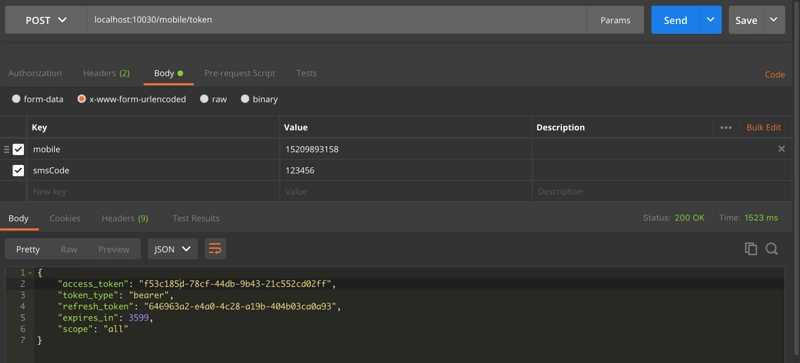
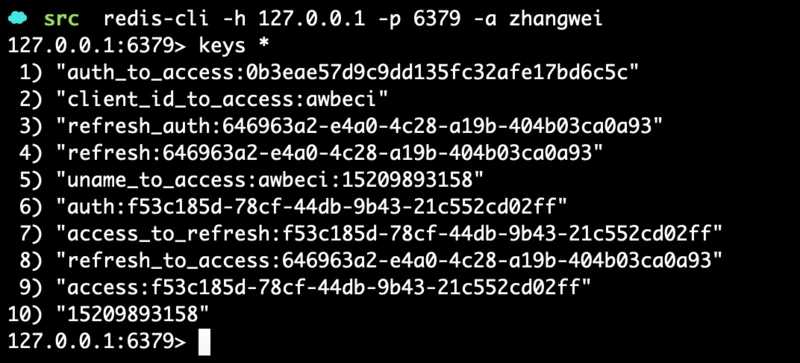
这样就成功的保存到redis了。
jwt是什么请自行百度。
首先还是要改造SsbAuthorizationServerConfig类,代码如下:
@Autowired(required = false)
private JwtAccessTokenConverter jwtAccessTokenConverter;

@Autowired(required = false)
private TokenEnhancer jwtTokenEnhancer;

@Override
public void configure(AuthorizationServerEndpointsConfigurer endpoints) throws Exception {

        //使用Redis作为Token的存储
        endpoints
//                .tokenStore(redisTokenStore)
//                .authenticationManager(authenticationManager)
                .userDetailsService(userDetailsService);

        //1、设置token为jwt形式
        //2、设置jwt 拓展认证信息
        if (jwtAccessTokenConverter != null && jwtTokenEnhancer != null) {
            TokenEnhancerChain enhancerChain = new TokenEnhancerChain();
            List<TokenEnhancer> enhancers = new ArrayList<TokenEnhancer>();
            enhancers.add(jwtTokenEnhancer);
            enhancers.add(jwtAccessTokenConverter);
            enhancerChain.setTokenEnhancers(enhancers);
            endpoints.tokenEnhancer(enhancerChain)
                    .accessTokenConverter(jwtAccessTokenConverter);
        }
    }
然后我们再来创建JwtTokenStoreConfig类代码如下:
@Configuration
@ConditionalOnProperty(
        prefix = "ssb.security.oauth2",
        name = "storeType",
        havingValue = "jwt",
        matchIfMissing = true)
public class JwtTokenStoreConfig {

    @Value("${ssb.security.jwt.signingKey}")
    private String signingkey;

    @Bean
    public TokenEnhancer jwtTokenEnhancer() {
        return new SsbJwtTokenEnhancer();
    }

    @Bean
    public TokenStore jetTokenStroe() {
        return new JwtTokenStore(jwtAccessTokenConverter());
    }

    @Bean
    public JwtAccessTokenConverter jwtAccessTokenConverter() {
        JwtAccessTokenConverter jwtAccessTokenConverter = new JwtAccessTokenConverter();
        //设置默认值
        if(StringUtils.isEmpty(signingkey)){
            signingkey = "awbeci";
        }
        //密钥,放到配置文件中
        jwtAccessTokenConverter.setSigningKey(signingkey);
        return jwtAccessTokenConverter;
    }
}
再创建一个基于JwtTokenEnhancerHandler的ApiJwtTokenEnhancerHandler类,代码如下:
/**
 * 拓展jwt token里面的信息
 */
@Service
public class ApiJwtTokenEnhancerHandler implements JwtTokenEnhancerHandler {
public HashMap<String, Object> getInfoToToken() {
HashMap<String, Object> info = new HashMap<String, Object>();
info.put("author", "张威");
info.put("company", "awbeci-copy");
return info;
}
}
最后不要忘了在application.properties里面设置一下
ssb.security.oauth2.storeType=jwt
ssb.security.jwt.signingKey=awbeci
好了,我们来测试一下吧
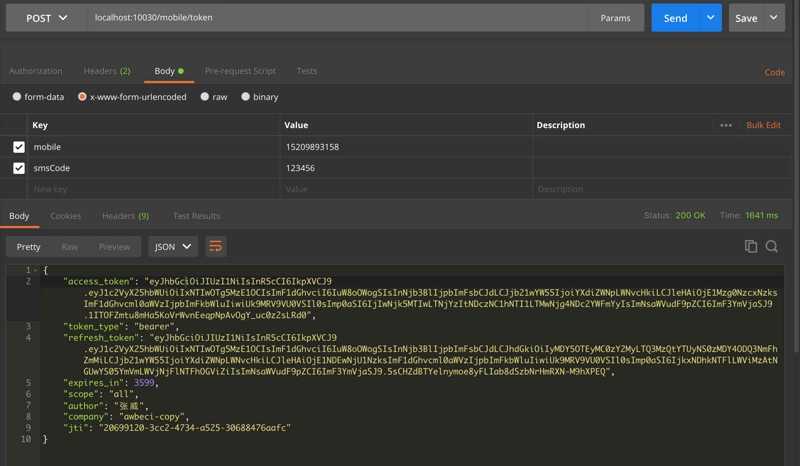
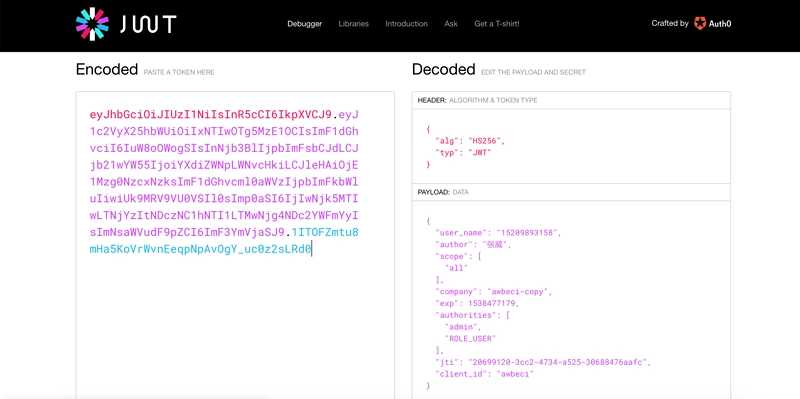
1)spring-security已经帮我们封装了用户名密码的表单登录了,我们只要实现手机号验证码登录就好
2)一共6个类,一个资源服务类ResourceServerConfigurer,一个认证服务类 AuthorizationServerConfigurer,一个手机验证码Token类,一个手机验证码Filter类,一个认证手机验证码类Provider类,一个配置类Configure类,就这么多,其实不难,有时候看网上人家写的好多,看着都要吓死。
前后端分离项目 — 基于SpringSecurity OAuth2.0用户认证
标签:判断 @Value author scope rom points manager 默认 多项目
原文地址:https://www.cnblogs.com/liboware/p/12535100.html