标签:mongo run kernel ons not ref dwr 默认 图片
下载
选择适合自己系统版本的安装包,本文安装环境CentOS 7.
MongoDB的官方网站是https://www.mongodb.com/,可以到官网上下载MongoDB的程序。之所以说是程序,是因为下载的安装包中MongoDB的相关程序已经编译好了,我使用的是mongodb-linux-x86_64-3.6.4.tgz
下载到opt目录
[root@node129 opt]# wget https://fastdl.mongodb.org/linux/mongodb-linux-x86_64-3.6.4.tgz
--2020-04-02 17:00:20--  https://fastdl.mongodb.org/linux/mongodb-linux-x86_64-3.6.4.tgz
正在解析主机 fastdl.mongodb.org (fastdl.mongodb.org)... 13.225.176.86, 13.225.176.115, 13.225.176.128, ...
正在连接 fastdl.mongodb.org (fastdl.mongodb.org)|13.225.176.86|:443... 已连接。
已发出 HTTP 请求,正在等待回应... 200 OK
长度:86915344 (83M) [application/x-gzip]
正在保存至: “mongodb-linux-x86_64-3.6.4.tgz”

100%[==============================================================================>] 86,915,344  8.49MB/s 用时 10s

2020-04-02 17:00:31 (8.11 MB/s) - 已保存 “mongodb-linux-x86_64-3.6.4.tgz” [86915344/86915344])
解压,然后修改文件名
[root@node129 opt]# tar -zxvf mongodb-linux-x86_64-3.6.4.tgz
mongodb-linux-x86_64-3.6.4/README
mongodb-linux-x86_64-3.6.4/THIRD-PARTY-NOTICES
mongodb-linux-x86_64-3.6.4/MPL-2
mongodb-linux-x86_64-3.6.4/GNU-AGPL-3.0
mongodb-linux-x86_64-3.6.4/bin/mongodump
mongodb-linux-x86_64-3.6.4/bin/mongorestore
mongodb-linux-x86_64-3.6.4/bin/mongoexport
mongodb-linux-x86_64-3.6.4/bin/mongoimport
mongodb-linux-x86_64-3.6.4/bin/mongostat
mongodb-linux-x86_64-3.6.4/bin/mongotop
mongodb-linux-x86_64-3.6.4/bin/bsondump
mongodb-linux-x86_64-3.6.4/bin/mongofiles
mongodb-linux-x86_64-3.6.4/bin/mongoreplay
mongodb-linux-x86_64-3.6.4/bin/mongoperf
mongodb-linux-x86_64-3.6.4/bin/mongod
mongodb-linux-x86_64-3.6.4/bin/mongos
mongodb-linux-x86_64-3.6.4/bin/mongo
mongodb-linux-x86_64-3.6.4/bin/install_compass
[root@node129 opt]# ls
mongodb-linux-x86_64-3.6.4  mongodb-linux-x86_64-3.6.4.tgz  ORCLfmap  Python-3.6.5  Python-3.6.5.tgz  rh  teradata
[root@node129 opt]# mv mongodb-linux-x86_64-3.6.4 mongodb
[root@node129 opt]# ls
mongodb  mongodb-linux-x86_64-3.6.4.tgz  ORCLfmap  Python-3.6.5  Python-3.6.5.tgz  rh  teradata
在mongodb目录下创建数据库目录db、创建日志目录logs、创建配置文件目录conf
[root@node129 opt]# cd mongodb/
[root@node129 mongodb]# mkdir db
[root@node129 mongodb]# mkdir logs
[root@node129 mongodb]# mkdir conf
[root@node129 mongodb]# ll
总用量 120
drwxr-xr-x 2 root root  4096 4月   2 17:00 bin
drwxr-xr-x 2 root root     6 4月   2 17:01 conf
drwxr-xr-x 2 root root     6 4月   2 17:01 db
-rw-r--r-- 1 root root 34520 4月  13 2018 GNU-AGPL-3.0
drwxr-xr-x 2 root root     6 4月   2 17:01 logs
-rw-r--r-- 1 root root 16726 4月  13 2018 MPL-2
-rw-r--r-- 1 root root  2195 4月  13 2018 README
-rw-r--r-- 1 root root 57190 4月  13 2018 THIRD-PARTY-NOTICES
[root@node129 mongodb]# cd conf/
[root@node129 conf]# touch mongodb.conf
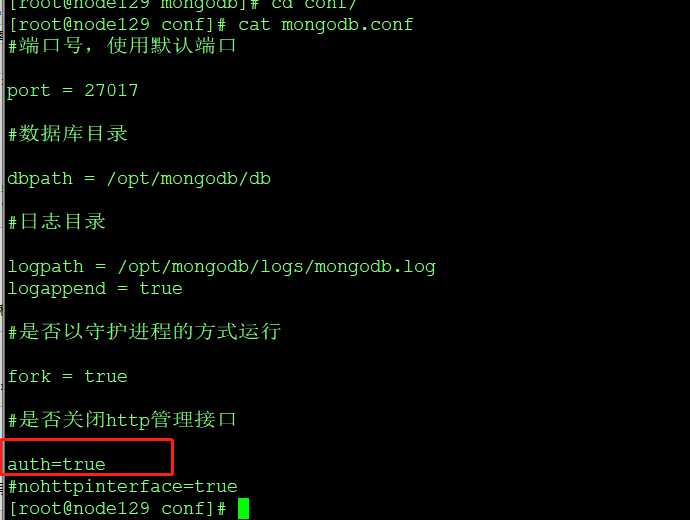
在conf下新建配置文件mogodb.conf,并配置以下内容
[root@node129 mongodb]# cd conf/
[root@node129 conf]# cat mongodb.conf
#端口号,使用默认端口

port = 27017

#数据库目录

dbpath = /opt/mongodb/db

#日志目录

logpath = /opt/mongodb/logs/mongodb.log
logappend = true

#是否以守护进程的方式运行

fork = true

#是否关闭http管理接口
#nohttpinterface=true
如果提示nohttpinterface不存在,注释了就好了
启动验证
启动
? 启动mongodb需要使用bin目录下的mongod,如果通过-f 或–config= 来指定配置文件
[root@node129 mongodb]# ./bin/mongod -f conf/mongodb.conf
about to fork child process, waiting until server is ready for connections.
forked process: 28109
child process started successfully, parent exiting
[root@node129 mongodb]#  ps -ef | grep mongodb
root     28109     1  5 17:16 ?        00:00:00 ./bin/mongod -f conf/mongodb.conf
root     28486  3218  0 17:16 pts/1    00:00:00 grep --color=auto mongodb
连接
? 连接mongodb需要使用bin目录下的mongo
创建一个root账号
[root@node129 mongodb]# ./bin/mongo
MongoDB shell version v3.6.4
connecting to: mongodb://127.0.0.1:27017
MongoDB server version: 3.6.4
Server has startup warnings:
2020-04-02T17:16:48.698+0800 I CONTROL  [initandlisten]
2020-04-02T17:16:48.699+0800 I CONTROL  [initandlisten] ** WARNING: Access control is not enabled for the database.
2020-04-02T17:16:48.699+0800 I CONTROL  [initandlisten] **          Read and write access to data and configuration is unrestricted.
2020-04-02T17:16:48.699+0800 I CONTROL  [initandlisten] ** WARNING: You are running this process as the root user, which is not recommended.
2020-04-02T17:16:48.699+0800 I CONTROL  [initandlisten]
2020-04-02T17:16:48.699+0800 I CONTROL  [initandlisten] ** WARNING: This server is bound to localhost.
2020-04-02T17:16:48.699+0800 I CONTROL  [initandlisten] **          Remote systems will be unable to connect to this server.
2020-04-02T17:16:48.699+0800 I CONTROL  [initandlisten] **          Start the server with --bind_ip <address> to specify which IP
2020-04-02T17:16:48.699+0800 I CONTROL  [initandlisten] **          addresses it should serve responses from, or with --bind_ip_all to
2020-04-02T17:16:48.699+0800 I CONTROL  [initandlisten] **          bind to all interfaces. If this behavior is desired, start the
2020-04-02T17:16:48.699+0800 I CONTROL  [initandlisten] **          server with --bind_ip 127.0.0.1 to disable this warning.
2020-04-02T17:16:48.699+0800 I CONTROL  [initandlisten]
2020-04-02T17:16:48.699+0800 I CONTROL  [initandlisten]
2020-04-02T17:16:48.699+0800 I CONTROL  [initandlisten] ** WARNING: /sys/kernel/mm/transparent_hugepage/enabled is ‘always‘.
2020-04-02T17:16:48.699+0800 I CONTROL  [initandlisten] **        We suggest setting it to ‘never‘
2020-04-02T17:16:48.699+0800 I CONTROL  [initandlisten]
2020-04-02T17:16:48.699+0800 I CONTROL  [initandlisten] ** WARNING: /sys/kernel/mm/transparent_hugepage/defrag is ‘always‘.
2020-04-02T17:16:48.699+0800 I CONTROL  [initandlisten] **        We suggest setting it to ‘never‘
2020-04-02T17:16:48.699+0800 I CONTROL  [initandlisten]
> show dbs
admin  0.000GB
local  0.000GB
> use admin
switched to db admin
> db.createUser({user: "root", pwd: "123456", roles:["root"]})
Successfully added user: { "user" : "root", "roles" : [ "root" ] }
创建管理员账户
现在需要创建一个帐号,该账号需要有grant权限,即:账号管理的授权权限。注意一点,帐号是跟着库走的,所以在指定库里授权,必须也在指定库里验证(auth)。
添加管理用户:
use admin
db.createUser( {user: "admin",pwd: "123456",roles: [ { role: "userAdminAnyDatabase", db: "admin" } ]})
user:用户名
pwd:密码
roles:指定用户的角色,可以用一个空数组给新用户设定空角色;在roles字段,可以指定内置角色和用户定义的角色。role里的角色可以选:
Built-In Roles(内置角色):
1. 数据库用户角色:read、readWrite;
2. 数据库管理角色:dbAdmin、dbOwner、userAdmin;
3. 集群管理角色:clusterAdmin、clusterManager、clusterMonitor、hostManager;
4. 备份恢复角色:backup、restore;
5. 所有数据库角色:readAnyDatabase、readWriteAnyDatabase、userAdminAnyDatabase、dbAdminAnyDatabase
6. 超级用户角色:root
// 这里还有几个角色间接或直接提供了系统超级用户的访问(dbOwner 、userAdmin、userAdminAnyDatabase)
7. 内部角色:__system
具体角色:
Read:允许用户读取指定数据库
readWrite:允许用户读写指定数据库
dbAdmin:允许用户在指定数据库中执行管理函数,如索引创建、删除,查看统计或访问system.profile
userAdmin:允许用户向system.users集合写入,可以找指定数据库里创建、删除和管理用户
clusterAdmin:只在admin数据库中可用,赋予用户所有分片和复制集相关函数的管理权限。
readAnyDatabase:只在admin数据库中可用,赋予用户所有数据库的读权限
readWriteAnyDatabase:只在admin数据库中可用,赋予用户所有数据库的读写权限
userAdminAnyDatabase:只在admin数据库中可用,赋予用户所有数据库的userAdmin权限
dbAdminAnyDatabase:只在admin数据库中可用,赋予用户所有数据库的dbAdmin权限。
root:只在admin数据库中可用。超级账号,超级权限。
刚建立了 userAdminAnyDatabase 角色,用来管理用户,可以通过这个角色来创建、删除用户。
注意,这时候,连接数据库时无验证的。需要将进程kill,修改conf文件
[root@node129 mongodb]# kill -9 XXXX
-bash: kill: (32540) - 没有那个进程
[root@node129 mongodb]#  ps -ef | grep mongodb

auth = true 在没有设置用户名和密码时 可不用填写
最后,使用root账号,新建一个账号,并分配给其一个数据空间。创建表,插入数据,查询数据
> use admin
switched to db admin
> db.auth("root","123456")
1
> db.createUser({user: "apple",pwd: "111111",roles: [ { role: "dbOwner", db: "autotest" } ]} )
Successfully added user: {
	"user" : "apple",
	"roles" : [
		{
			"role" : "dbOwner",
			"db" : "autotest"
		}
	]
}
> db.auth(‘apple‘,‘111111‘)
1
> use autotest
switched to db autotest
> db.city.insert({city_id: NumberLong("1"),city:"beijing"})
WriteResult({ "nInserted" : 1 })
> db.find()
2020-04-02T17:32:20.175+0800 E QUERY    [thread1] TypeError: db.find is not a function :
@(shell):1:1
> db.city.find()
{ "_id" : ObjectId("5e85b10b6e3e210197bf531d"), "city_id" : NumberLong(1), "city" : "beijing" }
>
标签:mongo run kernel ons not ref dwr 默认 图片
原文地址:https://www.cnblogs.com/l7planet/p/12621062.html