标签:mem with open 忽略 baidu 判断 false 速度 top enc
环境安装:
scrapy使用流程:
爬虫文件剖析:
# -*- coding: utf-8 -*-
  import scrapy
  class QiubaiSpider(scrapy.Spider):
      name = ‘qiubai‘ #应用名称
      #允许爬取的域名(如果遇到非该域名的url则爬取不到数据),其实没什么用。一般都是注释掉
      #allowed_domains = [‘https://www.qiushibaike.com/‘]
      #起始爬取的url
      start_urls = [‘https://www.qiushibaike.com/‘]
      #访问起始URL并获取结果后的回调函数,该函数的response参数就是向起始的url发送请求后,获取的响应对象.该函数返回值必须为可迭代对象或者NUll
      def parse(self, response):
          print(response.text) #获取字符串类型的响应内容
          print(response.body)#获取字节类型的相应内容
配置文件settings.py修改:
#修改内容及其结果如下:
USER_AGENT = ‘Mozilla/5.0 (Macintosh; Intel Mac OS X 10_12_0) AppleWebKit/537.36 (KHTML, like Gecko) Chrome/68.0.3440.106 Safari/537.36‘ #伪装请求载体身份
ROBOTSTXT_OBEY = False  #可以忽略或者不遵守robots协议
#日志信息
LOG_LEVEL = ‘ERROR‘  #只看错误信息
scrapy基于xpath数据解析操作:
将selector类型转成列表 【0】extract()、extract_first() 取第一个
提取全部内容: .extract(),获得是一个列表[‘abc‘,]
提取第一个:.extract_first(),获得是一个字符串 ‘abc‘
爬取糗事百科的段子数据
# -*- coding: utf-8 -*-
import scrapy
class QiubaiSpider(scrapy.Spider):
  name = ‘qiubai‘
  allowed_domains = [‘https://www.qiushibaike.com/‘]
  start_urls = [‘https://www.qiushibaike.com/‘]
  def parse(self, response):
      #xpath为response中的方法,可以将xpath表达式直接作用于该函数中
      odiv = response.xpath(‘//div[@id="content-left"]/div‘)
      content_list = [] #用于存储解析到的数据
      for div in odiv:
          #xpath函数返回的为列表,列表中存放的数据为Selector类型的数据。我们解析到的内容被封装在了Selector对象中,需要调用extract()函数将解析的内容从Selecor中取出。
          author = div.xpath(‘.//div[@class="author clearfix"]/a/h2/text()‘)[0].extract()
          content=div.xpath(‘.//div[@class="content"]/span/text()‘)[0].extract()
          #打印展示爬取到的数据
          print(author,content)
保证爬虫文件的parse方法中有可迭代类型对象(通常为列表or字典)的返回,该返回值可以通过终端指令的形式写入指定格式的文件中进行持久化操作。
import scrapy
class QiubaiSpider(scrapy.Spider):
    name = ‘qiubai‘
    allowed_domains = [‘https://www.qiushibaike.com/‘]
    start_urls = [‘https://www.qiushibaike.com/‘]
    def parse(self, response):
        #xpath为response中的方法,可以将xpath表达式直接作用于该函数中
        odiv = response.xpath(‘//div[@id="content-left"]/div‘)
        content_list = [] #用于存储解析到的数据
        for div in odiv:
            #xpath函数返回的为列表,列表中存放的数据为Selector类型的数据。我们解析到的内容被封装在了Selector对象中,需要调用extract()函数将解析的内容从Selecor中取出。
            author = div.xpath(‘.//div[@class="author clearfix"]/a/h2/text()‘)[0].extract()
            content=div.xpath(‘.//div[@class="content"]/span/text()‘)[0].extract()
            #将解析到的内容封装到字典中
            dic={
                ‘作者‘:author,
                ‘内容‘:content
            }
            #将数据存储到content_list这个列表中
            content_list.append(dic)
        return content_list
执行指令:
scrapy框架中已经为我们专门集成好了高效、便捷的持久化操作功能,我们直接使用即可。要想使用scrapy的持久化操作功能,我们首先来认识如下两个文件:
items.py:数据结构模板文件,定义数据属性
pipelines.py:管道文件。接受数据(items),进行数据持久化存储
持久化流程:
小试牛刀:将糗事百科首页中的段子和作者数据爬取下来,然后进行持久化存储
爬虫文件:qiubaiDemo.py
import scrapy
from secondblood.items import SecondbloodItem
class QiubaidemoSpider(scrapy.Spider):
  name = ‘qiubaiDemo‘
  allowed_domains = [‘www.qiushibaike.com‘]
  start_urls = [‘http://www.qiushibaike.com/‘]
  def parse(self, response):
      odiv = response.xpath(‘//div[@id="content-left"]/div‘)
      for div in odiv:
          # xpath函数返回的为列表,列表中存放的数据为Selector类型的数据。我们解析到的内容被封装在了Selector对象中,需要调用extract()函数将解析的内容从Selecor中取出。
          author = div.xpath(‘.//div[@class="author clearfix"]//h2/text()‘).extract_first()
          author = author.strip(‘\n‘)#过滤空行
          content = div.xpath(‘.//div[@class="content"]/span/text()‘).extract_first()
          content = content.strip(‘\n‘)#过滤空行
          #将解析到的数据封装至items对象中
          item = SecondbloodItem()
          item[‘author‘] = author
          item[‘content‘] = content
          yield item#提交item到管道文件(pipelines.py)
items文件:items.py
import scrapy
class SecondbloodItem(scrapy.Item):
  # define the fields for your item here like:
  # name = scrapy.Field()
  author = scrapy.Field() #存储作者
  content = scrapy.Field() #存储段子内容
管道文件:pipelines.py
class SecondbloodPipeline(object):
  #构造方法
  def __init__(self):
      self.fp = None  #定义一个文件描述符属性
#下列都是在重写父类的方法:
  #开始爬虫时,执行一次
  def open_spider(self,spider):
      print(‘爬虫开始‘)
      self.fp = open(‘./data.txt‘, ‘w‘)
 #因为该方法会被执行调用多次,所以文件的开启和关闭操作写在了另外两个只会各自执行一次的方法中。
  def process_item(self, item, spider):
      #将爬虫程序提交的item进行持久化存储
      self.fp.write(item[‘author‘] + ‘:‘ + item[‘content‘] + ‘\n‘)
      return item
  #结束爬虫时,执行一次
  def close_spider(self,spider):
      self.fp.close()
      print(‘爬虫结束‘)
配置文件
#开启管道
ITEM_PIPELINES = {
‘secondblood.pipelines.SecondbloodPipeline‘: 300, #300表示为优先级,值越小优先级越高
}
面试题:如果最终需要将爬取到的数据值一份存储到磁盘文件,一份存储到数据库中,则应该如何操作scrapy?
一个管道类定义一种持久化存储方式
在process_item中返回item,可以实现多个管道类都生效,是将item传递给下一个即将执行的管道类
重写父类方法,让文件和数据库的打开关闭连接等操作都只执行一次,提高效率
注意事项 : 对于存储的数据有单双引号都是用时,用pymysql或者MysqlDB的escape_string()方法对引号进行转义,不然就会报1064的语法错误
ITEM_PIPELINES = {
‘MoTe.pipelines.MotePipeline‘: 300,
‘MoTe.pipelines.MysqlPipeline‘: 301, }
本地文件存储
 class MotePipeline(object):
     fp = None
     # 重写父类方法,该方法只会执行一次,
     def open_spider(self,spider):
     # 该方法调用后就可以接受爬虫类提交的对象
         print(‘start spider‘)
         self.fp = open(‘./a.txt‘,‘w‘,encoding=‘utf-8‘)

     def process_item(self, item, spider):
         title = item[‘title_text‘]
         url = item[‘title_url‘]
         # print(title,url)
         self.fp.write(title+url)
         return item #将item传递给下一个即将执行的管道类

     def close_spider(self,spider):
         print(‘finish spider‘)
         self.fp.close()
数据库存储
class MysqlPipeline(object):
     conn = None
     cursor = None
     def open_spider(self,spider):
         self.conn = pymysql.Connection(host = ‘127.0.0.1‘,port = 3306,user = ‘root‘,password = ‘123‘,db=‘mote‘,charset = ‘utf8‘)
         print(self.conn)

     def process_item(self,item,spider):
         title = item[‘title_text‘]
         url = item[‘title_url‘]

         sql = ‘insert into cmodel values("%s","%s")‘%(pymysql.escape_string(title),pymysql.escape_string(url))#转义引号
         self.cursor = self.conn.cursor()
         try:
             self.cursor.execute(sql)
             self.conn.commit()
         except Exception as e:
             print(e)
             self.conn.rollback()
         return item

     def close_spider(self,spider):
         self.cursor.close()
         self.conn.close()
redis
 class RedisPipeline(object):
     conn = None

     def open_spider(self,spider):
         self.conn = Redis(host=‘127.0.0.1‘,port=6379)
         print(self.conn)

     def process_item(self,item,spider):
         self.conn.lpush(‘news‘,item)

redis版本的3以上的不支持字典作为值,降低版本即可
pip install -U redis==2.10.6
大部分的网站展示的数据都进行了分页操作,那么将所有页码对应的页面数据进行爬取就是爬虫中的全站数据爬取。
基于scrapy如何进行全站数据爬取呢?
需求:将糗事百科所有页码的作者和段子内容数据进行爬取切持久化存储
# -*- coding: utf-8 -*-
import scrapy
from qiushibaike.items import QiushibaikeItem
# scrapy.http import Request
class QiushiSpider(scrapy.Spider):
  name = ‘qiushi‘
  allowed_domains = [‘www.qiushibaike.com‘]
  start_urls = [‘https://www.qiushibaike.com/text/‘]
  #爬取多页
  pageNum = 1 #起始页码
  url = ‘https://www.qiushibaike.com/text/page/%s/‘ #每页的url
  def parse(self, response):
      div_list=response.xpath(‘//*[@id="content-left"]/div‘)
      for div in div_list:
          #//*[@id="qiushi_tag_120996995"]/div[1]/a[2]/h2
          author=div.xpath(‘.//div[@class="author clearfix"]//h2/text()‘).extract_first()
          author=author.strip(‘\n‘)
          content=div.xpath(‘.//div[@class="content"]/span/text()‘).extract_first()
          content=content.strip(‘\n‘)
          item=QiushibaikeItem()
          item[‘author‘]=author
          item[‘content‘]=content
          yield item #提交item到管道进行持久化
       #爬取所有页码数据
      if self.pageNum <= 13: #一共爬取13页(共13页)
          self.pageNum += 1
          url = format(self.url % self.pageNum)
          #递归爬取数据:callback参数的值为回调函数(将url请求后,得到的相应数据继续进行parse解析),递归调用parse函数
          yield scrapy.Request(url=url,callback=self.parse)  #手动发送请求
Scrapy是一个为了爬取网站数据,提取结构性数据而编写的应用框架。 其可以应用在数据挖掘,信息处理或存储历史数据等一系列的程序中。
其最初是为了页面抓取 (更确切来说, 网络抓取 )所设计的, 也可以应用在获取API所返回的数据(例如 Amazon Associates Web Services ) 或者通用的网络爬虫。Scrapy用途广泛,可以用于数据挖掘、监测和自动化测试。
Scrapy 使用了 Twisted异步网络库来处理网络通讯。整体架构大致如下
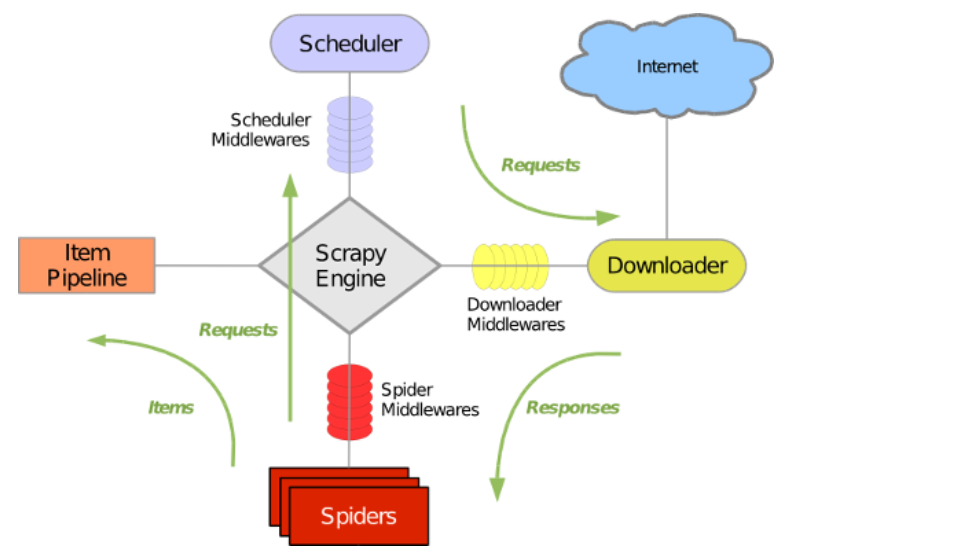
Scrapy主要包括了以下组件:
Scrapy运行流程大概如下:
文件说明:
注意:一般创建爬虫文件时,以网站域名命名
在某些情况下,我们爬取的数据不在同一个页面中(但是需要整合到一起,封装到一个item对象),例如,我们爬取一个电影网站,电影的名称,评分在一级页面,而要爬取的其他电影详情在其二级子页面中。这时我们就需要用到请求传参。
请求传参的使用场景
scrapy基本使用:
下面时基于管道的持久化存储 代码:
# -*- coding: utf-8 -*-
import scrapy
from ..items import BossItem

class BossSpider(scrapy.Spider):
    name = ‘boss‘
    # allowed_domains = [‘www.zhipin.com‘]
    #51
    start_urls = [‘https://search.51job.com/list/010000,000000,0000,00,9,99,python,2,1.html?&workyear=02‘]
    #分页
    url = ‘https://search.51job.com/list/010000,000000,0000,00,9,99,python,2,%s.html?&workyear=02‘
    page_num = 2

    #详情页
    def parse_detail(self, response):
        item = response.meta[‘item‘]
        job_desc = response.xpath(‘/html/body/div[3]/div[2]/div[3]/div[1]/div//text()‘).extract()
        job_desc = ‘‘.join(job_desc)  #以‘‘ 将字符串拼接在一起
        item[‘job_desc‘] = job_desc.strip()
        yield item  #提交item到管道文件(pipelines.py)

    # 解析首页中的岗位名称
    def parse(self, response):
        div_list = response.xpath(‘//*[@id="resultList"]/div[@class="el"]‘)

        for div in div_list:
            item = BossItem()
            job_name = div.xpath(‘./p/span/a/text()‘).extract_first() #[xx,] 取一个  .extract_first()
            # print(job_name)
            job_company = div.xpath(‘./span[1]/a/text()‘).extract_first()
            job_city = div.xpath(‘./span[2]/text()‘).extract_first()
            job_saray = div.xpath(‘./span[3]/text()‘).extract_first()
            job_pubtime = div.xpath(‘./span[4]/text()‘).extract_first()
            #封装到item对象
            item[‘job_name‘] = job_name.strip()
            item[‘job_company‘] = job_company
            item[‘job_city‘] = job_city
            item[‘job_saray‘] = job_saray
            item[‘job_pubtime‘] = job_pubtime

            #获取详情页href
            detail_url= div.xpath(‘./p/span/a/@href‘).extract_first()
            # print(detail_url)
            #对发请求  手动请求发送  请求传参meta
            yield scrapy.Request(detail_url,callback=self.parse_detail,meta={‘item‘:item})

        #分页爬取
        if self.page_num <= 5:
            new_url = format(self.url % (self.page_num))

            self.page_num += 1
            yield scrapy.Request(url=new_url,callback=self.parse) #回调parse解析
# -*- coding: utf-8 -*-

# Define here the models for your scraped items
#
# See documentation in:
# https://docs.scrapy.org/en/latest/topics/items.html

import scrapy
class BossItem(scrapy.Item):
    # define the fields for your item here like:
    # name = scrapy.Field()
    job_name = scrapy.Field()  # 岗位
    job_company = scrapy.Field()  # 公司
    job_city = scrapy.Field()   #城市
    job_saray = scrapy.Field()  # 薪资
    job_pubtime = scrapy.Field()  # 发布时间
    job_desc = scrapy.Field()  # 职位信息
# -*- coding: utf-8 -*-

# Define your item pipelines here
# Don‘t forget to add your pipeline to the ITEM_PIPELINES setting
# See: https://docs.scrapy.org/en/latest/topics/item-pipeline.html

from openpyxl import Workbook
from openpyxl.styles import PatternFill, Border, Side, Alignment, Protection, Font,NamedStyle

class BossPipeline(object):
    # 构造方法
    def __init__(self):
        pass

    def open_spider(self,spider):
        self.wb = Workbook()  # 实例化
        self.ws = self.wb.active  # 激活 worksheet
        self.ws.append([‘职位名‘, ‘公司‘, ‘城市‘, ‘薪资‘, ‘发布时间‘, ‘职位描述‘])

        ###设置单元格颜色
        self.li = [‘A‘, ‘B‘, ‘C‘, ‘D‘, ‘E‘]
        highlight = NamedStyle(name="highlight")
        highlight.fill = PatternFill("solid", fgColor="66CD00")  # 背景填充

        for i in self.li:
            self.ws.column_dimensions[i].width = 30  # 循环列设置行宽
            self.ws["%s1" % i].style = highlight  # 设置单元格颜色 第一行

    def process_item(self, item, spider):
        # print(‘职位名:‘,item["job_name"])
        # print(‘公司:‘,item["job_company"])
        # print(‘城市:‘,item["job_city"])
        # print(‘薪资:‘,item["job_saray"])
        # print(‘发布时间:‘,item["job_pubtime"])
        # print(‘职位描述:‘,item["job_desc"])

        #neirong
        desc= [item["job_name"],item["job_company"],item["job_city"],item["job_saray"],item["job_pubtime"],item["job_desc"]]
        print(item["job_name"])
        #写入文件execl
        self.ws.append(desc)
        return item  #返回给其他的管道类用于持久化存储

    def close_spider(self,spider):
        self.wb.save(‘./51_python_job.xlsx‘)
ITEM_PIPELINES = { ‘Boss.pipelines.BossPipeline‘: 300,}
基于scrapy爬取字符串的数据和爬取图片类型的数据区别?
ImagesPipeline:
需求:爬取站长素材中的高清图片 (图片懒加载)
使用流程:
数据解析(图片的地址)
将存储图片的地址的item提交到制定的管道类
在管道文件中自定制一个管道类(父类为ImagesPipeline)
from scrapy.pipelines.images import ImagesPipeline
重写三个方法
from scrapy.pipelines.images import ImagesPipeline

class ImgproPipeline(ImagesPipeline):
     # 该方法用作于请求发送
     def get_media_requests(self, item, info):
         # 对item中的图片地址进行请求发送,
         print(item)
         yield scrapy.Request(url=item[‘img_src‘])

     # 指定文件存储路径(文件夹+文件夹名称)  #看源码requset这里是get_media_requests中的item对象
     def file_path(self, request, response=None, info=None):
         return request.url.split(‘/‘)[-1]

     # 将item传递给下一个即将被执行的管道类
     def item_completed(self, results, item, info):
         return item
在配置文件中:
实例:
#spiders/imgs.py
# -*- coding: utf-8 -*-
import scrapy
from ..items import ImgsproItem

class ImgsSpider(scrapy.Spider):
    name = ‘imgs‘
    # allowed_domains = [‘www.xxx.com‘]

    start_urls = [‘http://sc.chinaz.com/tupian/‘]

    def parse(self, response):

        div_list =  response.xpath(‘//div[@id="container"]/div‘)
        for div in div_list:
            img_url = div.xpath(‘./div/a/img/@src2‘).extract_first()  #图片懒加载找到伪属性src2
            print(img_url)
            #封装item对象
            item = ImgsproItem()
            item[‘img_src‘] = img_url
            yield item
#items.py
# -*- coding: utf-8 -*-

# Define here the models for your scraped items
#
# See documentation in:
# https://docs.scrapy.org/en/latest/topics/items.html

import scrapy

class ImgsproItem(scrapy.Item):
    # define the fields for your item here like:
    # name = scrapy.Field()
    img_src = scrapy.Field()
#pipelines.py
# -*- coding: utf-8 -*-

# Define your item pipelines here
#
# Don‘t forget to add your pipeline to the ITEM_PIPELINES setting
# See: https://docs.scrapy.org/en/latest/topics/item-pipeline.html

from scrapy.pipelines.images import ImagesPipeline
import scrapy
# class ImgsproPipeline(object):
#     def process_item(self, item, spider):
#         return item

class ImgsPipeline(ImagesPipeline):
    # 该方法用作于请求发送
    def get_media_requests(self, item, info):
        print(item,‘media_request‘)
        yield scrapy.Request(url=item[‘img_src‘])
    #指定文件存储路径(文件夹 + 文件夹名称)  # 看源码requset这里是get_media_requests中的item对象
    def file_path(self, request, response=None, info=None):
        return request.url.split(‘/‘)[-1]

    # 将item传递给下一个即将被执行的管道类
    def item_completed(self, results, item, info):
        return item
#settings.py
#开启管道类
ITEM_PIPELINES = {
   # ‘imgsPro.pipelines.ImgsproPipeline‘: 300,
   ‘imgsPro.pipelines.ImgsPipeline‘: 300,
}
#img图片存储路径
IMAGES_STORE = ‘./imgs_zy‘
下载中间件(Downloader Middlewares) 位于scrapy引擎和下载器之间的一层组件。
作用:拦截到整个工程所有的请求和响应
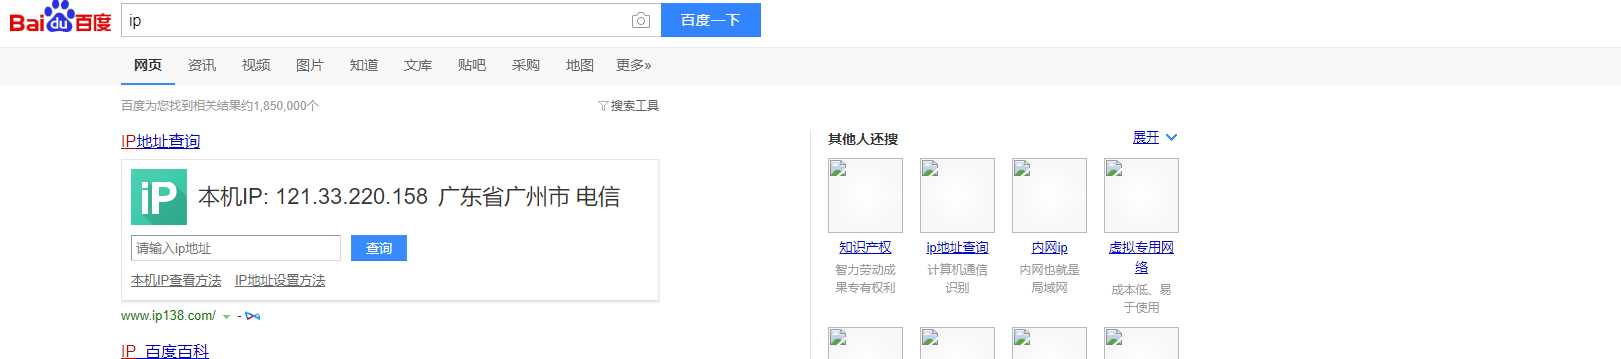
拦截请求: 案例爬取百度ip网页
拦截响应:
我们主要使用下载中间件处理请求,一般会对请求设置随机的User-Agent ,设置随机的代理。目的在于防止爬取网站的反爬虫策略。
#spiders/middletest.py
# -*- coding: utf-8 -*-
import scrapy
class MiddeltestSpider(scrapy.Spider):
    name = ‘middeltest‘
    # allowed_domains = [‘www.xx.com‘]
    start_urls = [‘http://www.baidu.com/s?wd=ip‘]

    def parse(self, response):
        ret=response.text
        print(ret)
        with open(‘./baidu.html‘,‘w‘,encoding=‘utf-8‘) as f:
            f.write(ret)
#middelware.py
# -*- coding: utf-8 -*-
# Define here the models for your spider middleware
#
# See documentation in:
# https://docs.scrapy.org/en/latest/topics/spider-middleware.html

from scrapy import signals
import random

class MiddleDownloaderMiddleware(object):
    # Not all methods need to be defined. If a method is not defined,
    # scrapy acts as if the downloader middleware does not modify the
    # passed objects.
    user_agent_list = [
        "Mozilla/5.0 (Windows NT 6.1; WOW64) AppleWebKit/537.1 "
        "(KHTML, like Gecko) Chrome/22.0.1207.1 Safari/537.1",
        "Mozilla/5.0 (X11; CrOS i686 2268.111.0) AppleWebKit/536.11 "
        "(KHTML, like Gecko) Chrome/20.0.1132.57 Safari/536.11",
        "Mozilla/5.0 (Windows NT 6.1; WOW64) AppleWebKit/536.6 "
        "(KHTML, like Gecko) Chrome/20.0.1092.0 Safari/536.6",
        "Mozilla/5.0 (Windows NT 6.2) AppleWebKit/536.6 "
        "(KHTML, like Gecko) Chrome/20.0.1090.0 Safari/536.6",
        "Mozilla/5.0 (Windows NT 6.2; WOW64) AppleWebKit/537.1 "
        "(KHTML, like Gecko) Chrome/19.77.34.5 Safari/537.1",
        "Mozilla/5.0 (X11; Linux x86_64) AppleWebKit/536.5 "
        "(KHTML, like Gecko) Chrome/19.0.1084.9 Safari/536.5",
        "Mozilla/5.0 (Windows NT 6.0) AppleWebKit/536.5 "
        "(KHTML, like Gecko) Chrome/19.0.1084.36 Safari/536.5",
        "Mozilla/5.0 (Windows NT 6.1; WOW64) AppleWebKit/536.3 "
        "(KHTML, like Gecko) Chrome/19.0.1063.0 Safari/536.3",
        "Mozilla/5.0 (Windows NT 5.1) AppleWebKit/536.3 "
        "(KHTML, like Gecko) Chrome/19.0.1063.0 Safari/536.3",
        "Mozilla/5.0 (Macintosh; Intel Mac OS X 10_8_0) AppleWebKit/536.3 "
        "(KHTML, like Gecko) Chrome/19.0.1063.0 Safari/536.3",
        "Mozilla/5.0 (Windows NT 6.2) AppleWebKit/536.3 "
        "(KHTML, like Gecko) Chrome/19.0.1062.0 Safari/536.3",
        "Mozilla/5.0 (Windows NT 6.1; WOW64) AppleWebKit/536.3 "
        "(KHTML, like Gecko) Chrome/19.0.1062.0 Safari/536.3",
        "Mozilla/5.0 (Windows NT 6.2) AppleWebKit/536.3 "
        "(KHTML, like Gecko) Chrome/19.0.1061.1 Safari/536.3",
        "Mozilla/5.0 (Windows NT 6.1; WOW64) AppleWebKit/536.3 "
        "(KHTML, like Gecko) Chrome/19.0.1061.1 Safari/536.3",
        "Mozilla/5.0 (Windows NT 6.1) AppleWebKit/536.3 "
        "(KHTML, like Gecko) Chrome/19.0.1061.1 Safari/536.3",
        "Mozilla/5.0 (Windows NT 6.2) AppleWebKit/536.3 "
        "(KHTML, like Gecko) Chrome/19.0.1061.0 Safari/536.3",
        "Mozilla/5.0 (X11; Linux x86_64) AppleWebKit/535.24 "
        "(KHTML, like Gecko) Chrome/19.0.1055.1 Safari/535.24",
        "Mozilla/5.0 (Windows NT 6.2; WOW64) AppleWebKit/535.24 "
        "(KHTML, like Gecko) Chrome/19.0.1055.1 Safari/535.24"
    ]
    # 可被选用的代理IP
    PROXY_http = [
        ‘153.180.102.104:80‘,
        ‘195.208.131.189:56055‘,
    ]
    PROXY_https = [
        ‘120.83.49.90:9000‘,
        ‘95.189.112.214:35508‘,
    ]
    def process_request(self, request, spider):
        #UA伪装
        request.headers[‘User-Agent‘] = random.choice(self.user_agent_list)
        print(request.headers[‘User-Agent‘])
        #为了验证代理ip 加的
        request.meta[‘proxy‘] = ‘http://121.33.220.158:808‘ #广东的一个代理ip
        return None

    def process_response(self, request, response, spider):
        return response

    def process_exception(self, request, exception, spider):
        #代理ip
        h = request.url.split(‘:‘)[0]  # 请求的协议头
        if h == ‘https‘:
            request.meta[‘proxy‘] = ‘https://‘+random.choice(self.PROXY_https)
        else:
            request.meta[‘proxy‘] = ‘http://‘ + random.choice(self.PROXY_http)
        return request
结果如下baidu.html: 如果有报错目标计算机连接报错,一般都是访问代理的问题。
#spiders/wangyi.py 爬虫文件
# -*- coding: utf-8 -*-
import scrapy
from selenium import webdriver
from ..items import WangyiproItem
#实现无可视化界面
from selenium.webdriver.chrome.options import Options

class WangyiSpider(scrapy.Spider):
    name = ‘wangyi‘
    # allowed_domains = [‘https://news.163.com/‘]
    start_urls = [‘https://news.163.com/‘]
    detail_urls = []
    def __init__(self):
        # 创建一个参数对象,用来控制chrome以无界面模式打开
        chrome_options = Options()
        chrome_options.add_argument(‘--headless‘)
        chrome_options.add_argument(‘--disable-gpu‘)
        # 实例化一个游览器对象
        self.driver = webdriver.Chrome(executable_path=r‘../chromedriver‘,chrome_options=chrome_options)

    #解析出网易新闻首页5大板块的详情页url
    def parse(self, response):
        li_list = response.xpath(‘//*[@id="index2016_wrap"]/div[1]/div[2]/div[2]/div[2]/div[2]/div/ul/li‘)
        a_list = [3,4,6,7,8]  #五大板块的列表索引
        for index in a_list:
            detail_url = li_list[index].xpath(‘./a/@href‘).extract_first()
            self.detail_urls.append(detail_url)

        for url in self.detail_urls: #对每一个板块的url进行请求发送
            yield scrapy.Request(url=url,callback=self.parse_detail) #回调函数

    def parse_detail(self,response):
        # print(response) #<200 http://news.163.com/uav/>
        div_list=response.xpath(‘/html/body/div/div[3]/div[2]/div[2]/div[1]/div[1]/div/ul/li/div/div‘)
        for div in div_list:
            title=div.xpath(‘.//div[@class="news_title"]/h3/a/text()‘).extract_first()
            new_detail_url=div.xpath(‘.//div[@class="news_title"]/h3/a/@href‘).extract_first()
            #封装到item中
            item = WangyiproItem()
            item[‘title‘] = title

            #对新闻的详情页发起url请求
            yield scrapy.Request(url=new_detail_url,callback=self.parse_detail_last,meta={‘item‘:item}) #请求传参

    def parse_detail_last(self,response):
        content=response.xpath(‘//*[@id="endText"]//text()‘).extract() #列表
        content = ‘‘.join(content)
        #接受参数meta
        item=response.meta[‘item‘]
        item[‘content‘] = content
        #提交到管道类存储
        yield item

    def closed(self,spider):
        #重写父类的方法关闭游览器,最后会执行一次
        self.driver.quit()
#下载中间件 位于引擎和下载器之间,用于拦截请求和响应
#middleware.py
# -*- coding: utf-8 -*-
# Define here the models for your spider middleware
#
# See documentation in:
# https://docs.scrapy.org/en/latest/topics/spider-middleware.html

from scrapy import signals
from time import sleep
from scrapy.http import HtmlResponse


class WangyiproDownloaderMiddleware(object):

    def process_request(self, request, spider):
        return None

    def process_response(self, request, response, spider):
        # Called with the response returned from the downloader.
        ‘‘‘
        :param request: 请求对象
        :param response:响应对象
        :param spider:爬虫对象<WangyiSpider ‘wangyi‘ at 0x52f8950>
        :return:
        ‘‘‘
        # Must either;
        # - return a Response object
        # - return a Request object
        # - or raise IgnoreRequest
        # print(request,response,spider)
        #拿到游览器对象
        driver = spider.driver
        #挑选出指定的响应对象进行篡改
        #通过url指定request、通过request指定response
        if request.url in spider.detail_urls:
            #五大板块的响应对象,针对定位到的这些response对象进行篡改
            #实例化一个新的响应对象(符合需求的:包含动态加载的新闻数据),替换原来旧的响应对象并返回
            #如何获取动态数据呢?
            driver.get(request.url)
            sleep(3)
            page_text = driver.page_source  #包含新闻的动态数据
            new_response=HtmlResponse(url=request.url,body=page_text,encoding=‘utf-8‘,request=request)

            return new_response
        else:
            #其他请求的响应对象(包括第一次请求)
            return response

    def process_exception(self, request, exception, spider):
        pass
#itme.py
import scrapy
class WangyiproItem(scrapy.Item):
    # define the fields for your item here like:
    # name = scrapy.Field()
    title = scrapy.Field()
    content = scrapy.Field()
#pipelines.py #管道,目前只是打印出来
class WangyiproPipeline(object):
    def process_item(self, item, spider):
        print(item)
        # print(‘新闻标题:‘,item[‘title‘])
        # print(‘内容:‘,item[‘content‘])
        return item
需求初步功能实现(上述代码的结果,可以根据需求在做修改),目的是发现中间件的作用,可以篡改响应对象(new_response=HtmlResponse(url=request.url,body=page_text,encoding=‘utf-8‘,request=request))
在通过scrapy框架进行某些网站数据爬取的时候,往往会碰到页面动态数据加载的情况发生,如果直接使用scrapy对其url发请求,是绝对获取不到那部分动态加载出来的数据值。但是通过观察我们会发现,通过浏览器进行url请求发送则会加载出对应的动态加载出的数据。那么如果我们想要在scrapy也获取动态加载出的数据,则必须使用selenium创建浏览器对象,然后通过该浏览器对象进行请求发送,获取动态加载的数据值。
需求:爬取网易新闻的国内板块下的新闻数据
需求分析:当点击国内超链进入国内对应的页面时,会发现当前页面展示的新闻数据是被动态加载出来的,如果直接通过程序对url进行请求,是获取不到动态加载出的新闻数据的。则就需要我们使用selenium实例化一个浏览器对象,在该对象中进行url的请求,获取动态加载的新闻数据。
当引擎将国内板块url对应的请求提交给下载器后,下载器进行网页数据的下载,然后将下载到的页面数据,封装到response中,提交给引擎,引擎将response在转交给Spiders。Spiders接受到的response对象中存储的页面数据里是没有动态加载的新闻数据的。要想获取动态加载的新闻数据,则需要在下载中间件中对下载器提交给引擎的response响应对象进行拦截,切对其内部存储的页面数据进行篡改,修改成携带了动态加载出的新闻数据,然后将被篡改的response对象最终交给Spiders进行解析操作。
重写爬虫文件的构造方法,在该方法中使用selenium实例化一个浏览器对象(因为浏览器对象只需要被实例化一次)
重写爬虫文件的closed(self,spider)方法,在其内部关闭浏览器对象。该方法是在爬虫结束时被调用
重写下载中间件的process_response方法,让该方法对响应对象进行拦截,并篡改response中存储的页面数据
在配置文件中开启下载中间件
crawlspider类:是Spider的一个子类
全栈数据爬取的方式
CrawlSpider的使用:
创建一个工程 scrapy startproject xxx
cd 目录
创建爬虫文件(CrawlSpider):
scrapy genspider -t crawl xxx www.xx.com
链接提取器:
LinkExtractor(allow=r‘Items/‘) #正则表达式
作用:根据指定的规则(allow)进行指定链接的提取。
规则解析器:
    rules = (
        Rule(link, callback=‘parse_item‘, follow=True),
        #follow=True,可以将链接提取器 继续作用到 链接提取器提取的链接 所对应的页面中,实现全站数据爬取
        # follow=False,提取的是页面显示的链接
    )
作用:将链接提取器提取到的链接进行指定规则(调用回调函数指定的 callback)解析
一个链接提取器对应的一个规则解析器
执行工程 scrapy crawl 文件
案例:爬取阳光热线网站
#spiders/sun.py
# -*- coding: utf-8 -*-
import scrapy
from scrapy.linkextractors import LinkExtractor
from scrapy.spiders import CrawlSpider, Rule
from ..items import SunproItem,DetailItem

class SunSpider(CrawlSpider):
    name = ‘sun‘
    # allowed_domains = [‘www.xx.com‘]
    start_urls = [‘http://wz.sun0769.com/political/index/politicsNewest?id=1&page=1‘]

    #链接提取器 根据指定的规则(allow=‘正则‘)进行指定链接的提取。
    link = LinkExtractor(allow=r‘id=1&page=\d+‘)
    detail_link = LinkExtractor(allow=r‘id=\d+‘) #详情页的url 规则

    #规则提取器。将链接提取器提取到的链接 进行制定规则callback的解析操作
    rules = (
        Rule(link, callback=‘parse_item‘, follow=False),
        #follow=True,可以将链接提取器 继续作用到 链接提取器提取的链接 所对应的页面中,实现全站数据爬取
        # follow=False,提取的是页面显示的链接
        Rule(detail_link,callback=‘parse_detail‘)
        #http://wz.sun0769.com/political/politics/index?id=449363
        #http://wz.sun0769.com/political/politics/index?id=449356
    )
    #下面两个方法不能请求传参!(因为没有手动发起请求)只能封装到两个item对象中
    def parse_detail(self, response):
        new_id = response.xpath(‘/html//div[3]/div[2]/div[2]/div[1]/span[4]/text()‘).extract_first()
        content = response.xpath(‘/html//div[3]/div[2]/div[2]/div[2]//text()‘).extract()
        content = ‘‘.join(content)
        # print(new_id,content)

        item = DetailItem()
        item[‘new_id‘] = new_id
        item[‘content‘] = content
        yield item
    def parse_item(self, response):
        # item = {}
        # return item
        #item[‘domain_id‘] = response.xpath(‘//input[@id="sid"]/@value‘).get()
        #item[‘name‘] = response.xpath(‘//div[@id="name"]‘).get()
        #item[‘description‘] = response.xpath(‘//div[@id="description"]‘).get()
        print(response)
        li_list = response.xpath(‘/html//div[2]/div[3]/ul[2]/li‘)
        for li in li_list:
            new_number=li.xpath(‘./span[1]/text()‘).extract_first()
            new_title = li.xpath(‘./span[3]/a/text()‘).extract_first()
            # print(new_num,new_title)

            item=SunproItem()
            item[‘new_number‘]=new_number
            item[‘new_title‘]=new_title

            yield item
#items.py
# -*- coding: utf-8 -*-

# Define here the models for your scraped items
#
# See documentation in:
# https://docs.scrapy.org/en/latest/topics/items.html

import scrapy


class SunproItem(scrapy.Item):
    # define the fields for your item here like:
    new_title = scrapy.Field()
    new_number = scrapy.Field()


class DetailItem(scrapy.Item):
    # define the fields for your item here like:

    new_id = scrapy.Field()
    content = scrapy.Field()
#pipelines.py
# -*- coding: utf-8 -*-
# Define your item pipelines here
#
# Don‘t forget to add your pipeline to the ITEM_PIPELINES setting
# See: https://docs.scrapy.org/en/latest/topics/item-pipeline.html


class SunproPipeline(object):
    def process_item(self, item, spider):
        print(item.__class__) #<class ‘sunPro.items.DetailItem‘>
        print(item.__class__.__name__)#DetailItem
        if item.__class__.__name__ == ‘DetailItem‘:
            print(item[‘new_id‘],item[‘content‘])

        else:
            print(item[‘new_number‘],item[‘new_title‘])  #需要入库的话根据new_id/new_number做条件判断进行插入数据

        return item
#setting.py
开启管道
ITEM_PIPELINES = {
   ‘sunPro.pipelines.SunproPipeline‘: 300,
}
概念:我们需要搭建一个分布式的机器(很多机器),让其对一组资源进行分布联合爬取
作用:提升爬取数据的效率
如何实现分布式?
安装一个scrapy-redis的组件
原生的scrapy不可以实现分布式爬虫,必须让scrapy结合这scrapy-redis组件一起实现分布式爬虫
为什么scrapy不能进行分布式爬虫?
scrapy-redis组件作用:
实现流程:
创建一个工程
创建一个基于CrawlSpider的爬虫文件
修改当前的CrawlSpider爬虫文件
修改settings(共享的管道)
#指定管道
ITEM_PIPELINES = {‘scrapy_redis.pipelines.RedisPipeline‘:400}
#指定调度器
#增加了一个去重容器类的配置,作用使用redis的set集合来存储请求的指纹数据,从而实现请求去重的持久化
DUPEFILTER_CLASS = ‘scrapy_redis.dupefilter.RFPDupeFilter‘
#使用scrapy-redis组件自己的调度器
SCHEDULER=‘scrapy_redis.scheduler.Scheduler‘
#配置调度器是否要持久化,也就是当爬虫结束了,要不要情况redis中的请求队列和去重指纹的set,如果是True,可以只爬取没有爬过的数据
#指定redis服务器  存储数据
REDIS_HOST = ‘192.116.13.36‘ #redis远程服务器的ip 测试的话用本机
REDIS_PORT = 6379
REDIS_ENCODING=‘utf-8‘
REDIS_PASSWORD={‘password‘:123456}
redis相关的操作配置(队列在redis中)
执行工程:(在pycharm中执行爬虫文件xx.py)
向调度器的队列中放入一个起始的url:
爬去到的数据存储在redis服务器端的proName:items这个数据结构中
redis中清空数据是 flushall
案例:
#spiders/fbs.py
# -*- coding: utf-8 -*-
import scrapy

from scrapy_redis.spiders import RedisCrawlSpider
from scrapy.linkextractors import LinkExtractor
from scrapy.spiders import  Rule

from fbsPro.items import FbsproItem

class FbsSpider(RedisCrawlSpider):
    name = ‘fbs‘
    # allowed_domains = [‘www.xx.com‘]
    # start_urls = [‘http://www.xx.com/‘]
    redis_key = ‘sun‘

    link = LinkExtractor(allow=r‘id=1&page=\d+‘)
    rules = (
        Rule(link, callback=‘parse_item‘, follow=True),
    )
    def parse_item(self, response):
        li_list = response.xpath(‘/html//div[2]/div[3]/ul[2]/li‘)
        for li in li_list:
            new_number=li.xpath(‘./span[1]/text()‘).extract_first()
            new_title = li.xpath(‘./span[3]/a/text()‘).extract_first()

            item=FbsproItem()
            item[‘new_number‘]=new_number
            item[‘new_title‘]=new_title

            yield item
end
概念:监测网站数据更新的情况,只会爬取网站最新更新出来的数据
分析:
案例:
#spiders/movie.py
# -*- coding: utf-8 -*-
import scrapy
from scrapy.linkextractors import LinkExtractor
from scrapy.spiders import CrawlSpider, Rule
from redis import Redis
from MoviePro.items import MovieproItem

class MovieSpider(CrawlSpider):
    name = ‘movie‘
    # allowed_domains = [‘www.xx.com‘]

    start_urls = [‘https://www.4567kan.com/frim/index1.html‘]
    link=LinkExtractor(allow=r‘/frim/index1-\d+\.html‘)
    rules = (
        Rule(link, callback=‘parse_item‘, follow=False),
    )
    #创建redis链接对象
    conn = Redis(host=‘127.0.0.1‘,port=6379) #默认是本机
    print(‘connect success!!‘)
    #拿到详情页的url
    def parse_item(self, response):
        li_list = response.xpath(‘/html/body/div[1]/div/div/div/div[2]/ul/li‘)
        for li in li_list:
            dertail_url = ‘https://www.4567kan.com‘+ li.xpath(‘./div/a/@href‘).extract_first()
            #将详情页的url存入redis的set数据结构中
            ex = self.conn.sadd(‘urls‘,dertail_url) #sadd urls detail_url
            if ex == 1: #意思是成功,没有重复的
                print(‘url没有被爬取过,正在爬取‘)
                yield scrapy.Request(url=dertail_url,callback=self.parse_detail)
            else:#有重复的意味着
                print(‘数据还没更新,暂无数据可爬取!‘)

    def parse_detail(self,response):
        item = MovieproItem()
        item[‘name‘]=response.xpath(‘/html//div[1]/div/div/div/div[2]/h1/text()‘).extract_first()
        yield item
#items.py
import scrapy
class MovieproItem(scrapy.Item):
    # define the fields for your item here like:
    name = scrapy.Field()
#pipelines.py
class MovieproPipeline(object):
def open_spider(self,spider): #开始执行一次
self.conn = spider.conn
def process_item(self, item, spider):
print(item[‘name‘])
dic={
‘name‘:item[‘name‘],
}
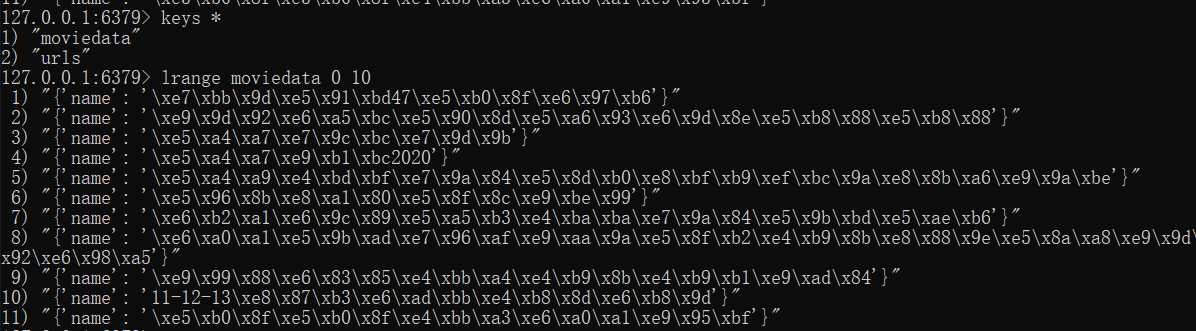
self.conn.lpush(‘moviedata‘,dic) #插入redis列表moviedata中
return item
#settings.py
#开启管道
ITEM_PIPELINES = {
   ‘MoviePro.pipelines.MovieproPipeline‘: 300,
}
执行爬虫文件 scrapy crawl movie
redis中的数据:
1.解析1
我们通过 yield 来发起一个请求,并通过 callback 参数为这个请求添加回调函数,在请求完成之后会将响应作为参数传递给回调函数。
scrapy框架会根据 yield 返回的实例类型来执行不同的操作:
a. 如果是 scrapy.Request 对象,scrapy框架会去获得该对象指向的链接并在请求完成后调用该对象的回调函数。
b. 如果是 scrapy.Item 对象,scrapy框架会将这个对象传递给 pipelines.py做进一步处理。
2.解析2
yield 的作用就是把一个函数变成一个生成器(generator),带有yield的函数不再是一个普通函数,Python解释器会将其视为一个generator,单独调用(如fab(5))不会执行fab函数,而是返回一个 iterable 对象!

在for循环执行时,每次循环都会执行fab函数内部的代码,执行到yield b时,fab函数就返回一个迭代值,下次迭代时,代码从 yield b 的下一条语句继续执行,而函数的本地变量看起来和上次中断执行前是完全一样的,于是函数继续执行,直到再次遇到 yield。参考实例如下:

复制代码
def fab(max):
   n, a, b = 0, 0, 1
   while n < max:
      # print b
      yield b
      # print b
      a, b = b, a + b
      n = n + 1
print(fab(5))  # 输出:<generator object fab at 0x00000000069D8A68>
for n in fab(5):
    print n    # 依次1,1,2,3,5
#对于含有yield的函数,外部要以迭代的方式调用,当函数执行结束时,generator 自动抛出 StopIteration 异常,表示迭代完成。
# 在 for 循环里,无需处理 StopIteration 异常,循环会正常结束。

def ff(max):
   a,b = 0,1
   yield max  # yield不在循环中,这里已经到函数最后所以直接返回,相当于return
for n in ff(5):
   print n    # 输出:5
复制代码
【结论】综上可知,yield要使用在循环中,这样生成器才有使用的意义。


2. 对scrapy中使用yield循环处理网页url的分析
首先,scrapy框架对含有yield关键字的parse()方法的调用是以迭代的方式进行的。相当于:
for n in parse(self, response):
pass
其次,python将parse()函数视为生成器,但首次调用才会开始执行代码,每次迭代请求(即上面的for循环)才会执行yield处的循环代码,生成每次迭代的值。如下方法:

复制代码
def parse(self, response):
    # 具体处理逻辑:如,分析页面,找到页面中符合规则的内容(校花图片),保存
    hxs = HtmlXPathSelector(response)  # 创建查询对象
    # 获取所有的url,继续访问,并在其中寻找相同的url
    all_urls = hxs.select(‘//a/@href‘).extract()
    for url in all_urls:
        if url.startswith(‘http://www.xiaohuar.com/list-1-‘):
            yield Request(url, callback=self.parse)  # 递归的找下去
            print(url)

# Scrapy框架开始执行spider,即是对parse()方法迭代的过程{for n in parse(self, response)},
# 首先程序会将第一个response对象分析提取需要的东西,然后提取该response中所有的urls进行循环处理
# 对urls循环处理过程中,首次执行到parse-for-yield处,会返回一个迭代值,即生成一个Request1 对象(其中定义了回调方法为parse);
# 此时,第一次迭代结束。
        # 第一次迭代过程中生成的Request1对象,即一个新的url请求,会返回一个新的response,然后框架会使用该response执行回调函数,进行另一个分支的迭代处理
# 分支迭代的程序处理完成,进行第二次迭代,会从yield的下一条语句开始,即print,然后继续执行for循环,最后执行到yield,又会生
# 成一个request2 对象,
        # 生成request2 对象,相当于又开始了一个新的分支,这个分支处理完后返回一个对象后开始回到主程序
# 接下来,开始第三次迭代,又从yield后面的print开始执行.....
# 最终,直到循环结束。
标签:mem with open 忽略 baidu 判断 false 速度 top enc
原文地址:https://www.cnblogs.com/hanfe1/p/12634646.html