标签:art 主从同步配置 partial 复制粘贴 ted 主服务器 res 从服务器 sse
一、实验环境二、搭建主从复制
1)两台服务器同时安装MySQL服务
说明:因为本人之前已经写过“CentOS-7.5 安装 社区版 MySQL-5.7”这样的博文,所以在此就不在做重复性动作了;两台虚拟机安装MySQL服务的操作是一摸一样的,直接复制粘贴即可
博文链接为:https://blog.51cto.com/14783377/2485030
2)修改两台MySQL的配置文件
master端如下: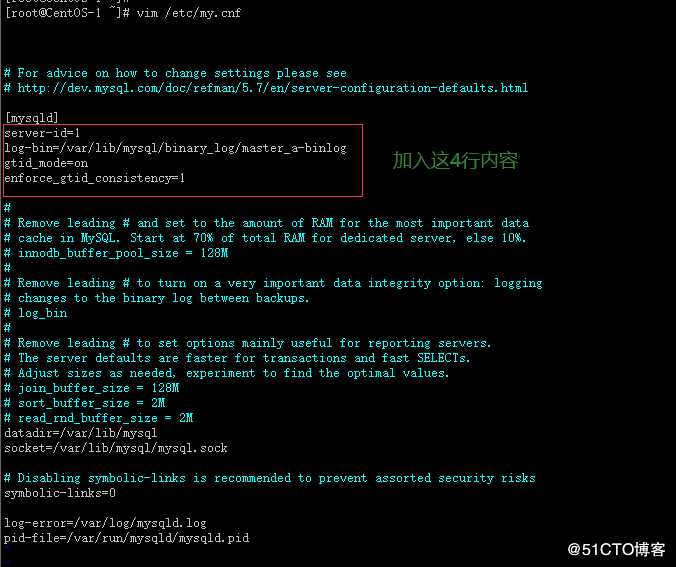
slave端如下: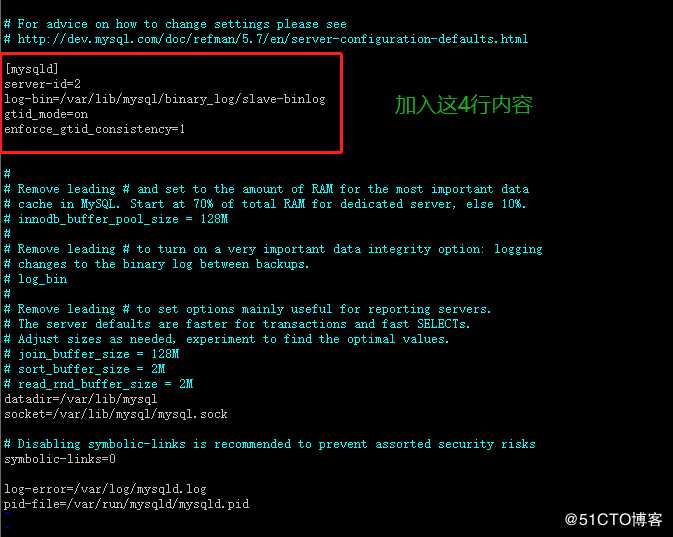
切记:修改完配置文件以后,都要重启MySQL服务使配置生效
3)mysql主服务器初始化以后的第一次全备
[root@CentOS-1 ~]#
[root@CentOS-1 ~]# mysqldump -uroot -p‘Mysql.2020‘ --all-databases --single-transaction > /tmp/mysql_all.sql #数据库第一次全量备份
mysqldump: [Warning] Using a password on the command line interface can be insecure.
Warning: A partial dump from a server that has GTIDs will by default include the GTIDs of all transactions, even those that changed suppressed parts of the database. If you don‘t want to restore GTIDs, pass --set-gtid-purged=OFF. To make a complete dump, pass --all-databases --triggers --routines --events.
[root@CentOS-1 ~]#
[root@CentOS-1 ~]#
[root@CentOS-1 ~]# ll /tmp | grep ‘mysql*‘
4)将mysql主服务器的第一次全备拷贝到从服务器
[root@CentOS-1 ~]#
[root@CentOS-1 ~]# scp /tmp/mysql_all.sql root@192.168.218.136:/tmp/ #将数据库的全备文件从主服务器拷贝到从服务器
在从服务器端进行查看:
[root@CentOS-2 ~]#
[root@CentOS-2 ~]# ll /tmp | grep ‘mysql*‘
5)在从服务器端进行全备恢复
[root@CentOS-2 ~]#
[root@CentOS-2 ~]# mysql -uroot -p‘Mysql.2020‘ < /tmp/mysql_all.sql
mysql: [Warning] Using a password on the command line interface can be insecure.
[root@CentOS-2 ~]#
此时,master端和slave端数据处于一致状态
6)主服务器对从服务器的授权
主服务器端执行:
[root@CentOS-1 ~]#
[root@CentOS-1 ~]# mysql -uroot -p‘Mysql.2020’
mysql>
mysql> grant replication slave on . to repluser@192.168.218.136 identified by ‘Mysql.2019‘; #授权repluser账户可以通过从服务器192.168.218.136来复制主服务器的所有库和所有表
Query OK, 0 rows affected, 1 warning (0.00 sec)
mysql>
mysql> flush privileges; #刷新权限
Query OK, 0 rows affected (0.00 sec)
mysql> 
从服务器端执行:
[root@CentOS-2 ~]#
[root@CentOS-2 ~]# mysql -uroot -p‘Mysql.2020‘
mysql>
mysql> change master to master_host=‘192.168.218.128‘,master_user=‘repluser‘,master_password=‘Mysql.2019‘,master_auto_position=1;
Query OK, 0 rows affected, 2 warnings (0.11 sec)
mysql>
mysql> start slave;
Query OK, 0 rows affected (0.01 sec)
mysql>
mysql> show slave status\G #查看slave状态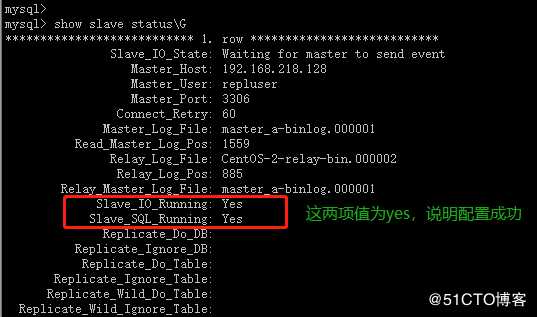
三、验证主从同步是否成功
思路:如果在master端插入或者删除SQL语句,在slave端能出现一样效果的话,就说嘛主从同步配置成功
1)在验证前,先对比master和slave数据是否一致
master服务器端执行:
[root@CentOS-1 ~]#
[root@CentOS-1 ~]# mysql -uroot -p‘Mysql.2020‘ #登录master
mysql>
mysql> show databases;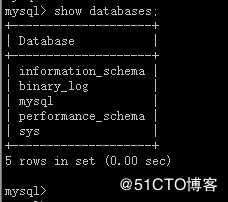
slave服务器端执行:
[root@CentOS-2 ~]#
[root@CentOS-2 ~]# mysql -uroot -p‘Mysql.2020‘ #登录slave
mysql>
mysql> show databases;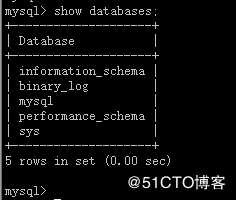
对比结果:验证前的master和slave两端数据一致
2)在master端创建数据库并插入数据
mysql>
mysql> create database db_1;
Query OK, 1 row affected (0.00 sec)
mysql>
mysql> use db_1;
Database changed
mysql>
mysql> create table Student(
-> Sid varchar(10),
-> Sname nvarchar(10),
-> Sage datetime,
-> Ssex nvarchar(10)
-> );
Query OK, 0 rows affected (0.13 sec)
mysql>
mysql> desc Student;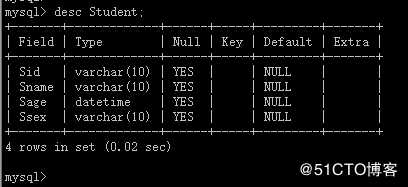
mysql>
mysql>
mysql> insert into Student values(‘01‘,‘张磊‘,‘1995-02-08‘,‘男‘);
Query OK, 1 row affected (0.01 sec)
mysql>
mysql> insert into Student values(‘02‘,‘李华‘,‘1995-06-11‘,‘男‘);
Query OK, 1 row affected (0.00 sec)
mysql>
mysql> insert into Student values(‘03‘,‘王青‘,‘1996-01-06‘,‘男‘);
Query OK, 1 row affected (0.01 sec)
mysql>
mysql> select * from Student;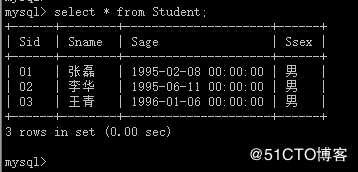
3)去slave端查看是否存在master中插入的数据
[root@CentOS-2 ~]#
[root@CentOS-2 ~]# mysql -uroot -p‘Mysql.2020‘
mysql>
mysql> show databases;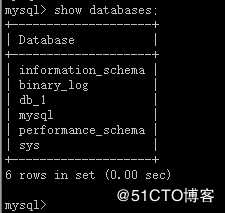
mysql> use db_1;
Reading table information for completion of table and column names
You can turn off this feature to get a quicker startup with -A
Database changed
mysql>
mysql> show tables;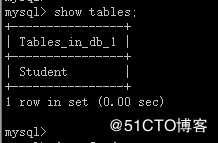
mysql>
mysql> desc Student;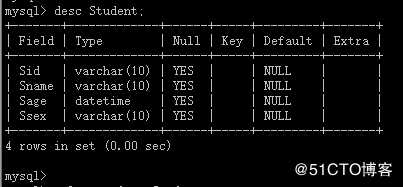
mysql>
mysql> select * from Student;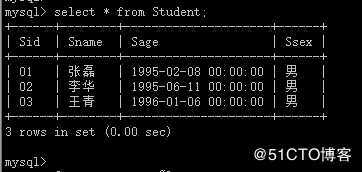
4)在master端删除数据
mysql>
mysql> drop database db_1;
Query OK, 1 row affected (0.01 sec)
mysql>
mysql> show databases;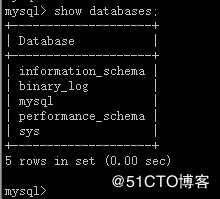
5)去slave端查看db_1数据库是否还存在
mysql>
mysql> show databases;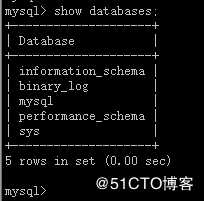
结论:经验证得出,MySQL-5.7主从同步搭建成功
标签:art 主从同步配置 partial 复制粘贴 ted 主服务器 res 从服务器 sse
原文地址:https://blog.51cto.com/14783377/2485053