标签:需求 hand false body time erro cto 内容 getpass
一、需求描述: 系统中,如果有一些数据发生异常的情况需要及时处理掉。比如: 跟其他系统对接时候发生异常!
二、思路: 利用切面捕获到某些特定业务接口产生的异常信息,然后 发送到MQ中,MQ获取到异常信息,发送到接收异常报告的邮箱。
末尾有Github地址~
代码部分 :
三、自定义异常日志的注解
主要作用是: 方便只对加上注解的特定业务接口起作用,其他地方不用。
/**
 * 自定义异常日志的注解
 * @author 600336
 */
@Documented

@Retention(RetentionPolicy.RUNTIME)
@Target({ElementType.PARAMETER, ElementType.METHOD})
public @interface ExceptionLogAnnotation {
    /**
     * 操作类型
     * @return
     */
    String operationType() default "";
    /**
     * 操作名称
     */
      String operationName() default "";
}
四、异常的切面
@Aspect
@Component
public class ExceptionLogAspect {

    private static final Logger logger = LoggerFactory.getLogger(ExceptionLogAspect.class);

    @Autowired
    ExceptionLogSender exceptionLogSender;

    /**
     * 这里切点是web包 并且加了自定义注解(ExceptionLogAnnotation)
     */
    @Pointcut("execution(public * czs.web..*(..)) && @annotation(czs.annotation.ExceptionLogAnnotation)")
    public void exceptionLog() {
    }

    @AfterThrowing(pointcut = "exceptionLog()", throwing = "e")
    public void handleThrowing(JoinPoint joinPoint, Exception e) {
        String className = joinPoint.getTarget().getClass().getName();
        String methodName = joinPoint.getSignature().getName();
        Object[] args = joinPoint.getArgs();
        logger.error("ExceptionLogAspect切面获取到异常:" + e.getMessage(), e);

        //开始打log
        //logger.error("异常:" + e.getMessage());
        //logger.error("异常所在类:" + className);
        // logger.error("异常所在方法:" + methodName);
        //logger.error("异常中的参数:");
        //logger.error(methodName);

        Class targetClass = null;
        String operationType = "";
        String operationName = "";
        Method[] methods = null;
        try {
            targetClass = Class.forName(className);
            methods = targetClass.getMethods();
        } catch (ClassNotFoundException e2) {
            e.printStackTrace();
        }
        if (methods != null) {
            for (Method method : methods) {
                if (method.getName().equals(methodName)) {
                    Class[] clazzs = method.getParameterTypes();
                    if (clazzs != null && clazzs.length == args.length &&
                            method.getAnnotation(ExceptionLogAnnotation.class) != null) {
                        operationName = method.getAnnotation(ExceptionLogAnnotation.class).operationName();
                        operationType = method.getAnnotation(ExceptionLogAnnotation.class).operationType();
                        break;
                    }
                }
            }
        }

        logger.info("operationName :" + operationName);
        logger.info("operationType :" + operationType);

        //异常收集的StringBuffer
        StringBuffer execBuff = new StringBuffer();
        //异常的具体信息
        String exceTrace = ExceptionUtils.getTrace(e);
        //拼接信息
        execBuff.append("[切面捕获异常信息]").append("<br/>")
                .append("异常:").append(e.getMessage()).append("<br/>")
                .append("异常所在类:").append(className).append("<br/>")
                .append("异常所在方法:").append(methodName).append("<br/>")
                .append("异常中的参数:").append(JSONObject.toJSONString(args)).append("<br/>")
                .append("操作类型:").append(operationType).append("<br/>")
                .append("操作名称:").append(operationName).append("<br/>")
                .append("具体异常信息如下:").append("<br/>")
                .append(exceTrace)
        ;

        //发消息
        exceptionLogSender.send(execBuff.toString());

    }


    /**
     * @param joinPoint
     * @throws Throwable
     */
    @Before("exceptionLog()")
    public void doBefore(JoinPoint joinPoint) throws Throwable {
        // 接收到请求,记录请求内容
        ServletRequestAttributes attributes = (ServletRequestAttributes) RequestContextHolder.getRequestAttributes();
        HttpServletRequest request = attributes.getRequest();         // 记录下请求内容
        logger.info("开始记录请求数据-------->>>>> ");
        logger.info("URL : " + request.getRequestURL().toString());
        logger.info("HTTP_METHOD : " + request.getMethod());
        logger.info("IP : " + request.getRemoteAddr());
        logger.info("CLASS_METHOD : " + joinPoint.getSignature().getDeclaringTypeName() + "." + joinPoint.getSignature().getName());
        logger.info("ARGS : " + Arrays.toString(joinPoint.getArgs()));
    }

}
根据异常T获取异常信息的工具类ExceptionUtils方法:
    /**
     * 获取异常的信息
     *
     * @param t
     * @return
     */
    public static String getTrace(Throwable t) {
        StringWriter stringWriter = new StringWriter();
        PrintWriter writer = new PrintWriter(stringWriter);
        t.printStackTrace(writer);
        StringBuffer buffer = stringWriter.getBuffer();
        return buffer.toString();
    }
六、rabbitmq配置、生产者和消费者
@Configuration
public class RabbitConfig {

    /*异常日志的队列*/
    @Bean
    public Queue exceptionLogQueue() {
        return new Queue("exception.log");
    }
}
/**
 * 单生产者-单消费者
 * 异常日志信息-生产者
 */
@Component
public class ExceptionLogSender {

    private static final Logger log = LoggerFactory.getLogger(ExceptionLogSender.class);
    @Autowired
    public AmqpTemplate amqpTemplate;

    public void send(String info) {
        log.info("生产者 发送异常日志信息:" + info);
        this.amqpTemplate.convertAndSend("exception.log", info);
    }


}
/**
 * 单生产者-单消费者
 * 异常日志信息-消费
 */
@Component
public class ExceptionLogReceiver {
    private static final Logger log = LoggerFactory.getLogger(ExceptionLogReceiver.class);
    @Autowired
    public AmqpTemplate amqpTemplate;

    //监听器监听指定的Queue
    @RabbitListener(queues = "exception.log")
    public void process(String info) {
        log.info("消费者 收到异常日志信息:" + info);
        //发送邮件
        try {
            SendMailUtil.sendMail("系统异常日志信息报告", info);
        } catch (Exception e) {
            log.error("发送异常日志信息邮件失败!",e);
        }
    }
}
七、发送邮件工具类
public class SendMailUtil {

    /**
     * 发送邮件
     *
     * @param subject 主题
     * @param content 内容
     * @throws Exception 这里可以try catch一下异常~
     */
    public static void sendMail(String subject, String content) throws Exception {

        Properties props = new Properties();
        props.put("mail.smtp.auth", "true");
        props.put("mail.smtp.host", "smtp.exmail.qq.com");  //腾讯企业邮箱的smtp服务器
        props.put("mail.smtp.port", "465");
        props.put("mail.smtp.ssl.enable", "true");


        String from = "xxx1@qq.com";    // 发送方地址
        String to = "xxx2@qq.com";      // 收件方地址
        String username = "xxx1@qq.com";  //邮箱名称
        String password = "mima";       //邮箱密码

        List<String> recipients = Arrays.asList(to);

        //认证
        Authenticator smtpAuth = new PopupAuthenticator(from, password);
        Session session = Session.getDefaultInstance(props, smtpAuth);

        //上线关闭debug
        session.setDebug(true);
        //session.setDebug(false);
        MimeMessage message = new MimeMessage(session);
        message.setFrom(new InternetAddress(from));

        //多个收件人
        int num = recipients.size();
        InternetAddress[] rece_addresses = new InternetAddress[recipients.size()];
        for (int i = 0; i < num; i++) {
            rece_addresses[i] = new InternetAddress(recipients.get(i));
        }
        message.setRecipients(Message.RecipientType.TO, rece_addresses);

        message.setContent(content, "text/html; charset=utf-8");
        message.setSubject(subject);
        message.saveChanges();

        Transport transport = session.getTransport("smtp");
        transport.connect("smtp.exmail.qq.com", username, password);
        transport.sendMessage(message, message.getAllRecipients());
        transport.close();
    }


    public static void main(String[] args) throws Exception {
        sendMail("主题测试的", "hello");
    }
}


class PopupAuthenticator extends Authenticator {
    String username = null;
    String password = null;

    public PopupAuthenticator() {
    }

    public PopupAuthenticator(String username, String password) {
        this.username = username;
        this.password = password;
    }

    PasswordAuthentication performCheck(String user, String pass) {
        username = user;
        password = pass;
        return getPasswordAuthentication();
    }

    @Override
    protected PasswordAuthentication getPasswordAuthentication() {
        return new PasswordAuthentication(username, password);
    }

}
八、测试接口( 项目名称我这里取rabbitmq,端口8888 )
@Controller
@RequestMapping("/exception")
public class ExceptionController {

    /**
     * 测试地址:http://localhost:8888/rabbitmq/exception/test/10
     * 测试地址:http://localhost:8888/rabbitmq/exception/test/0
     * ***这里加了注解ExceptionLogAnnotation
     *
     * @param id
     * @return
     */
    @RequestMapping(value = "/test/{id}", method = RequestMethod.GET)
    @ResponseBody
    @ExceptionLogAnnotation(operationType = "测试操作", operationName = "测试异常或者测试返回")
    public JSONObject test(@PathVariable Integer id) {
        JSONObject result = new JSONObject();
        result.put("success", "true");
        result.put("test", "test");
        //id可以传0 测试异常
        int aa = 10 / id;
        return result;
    }


    /**
     * 测试地址:http://localhost:8888/rabbitmq/exception/test2/10
     * 测试地址:http://localhost:8888/rabbitmq/exception/test2/0
     * ***这里不加注解ExceptionLogAnnotation
     *
     * @param id
     * @return
     */
    @RequestMapping(value = "/test2/{id}", method = RequestMethod.GET)
    @ResponseBody
    public JSONObject test2(@PathVariable Integer id) {

        JSONObject result = new JSONObject();
        result.put("success", "true");
        result.put("test2", "test2");
        //id可以传0 测试异常
        int aa = 10 / id;
        return result;
    }

}
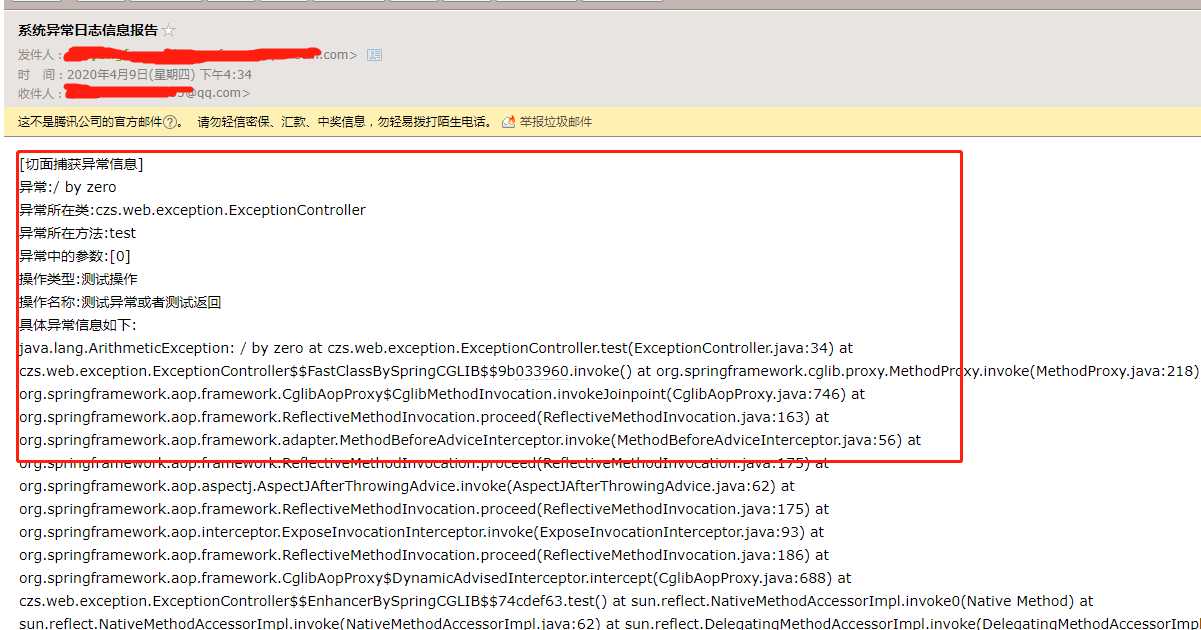
九、效果
请求 http://localhost:8888/rabbitmq/exception/test/0 这个链接会发邮件给邮箱;
其他的三个链接不会发邮件。
十、总结
1.rabbitmq需要自己装一下
2.有想法就行动
3.多参考资料
4.github地址: https://github.com/ColoZhu/springbootRabbitmqMail.git
springboot+rabbitMQ+Aspect发送特定业务的异常报告邮件
标签:需求 hand false body time erro cto 内容 getpass
原文地址:https://www.cnblogs.com/coloz/p/12668098.html