标签:ns3 服务 测试 x86_64 配置文件 email 自启动 实验环境 情况下
实验环境两台CentOS-7.5虚拟机
web1:10.0.11.203
web2:10.0.11.204
VIP :10.0.11.210
web类型:nginx
客户端:自用笔记本(win10)
nginx状态检测脚本:ck_nginx.sh
实验一、使用keepalived简单实现web集群的高可用功能
1、准备两台web服务器
1)web1网卡情况
[root@CentOS ~]#
[root@CentOS ~]# ip a
2)web2网卡情况
[root@CentOS-2 ~]#
[root@CentOS-2 ~]# ip a
3)安装nginx
web1端:
[root@CentOS ~]#
[root@CentOS ~]# yum install nginx
[root@CentOS ~]# rpm -qa nginx
nginx-1.16.1-1.el7.x86_64
[root@CentOS ~]#
[root@CentOS ~]#
[root@CentOS ~]# > /usr/share/nginx/html/index.html #清空默认网页
[root@CentOS ~]# echo web1 > /usr/share/nginx/html/index.html #让网页显示web1
[root@CentOS ~]# cat /usr/share/nginx/html/index.html
web1
[root@CentOS ~]#
[root@CentOS ~]# systemctl start nginx #启动nginx
[root@CentOS ~]# systemctl enable nginx #设置nginx开机自启动
C:\Users\Administrator>curl 10.0.11.203
web2端:
[root@CentOS-2 ~]#
[root@CentOS-2 ~]# yum install nginx
[root@CentOS-2 ~]# rpm -qa nginx
nginx-1.16.1-1.el7.x86_64
[root@CentOS-2 ~]#
[root@CentOS-2 ~]#
[root@CentOS-2 ~]# > /usr/share/nginx/html/index.html
[root@CentOS-2 ~]# echo web2 > /usr/share/nginx/html/index.html
[root@CentOS-2 ~]# cat /usr/share/nginx/html/index.html
web2
[root@CentOS-2 ~]#
[root@CentOS-2 ~]# systemctl start nginx
[root@CentOS-2 ~]# systemctl enable nginx
C:\Users\Administrator>curl 10.0.11.204
4)安装keepalived
说明:两台web服务器都需要安装keepalived服务
web1端:
[root@CentOS ~]#
[root@CentOS ~]# yum install keepalived
[root@CentOS ~]# rpm -qa keepalived
keepalived-1.3.5-16.el7.x86_64
[root@CentOS ~]#
web2端:
[root@CentOS-2 ~]#
[root@CentOS-2 ~]# yum install keepalived
[root@CentOS-2 ~]# rpm -qa keepalived
keepalived-1.3.5-16.el7.x86_64
[root@CentOS-2 ~]#
5)配置两台keepalived并启动
web1端:
[root@CentOS ~]#
[root@CentOS ~]# > /etc/keepalived/keepalived.conf #清空原来的配置
[root@CentOS ~]# vim /etc/keepalived/keepalived.conf #编辑配置文件,自定义keepalived配置文件
[root@CentOS ~]# cat /etc/keepalived/keepalived.conf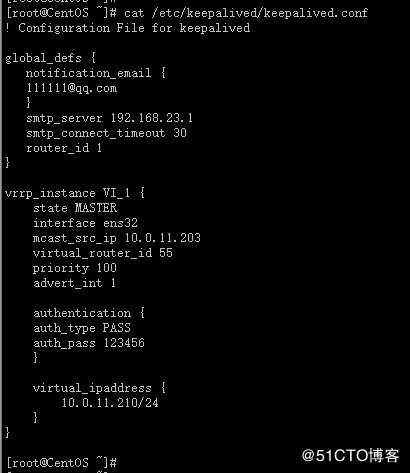
[root@CentOS ~]#
[root@CentOS ~]# systemctl start keepalived #启动
[root@CentOS ~]# systemctl enable keepalived #设置开机启动
web2端:
[root@CentOS-2 ~]#
[root@CentOS-2 ~]# > /etc/keepalived/keepalived.conf
[root@CentOS-2 ~]# vim /etc/keepalived/keepalived.conf
[root@CentOS-2 ~]# cat /etc/keepalived/keepalived.conf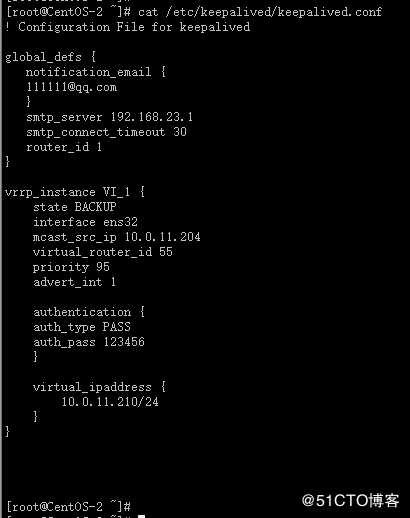
[root@CentOS-2 ~]#
[root@CentOS-2 ~]# systemctl start keepalived #启动
[root@CentOS-2 ~]# systemctl enable keepalived #设置开机启动
3、测试访问
方法:用客户端通过VIP测试访问web
C:\Users\Administrator>curl 10.0.11.210 #个人笔记本通过VIP测试访问web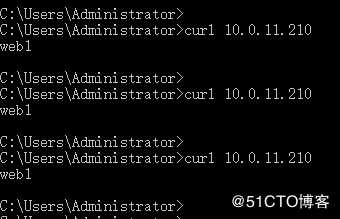
拔掉web1服务器的网线,用客户端通过VIP测试访问web:
C:\Users\Administrator>curl 10.0.11.210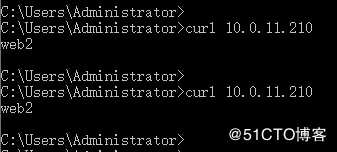
再次将web1服务器的网线接好,用客户端通过VIP测试访问web:
C:\Users\Administrator>curl 10.0.11.210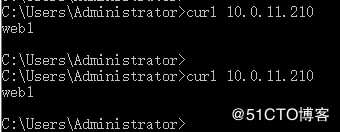
4、实验一结论:
1)利用keepalived成功实现了web服务器集群的高可用
2)虽然可以实现在服务器发生异常高故障的情况下web的高可用,但是遗憾的是此时无法实现针对web服务异常故障所引发的主备高可用切换;因为keepalived无法感知nginx服务的运行状态和健康状态。
实验二、使用keepalived结合nginx监控检测脚本实现更加灵活的高可用集群功能
实验环境:基于实验一的环境,以实验一的环境为基础进行
与实验一的唯一区别:需要准备nginx的健康状态检测脚本
1、编写nginx的健康检测脚本
web1端执行:
[root@CentOS ~]#
[root@CentOS ~]# vim /etc/keepalived/ck_nginx.sh #编写keepalived检测nginx健康状态的脚本
#!/bin/bash
#检查ngin进程是否存在
counter=$(ps -C nginx --no-heading|wc -l)
if [ "${counter}"="0" ]; then
#尝试启动一次ngnx,停止5秒后再次检测
systemctl start nginx
sleep 5
counter=$(ps -C nginx --no-heading|wc -l)
if [ "${counter}"="0" ]; then
#如果启动没成功,就杀掉keepave触发主备切换
systemctl stop nginx
fi
fi
[root@CentOS ~]#
[root@CentOS ~]# cat /etc/keepalived/ck_nginx.sh #查看脚本内容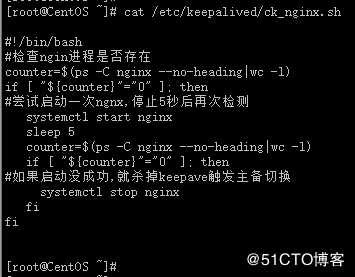
[root@CentOS ~]#
[root@CentOS ~]# chmod +x /etc/keepalived/ck_nginx.sh #授予脚本可执行权限
[root@CentOS ~]#
web2端执行:
[root@CentOS-2 ~]#
[root@CentOS-2 ~]# vim /etc/keepalived/ck_nginx.sh
#!/bin/bash
#检查ngin进程是否存在
counter=$(ps -C nginx --no-heading|wc -l)
if [ "${counter}"="0" ]; then
#尝试启动一次ngnx,停止5秒后再次检测
systemctl start nginx
sleep 5
counter=$(ps -C nginx --no-heading|wc -l)
if [ "${counter}"="0" ]; then
#如果启动没成功,就杀掉keepave触发主备切换
systemctl stop nginx
fi
fi
[root@CentOS-2 ~]#
[root@CentOS-2 ~]#
[root@CentOS-2 ~]# cat /etc/keepalived/ck_nginx.sh 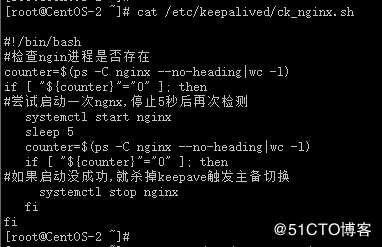
[root@CentOS-2 ~]#
[root@CentOS-2 ~]# chmod +x /etc/keepalived/ck_nginx.sh
[root@CentOS-2 ~]#
2、编辑修改nginx的配置文件
web1端:
[root@CentOS ~]#
[root@CentOS ~]# vim /etc/keepalived/keepalived.conf #自定义配置文件
! Configuration File for keepalived
global_defs {
notification_email {br/>111111@qq.com
}
smtp_server 192.168.23.1
smtp_connect_timeout 30
router_id 1
}
vrrp_script chk_nginx {
script "/etc/keepalived/ck_nginx.sh"
interval 2
weight -5
fail 3
}
vrrp_instance VI_1 {
state MASTER
interface ens32
mcast_src_ip 10.0.11.203
virtual_router_id 55
priority 100
advert_int 1
authentication {
auth_type PASS
auth_pass 123456
}

virtual_ipaddress {
    10.0.11.210/24
}

track_script {
     chk_nginx
}
}
[root@CentOS ~]#
[root@CentOS ~]# systemctl restart keepalived #重启keepalived使配置生效
[root@CentOS ~]#
web2端:
[root@CentOS-2 ~]#
[root@CentOS-2 ~]# vim /etc/keepalived/keepalived.conf #自定义配置文件
! Configuration File for keepalived
global_defs {
notification_email {br/>111111@qq.com
}
smtp_server 192.168.23.1
smtp_connect_timeout 30
router_id 1
}
vrrp_script chk_nginx {
script "/etc/keepalived/ck_nginx.sh"
interval 2
weight -5
fail 3
}
vrrp_instance VI_1 {
state MASTER
interface ens32
mcast_src_ip 10.0.11.204
virtual_router_id 55
priority 95
advert_int 1
authentication {
auth_type PASS
auth_pass 123456
}

virtual_ipaddress {
    10.0.11.210/24
}

track_script {
     chk_nginx
}
}
[root@CentOS-2 ~]#
[root@CentOS-2 ~]#
[root@CentOS-2 ~]# systemctl restart keepalived #重启keepalived使配置生效
测试keepalived功能:
由于脚本内容里边,nginx服务在停止以后会立马自启动,所以我们模拟服务器异常关闭导致nginx服务没有办法实现自启动
[root@CentOS ~]#
[root@CentOS ~]# init 0 #关闭web1服务器
[root@CentOS-2 ~]#
[root@CentOS-2 ~]# ping 10.0.11.203 #用web2去pingweb1,发现web1已经被关闭
此时使用客户端去测试验证keepalived功能:
C:\Users\Administrator>curl 10.0.11.210 #用客户端通过VIP去访问web服务器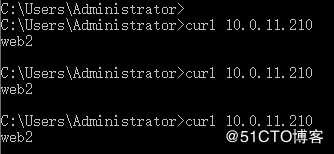
3、实验二结论
使用keepalived服务结合nginx健康状态检测脚本成功实现了对web服务器集群的高可用
keepalived结合nginx状态检测脚本实现对web服务器集群的高可用
标签:ns3 服务 测试 x86_64 配置文件 email 自启动 实验环境 情况下
原文地址:https://blog.51cto.com/14783377/2486411