标签:drawrect reg tin 影响 cmd nsf inpu 重复 removing
前面几章介绍了处理适量适中的图形内容的最佳方法。通过使用几何图形、图画和路径,可以降低2D图形的开销。即使正在使用复杂的具有分层效果的组合形状和渐变画刷,这种方法也仍然能够正常得很好。
然而,这样设计不适合需要渲染大量图形元素的绘图密集型应用程序。例如绘图程序、演示粒子碰撞的物理模型程序或横向卷轴形式的游戏。这些应用程序面临的不是图形复杂程度的问题,而纯粹是单独的图形元素数量的问题。即使使用量级更轻的Geometry对象代替Path元素,需要的开销也仍会较大地影响应用程序的性能。
WPF针对此类问题的解决方案是,使用低级的可视化层(visual layer)模型。基本思想是将每个图形元素定义为一个Visual对象,Visual对象是极轻易级的要素,比Geometry对象或Path对象需要的开销小。然后可使用单个元素在窗口中渲染所有可视化对象。
一、绘制可视化对象
Visual类是抽象类,所以不能创建该类的实例。相反,需要使用继承自Visual类的某个类,包括UIElement类(该类是WPF元素模型的根)、Viewport3DVisual类(通过该类可显示3D内容)以及ContainerVisual类(包含其他可视化对象的基本容器)。但最有用的派生类是DrawingVisual类,该类继承自ContainerVisual,并添加了支持“绘制”希望放置到可视化对象中的图形内容的功能。
为使用DrawingVisual类绘制内容,需要调用DrawingVisual.RederOpen()方法。该方法返回一个可用于定义可视化内容的DrawingContext对象。绘制完毕后,需要调用DrawingContext.Close()方法。下面是绘制图形的完整过程:
DrawingVisual visual=new DrawingVisual();
DrawingContext dc=visual.RenderOpen();

//(perform drawing here.)

dc.Close();
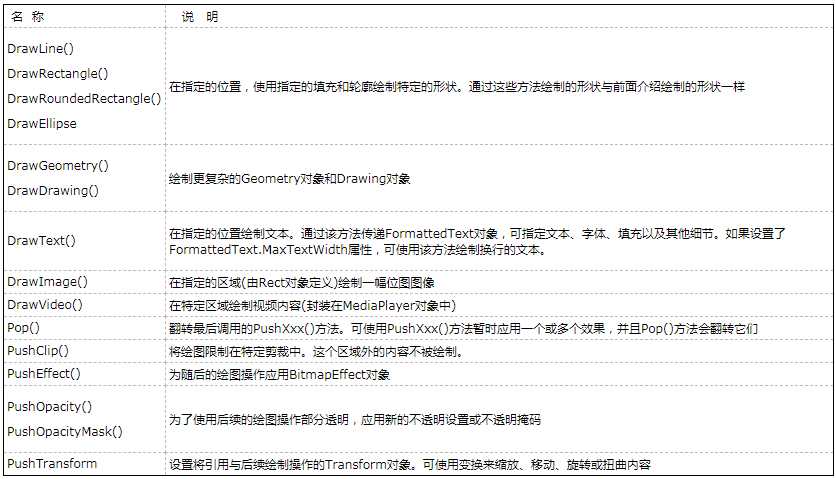
在本质上,DrawingContext类由各种为可视化对象增加了一些图形细节的方法构成。可调用这些方法来绘制各种图形、应用变换以及改变不透明度等。下表列出了DrawingContext类的方法。

下面的示例创建了一个可视化对象,该可视化对象包含没有填充的基本的黑色三角形:
DrawingVisual visual=new DrawingVisual();
using(DrawingContext dc=visual.RenderOpen())
{
    Pen drawingPen=new Pen(Color.Black,3);
    dc.DrawLine(drawingPen,new Point(0,50),new Point(50,0));
    dc.DrawLine(drawingPen,new Point(50,0),new Point(100,50));
    dc.DrawLine(drawingPen,new Point(0,50),new Point(100,50));
}
当调用DrawingContext方法,没有实际绘制可视化对象——而只是定义了可视化外观。当通过调用Close()方法结束绘制时,完成的图画被存储在可视化对象中,并通过只读的DrawingVisual.Drawing属性提供这些图画。WPF会保存Drawing对象,从而当需要时可以重新绘制窗口。
绘图代码的顺序很重要。后面的绘图操作可在已经存在的图形上绘制内容。PushXxx()方法应用的设置会被应用到后续的绘图操作中。例如,可使用PushOpacity()方法改变不透明级别,该设置会影响所有的后续绘图操作。可使用Pop()方法恢复最佳的PushXxx()方法。如果多次调用PushXxx()方法,可一次使用一系列Pop()方法调用关闭它们。
一旦关闭DrawingContext对象,就不能再修改可视化对象。但可以使用DrawingVisual类的Transform和Opacity属性应用变换或改变整个可视化对象的透明度。如果希望提供全新的内容,可以再次调用RenderOpen()方法并重复绘制过程。
二、在元素中封装可视化对象
在可视化层中编写程序时,最重要的一步是定义可视化对象,但为了在屏幕上实际显示可视内容,这还不够。为显示可视化对象,还需要借助于功能完备的WPF元素,WPF元素将可视化对象添加到可视化树中。乍一看,这好像降低了可视化层变成的优点——毕竟,避免使用元素并避免它们的巨大开销不正是使用可视化层的全部目的吗?然而,单个元素具有显示任意数量可视化对象的能力。因此,可以很容易地创建只包含一两个元素,但却驻留了几千个可视化对象的窗口。
为在元素中驻留可视化对象,需要执行一下任务:
当重写VisualChildrenCount属性和GetVisualChild()方法时,本质上时劫持了那个元素。如果使用的是能够包含嵌套的内容控件、装饰元素或面板,这些元素将不再被渲染。例如,如果在自定义窗口中重写了这两个方法,就看不到窗口的其他内容。只会看到添加的可视化对象。
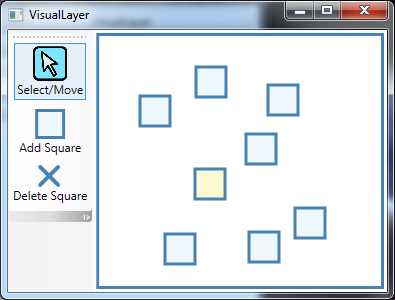
因此,通常创建专用的自定义类来封装希望显示的可视化对象。例如,分析下图显示的窗口。该窗口允许用户为自定义的Canvas面板添加正方形(每个正方形是可视化对象).

在上图中,窗口的左边是具有三个RadioButton对象的工具栏。通过使用一组RadioButton对象,科室创建一套相互关联的按钮。当单击这套按钮中的某个按钮时,该按钮会被选中,并保持“按下”状态,而原来选择的按钮会恢复成正常的外观。
在上图中,窗口的右边为自定义的名为DrawingCanvas的Canvas面板,该面板在内部存储了可视化对象的集合。DrawingCanvas面板返回保存在VisualChildrenCount属性的正方形总数量,并使用GetVisualChild()方法提供对集合中每个可视化对象的访问。下面是实现细节:
 public class DrawingCanvas:Panel
    {
        private List<Visual> visuals = new List<Visual>();

        protected override Visual GetVisualChild(int index)
        {
            return visuals[index];
        }
        protected override int VisualChildrenCount
        {
            get
            {
                return visuals.Count;
            }
        }
        ...
}
此外,DrawingCanvas类还提供了AddVisual()方法和DeleteVisual()方法,以简化在集合的恰当位置插入可视化对象的自定义代码:
public void AddVisual(Visual visual)
        {
            visuals.Add(visual);

            base.AddVisualChild(visual);
            base.AddLogicalChild(visual);
        }

        public void DeleteVisual(Visual visual)
        {
            visuals.Remove(visual);

            base.RemoveVisualChild(visual);
            base.RemoveLogicalChild(visual);
        }
DrawingCanvas类没有提供用于绘制、选择以及移动正方形的逻辑,这是因为该功能是在应用程序层中控制的。因为可能有几个不同的绘图工具都使用同一个DrawingCanvas类,所以这样做是合理的。根据用户单击的按钮,用户可绘制不同类型的形状,或使用不同的笔画颜色和填充颜色。所有这些细节都是特定与窗口的。DrawingCanvas类提供了用于驻留、渲染以及跟踪可视化对象的功能。
下面演示了如何在窗口的XAML标记中声明DrawingCanvas对象:
<local:DrawingCanvas x:Name="drawingSurface" Background="White" ClipToBounds="True"
                             MouseLeftButtonDown="drawingSurface_MouseLeftButtonDown"
                MouseLeftButtonUp="drawingSurface_MouseLeftButtonUp"
                MouseMove="drawingSurface_MouseMove"></local:DrawingCanvas>
上图已经分析了DrawingCanvas容器,现在应当分析创建正方形的事件处理代码了。首先分析MouseLeftButton事件的处理程序。正是该事件处理程序中的代码决定了将要执行什么操作——是创建正方形、删除正方形还是选择正方形。目前,我们只对第一个任务感兴趣:
private void drawingSurface_MouseLeftButtonDown(object sender, MouseButtonEventArgs e)
        {
            Point pointClicked = e.GetPosition(drawingSurface);

            if (cmdAdd.IsChecked == true)
            {
                DrawingVisual visual = new DrawingVisual();
                DrawSquare(visual, pointClicked, false);
                drawingSurface.AddVisual(visual);
            }
        ...
        }
实际工作由自定义的DrawSquare()方法执行。该方法非常有用,因为需要在代码中的几个不同位置触发正方形绘制操作。显然,当第一次创建正方形时,需要使用DrawSquare()方法,当正方形的外观因为各种原因发生变化时(例如,当正方形被选中时),也需要使用该方法。
DrawSquare()方法接收三个参数:准备绘制的DrawingVisual对象、正方形左上角的点以及知识当前是否选中正方形的Boolean标志。对于选中的正方形使用不同的填充颜色进行填充。
下面是渲染代码:
// Drawing constants.
        private Brush drawingBrush = Brushes.AliceBlue;
        private Brush selectedDrawingBrush = Brushes.LightGoldenrodYellow;
        private Pen drawingPen = new Pen(Brushes.SteelBlue, 3);
        private Size squareSize = new Size(30, 30);
        private DrawingVisual selectionSquare;

        // Rendering the square.
        private void DrawSquare(DrawingVisual visual, Point topLeftCorner, bool isSelected)
        {
            using (DrawingContext dc = visual.RenderOpen())
            {
                Brush brush = drawingBrush;
                if (isSelected) brush = selectedDrawingBrush;

                dc.DrawRectangle(brush, drawingPen,
                    new Rect(topLeftCorner, squareSize));
            }
        }
这就是在窗口中显示可视化对象需要做的全部工作:渲染可视化对象的代码,以及处理必需的跟踪细节的内容。如果希望为可视化对象添加交互功能,还需要完成其他一些工作。
三、命中测试
绘制正方形的应用程序不仅允许绘制正方形,还允许用户移动和删除以及绘制的正方形。为了执行这些任务,需要编写代码以截获鼠标单击,并查找位于可单击位置的可视化对象。该任务被称为命中测试(hit testing)。
为支持命中测试,最好为DrawingCanvas类添加GetVisual()方法。该方法使用一个点作为参数并返回匹配的DrawingVisual对象。为此使用了VisualTreeHelper.HitTest()静态方法。下面是GetVisual()方法的完整带代码:
public DrawingVisual GetVisual(Point point)
        {
            HitTestResult hitResult = VisualTreeHelper.HitTest(this, point);
            return hitResult.VisualHit as DrawingVisual;
        }
在该例中,代码忽略了所有非DrawingVisual类型的命中对象,包括DrawingCanvas对象本身。如果没有正方形被单击,GetVisual()方法返回null引用。
删除功能利用了GetVisual()方法。当选择删除命令并选中一个正方形时,MouseLeftButtonDown事件处理程序使用下面的代码删除这个正方形:
else if (cmdDelete.IsChecked == true)
            {
                DrawingVisual visual = drawingSurface.GetVisual(pointClicked);
                if (visual != null) drawingSurface.DeleteVisual(visual);
            }
可用类似的代码支持拖放特性,但需要通过一种方法对拖动进行跟踪。在窗口中添加了三个字段用于该目的——isDragging、clickOffset和selectedVisual:
 // Variables for dragging shapes.
        private bool isDragging = false;
        private Vector clickOffset;
        private DrawingVisual selectedVisual;
当用户单击某个形状时,isDragging字段被设置为true,selectedVisual字段被设置为被单击的可视化对象,而clickOffset字段记录了用户单击点和正方形左上角之间的距离。下面是MouseLeftButtonDown事件处理程序中的相关代码:
else if (cmdSelectMove.IsChecked == true)
            {
                DrawingVisual visual = drawingSurface.GetVisual(pointClicked);
                if (visual != null)
                {
                    // Calculate the top-left corner of the square.
                    // This is done by looking at the current bounds and
                    // removing half the border (pen thickness).
                    // An alternate solution would be to store the top-left
                    // point of every visual in a collection in the
                    // DrawingCanvas, and provide this point when hit testing.
                    Point topLeftCorner = new Point(
                        visual.ContentBounds.TopLeft.X + drawingPen.Thickness / 2,
                        visual.ContentBounds.TopLeft.Y + drawingPen.Thickness / 2);
                    DrawSquare(visual, topLeftCorner, true);

                    clickOffset = topLeftCorner - pointClicked;
                    isDragging = true;

                    if (selectedVisual != null && selectedVisual != visual)
                    {
                        // The selection has changed. Clear the previous selection.
                        ClearSelection();
                    }
                    selectedVisual = visual;
                }
除基本的记录信息外,上面的代码还调用DrawSquare()方法,使用新颜色重新渲染DrawingVisual对象。上面的代码还使用另一个自定义方法ClearSelection(),该方法重新绘制以前选中的正方形,使该正方形恢复其正常外观:
private void ClearSelection()
        {
            Point topLeftCorner = new Point(
                        selectedVisual.ContentBounds.TopLeft.X + drawingPen.Thickness / 2,
                        selectedVisual.ContentBounds.TopLeft.Y + drawingPen.Thickness / 2);
            DrawSquare(selectedVisual, topLeftCorner, false);
            selectedVisual = null;
        }
接下来,当用户拖动时需要实际移动正方形,并当用户释放鼠标左键时结束拖动操作。这两个任务是使用一些简单的事件处理代码完成的:
private void drawingSurface_MouseLeftButtonUp(object sender, MouseButtonEventArgs e)
        {
            isDragging = false;
        }
private void drawingSurface_MouseMove(object sender, MouseEventArgs e)
        {
            if (isDragging)
            {
                Point pointDragged = e.GetPosition(drawingSurface) + clickOffset;
                DrawSquare(selectedVisual, pointDragged, true);
            }
        }
四、复杂的命中测试
在上面的示例中,命中测试代码始终返回最上面的可视化对象(如果单击空白处,就返回null引用)。然而,VisualTreeHelper类提供了HitTest()方法的两个重载版本,从而可以执行更加复杂的命中测试。使用这些方法,可以检索位于特定点的所有可视化对象,即使它们被其他元素隐藏在后面也同样如此。还可找到位于给定几何图形中的所有可视化对象。
为了使用这个更高级的命中测试行为,需要创建回调函数。之后,VisualTreeHelper类自上而下遍历所有可视化对象(与创建它们的顺序相反)。每当发现匹配的对象时,就会调用回调函数并传递相关细节。然后可以选择停止查找(如果已经查找到足够的层次),或继续查找知道遍历完所有的可视化对象为止。
下面的代码通过为DrawingCanvas类添加GetVisuals()方法实现了该技术。GetVisuals()方法接收一个Geometry对象,该对象用于命中测试。GetVisuals()方法创建回调函数委托、清空命中测试结果的集合,然后通过调用VisualTreeHelper.HitTest()方法启动命中测试过程。当该过程结束时,该方法返回包含所有找到的可视化对象的集合:
private List<DrawingVisual> hits = new List<DrawingVisual>();
        public List<DrawingVisual> GetVisuals(Geometry region)
        {
            hits.Clear();
            GeometryHitTestParameters parameters = new GeometryHitTestParameters(region);
            HitTestResultCallback callback = new HitTestResultCallback(this.HitTestCallback);
            VisualTreeHelper.HitTest(this, null, callback, parameters);
            return hits;
        }
回调方法实现了命中测试行为。通常,HitTestResult对象只提供一个熟悉(VisualHit),但可以根据执行命中测试的类型,将它转换成两个派生类型中的任意一个。
如果使用一个点进行命中测试,可将HitTestResult对象转换为PointHitTestResult对象,该类提供了一个不起眼的PointHit熟悉,该属性返回用于执行命中测试的原始点。但如果使用Geometry对象吉祥鸟命中测试,如本例那样,可将HitTestResult对象转换为GeometryHitTestResult对象,并访问IntersectionDetail属性。IntersectionDetail属性告知几何图形是否完全封装了可视化对象(FullyInside),几何图形是否与可视化元素只是相互重叠(Intersets),或者用于命中测试的集合图形是否落在可视化元素的内部(FullyContains)。在该例中,只有当可视化对象完全位于命中测试区域时,才会对命中数量计算。最后,在回调函数的末尾,可返回两个HitTestResultBehavior枚举值中的一个:返回continue表示继续查找命中,返回Stop则表示结束查找过程。
private HitTestResultBehavior HitTestCallback(HitTestResult result)
        {
            GeometryHitTestResult geometryResult = (GeometryHitTestResult)result;
            DrawingVisual visual = result.VisualHit as DrawingVisual;
            if (visual != null &&
                geometryResult.IntersectionDetail == IntersectionDetail.FullyInside)
            {
                hits.Add(visual);
            }
            return HitTestResultBehavior.Continue;
        }
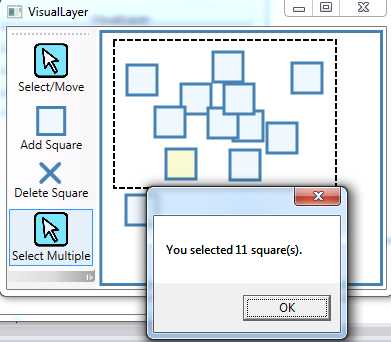
使用GetVisuals()方法,可创建如下图所示的复杂选择框效果。在此,用户在一组矩形的周围绘制了一个方框。应用程序接着报告该区域中矩形的数量。

为了创建选择框,窗口只需要为DrawingCanvas面板添加另一个DrawingVisual对象即可。在窗口中还作为成员字段存储了指向选择框的引用,此外还有isMultiSelecting标记和selectionSquareTopLeft字段,当绘制选择框时,isMultiSelecting标记跟踪正在进行的选择操作,selectionSquareTopLeft字段跟踪当前选择框的左上角:
// Variables for drawing the selection square.
        private bool isMultiSelecting = false;
        private Point selectionSquareTopLeft;
为实现选择框特性,需要为前面介绍的事件处理程序添加一些代码。当单击鼠标时,需要创建选择框,将isMultiSelecting开关设置为true,并捕获鼠标。下面的MouseLeftButtonDown事件处理程序中的代码完成这项工作:
else if (cmdSelectMultiple.IsChecked == true)
            {

                selectionSquare = new DrawingVisual();

                drawingSurface.AddVisual(selectionSquare);

                selectionSquareTopLeft = pointClicked;
                isMultiSelecting = true;

                // Make sure we get the MouseLeftButtonUp event even if the user
                // moves off the Canvas. Otherwise, two selection squares could be drawn at once.
                drawingSurface.CaptureMouse();
            }
现在,当移动鼠标时,可根据当前选择框是否处于激活状态。如果是激活状态,就绘制它。为此,需要在MouseMove事件处理程序中添加以下代码:
else if (isMultiSelecting)
            {
                Point pointDragged = e.GetPosition(drawingSurface);
                DrawSelectionSquare(selectionSquareTopLeft, pointDragged);
            }
实际的绘图操作在专门的DrawSelectionSquare()方法中进行,该方法与前面介绍的DrawSquare()方法有一些类似之处:
private Brush selectionSquareBrush = Brushes.Transparent;
        private Pen selectionSquarePen = new Pen(Brushes.Black, 2);

        private void DrawSelectionSquare(Point point1, Point point2)
        {
            selectionSquarePen.DashStyle = DashStyles.Dash;

            using (DrawingContext dc = selectionSquare.RenderOpen())
            {
                dc.DrawRectangle(selectionSquareBrush, selectionSquarePen,
                    new Rect(point1, point2));
            }
        }
最后,当释放鼠标时,可执行命中测试,显示消息框,然后移除选择框。为此,需要MouseLeftButtonUp事件处理程序中添加如下代码:
 if (isMultiSelecting)
            {
                // Display all the squares in this region.
                RectangleGeometry geometry = new RectangleGeometry(
                    new Rect(selectionSquareTopLeft, e.GetPosition(drawingSurface)));
                List<DrawingVisual> visualsInRegion =
                    drawingSurface.GetVisuals(geometry);
                MessageBox.Show(String.Format("You selected {0} square(s).", visualsInRegion.Count));

                isMultiSelecting = false;
                drawingSurface.DeleteVisual(selectionSquare);
                drawingSurface.ReleaseMouseCapture();
            }
本实例的完整代码如下所示:

using System;
using System.Collections.Generic;
using System.Linq;
using System.Text;
using System.Threading.Tasks;
using System.Windows;
using System.Windows.Controls;
using System.Windows.Media;

namespace Drawing
{
    public class DrawingCanvas:Panel
    {
        private List<Visual> visuals = new List<Visual>();

        protected override Visual GetVisualChild(int index)
        {
            return visuals[index];
        }
        protected override int VisualChildrenCount
        {
            get
            {
                return visuals.Count;
            }
        }

        public void AddVisual(Visual visual)
        {
            visuals.Add(visual);

            base.AddVisualChild(visual);
            base.AddLogicalChild(visual);
        }

        public void DeleteVisual(Visual visual)
        {
            visuals.Remove(visual);

            base.RemoveVisualChild(visual);
            base.RemoveLogicalChild(visual);
        }

        public DrawingVisual GetVisual(Point point)
        {
            HitTestResult hitResult = VisualTreeHelper.HitTest(this, point);
            return hitResult.VisualHit as DrawingVisual;
        }

        private List<DrawingVisual> hits = new List<DrawingVisual>();
        public List<DrawingVisual> GetVisuals(Geometry region)
        {
            hits.Clear();
            GeometryHitTestParameters parameters = new GeometryHitTestParameters(region);
            HitTestResultCallback callback = new HitTestResultCallback(this.HitTestCallback);
            VisualTreeHelper.HitTest(this, null, callback, parameters);
            return hits;
        }

        private HitTestResultBehavior HitTestCallback(HitTestResult result)
        {
            GeometryHitTestResult geometryResult = (GeometryHitTestResult)result;
            DrawingVisual visual = result.VisualHit as DrawingVisual;
            if (visual != null &&
                geometryResult.IntersectionDetail == IntersectionDetail.FullyInside)
            {
                hits.Add(visual);
            }
            return HitTestResultBehavior.Continue;
        }
    }
}

<Window x:Class="Drawing.VisualLayer"
        xmlns="http://schemas.microsoft.com/winfx/2006/xaml/presentation"
        xmlns:x="http://schemas.microsoft.com/winfx/2006/xaml"
        xmlns:local="clr-namespace:Drawing"
        Title="VisualLayer" Height="300" Width="394.737">
    <Grid>
        <Grid.ColumnDefinitions>
            <ColumnDefinition Width="Auto"></ColumnDefinition>
            <ColumnDefinition></ColumnDefinition>
        </Grid.ColumnDefinitions>
        <ToolBarTray Orientation="Vertical">
            <ToolBar>
                <RadioButton Margin="0,3" Name="cmdSelectMove">
                    <StackPanel>
                        <Image Source="pointer.png" Width="35" Height="35"></Image>
                        <TextBlock>Select/Move</TextBlock>
                    </StackPanel>
                </RadioButton>
                <RadioButton Margin="0,3" IsChecked="True" Name="cmdAdd">
                    <StackPanel>
                        <Rectangle Width="30" Height="30" Stroke="SteelBlue" StrokeThickness="3" Fill="AliceBlue"></Rectangle>
                        <TextBlock>Add Square</TextBlock>
                    </StackPanel>
                </RadioButton>
                <RadioButton Margin="0,3" Name="cmdDelete">
                    <StackPanel>
                        <Path Stroke="SteelBlue" StrokeThickness="4" StrokeEndLineCap="Round" StrokeStartLineCap="Round"
                  Fill="Red" HorizontalAlignment="Center">
                            <Path.Data>
                                <GeometryGroup>
                                    <PathGeometry>
                                        <PathFigure StartPoint="0,0">
                                            <LineSegment Point="18,18"></LineSegment>
                                        </PathFigure>
                                        <PathFigure StartPoint="0,18">
                                            <LineSegment Point="18,0"></LineSegment>
                                        </PathFigure>
                                    </PathGeometry>
                                </GeometryGroup>
                            </Path.Data>
                        </Path>
                        <TextBlock>Delete Square</TextBlock>
                    </StackPanel>
                </RadioButton>
                <RadioButton Margin="0,3" Name="cmdSelectMultiple">
                    <StackPanel>
                        <Image Source="pointer.png" Width="35" Height="35"></Image>
                        <TextBlock>Select Multiple</TextBlock>
                    </StackPanel>
                </RadioButton>
            </ToolBar>
        </ToolBarTray>
        <Border Grid.Column="1" Margin="3" BorderThickness="3" BorderBrush="SteelBlue">
            <local:DrawingCanvas x:Name="drawingSurface" Background="White" ClipToBounds="True"
                             MouseLeftButtonDown="drawingSurface_MouseLeftButtonDown"
                MouseLeftButtonUp="drawingSurface_MouseLeftButtonUp"
                MouseMove="drawingSurface_MouseMove"></local:DrawingCanvas>
        </Border>
    </Grid>
</Window>

using System;
using System.Collections.Generic;
using System.Linq;
using System.Text;
using System.Threading.Tasks;
using System.Windows;
using System.Windows.Controls;
using System.Windows.Data;
using System.Windows.Documents;
using System.Windows.Input;
using System.Windows.Media;
using System.Windows.Media.Imaging;
using System.Windows.Shapes;

namespace Drawing
{
    /// <summary>
    /// VisualLayer.xaml 的交互逻辑
    /// </summary>
    public partial class VisualLayer : Window
    {
        public VisualLayer()
        {
            InitializeComponent();
            DrawingVisual v = new DrawingVisual();
            DrawSquare(v, new Point(10, 10), false);
        }

        // Variables for dragging shapes.
        private bool isDragging = false;
        private Vector clickOffset;
        private DrawingVisual selectedVisual;

        // Variables for drawing the selection square.
        private bool isMultiSelecting = false;
        private Point selectionSquareTopLeft;

        private void drawingSurface_MouseLeftButtonDown(object sender, MouseButtonEventArgs e)
        {
            Point pointClicked = e.GetPosition(drawingSurface);

            if (cmdAdd.IsChecked == true)
            {
                DrawingVisual visual = new DrawingVisual();
                DrawSquare(visual, pointClicked, false);
                drawingSurface.AddVisual(visual);
            }
            else if (cmdDelete.IsChecked == true)
            {
                DrawingVisual visual = drawingSurface.GetVisual(pointClicked);
                if (visual != null) drawingSurface.DeleteVisual(visual);
            }
            else if (cmdSelectMove.IsChecked == true)
            {
                DrawingVisual visual = drawingSurface.GetVisual(pointClicked);
                if (visual != null)
                {
                    // Calculate the top-left corner of the square.
                    // This is done by looking at the current bounds and
                    // removing half the border (pen thickness).
                    // An alternate solution would be to store the top-left
                    // point of every visual in a collection in the
                    // DrawingCanvas, and provide this point when hit testing.
                    Point topLeftCorner = new Point(
                        visual.ContentBounds.TopLeft.X + drawingPen.Thickness / 2,
                        visual.ContentBounds.TopLeft.Y + drawingPen.Thickness / 2);
                    DrawSquare(visual, topLeftCorner, true);

                    clickOffset = topLeftCorner - pointClicked;
                    isDragging = true;

                    if (selectedVisual != null && selectedVisual != visual)
                    {
                        // The selection has changed. Clear the previous selection.
                        ClearSelection();
                    }
                    selectedVisual = visual;
                }
            }
            else if (cmdSelectMultiple.IsChecked == true)
            {

                selectionSquare = new DrawingVisual();

                drawingSurface.AddVisual(selectionSquare);

                selectionSquareTopLeft = pointClicked;
                isMultiSelecting = true;

                // Make sure we get the MouseLeftButtonUp event even if the user
                // moves off the Canvas. Otherwise, two selection squares could be drawn at once.
                drawingSurface.CaptureMouse();
            }
        }

        // Drawing constants.
        private Brush drawingBrush = Brushes.AliceBlue;
        private Brush selectedDrawingBrush = Brushes.LightGoldenrodYellow;
        private Pen drawingPen = new Pen(Brushes.SteelBlue, 3);
        private Size squareSize = new Size(30, 30);
        private DrawingVisual selectionSquare;

        // Rendering the square.
        private void DrawSquare(DrawingVisual visual, Point topLeftCorner, bool isSelected)
        {
            using (DrawingContext dc = visual.RenderOpen())
            {
                Brush brush = drawingBrush;
                if (isSelected) brush = selectedDrawingBrush;

                dc.DrawRectangle(brush, drawingPen,
                    new Rect(topLeftCorner, squareSize));
            }
        }

        private void drawingSurface_MouseLeftButtonUp(object sender, MouseButtonEventArgs e)
        {
            isDragging = false;

            if (isMultiSelecting)
            {
                // Display all the squares in this region.
                RectangleGeometry geometry = new RectangleGeometry(
                    new Rect(selectionSquareTopLeft, e.GetPosition(drawingSurface)));
                List<DrawingVisual> visualsInRegion =
                    drawingSurface.GetVisuals(geometry);
                MessageBox.Show(String.Format("You selected {0} square(s).", visualsInRegion.Count));

                isMultiSelecting = false;
                drawingSurface.DeleteVisual(selectionSquare);
                drawingSurface.ReleaseMouseCapture();
            }
        }

        private void ClearSelection()
        {
            Point topLeftCorner = new Point(
                        selectedVisual.ContentBounds.TopLeft.X + drawingPen.Thickness / 2,
                        selectedVisual.ContentBounds.TopLeft.Y + drawingPen.Thickness / 2);
            DrawSquare(selectedVisual, topLeftCorner, false);
            selectedVisual = null;
        }

        private void drawingSurface_MouseMove(object sender, MouseEventArgs e)
        {
            if (isDragging)
            {
                Point pointDragged = e.GetPosition(drawingSurface) + clickOffset;
                DrawSquare(selectedVisual, pointDragged, true);
            }
            else if (isMultiSelecting)
            {
                Point pointDragged = e.GetPosition(drawingSurface);
                DrawSelectionSquare(selectionSquareTopLeft, pointDragged);
            }
        }

        private Brush selectionSquareBrush = Brushes.Transparent;
        private Pen selectionSquarePen = new Pen(Brushes.Black, 2);

        private void DrawSelectionSquare(Point point1, Point point2)
        {
            selectionSquarePen.DashStyle = DashStyles.Dash;

            using (DrawingContext dc = selectionSquare.RenderOpen())
            {
                dc.DrawRectangle(selectionSquareBrush, selectionSquarePen,
                    new Rect(point1, point2));
            }
        }
    }
}
标签:drawrect reg tin 影响 cmd nsf inpu 重复 removing
原文地址:https://www.cnblogs.com/treeskyer/p/12723914.html