在上一篇文章中,我们已经了解了Raspkate这一轻量型Web服务器,今天,我们再一起了解下如何基于Raspkate实现简单的RESTful API。
模块
首先让我们了解一下“模块”的概念。Raspkate的模块包含了一组能够提供完整业务功能的HTTP处理器(Handler),例如,在Raspkate的源代码库中,默认提供了两个模块:Default和RaspberryPi,它们分别位于两个不同的C#项目中:
- Raspkate.Modules.Default
- Raspkate.Modules.RaspberryPi
Default模块包含了一个标准的静态文件访问服务/处理器,以及一个能够读取并返回服务器信息的RESTful API控制器;而RaspberryPi模块则提供了一个访问树莓派信息页静态文件的处理器,以及一个读取树莓派信息的RESTful API控制器。当然,在这里静态文件访问处理都是由FileHandler负责,而RESTful API的处理则由ControllerHandler完成。虽然这两个模块使用了相同类型的Handler,但它们所专注的业务功能完全不同,而且它们是相互隔离,独立执行的。
Raspkate中每个模块都被存放于modules目录下的某个子目录中,在Raspkate服务启动时,会扫描modules目录下的所有程序集,定位所有继承于RaspkateModule类的子类,并根据类型定义对Handler进行初始化然后注册到Raspkate服务中,以便这些Handler能够为HTTP请求提供服务。当然,这些模块也可以放在其它目录下,但这就需要修改Raspkate服务的配置文件RaspkateService.exe.config,把模块所在的目录添加到modules节点下,例如:
|
1
2
3
4
5
6
7
8
9
10
11
12
13
14
|
<?xml version="1.0" encoding="utf-8" ?><configuration> <configSections> <section name="raspkateConfiguration" type="Raspkate.Config.RaspkateConfiguration, Raspkate"/> </configSections> <raspkateConfiguration xmlns="urn:Raspkate.Config" prefix="http://127.0.0.1:9023/"> <modules> <add path="modules"/> <add path="d:\\test" relative="false" /> </modules> </raspkateConfiguration></configuration> |
在模块的注册类型中(也就是继承于RaspkateModule类的子类中),只需要返回该模块能够提供的Handler实例即可。接下来,让我们一起看看,如何开发一个自己的模块,并通过注册ControllerHandler,向调用者提供RESTful API服务。
案例:计算器
最简单的不过就是计算器运算:加、减、乘、除。那么最最简单的就是计算两个整数的和,好吧,就以这个为例,开始我们的RESTful API开发之旅。
首先,打开Visual Studio 2013,新建一个C#类库(Class Library)项目,项目命名为RaspkateCalculatorModule,注意.NET Framework至少选择4.5.2以上(老版本的Framework除了2.0以外,Microsoft都不再官方支持了)。成功创建项目后,添加对Raspkate.dll的引用。
然后,在这个项目中新建一个名为CalculatorController的类,代码如下:
|
1
2
3
4
5
6
7
8
9
10
|
[RoutePrefix("calc")]public class CalculatorController : RaspkateController{ [HttpGet] [Route("add/{a}/{b}")] public int Add(int a, int b) { return a + b; }} |
接着,在这个项目中新建一个名为Module的类,代码如下:
|
1
2
3
4
5
6
7
8
9
10
11
12
|
internal sealed class Module : RaspkateModule{ public Module(ModuleContext context) : base(context) { } protected override IEnumerable<IRaspkateHandler> CreateHandlers() { yield return new ControllerHandler("CalculatorController", new [] { typeof(CalculatorController) }); }} |
OK,万事俱备,只欠东风啦!回到Raspkate中,将RaspkateService.exe.config稍微改动一下,将该模块的输出目录添加到modules节点中,即可直接启动RaspkateService.exe程序了:
|
1
2
3
4
5
6
7
8
9
10
11
12
13
14
15
16
17
18
19
20
21
22
23
24
25
26
27
28
29
30
31
32
33
34
35
36
37
38
|
<?xml version="1.0" encoding="utf-8" ?><configuration> <configSections> <section name="raspkateConfiguration" type="Raspkate.Config.RaspkateConfiguration, Raspkate"/> <section name="log4net" type="log4net.Config.Log4NetConfigurationSectionHandler, log4net"/> </configSections> <raspkateConfiguration xmlns="urn:Raspkate.Config" prefix="http://127.0.0.1:9023/"> <modules> <add path="modules"/> <add path="C:\Users\chenqn\Documents\visual studio 2013\Projects\RaspkateCalculatorModule\RaspkateCalculatorModule\bin\Debug" relative="false"/> </modules> </raspkateConfiguration> <log4net> <appender name="ConsoleAppender" type="log4net.Appender.ConsoleAppender"> <layout type="log4net.Layout.PatternLayout"> <conversionPattern value="%utcdate{DATE} [%thread] %level %logger - %message%newline"/> </layout> </appender> <appender name="FileAppender" type="log4net.Appender.FileAppender"> <file value="logs/raspkate.log" /> <appendToFile value="true" /> <lockingModel type="log4net.Appender.FileAppender+MinimalLock" /> <layout type="log4net.Layout.PatternLayout"> <conversionPattern value="%date [%thread] %level %logger - %message%newline" /> </layout> </appender> <root> <level value="INFO"/> <appender-ref ref="ConsoleAppender"/> <appender-ref ref="FileAppender" /> </root> </log4net> <startup> <supportedRuntime version="v4.0" sku=".NETFramework,Version=v4.5.2" /> </startup></configuration> |
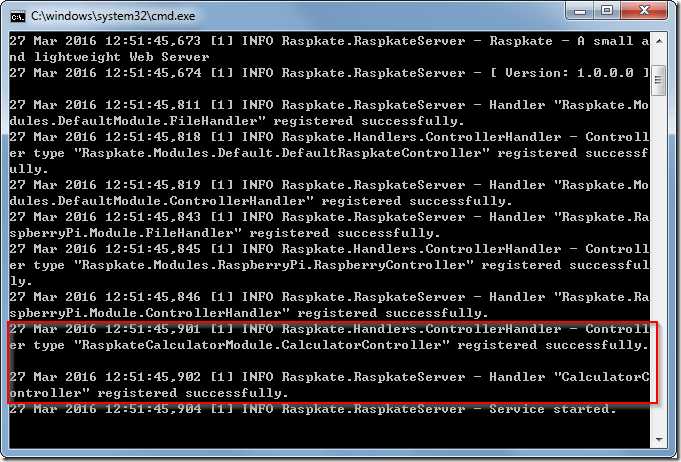
启动程序后,你可以在输出的日志中注意到,CalculatorController已经被注册到ControllerHandler当中,进而可以开始提供HTTP请求的服务了:
请打开你的浏览器,在地址栏中输入:
|
1
|
http://127.0.0.1:9023/calc/add/12/30 |
那么,你应该看到的是:
看来Raspkate服务已经将计算结果返回给你了。怎么样?使用Raspkate开发RESTful API是不是非常快捷?接下来让我们看看更加有意思的特性。
案例:计算器(进阶)
刚才我们的计算器还是太简单,接下来我打算让这个计算器能够计算复数(包括虚数部分)的乘法。同学们是否还记得复数相乘的计算公式?
OK,也就是我们的RESTful API需要接收两个复数,每个复数都要包含实数 r 和虚数 i 两个部分,返回值也应该包含实数和虚数两个部分。那么,我们的CalculatorController就可以写成这样:
|
1
2
3
4
5
6
7
8
9
10
11
12
13
14
15
16
17
18
19
20
21
|
[RoutePrefix("calc")]public class CalculatorController : RaspkateController{ [HttpGet] [Route("add/{a}/{b}")] public int Add(int a, int b) { return a + b; } [HttpPost] [Route("mul")] public dynamic Multiplicity([FromBody] dynamic input) { var a = input.x.r; // 第一个数的实数部分 var b = input.x.i; // 第一个数的虚数部分 var c = input.y.r; // 第二个数的实数部分 var d = input.y.i; // 第二个数的虚数部分 return new { z = new { r = a * c - b * d, i = b * c + a * d } }; }} |
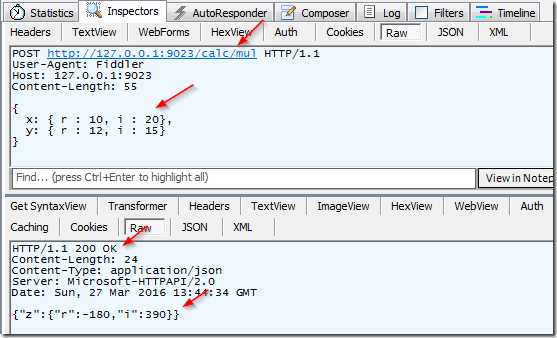
重新运行Raspkate服务,打开能够发出HttpPost请求的测试客户端(我用的是Fiddler),看看我们的程序是否可以正确执行:
测试成功,RESTful API已经以JSON格式返回了我们需要的计算结果。
总结
从上面的演示可以看到,Raspkate服务中RESTful API的实现,沿用了类似微软ASP.NET Web API的编程习惯,包括:
- Controller的编程模型(ASP.NET Web API中使用ApiController作为基类,此处使用RaspkateController作为基类)
- Attribute Routing
- HttpGet和HttpPost两种HTTP方法(其它的暂未实现)
- FromBody特性修饰符,使得方法的某些参数可以直接从HTTP Post Body中取值
- 对dynamic类型、匿名类型的支持
相比之下,Raspkate服务所提供的RESTful API编程更为简单快捷。今后如果这部分的确有应用的话,可以对整个结构作进一步完善。


