标签:des style blog http io color ar os 使用
CoreData是Mac、iPhone应用里标准的数据存储方法。所以,我们很有必要学习这个技术。那么我们要创建什么呢?首先是一个table view来处理数据,添加、删除、编辑,还有查找和排序。这些数据会被一直保存,即使是设备重启了都会存在。因为,这些数据时放在sqlite里的。
苹果的官方是这么描述Core Data的,“Core Data库是一个高层的自动的管理对象生命周期和持久话的解决方案”。
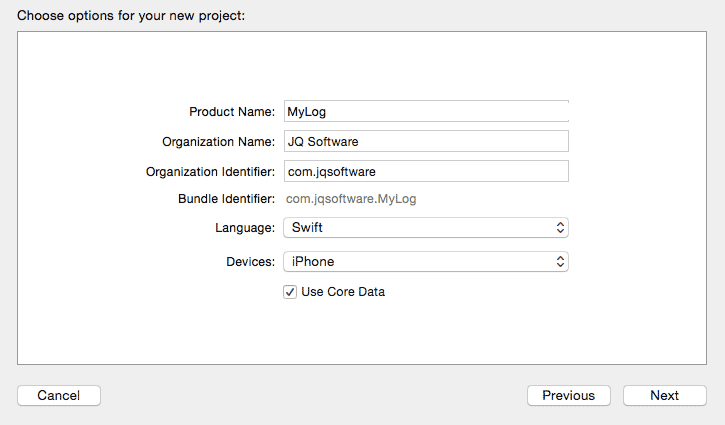
下面,我们就一步一步的开始。首先创建一个Xcode6的项目,选择single-view-template,语言选择Swift,选择开启Core Data。这个项目就叫做MyLog。
打开AppDelegate.swift,你会发现已经生成了很多的代码。这些都是初始化和设定Core Data的。使用Core Data,第一个需要了解的就是managedObjectContext,下面是定义:
lazy var managedObjectContext: NSManagedObjectContext? = {
    // Returns the managed object context for the application (which is already bound to the persistent store
    // coordinator for the application.) This property is optional since there are legitimate error
    // conditions that could cause the creation of the context to fail.
    let coordinator = self.persistentStoreCoordinator
    if coordinator == nil {
        return nil
    }
    var managedObjectContext = NSManagedObjectContext()
    managedObjectContext.persistentStoreCoordinator = coordinator
    return managedObjectContext
}()
"项目创建完成后,Xcode会自动添加CoreData库。自动在AppDelegate中添加NSManagedObjectContext、NSManagedObjectModel、NSPersistentCoordinator属性和saveContext、applicationDocumentDirectory两个方法。当然最不能少的就是创建xcdatamodeld文件。如果,你没有在项目开始的时候选择使用CoreData,那么可以手动添加这些内容。这样一样可以使用Core Data。"
For the most part, all you really need to know about this though, is that managedObjectContext is a lazily computed variable on AppDelegate. Knowing this we can find it from our ViewController.swift file. For example in viewDidLoad() of ViewController.swift, we can use this code to print the managedObjectContext’s description to the console.
First we need to set up a lazily loaded variable in the ViewController.swift file that can help us get the managedObjectContext from the app delegate using the UIApplication.sharedApplication().delegate property. Note that you’ll need to import CoreData in order to use the NSManagedObjectContext class name here.
import UIKit
import CoreData

class ViewController: UIViewController {

    lazy var managedObjectContext : NSManagedObjectContext? = {
        let appDelegate = UIApplication.sharedApplication().delegate as AppDelegate
        if let managedObjectContext = appDelegate.managedObjectContext {
            return managedObjectContext
        }
        else {
            return nil
        }
    }()

    override func viewDidLoad() {
        super.viewDidLoad()
        println(managedObjectContext!)
    }

    override func didReceiveMemoryWarning() {
        super.didReceiveMemoryWarning()
        // Dispose of any resources that can be recreated.
    }

}
The managedObjectContext variable is computed using the existing managedObjectContext in the application’s delegate. In viewdidLoad() we cause this variable to be computed by printing it to the console. If your application is set up right you should see something like this:
<NSManagedObjectContext: 0x7fff39c3b790>
You’ll notice the Xcode template produced an additional file, MyLog.xcdatamodeld.
Opening up this file you can see the Core Data model editor.
Let’s add a new Core Data entity called LogItem. Our log app will show a list of LogItems, which have a bit of text in them.
点击“Add Entity”按钮,在右侧面板中选择“Data Model Inspector”。这里,我们就可以重命名默认的Entity为LogItem。
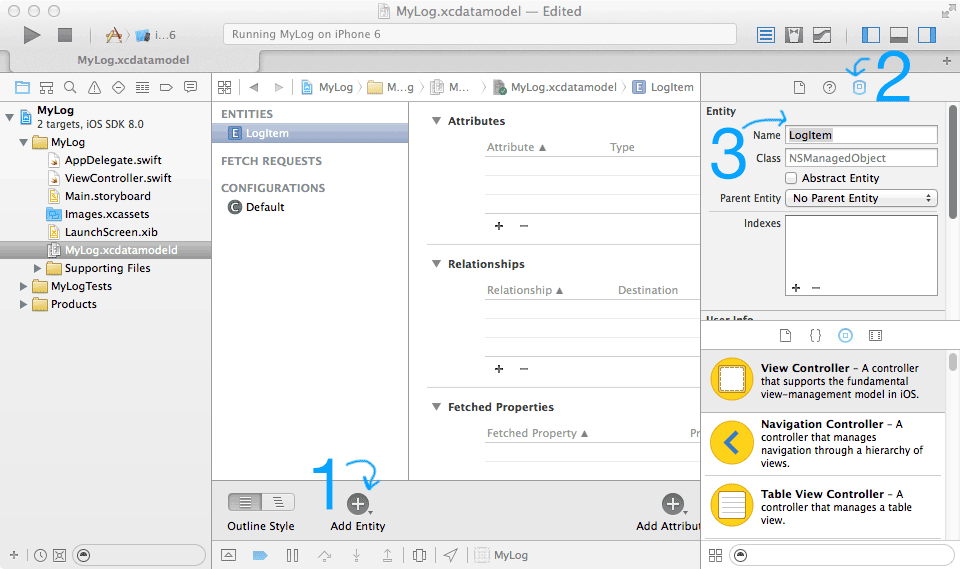
然后,在下面右侧的地方点击“+Attribute”按钮添加属性。
把第一个属性命名为title,类型设定为String。然后再添加一个itemText属性,类型也是String。

这样,就创建了我们的第一个Entity。我们还需要在代码中直接使用这个类。Xcode提供了一个工具。在菜单中选择Editor->Create NSManagedObject SubClass...
在弹出框中选择MyLog的model文件,点Next。之后选择LogItem实体。在弹出的文件保存窗口中选择Swift语言。最后点创建按钮。这时,你会看到一个LogItem.swift文件已经出现在项目中。
import Foundation
import CoreData

class LogItem: NSManagedObject {
    @NSManaged var title: String
    @NSManaged var itemText: String
}
这个类是基于xcdatamodeld文件中的LogItem创建并代表了这个entity。这个类的property则代表了Entity的属性。@NSManaged则使得property可以操作Core Data的Entity。
最后还需要修改一个地方才能使用上面创建的类。在Inspector的Entity菜单的“Class”字段内给LogItem加上项目名称作为前缀,这里就是:MyLog.LogItem。

在ViewController.swift文件的viewDidLoad方法中,初始化几个LogItem。方法有很多,不过最好的办法是用NSEntityDescription的insertNewObjectForEntityForName方法。
override func viewDidLoad() {
    super.viewDidLoad()

    let newItem = NSEntityDescription.insertNewObjectForEntityForName("LogItem", inManagedObjectContext: self.managedObjectContext!) as LogItem
}
这里,我们使用系统默认生成的managedObjectContext在Core Data中插入了一个对象。这个方法返回一个NSManagedObject类型的对象。这个对象都会响应valueForKey方法。如果你不是很理解也没有关系,继续往下看。
在NSManagedObject的新对象newItem中,我们可以用newItem.valueForKey("title")的方法获得title值。不过这个可不是什么好方法,因为你不知道什么时候会拼错了property名、或者弄错了对象的类型等。
所以,在这里我们将NSManagedObject的类型转化为LogItem。这样就可以直接存取属性值了。如:
override func viewDidLoad() {
    super.viewDidLoad()

    let newItem = NSEntityDescription.insertNewObjectForEntityForName("LogItem", inManagedObjectContext: self.managedObjectContext!) as LogItem

    newItem.title = "Wrote Core Data Tutorial"
    newItem.itemText = "Wrote and post a tutorial on the basics of Core Data to blog."
    presentItemInfo()
}
如果我们之前没有声称LogItem.swift文件,那么类型LogItem就是为定义的。那就只能用valueForKey来存取NSManagedObject对象的属性值了。这样在调用Core Data API的时候就不得不在运行状态下用字符串比较的方法获得Entity、state等的类型,非常麻烦。
既然,我们创建了一个新对象,设置了title和text属性。我们就可以查找这个entity了。在viewDidLoad的最后调用presentItemInfo方法。这个方法点定义:
func presentItemInfo() {
    let fetchRequest = NSFetchRequest(entityName: "LogItem")
    if let fetchResults = managedObjectContext!.executeFetchRequest(fetchRequest, error: nil) as? [LogItem] {

        let alert = UIAlertView()
        alert.title = fetchResults[0].title
        alert.message = fetchResults[0].itemText
        alert.show()
    }
}
首先,我们创建一个NSFetchRequest实例,指定处理entityLogItem。之后,执行方法executeFetchRequest方法查找LogItem实例。因为我们只设定了查找的entity名称,所以持久话的LogItem都将被查找到并存放在实例fetchResults中。最后把LogItem的title和message放在UIAlertView中显示在屏幕上。
运行app你会看到屏幕上出现的结果。这还是一个很简单的app。
在第二部分中,我们将会讨论处理使用NSPredicate处理多条记录请求的内容。
标签:des style blog http io color ar os 使用
原文地址:http://www.cnblogs.com/sunshine-anycall/p/4079230.html