标签:hand 读取 run 可迭代对象 基本 eve icon tuple gateway
WSGI全称Web Server Gateway Interface, 即web服务器网关接口.
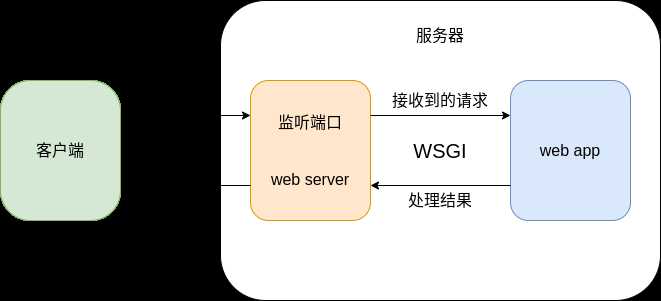
如图所示的http服务器, web服务器负责面向客户端接受请求和返回响应, web应用负责处理请求, 因此二者需要进行交互, web服务器将请求数据传给web应用, web应用执行完业务逻辑后将处理结果返回给web服务器. WSGI就是通过标准接口的方式, 定义了web服务器和python web应用之间的交互规范. 对于一个python web应用, 只要它遵循WSGI规范, 理论上就可以在任何写入这个规范的服务器上运行, 这样就提高了程序的可移植性.
WSGI的接口定义很简单, 对于web应用端, 只需要定义一个类似如下的可调用对象:
from typing import List, Callable


def my_application(environ: dict, start_response: Callable) -> List[bytes]:
    # do something
    status = ‘200 OK‘
    headers = [(‘Content-Type‘, ‘text/html‘)]
    start_response(status, headers)
    return [b‘<h1>hello wsgi</h1>‘]
这个可调用对象要接收两个参数. 第一个参数environ是一个字典, 内容是客户端的请求信息, 像是下面这样:
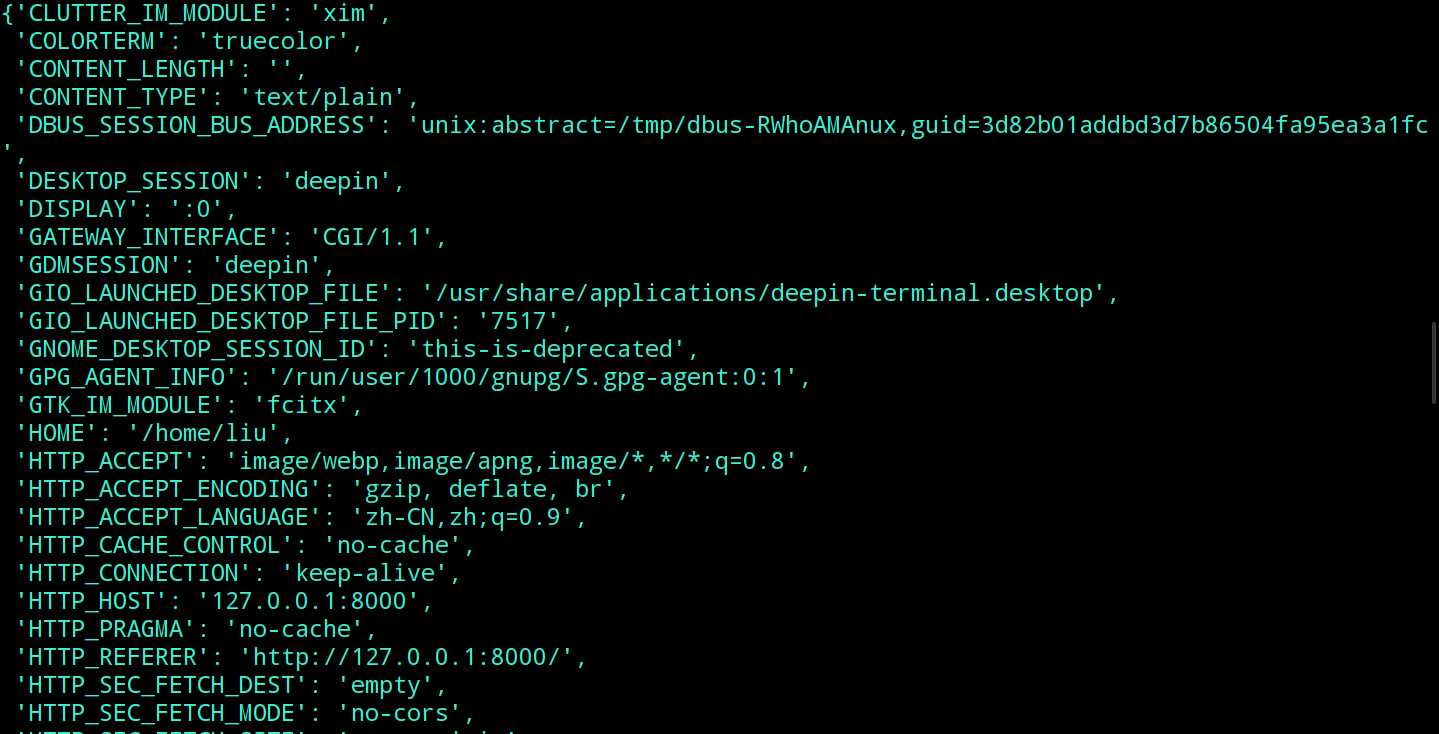
第二个参数start_response则是一个函数, 它接收status和headers两个参数, 当后端业务逻辑执行完毕之后, 调用它就可以设置响应状态和响应头.
最后, web应用需要将响应体以字节的形式放在一个可迭代对象中返回.
这样, WSGI就定义了一个web应用的行为模式: 首先解析environ提取需要的数据, 进行各种操作后, 调用start_response函数设置响应状态和消息报头, 最后将响应正文放在可迭代对象中返回.
对于web服务器端,使用如下方式就能启动服务并调用刚才写的web应用:
from wsgiref.simple_server import make_server
from app import my_application #这里的app表示web应用所在的地方, 根据自己的代码自行修改

httpd = make_server(‘127.0.0.1‘, 8000, my_application)
httpd.serve_forever()
这样, 一个最简单的http服务端就写好了. 访问127.0.0.1:8000, 得到结果如下:

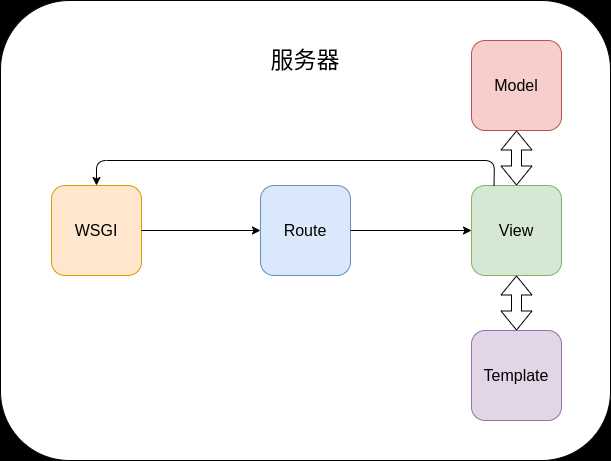
借用Django中MVC的那一套, 一个web框架主要包含路由, 控制器View, 模板层Template和模型层Model. web服务器将数据传给路由, 路由再将数据分发给对应的控制器去处理. 控制器与模型层交互得到数据库数据, 与模板层交互得到前端网页文件后, 将处理结果返回给web服务器.
基于上面的一套流程, 本文要实现的web框架需要如下一些类和函数:
这个类就作为environ参数的封装, 这样可以让代码更加清晰和整洁.
和Request类的理由差不多, 对响应进行封装.
负责路由的分发, 这里借鉴flask的写法, 用装饰器的形式来实现.
一方面作为WSGI的调用入口, 一方面对web应用进行整体的调度.
pass
这个不写了,因为我对数据库的了解还不够.
Request类的代码如下:
from urllib.parse import parse_qs
from typing import List


class Request:

    def __init__(self, environ: dict) -> None:
        self.environ = environ
        self.method = environ[‘REQUEST_METHOD‘]
        self.path = environ[‘PATH_INFO‘]
        # 首先获取url中携带的参数
        self.arguments = parse_qs(environ[‘QUERY_STRING‘])
        # 然后读取form表单参数
        try:
            request_body_size = int(environ[‘CONTENT_LENGTH‘])
        except (ValueError, KeyError):
            request_body_size = 0
        request_body = environ[‘wsgi.input‘].read(request_body_size).decode()
        # 最后将二者整合,表单数据中相同key的参数会把url的覆盖
        self.arguments.update(parse_qs(request_body))

    def __str__(self) -> str:
        items = (
            ‘arguments‘,
            ‘path‘,
            ‘method‘,
        )
        info = {item: getattr(self, item) for item in items}
        return str(info)

    def get_argument(self, key: str, default: str = ‘‘) -> str:
        values = self.arguments.get(key, None)
        if not values:
            return default
        return values[-1]

    def get_arguments(self, key: str) -> List[str]:
        values = self.arguments.get(key, None)
        if values is None:
            return []
        return values
Request类作为environ的封装. 这里只提取最常用的几个信息: 请求类型, 请求路径和url以及form表单的参数, 其他信息本文用不上, 就不提取了.
Response类的代码如下:
import http.client
from wsgiref.headers import Headers
from typing import Iterable


class Response:

    def __init__(self, body: Iterable[str] = None, status_code: int = 200, content_type: str = ‘text/html‘,
                 charset: str = ‘utf-8‘) -> None:
        if body is None:
            self.body = []
        elif isinstance(body, str):
            self.body = [body]
        else:
            self.body = body
        self.status_code = status_code
        self._headers = Headers()
        self._headers.add_header(‘content-type‘, f‘{content_type}; charset={charset}‘)
        self.charset = charset

    def __iter__(self):
        for val in self.body:
            print(val)
            yield val.encode(self.charset)

    @property
    def status(self):
        status_string = http.client.responses.get(self.status_code, ‘UNKNOWN‘)
        return f‘{self.status_code} {status_string}‘

    @property
    def headers(self):
        return self._headers.items()
Response类和Request类类似, 封装一些响应的基本的信息. 由于WSGI定义的接口要求返回一个可迭代对象, 因此这里定义response的__iter__方法, 将响应数据转码后返回.
通过如下方式使用上面定义的两个类:
from typing import Callable, Iterable


def application(environ: dict, start_response: Callable) -> Iterable[bytes]:
    request = Request(environ)
    print(request)
    response = Response([‘<h1>hello wsgi</h1>‘])
    start_response(response.status, response.headers)
    return response
路由的写法参照了flask, 通过装饰器的形式来指定路由分发. 代码如下:
import re
from typing import (
    Callable,
    Sequence,
    Tuple,
)


class Route:

    def __init__(self) -> None:
        self.handlers = []
        for pattern in (r‘/(favicon\.ico)‘, r‘/(robots\.txt)‘,):
            self.handlers.append((re.compile(pattern), static_handler))

    def __call__(self, pattern: str) -> Callable:
        if not pattern.endswith(‘$‘):
            pattern += ‘$‘

        def wrapper(handler: Callable) -> None:
            self.handlers.append((re.compile(pattern), handler))

        return wrapper

    def match(self, path: str) -> Tuple[Callable, Sequence]:
        for pattern, handler in self.handlers:
            args = re.match(pattern, path)
            if args:
                return handler, args.groups()
        raise HttpError(404)
路由需要保存不同的url和对应的handler, 因此这里使用类而不是函数来作为装饰器, 使用handlers这个属性来保存url和对应的handler函数. 当接收到客户端的请求时, 调用路由对象的match方法就能得到对应的处理函数和url中的匹配数据. 如果无法匹配, 则通过HttpError类来引发404错误. HttpError类的代码如下:
import http.client


class HttpError(Exception):
    def __init__(self, status_code: int = 500, message: str = ‘‘) -> None:
        self.status_code = status_code
        self.message = message

    def __str__(self) -> str:
        error = f‘HTTP {self.status_code}: {http.client.responses.get(self.status_code, "Unknown")}‘
        if self.message:
            return error + f‘({self.message})‘
        else:
            return error
HttpError的本质就是一个包含了状态码和错误信息的Exception, 实现这个类的好处是, 当某个流程无法继续的时候, 可以不用传参数, 而是直接将这个异常抛给上层.
另外, Route类在初始化的时候, 在路由列表中加了r‘/(favicon\.ico)‘和r‘/(robots\.txt)‘两项, 这两分别是网站的图标和爬虫协议, 因此交由static_handler函数处理:
def static_handler(request: Request, file_name: str) -> None:
    # 本文用不上,直接404得了
    raise HttpError(404)
最后, 通过下面的代码测试刚才写的路由:
route = Route()


@route(r‘/‘)
def index(request: Request) -> str:
    return ‘hello wsgi‘


@route(r‘/(.*)‘)
def hello(request: Request, username: str) -> str:
    return f‘hello {username}‘


def application(environ: dict, start_response: Callable) -> Iterable[bytes]:
    request = Request(environ)
    try:
        handler, args = route.match(request.path)
        response = Response(handler(request, *args))
    except HttpError as e:
        response = Response(status_code=e.status_code)
    start_response(response.status, response.headers)
    return response
application的本质就是WSGI的web应用端入口. 为了方便扩展, 这里把它写成类的形式, 然后定义__call__方法;
from wsgiref.simple_server import make_server
from typing import Callable, Iterable


class Application:

    def __init__(self) -> None:
        self.route = Route()

    def __call__(self, environ: dict, start_response: Callable) -> Iterable[bytes]:
        request = Request(environ)
        try:
            handler, args = self.route.match(request.path)
            response = Response(handler(request, *args))
        except HttpError as e:
            response = Response(status_code=e.status_code)
        start_response(response.status, response.headers)
        return response

    def run(self, host: str = ‘127.0.0.1‘, port: int = 8000) -> None:
        httpd = make_server(host, port, self)
        httpd.serve_forever()
没什么好说的, 和之前的代码是一样的.
这样一来, 一个web框架就差不多成型了, 用下面的代码进行测试:
app = Application()


@app.route(r‘/‘)
def index(request: Request) -> str:
    return ‘hello wsgi‘


@app.route(r‘/(.*)‘)
def hello(request: Request, username: str) -> str:
    return f‘hello {username}‘


if __name__ == ‘__main__‘:
    app.run()
关于如何实现模板层, 我单独写了一篇博客, 在这里.
能力不够, 先不讲了.
把上面的代码整合起来, 我们就得到了一个web框架, 用起来像是这样:
from framework import Application, Request, render

app = Application()


@app.route(r‘/(.*)‘)
def hello(request: Request, username: str) -> str:
    return render(‘<h1>hello {{username}}</h1>‘, {‘username‘: username})
调用app.run, 就可以运行hello应用了. 此外, 也可以使用其他支持WSGI的web服务器来启动服务, 比如gunicorn:

标签:hand 读取 run 可迭代对象 基本 eve icon tuple gateway
原文地址:https://www.cnblogs.com/q1214367903/p/12783167.html