标签:find sage pos copy pre adf 交互 ntb view
Androidstudio复习弹窗对话框(Popupwindow)、日期对话框(DataPickerDialog)、
时间对话框(TimePickerDialog)制作综合小demo
——安德风QQ1652102745
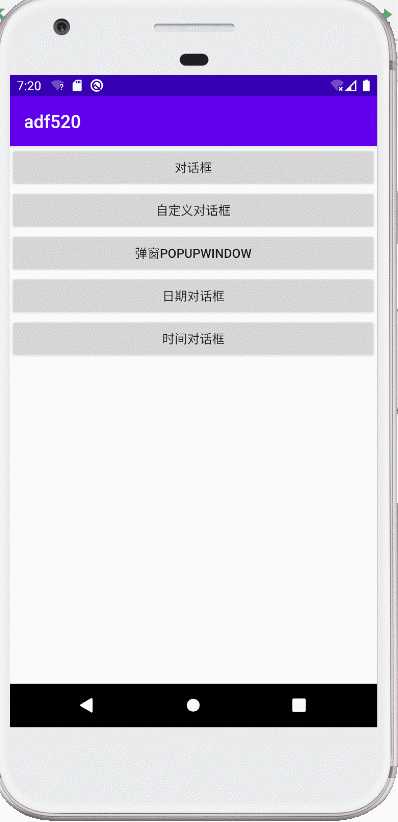
一、最终效果演示:
二、布局设计
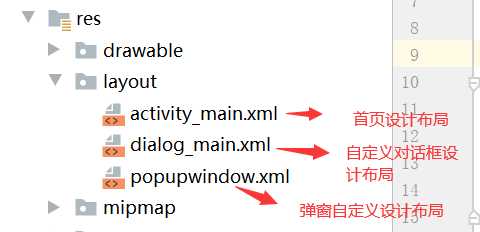
1、首页界面设计Activity_main.xml
 1 <?xml version="1.0" encoding="utf-8"?>
 2 <LinearLayout xmlns:android="http://schemas.android.com/apk/res/android"
 3 xmlns:app="http://schemas.android.com/apk/res-auto"
 4 xmlns:tools="http://schemas.android.com/tools"
 5 android:layout_width="match_parent"
 6 android:layout_height="match_parent"
 7 android:orientation="vertical"
 8 tools:context=".MainActivity" >
 9
10 <Button
11     android:id="@+id/btn_1"
12     android:layout_width="match_parent"
13     android:layout_height="wrap_content"
14     android:onClick="MyClick"
15     android:text="对话框" />
16
17 <Button
18     android:id="@+id/btn_2"
19     android:layout_width="match_parent"
20     android:layout_height="wrap_content"
21     android:text="自定义对话框"
22     android:onClick="MyClick"
23     />
24
25     <Button
26         android:id="@+id/btn_3"
27         android:layout_width="match_parent"
28         android:layout_height="wrap_content"
29         android:text="弹窗popupwindow" />
30
31     <RadioGroup
32         android:layout_width="match_parent"
33         android:layout_height="match_parent" >
34
35         <Button
36             android:id="@+id/btn_4"
37             android:layout_width="match_parent"
38             android:layout_height="wrap_content"
39             android:text="日期对话框" />
40
41         <Button
42             android:id="@+id/btn_5"
43             android:layout_width="match_parent"
44             android:layout_height="wrap_content"
45             android:text="时间对话框" />
46     </RadioGroup>
47 </LinearLayout>
2、自定义对话框布局设计Dialog_main.xml
 1 <?xml version="1.0" encoding="utf-8"?>
 2 <androidx.constraintlayout.widget.ConstraintLayout
 3     xmlns:android="http://schemas.android.com/apk/res/android"
 4     xmlns:app="http://schemas.android.com/apk/res-auto"
 5     xmlns:tools="http://schemas.android.com/tools"
 6     android:layout_width="match_parent"
 7     android:layout_height="wrap_content"
 8     android:layout_gravity="center_horizontal"
 9     android:background="@drawable/dialog_bg">
10
11     <TextView
12         android:id="@+id/textView"
13         android:layout_width="wrap_content"
14         android:layout_height="wrap_content"
15         android:layout_marginTop="356dp"
16         android:text="您确定要退出吗?"
17         android:textColor="#EF0A0A"
18         android:textSize="40sp"
19         android:textStyle="bold"
20         app:layout_constraintEnd_toEndOf="parent"
21         app:layout_constraintHorizontal_bias="0.62"
22         app:layout_constraintStart_toStartOf="parent"
23         app:layout_constraintTop_toTopOf="parent" />
24
25     <LinearLayout
26         android:layout_width="409dp"
27         android:layout_height="184dp"
28         android:orientation="horizontal"
29         app:layout_constraintBottom_toBottomOf="parent"
30         app:layout_constraintEnd_toEndOf="parent"
31         app:layout_constraintHorizontal_bias="0.487"
32         app:layout_constraintStart_toStartOf="parent"
33         app:layout_constraintTop_toBottomOf="@+id/textView"
34         android:gravity="center_vertical"
35         app:layout_constraintVertical_bias="0.251">
36
37         <Button
38             android:id="@+id/yesbutton"
39             android:layout_width="80dp"
40             android:layout_height="50dp"
41             android:layout_weight="1"
42             android:layout_marginLeft="40dp"
43             android:background="@drawable/yes_btn" />
44
45         <Button
46             android:id="@+id/nobutton"
47             android:layout_width="80dp"
48             android:layout_height="50dp"
49             android:layout_marginRight="40dp"
50             android:layout_marginLeft="20dp"
51             android:layout_weight="1"
52             android:background="@drawable/no_btn" />
53     </LinearLayout>
54 </androidx.constraintlayout.widget.ConstraintLayout>
3、弹窗自定义布局设计 popupwindow.xml
 1 <?xml version="1.0" encoding="utf-8"?>
 2 <androidx.constraintlayout.widget.ConstraintLayout xmlns:android="http://schemas.android.com/apk/res/android"
 3     xmlns:app="http://schemas.android.com/apk/res-auto"
 4     xmlns:tools="http://schemas.android.com/tools"
 5     android:layout_width="match_parent"
 6     android:layout_height="match_parent"
 7     android:onClick="xz">
 8
 9
10     <Button
11         android:id="@+id/option"
12         android:layout_width="50dp"
13         android:layout_height="wrap_content"
14         android:background="#000000"
15         android:onClick="xz"
16         android:text="选择"
17         android:textColor="#ffffff"
18         android:textStyle="bold"
19         app:layout_constraintStart_toStartOf="parent"
20         app:layout_constraintTop_toTopOf="parent" />
21
22     <Button
23         android:id="@+id/copy"
24         android:layout_width="50dp"
25         android:layout_height="wrap_content"
26         android:background="#000000"
27         android:text="复制"
28         android:textColor="#ffffff"
29         android:textStyle="bold"
30         app:layout_constraintStart_toEndOf="@+id/option"
31         app:layout_constraintTop_toTopOf="parent" />
32
33     <Button
34         android:id="@+id/paste"
35         android:layout_width="50dp"
36         android:layout_height="wrap_content"
37         android:background="#000000"
38         android:text="粘贴"
39         android:textColor="#ffffff"
40         android:textStyle="bold"
41         app:layout_constraintStart_toEndOf="@+id/copy"
42         app:layout_constraintTop_toTopOf="parent" />
43 </androidx.constraintlayout.widget.ConstraintLayout>
三、样式设置res/values/style.xml
 1 <resources>
 2
 3     <!-- Base application theme. -->
 4     <style name="AppTheme" parent="Theme.AppCompat.Light.DarkActionBar">
 5         <!-- Customize your theme here. -->
 6         <item name="colorPrimary">@color/colorPrimary</item>
 7         <item name="colorPrimaryDark">@color/colorPrimaryDark</item>
 8         <item name="colorAccent">@color/colorAccent</item>
 9     </style>
10                  <!--  设置自定义对话框样式:①导入对话框样式模板  -->
11     <style name="mydialog" parent="android:style/Theme.Dialog">
12         <item name="android:windowNoTitle">true</item>
13              <!--   设置关闭自定义对话框标题    -->
14         <item name="android:windowBackground">@android:color/transparent</item>
15              <!--   设置自定义对话框背景颜色为透明    -->
16     </style>
17
18 </resources>
四、功能实现
1、MainActivity.java
  1 package com.example.adf520;
  2
  3 import androidx.appcompat.app.AlertDialog;
  4 import androidx.appcompat.app.AppCompatActivity;
  5
  6 import android.app.DatePickerDialog;
  7 import android.app.DatePickerDialog.OnDateSetListener;
  8 import android.app.Dialog;
  9 import android.app.TimePickerDialog;
 10 import android.content.DialogInterface;
 11 import android.graphics.Color;
 12 import android.graphics.drawable.ColorDrawable;
 13 import android.os.Bundle;
 14 import android.view.LayoutInflater;
 15 import android.view.View;
 16 import android.widget.Button;
 17 import android.widget.CheckBox;
 18 import android.widget.CompoundButton;
 19 import android.widget.DatePicker;
 20 import android.widget.LinearLayout;
 21 import android.widget.PopupWindow;
 22 import android.widget.RadioButton;
 23 import android.widget.TimePicker;
 24 import android.widget.Toast;
 25
 26 public class MainActivity extends AppCompatActivity implements View.OnClickListener {
 27 Button btn_1,btn_2,btn_3,btn_4,btn_5;//声明对话框按钮、自定义对话框
 28
 29
 30     @Override
 31     protected void onCreate(Bundle savedInstanceState) {
 32         super.onCreate(savedInstanceState);
 33         setContentView(R.layout.activity_main);
 34        btn_1=findViewById(R.id.btn_1);//寻找对话框按钮ID
 35        btn_2=findViewById(R.id.btn_2);//寻找自定义对话框按钮ID
 36        btn_3=findViewById(R.id.btn_3);//寻找弹窗按钮ID
 37        btn_4=findViewById(R.id.btn_4);//寻找日期对话框按钮ID
 38        btn_5=findViewById(R.id.btn_5);//寻找时间对话框按钮ID
 39
 40         btn_1.setOnClickListener(this);//对话框按钮建立监听器
 41         btn_2.setOnClickListener(this);//自定义对话框按钮建立监听器
 42         btn_3.setOnClickListener(this);//弹窗按钮建立监听器
 43         btn_4.setOnClickListener(this);//日期对话框按钮建立监听器
 44         btn_5.setOnClickListener(this);//时间对话框按钮建立监听器
 45
 46
 47
 48
 49     }
 50 //实现按钮交互功能
 51 @Override
 52 public void onClick(View v) {
 53     switch (v.getId()){  //通过多分支选择判断:当选中对话框时,执行对话框按钮
 54         //①对话框响应事件
 55         case R.id.btn_1:
 56             AlertDialog.Builder builder=new AlertDialog.Builder(this);//AlertDialog创建一个Builder实例化建立器
 57             //通过builder实例化建立器来调用对话框属性:
 58             builder.setTitle("提示"); //设置对话框标题
 59             builder.setMessage("您是否退出?");//设置对话框信息提示
 60             builder.setNegativeButton("NO",null);//对话框信息提示,选择取消
 61             builder.setPositiveButton("YES", new DialogInterface.OnClickListener() {
 62                 //对话框信息提示,选项按钮,选择"YES"将执行DialogInterface监听器里面方法,执行退出
 63                 @Override
 64                 public void onClick(DialogInterface dialog, int which) {
 65                     finish();
 66                 }
 67             });
 68             builder.show();//对话框展示
 69             break;
 70
 71
 72
 73         //通过多分支选择判断:当选中对话框时,执行自定义对话框按钮
 74         case R.id.btn_2:
 75             mydialog mydialog=new mydialog(this,R.style.mydialog);
 76             //实例化mydialog设置参数( 参数1:环境上下文 (这里设置this), 参数2:导入样式R.style/样式名)
 77             mydialog.show();//展示效果
 78             break;
 79
 80
 81         //弹窗响应事件
 82         case R.id.btn_3:
 83             showPopupWindow(v);
 84             break;
 85         //日期对话框响应事件
 86         case R.id.btn_4:
 87             /**
 88              * 参数1:上下文
 89              * 参数2:日期设置监听器
 90              * 参数3-5:默认显示的年、月、日
 91              */
 92             DatePickerDialog datePickerDialog=new DatePickerDialog(MainActivity.this, new OnDateSetListener() {
 93                 @Override
 94                 public void onDateSet(DatePicker view, int year, int month, int dayOfMonth) {
 95                     Toast.makeText(MainActivity.this, "您当前选择日期:"+year+"年"+(month+1)+"月"+dayOfMonth+"日", Toast.LENGTH_SHORT).show();
 96                 }
 97             }, 2020, 3, 30);
 98             datePickerDialog.show();//展示日期对话框
 99             break;
100         //时间对话框响应事件
101         case R.id.btn_5:
102             /**
103              * 参数1:上下文
104              * 参数2:日期设置监听器
105              * 参数3-5:默认显示的小时、分钟、是否设置为24进制
106              */
107             TimePickerDialog timePickerDialog=new TimePickerDialog(MainActivity.this, new TimePickerDialog.OnTimeSetListener() {
108                 @Override
109                 public void onTimeSet(TimePicker view, int hourOfDay, int minute) {
110                     Toast.makeText(MainActivity.this, "您当前选择时间:"+hourOfDay+":"+minute, Toast.LENGTH_SHORT).show();
111                 }
112             }, 12, 33, true);
113             timePickerDialog.show();//展示时间对话框
114             break;
115     }
116 }
117     //设置popupWindows方法
118     public void showPopupWindow(View view) {
119 //1、准备弹窗需要的视图对象(通过View孵化类来加载弹窗布局)
120     View v= LayoutInflater.from(this).inflate(R.layout.popupwindow,null);
121
122 ///2、实例化对象popupwindow
123         //参数1:用在弹窗中的View
124         //参数2、3:弹窗的宽高
125         //参数4(focusable),是否获取焦点
126         final PopupWindow popupWindow=new PopupWindow(v,500,80,true);
127
128 //3、设置背景、动画
129         //设置背景
130         popupWindow.setBackgroundDrawable(new ColorDrawable(Color.TRANSPARENT));
131         //设置能响应外部的点击事件
132         popupWindow.setOutsideTouchable(true);
133         //设置能响应点击事件
134         popupWindow.setTouchable(true);
135
136
137
138
139
140 //4、显示
141         //参数1(anchor):锚
142         //参数2 、 3:相对于锚在x 、 y方向上的偏移量
143         popupWindow.showAsDropDown(view,1000,50);
144
145     //给弹出设置响应事件
146     v.findViewById(R.id.option).setOnClickListener(new View.OnClickListener() {
147         @Override
148         public void onClick(View v) {
149             Toast.makeText(MainActivity.this, "选择", Toast.LENGTH_SHORT).show();
150             popupWindow.dismiss();//弹窗消失
151         }
152     });
153         v.findViewById(R.id.copy).setOnClickListener(new View.OnClickListener() {
154             @Override
155             public void onClick(View v) {
156                 Toast.makeText(MainActivity.this, "复制", Toast.LENGTH_SHORT).show();
157                 popupWindow.dismiss();//弹窗消失
158             }
159         });
160         v.findViewById(R.id.paste).setOnClickListener(new View.OnClickListener() {
161             @Override
162             public void onClick(View v) {
163                 Toast.makeText(MainActivity.this, "粘贴", Toast.LENGTH_SHORT).show();
164                 popupWindow.dismiss();//弹窗消失
165             }
166         });
167
168     }
169
170
171
172
173 //    上下文菜单普通方法
174     public void show(){
175         AlertDialog dialog=new AlertDialog.Builder(this).create();
176         dialog.setTitle("提示");
177         dialog.setMessage("您确定要退出吗?");
178         dialog.setButton(DialogInterface.BUTTON_POSITIVE, "确定", new DialogInterface.OnClickListener() {
179             @Override
180             public void onClick(DialogInterface dialog, int which) {
181
182             }
183         });
184         dialog.show();
185     }
186
187
188
189
190
191
192 }
2、mydialog.java自定义对话框
 1 package com.example.adf520;
 2
 3 import android.app.Dialog;
 4 import android.content.Context;
 5 import android.view.View;
 6
 7 import androidx.annotation.NonNull;
 8
 9 public class mydialog extends Dialog {
10
11     public mydialog(@NonNull Context context, int themeResId) {
12         super(context, themeResId);
13         setContentView(R.layout.dialog_main);//输出自定义对话框布局
14
15 /**总结自定义对话框步骤:
16  * ①设计自定义对话框布局样式--》dialog_layout.xml
17  * ②设计style文件(关闭自定义对话框的标题、去除背景(把背景设置成透明色))
18  *③ 将第一步的布局应用到当前自定义对话框(mydialog.java中设置,另外也要实现YES按钮和NO按钮的响应功能)
19  * ④在MainActivity.java实例化对话框(参数1:环境上下文(默认设置:this),参数2:导入样式R.style/样式名     ;并且show()方法展示出对话框效果)
20  */
21
22
23
24
25         //YES按钮安装监听器,实现响应功能
26         findViewById(R.id.yesbutton).setOnClickListener(new View.OnClickListener() {
27             @Override
28             public void onClick(View v) {
29                 System.exit(0);      //自定义对话框点击YES按钮时,执行退出
30             }
31         });
32             //NO按钮安装监听器,实现响应功能
33         findViewById(R.id.nobutton).setOnClickListener(new View.OnClickListener() {
34             @Override
35             public void onClick(View v) {
36               dismiss();  //自定义对话框点击NO按钮时,取消
37             }
38         });
39     }
40 }
Androidstudio复习弹窗对话框(Popupwindow)、日期对话框(DataPickerDialog)、时间对话框(TimePickerDialog)制作综合小demo
标签:find sage pos copy pre adf 交互 ntb view
原文地址:https://www.cnblogs.com/adf520/p/12813734.html