标签:kill root 占用 工作 linux 进入 情况 环境变量 写入文件
容器及镜像注意: 查看docker状态使用的命令:
常见的选项介绍:
--name: 指定容器名称-i: 交互式运行和-t一起使用,可以合成-it使用-t: 允许tty-e: 设置容器启动的环境变量,例如mysql的容器启动需要指定-e MYSQL_ROOT_PASSWORD=‘12345‘等-d: detach,后台运行--network: 指定网络--restart: always,-p: 端口映射-v: 指定存储卷--rm: 运行之后删除,需要与-it配合使用,但是与-d互斥-m: 限制最大使用内存--oom-kill-disable:禁止oom--cpus: 限定使用的CPU容量
[root@centos7-node1 ~]# docker run --name redis -d redis:4-alpine常见的选项介绍:
-d: 后台运行-e: 指定环境变量-it: 交互模式-u: 指定用户-w: 指定工作路径
[root@centos7-node1 ~]# docker container exec redis netstat -tanlp    #对容器执行命令
[root@centos7-node1 ~]# docker exec -it redis /bin/sh
/data # redis-cli    #客户端连接redis
127.0.0.1:6379> set hello my_name_is_wanghui
OK
127.0.0.1:6379> get hello
"my_name_is_wanghui"[root@centos7-node1 ~]# docker stop redis # 未指定存储卷的情况下,停止容器之后数据会丢失
[root@centos7-node1 ~]# docker start redis[root@centos7-node1 ~]# docker image pull nginx:1.18-alpine
[root@centos7-node1 ~]# docker run --name web -it --rm nginx:1.18-alpine /bin/sh #推出交互模式就自动退出并删除容器
[root@centos7-node1 ~]# docker run --name web -d nginx:1.18-alpine
[root@centos7-node1 ~]# docker container exec web ifconfig #获取创建机器的ip
[root@centos7-node1 ~]# elinks -dump 172.17.0.3 #访问页面
[root@centos7-node1 ~]# docker logs web -f #查看Nginx 滚动日志
[root@centos7-node1 ~]# docker stats web #查看web这个容器运行时资源占用情况
[root@centos7-node1 ~]# docker top web #查看web这个容器的进程状态
[root@centos7-node1 ~]# docker run --name c2 -it centos:7
[root@f879de456c8d /]#
[root@f879de456c8d /]# [root@centos7-node1 ~]# `ctrl+p,ctrl+q`
[root@centos7-node1 ~]# docker ps #c2是运行状态的
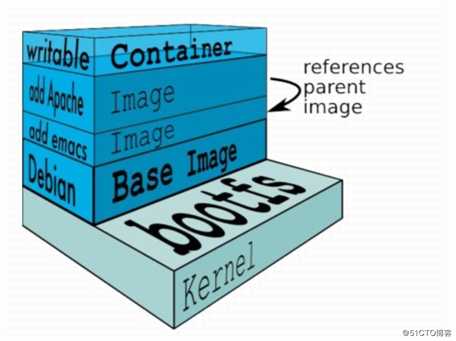
[root@centos7-node1 ~]# docker attach c2 #进入容器docker镜像含有启动容器时所需要的文件系统及其内容,因此,其用于创建并启动容器
分层构建机制,最底层为bootfs,其次为rootfs
只读模式,完整性比肩完成之后重新挂载为读写模式
只读模式,而后通过联合挂载技术,额外在挂载一个可写层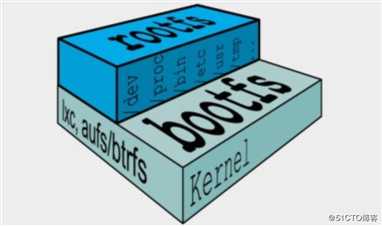
特点: 分层叠加,写时复制(COW)
此文件系统是建构在底层操作系统文件系统之上用于存放镜像的文件系统,建议底层支持操作系统务必使用xfs文件系统
分类如下:
联合挂载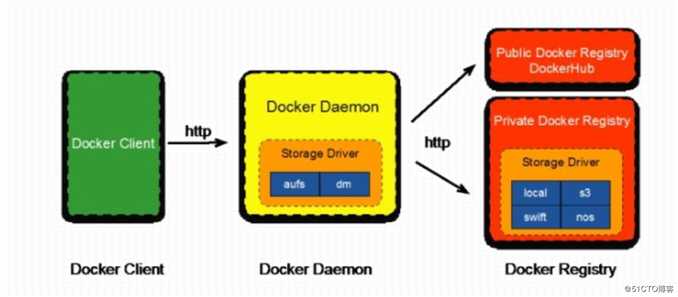
Registry用于保存docker镜像,包括景象的层次结构和元数据
用户可以自建Registry,也可以使用官方的dockerhub
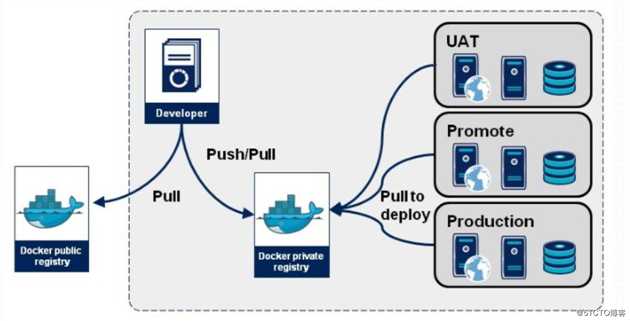
Repostory
顶层仓库和用户仓库用户名/仓库名Tag,每个Tag只对应一个镜像docker registry中的镜像由开发或者运维人员制作,而后推送到“公共”或者“私有”Repostry上保存,供其他人使用
例如: 部署到生产环境
myimg仓库[root@centos7-node1]# docker pull busybox:latest
[root@centos7-node1 ~]# docker run --name b1 -it -d busybox /bin/sh
/ # mkdir /data/web/html -p
/ # echo "<h1>this is a test page @busyboxServer</h1>" > /data/web/html/index.html
[root@centos7-node1 ~]# docker container commit b1 wanghui122725501/myimg:v0.1 #另起终端打包镜像
[root@centos7-node1 ~]# docker images #查看镜像
REPOSITORY TAG IMAGE ID CREATED SIZE
wanghui122725501/myimg v0.1 baf6ad6a846f About a minute ago 1.22MB
[root@centos7-node1 ~]# docker run --name mybbox1 -it wanghui122725501/myimg:v0.1 #运行容器
/ # ls /data/web/html/ #此文件已被写入文件系统
[root@centos7-node1 ~]# docker login #登陆dockerhub
[root@centos7-node1 ~]# docker push wanghui122725501/myimg:v0.1 #推送镜像
[root@centos7-node1 ~]# docker container commit -p -a "wanghui@yeecall.com" -c "CMD [‘/bin/httpd -f -h /data/web/html‘]" b1 wanghui122725501/myimg:v0.2 #前台运行httpd
[root@centos7-node1 ~]# docker tag wanghui122725501/myimg:v0.2 wanghui122725501/myimg:latest
[root@centos7-node1 ~]# docker push wanghui122725501/myimg:v0.2 #镜像推送
-----另起终端,进入b1容器
[root@centos7-node1 ~]# docker exec -it b1 sh
/ # /bin/httpd -f -h /data/web/html/ #执行httpd
[root@centos7-node1 ~]# curl 172.17.0.5 #另起终端执行
<h1>this is a test page @busyboxServer</h1>标签:kill root 占用 工作 linux 进入 情况 环境变量 写入文件
原文地址:https://blog.51cto.com/13812615/2500174