标签:spn logs class 传递 sde develop tab 自定义 env
原文:.NET CORE 中间件
对于中间件我们其实并不陌生,在.NET CORE出现之前中间件的概念在OWIN应用程序中就已经普遍使用了。
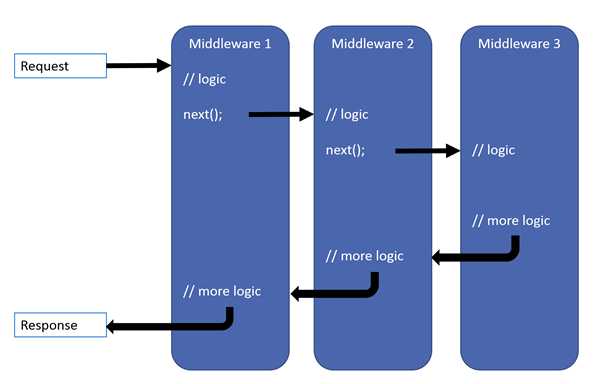
中间件官方定义: 中间件是一种集成到应用管道中间来处理请求和响应的模块,每个中间件可以:
ASP.NETCORE中的中间件本质上是一个请求委托 Func< RequestDelegate, RequestDelegate> middleware。
RequestDelegate本身也是一个委托,定义为 public delegate Task RequestDelegate(HttpContext Context)。
在ASP.NETCORE请求管道中,形成一条委托链。

请求管道短路:当委托不选择将请求传递到下一个委托时,称之为“短路”。
在ASP.NETCORE中,使用 IApplicationBuilder 来创建/插入中间件管道。提供了 Run和Use 两类方式。依赖组件包 Microsoft.AspNetCore.Http.Abstractions
Run是一种 约定 的终端管道,即短路,不再执行下一个委托
    public void Configure(IApplicationBuilder app, IWebHostEnvironment env)
    {
        if (env.IsDevelopment())
        {
            app.UseDeveloperExceptionPage();
        }


        app.Run(async context => { await context.Response.WriteAsync("hello world 1"); });
		//这里不会执行到!!
		app.Run(async context => { await context.Response.WriteAsync("hello world 2"); });

    }
Use通常以扩展方法提供中间件,很适合处理一些AOP的事务。
    public void Configure(IApplicationBuilder app, IWebHostEnvironment env)
    {
        if (env.IsDevelopment())
        {
            app.UseDeveloperExceptionPage();
        }

        app.Use(async (context, next) =>
        {
            //可以在invoke之前做一些事
            await next.Invoke();
            //可以在invoke之后做一些事
        });

        app.Run(async context => { await context.Response.WriteAsync("hello world"); });
    }
实际开发中我们通常需要自己定义中间件,有两种方式可以实现。
public class RequestIdInRequestMiddleware
{
    private readonly RequestDelegate _next;

    public RequestIdInRequestMiddleware(RequestDelegate next)
    {
        _next = next;
    }

    public Task Invoke(HttpContext httpContext,IService service)
    {
		service.SayHello();
        //request head 加入requestid
        var requestId = Guid.NewGuid().ToString("n");
        httpContext.Request.Headers.Add("REQUESTID", requestId);

        return _next(httpContext);
    }
}
如上有以下约定:
RequestDelegate 的参数公共构造函数Invoke 或 InvokeAsync 的公共方法,且此方法必须:
TaskHttpContext目前官方是推荐使用约定方式, 注意:该方式加入管道中的生命周期为单例。也因此如果依赖一些Service,建议从Invoke 或 InvokeAsync的方法参数注入,而不是从构造函数注入。(可以想想为什么?单例构造函数注入对Service的生命周期有要求~~)。
官方也提供了IMiddleware接口,用于扩展创建中间件。这种方式有两个优点:
可以按需(生命周期)注入
中间件强类型话,更易理解
  public class RequestIdInResponseMiddleware:IMiddleware
  {
      private readonly IService _service;

      public RequestIdInResponseMiddleware(IService service)
      {
          _service = service;
      }

      public Task InvokeAsync(HttpContext context, RequestDelegate next)
      {
          var requestId = Guid.NewGuid().ToString("n");
          context.Response.Headers.Add("REQUESTID", requestId);

          return next(context);
      }
  }
中间件一般都是基于IApplicationBuilder扩展方法加入管道。
public static class RequestIdMiddlewareExtensions
{
    public static IApplicationBuilder UseRequestIdInResponseMiddleware(this IApplicationBuilder builder)
    {
        return builder.UseMiddleware<RequestIdInResponseMiddleware>();
    }
}
可以在 Configure 方法中调用加入 app.UseRequestIdInResponseMiddleware();
如果是 强类型 方式创建的Middleware,还需要在 ConfigureServices 中注册 services.AddSingleton<RequestIdInResponseMiddleware>();
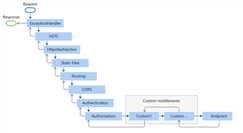
中间件显著受加入的顺序影响,官方提供的默认中间件顺序图

Map 扩展用来约定创建管道分支,和管道短路类似,不过它是基于给定的请求路径匹配项来创建请求管道分支。官方提供的例子,
public class Startup
{
    private static void HandleMapTest1(IApplicationBuilder app)
    {
        app.Run(async context =>
        {
            await context.Response.WriteAsync("Map Test 1");
        });
    }

    private static void HandleMapTest2(IApplicationBuilder app)
    {
        app.Run(async context =>
        {
            await context.Response.WriteAsync("Map Test 2");
        });
    }

    public void Configure(IApplicationBuilder app)
    {
        app.Map("/map1", HandleMapTest1);

        app.Map("/map2", HandleMapTest2);

        app.Run(async context =>
        {
            await context.Response.WriteAsync("Hello from non-Map delegate. <p>");
        });
    }
}
根据请求会响应不同结果
| 请求 | 响应 |
|---|---|
| localhost:1234 | Hello from non-Map delegate. |
| localhost:1234/map1 | Map Test 1 |
| localhost:1234/map2 | Map Test 2 |
| localhost:1234/map3 | Hello from non-Map delegate. |
另外还可以使用 UseWhen 创建管道分支,只有匹配一定条件才会短路管道。
public void Configure(IApplicationBuilder app)
{
	//只有请求url包含查询字符串变量 branch,才会短路管道
    app.UseWhen(context => context.Request.Query.ContainsKey("branch"),
                builder => builder.Use(async (context, next) =>
                     {
                         var branchVer = context.Request.Query["branch"];
                         // Do work that doesn‘t write to the Response.
                         await next();
                         // Do other work that doesn‘t write to the Response.
                     }));

    app.Run(async context =>
    {
        await context.Response.WriteAsync("Hello from main pipeline.");
    });
}
针对中间件的单元测试,可以使用 TestServer 来进行。它有以下几个优点:
HttpContexthttp请求发送模拟可以使用 HttpClient 和 HttpContext ,分别可以验证Response和Request Context相关功能。下面分别测试RequestIdInRequestMiddleware,RequestIdInResponseMiddleware。
新建xunit单元测试项目,加入依赖包: Microsoft.AspNetCore.TestHost , Microsoft.Extensions.Hosting 。
测试代码如下:
public class MiddlewareTest
{
    /// <summary>
    /// HttpContext模拟,验证request header是否成功加入requestId
    /// </summary>
    [Fact]
    public void MiddlewareTest_RequestHeaderExistRequestId()
    {
        var hostBuilder = new HostBuilder()
            .ConfigureWebHost(webBuilder =>
            {
                webBuilder
                    .UseTestServer()
                    .ConfigureServices((context, services) =>
                    {
                        services.AddTransient<IService, MyService>();
                    })
                    .Configure(app =>
                    {
                        app.UseRequestIdInRequestMiddleware();
                    });
            });
        using (var host = hostBuilder.Start())
        {
            var context = host.GetTestServer().SendAsync(c =>
                    {
                        c.Request.Path = "/map";
                        c.Request.Method = HttpMethods.Get;
                    }).Result;

            Assert.True(context.Request.Headers.ContainsKey("REQUESTID"));
        }
    }
    /// <summary>
    /// HttpClient模拟,验证response header是否成功加入requestId
    /// </summary>
    [Fact]
    public void MiddlewareTest_ResponseHeaderExistRequestId()
    {
        var hostBuilder = new HostBuilder()
            .ConfigureWebHost(webBuilder =>
            {
                webBuilder
                    .UseTestServer()
                    .ConfigureServices((context, services) =>
                    {
                        services.AddSingleton<RequestIdInResponseMiddleware>();
                        services.AddTransient<IService, MyService>();
                    })
                    .Configure(app =>
                    {
                        app.UseRequestIdInResponseMiddleware();
                    });
            });
        using (var host = hostBuilder.Start())
        {
            host.GetTestServer().CreateRequest("/map").GetAsync()
                .ContinueWith(task =>
                {
                    var response = task.Result;
                    Assert.True(response.Headers.Contains("REQUESTID"));
                }).Wait();
        }
    }
}标签:spn logs class 传递 sde develop tab 自定义 env
原文地址:https://www.cnblogs.com/lonelyxmas/p/13046540.html