标签:解决方法 odi 其他 xsd err 现在 面向 ext nal

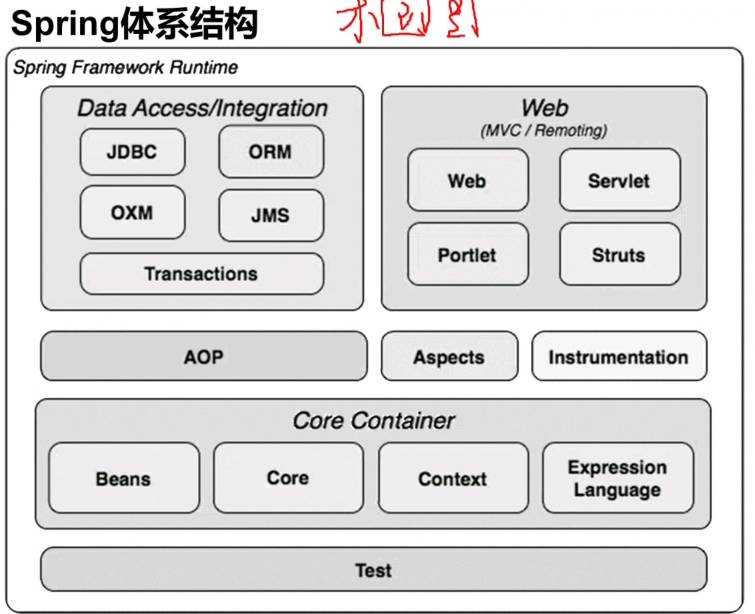
1.这个框架图是从下往上看的,可以看出测试的重要性。
2.servlet会进行容器管理,controler,不会再有重定型和跳转界面,只会进行传输json数据。可以解决多端问题。
3.在测试的基础上,核心容器Core Container对象,两个作用,一:可以帮我们生成控件,二,可以帮我们维护对象之间的关系。
4.容器帮我们创建的对象是带有上下文(context)的,就是运行环境,servlet访问上下文是通过application,application是servletcontext的。
5.Core Container也叫做ioc:控制反转,也叫做注入依赖;
6.
Spring是面相Bean的编程
控制反转的正式定义:将对象的控制权从代码本身转移到外部容器。
控制反转:原本自己手工new对象现在转换为容器帮忙创建,手动控制变为容器控制。学了SPring之后学会让容器创建对象,把自己创建对象交给容器管理。
依赖注入:我们需要使用A方法,而使用A方法需要实例化并调用B方法,我们说A类依赖B类。但是创建和调用B均是由容器完成的,而我们不关心B,我们只关心A,这个就是B就是注入。
组件化的思想:分离关注点,使用接口,不再关注实现。要点:明确定义组件间的接口。
Aop的目标:让我们可以“专心做事”
Aop的原理:
AOP面向切面:1.散布在业务系统中的共性内容取出来形成切面;
2.通过预编译/代理技术在程序运行时将切面内容切入业务系统。
一。创建新的一个模块,然后引入jar包(all所有的jar包),
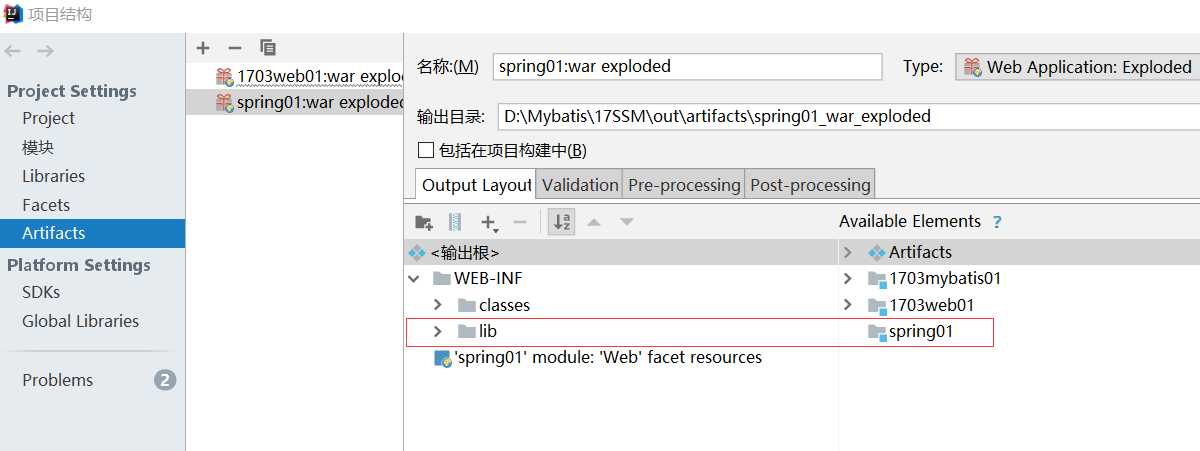
然后记得在项目结构中添加项目的jar包以及tomcat服务器。
当我们把之前的所有引入到新的spring01模块的时候,可能会报错,此时的原因可能是lib未引入。

此时右下角有一个fix(修复),点击“应用”,然后tomcat服务器添加这个项目,项目可能会报错,如果报错,运行之后再点击项目右键选择redeploy。
二:通过实例增加对Spring的理解:
1.1创建一个Person类,覆toString方法.
package com.service;

public class Person {
    private String name;

    @Override
    public String toString() {
        return "我的名字是:" + name;
    }

    public String getName() {
        return name;
    }

    public void setName(String name) {
        this.name = name;
    }
}
1.2再创建一个helloPerson,每个HellowPerson类当中都有一个Person类。
package com.service;

import org.springframework.context.ApplicationContext;
import org.springframework.context.support.ClassPathXmlApplicationContext;

public class HelloPerson {
    private Person person;

    public void show() {
        System.out.println(person);
    }

    public Person getPerson() {
        return person;
    }

    public void setPerson(Person person) {
        this.person = person;
    }

    public static void main(String[] args) {
        //<bean class="com.service.Person" id="person">
        Person person = new Person();
        person.setName("齐德龙");
        HelloPerson helloPerson = new HelloPerson();
        helloPerson.setPerson(person);
        // <property name="person" ref="person"/>
        // 调用helloPerson的方法
        helloPerson.show();
        // 创建工厂,下面是通过spring完成,上面是常规创建
        ApplicationContext ctx = new ClassPathXmlApplicationContext("core.xml");
        // 从工厂获取对象
        HelloPerson hp = (HelloPerson) ctx.getBean("helloPerson");
        hp.show();
    }
}
1.3创建spring配置文件。(在src下创建一个xml中的spring config配置文件 core.xml)
刚创建时是这样的:
<?xml version="1.0" encoding="UTF-8"?>
<beans xmlns="http://www.springframework.org/schema/beans"
       xmlns:xsi="http://www.w3.org/2001/XMLSchema-instance"
       xsi:schemaLocation="http://www.springframework.org/schema/beans http://www.springframework.org/schema/beans/spring-beans.xsd">

</beans>
解释:bean中第一行:xmlns是命名空间。是主配置,可以在浏览器中打开网址,是一些配置模板。默认的命名空间
第二行:
第三行:后面网址是记录的版本号,可以参考模板,如果不知道版本号,可以直接spring-beans.xsd。xsd定义标签的作用。
引入其他命名空间步骤:
1.在第二行下,引入所需要的命名空间,eg:xmlns="http://www.springframework.org/schema/aop" xmlns="http://www.springframework.org/schema/mvc"
2.在第三行里引入:eg:http://www.springframework.org/schema/beans http://www.springframework.org/schema/beans/spring-beans.xsd(黑色是需更改)
之后我们完成注入依赖与控制反转:
eg:
<?xml version="1.0" encoding="UTF-8"?>
<beans xmlns="http://www.springframework.org/schema/beans"
       xmlns:xsi="http://www.w3.org/2001/XMLSchema-instance"
       xmlns:context="http://www.springframework.org/schema/context"
       xmlns:aop="http://www.springframework.org/schema/aop"
       xmlns:mvc="http://www.springframework.org/schema/mvc"
       xsi:schemaLocation="http://www.springframework.org/schema/beans http://www.springframework.org/schema/beans/spring-beans.xsd
      http://www.springframework.org/schema/context
       http://www.springframework.org/schema/context/spring-context.xsd
       http://www.springframework.org/schema/aop
       http://www.springframework.org/schema/aop/spring-aop.xsd
       http://www.springframework.org/schema/mvc
       http://www.springframework.org/schema/context/spring-mvc.xsd">
    <bean class="com.service.Person" id="person">
        <property name="name" value="钱东强"/>
    </bean>
    <bean class="com.service.HelloPerson" id="helloPerson">
        <property name="person" ref="person"/>
    </bean>
</beans>
说明:一个property对应一个属性,由于name是string类型,使用value。而类类型是引用类型,参数类型设为ref;
而在spring中我们想要调用,首先需要创建工厂:(注意这里的bean实例化参数与xml文件中bean的id是一致的)
        ApplicationContext ctx = new ClassPathXmlApplicationContext("core.xml");
        // 从工厂获取对象
        HelloPerson hp = (HelloPerson) ctx.getBean("helloPerson");
        hp.show();
巩固对spring的理解:
spring中配置过的类都可以通过工厂进行使用:
Spring工厂:
1.ClasspathXmlApplicationContext classpath中搜索spring配置文件
2.FileSystemXmlApplicationContext 文件系统
3.XmlWebApplicationContext web
Bean标签:进行控制反转,并且可以控制作用域 通过scope:有四个取值。单例:
1.singleton(所有的都是同一个,默认)
2.prototype(每次读取都会返回新的,像每次new新对象一样)
3.request (一个请求一个,在web下才有效果)
4.session (一个会话内同一个)
1.使用Spring AOP实现日志输出,步骤:
对应第二步:(本例子是打印机,对应Print类当中的print方法)
package com.service;

import org.aspectj.lang.JoinPoint;

import java.util.Arrays;
import java.util.logging.Logger;

// 日志切面
public class LogAdvice {
    static final Logger log = Logger.getLogger("LogAdvice");
    // 前置增强
    public void before(JoinPoint jp){            //JoinPoint引入点
        String info = String.format("开始——目标对象:%s——目标方法:%s——参数列表:" +
                "%s",jp.getTarget(),jp.getSignature().getName(),
                Arrays.toString(jp.getArgs()));
        log.info(info);
    }
    // 后置增强
    public void after(JoinPoint jp, Object result){
        String info = String.format("结束——目标对象:%s——目标方法:%s——参数列表:" +
                        "%s——返回值:%s",jp.getTarget(),jp.getSignature().getName(),
                Arrays.toString(jp.getArgs()),result);
        log.info(info);
    }

}
对应第3步:概念:

实例:
 <bean class="com.service.Printer" id="printer"><!--控制反转-->
        <property name="ink">  <!--依赖注入-->
            <bean class="com.service.ColorInk"/>
        </property>
        <property name="pagers">
            <list>
                <bean class="com.service.A4Paper"/>
                <bean class="com.service.B5Paper"/>
            </list>
        </property>
    </bean>

    <!--定义切面对象-->
    <bean class="com.service.LogAdvice" id="logAdvice"/>
    <!--切面配置-->
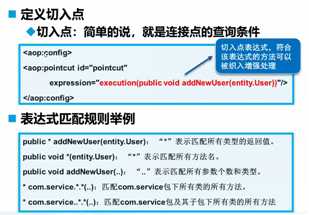
    <aop:config>
        <aop:pointcut id="pc"
                      expression="execution(* com.service.Printer.print(..))"/>
        <aop:aspect ref="logAdvice"><!--引入切面-->
            <aop:before method="before" pointcut-ref="pc"/><!--方法,配置切入点-->
            <aop:after-returning method="after" pointcut-ref="pc"
                                 returning="result"/>
        </aop:aspect>
    </aop:config>
单元测试:
package com.service;

import org.junit.BeforeClass;
import org.junit.Test;
import org.springframework.context.ApplicationContext;
import org.springframework.context.support.ClassPathXmlApplicationContext;

public class PrinterTest {
    static ApplicationContext ctx = null;
    @BeforeClass
    public static void load(){
        ctx = new ClassPathXmlApplicationContext("core.xml");
    }
    @Test
    public void print(){
        IPrinter printer = (IPrinter) ctx.getBean("printer");
        printer.print("这是一段要打印的话!!!",3, Paper.A4);
        printer.print("这是一段要打印的话!!!",3, Paper.B5);
    }
}
在getbean使用代理增强的时候,返回的应该是print的子类,如果动态生成他的子类,那么应该引入一些类库。解决方法:我们可以给打印机print创建一个接口,然后把print实现接口,是其中一种面向切面的方法。
接口:
package com.service;

public interface IPrinter {
    void print(String msg, int count, Paper.Size size);
}
织入:将通知与前置增强与后置增强相配置就是织入。
在上面中关于接口的问题,其实是使用了代理模式,是动态编译,如下为静态的,可供参考:
package com.service;

public class $Proxy5Test implements IPrinter {
    private IPrinter target;  // 目标对象
    private LogAdvice logAdvice;  // Advice
    @Override
    public void print(String msg, int count, Paper.Size size) {
        // 1、执行前
        logAdvice.before(null);
        // 2、执行
        target.print(msg,count,size);
        // 3、执行后
        logAdvice.after(null,null);
    }
}
至于如果通过预编译处理,则会通过修改源代码进行处理。
标签:解决方法 odi 其他 xsd err 现在 面向 ext nal
原文地址:https://www.cnblogs.com/zxdup/p/13073249.html