标签:style net l数据库 令行 客户端 sla tin ora mysql主从
一、说明
数据库名称 端口号 角色
mysql-m1 3320 master
mysql-s1 3321 slave1
二、免安装数据库
1、免安装mysql 下载地址:https://dev.mysql.com/downloads/mysql/ ;注意下载(mysql-8.0.20-winx64.zip)
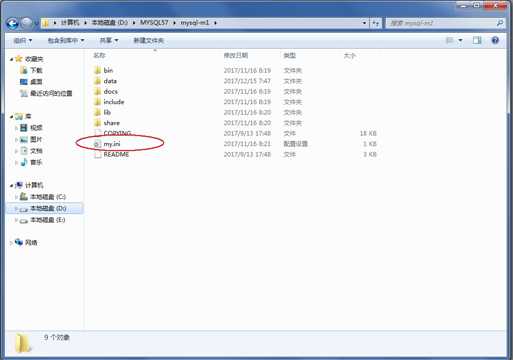
2、本地找个位置创建文件夹分别为:mysql-m1(主)、mysql-s1(从),将解压文件夹内的文件分别拷贝到文件夹,并分别在目录下创建my.ini文件


3、my.ini文件配置 (以下的D:\\worksoftware\\mysql-zc 替换成你本地的位置)
mysql-m1:
[mysql]
#设置mysql客户端默认字符集
default-character-set=utf8
[mysqld]
log_bin = log
basedir = D:\\worksoftware\\mysql-zc\\mysql-m1
datadir = D:\\worksoftware\\mysql-zc\\mysql-m1\\data
port = 3320
character_set_server=utf8
server_id = 20
sql_mode=NO_ENGINE_SUBSTITUTION,STRICT_TRANS_TABLES
mysql-s1:
[mysql]
#设置mysql客户端默认字符集
default-character-set=utf8
[mysqld]
#log_bin = log 从库可以不开启binlog
basedir = D:\\worksoftware\\mysql-zc\\mysql-s1
datadir = D:\\worksoftware\\mysql-zc\\mysql-s1\\data
port = 3321
character_set_server=utf8
server_id = 21
sql_mode=NO_ENGINE_SUBSTITUTION,STRICT_TRANS_TABLES
四、初始化mysql操作(主,从操作一样)
1、以管理员身份打开命令行窗口(组合键win+R,在打开中输入cmd,点击确定)
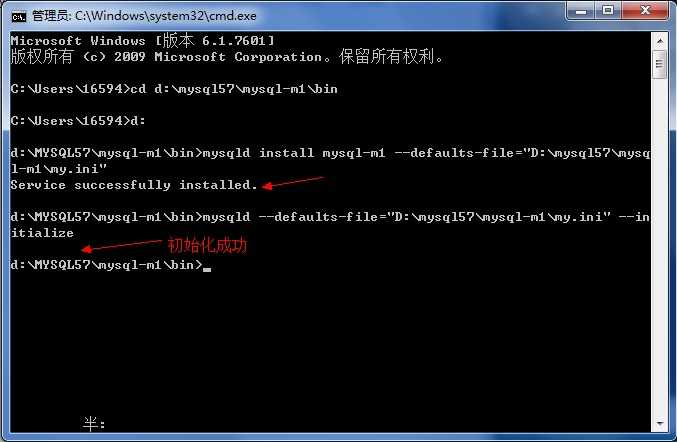
2、在命令行窗口中,切换至mysql-m1/bin目录下,然后执行mysqld install mysql-m1 –defaults-file="D:\worksoftware\mysql-zc\mysql-m1\my.ini",提示Service successfully installed。
3、初始化数据,执行mysqld --initialize,稍等片刻,执行成功没有任何提示。执行成功后在mysql-m1目录下多出一个data文件夹

4、启动数据库
通过服务窗体,找到数据库实例名称,点击启动。
在命令行窗口中输入:net start mysql-m1
5、重置mysql密码
在实例化mysql数据库时,系统会自动生成一个root用户密码。我们可以用记事本打开data目录下的*.err文件(*一般是计算机名),找到A temporary password is generated for root@localhost: (iQ4?Ilk2p0.
。其中“(iQ4?Ilk2p0.”就是系统默认生成的密码。

6、然后在命令行窗口下执行命令,mysql -P3320 -uroot -p,然后输入密码:(iQ4?Ilk2p0.。登录成功后,执行以下命令修改root用户密码为root(以下操作能保证在navicat正常登陆)。
ALTER USER ‘root‘@‘localhost‘ IDENTIFIED BY ‘root‘ PASSWORD EXPIRE NEVER;
alter user ‘root‘@‘localhost‘ identified with mysql_native_password by ‘root‘;
flush privileges;
7、在master库中创建slave用户
登录主库:mysql -P3320 -uroot -p123456
登录之后创建从库登陆主库账号:
create user ‘test‘@‘localhost‘ identified by ‘test‘;
GRANT REPLICATION SLAVE ON *.* to ‘test‘@‘localhost‘(或者GRANT all ON *.* to ‘test‘@‘localhost‘)
新建test账号需要以下操作:
mysql -P3320 -uroot -proot
alter user ‘test‘@‘localhost‘ identified by ‘test‘ password expire never;
alter user ‘test‘@‘localhost‘ identified with mysql_native_password by ‘test‘;
flush privileges;
8、查看主库信息
show master status; 记录下file和position信息(log.000003和448)。
9、配置从库信息
登录从库:mysql -P3321 -uroot -proot
配置从库的mster: change master to master_host=‘127.0.0.1‘,master_port=3320,master_user=‘test‘,master_password=‘test‘,master_log_file=‘log.000003‘,master_log_pos=448;
10、从库开启数据库复制功能
start slave;
11、查看从库信息
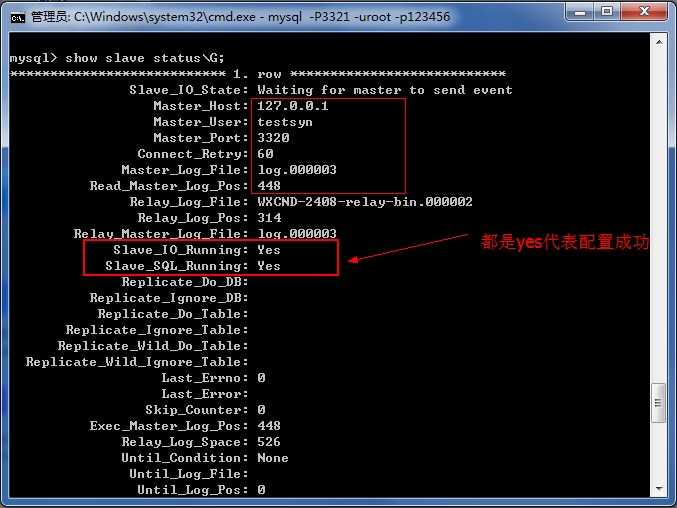
show slave status \G(不需要;分号结尾)

五、以上操作执行完就可以测试了,navicat登陆主从库,在主库中新建数据库,表,数据,从库同时会出现。(其他工具测试应该也没问题)
六、遇到问题解决方案
1、slave_io_running connecting 问题
参考:https://blog.csdn.net/mbytes/article/details/86711508
1、计算机丢失vcruntime140_1.dll
参考: https://blog.csdn.net/mr__sun__/article/details/104669448
2、navicat 登录不上 报1251 解决办法: cmd 管理员运行,cd到mysqlbin路径下执行以下命令
mysql -P3320 -uroot -proot
alter user ‘root‘@‘localhost‘ identified by ‘root‘ password expire never;
alter user ‘root‘@‘localhost‘ identified with mysql_native_password by ‘root‘;
flush privileges;

标签:style net l数据库 令行 客户端 sla tin ora mysql主从
原文地址:https://www.cnblogs.com/mustanglqt/p/13156041.html