标签:mit pos 输入 image head stand none width features
Kaggle上的犬种识别(ImageNet Dogs)
Dog Breed Identification (ImageNet Dogs) on Kaggle
在本节中,将解决在Kaggle竞赛中的犬种识别挑战。比赛的网址是
https://www.kaggle.com/c/dog-breed-identification
在这场竞赛中,试图鉴别120种不同品种的狗。本次竞赛中使用的数据集实际上是著名的ImageNet数据集的一个子集。与CIFAR-10数据集中的图像不同,ImageNet数据集中的图像更高更宽,尺寸不一致。
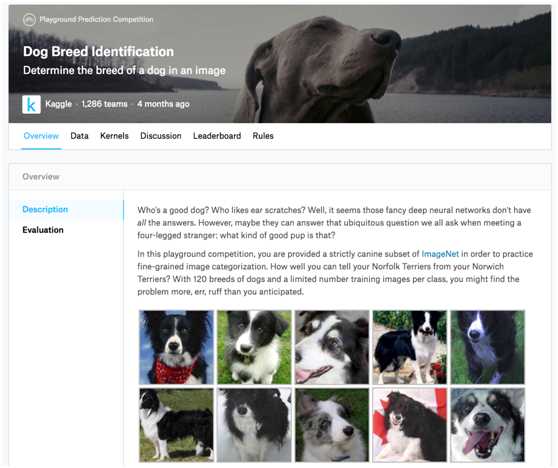
图1显示了比赛网页上的信息。为了提交结果,请先在Kaggle网站注册一个帐户。

Fig. 1 Dog breed identification competition website. The dataset for the competition can be accessed by clicking the “Data” tab.
首先,导入比赛所需的软件包或模块。
import collections
from d2l import mxnet as d2l
import math
from mxnet import autograd, gluon, init, npx
from mxnet.gluon import nn
import os
import time
npx.set_np()
1. Obtaining and Organizing the Dataset
比赛数据分为训练集和测试集。训练集包含10222帧图像和测试集包含10357帧图像。两组图像均为JPEG格式。这些图像包含三个RGB通道(颜色),具有不同的高度和宽度。训练集中有120种狗,包括拉布拉多犬、贵宾犬、腊肠犬、萨摩耶犬、哈士奇犬、吉娃娃犬和约克郡梗(Labradors, Poodles, Dachshunds, Samoyeds, Huskies, Chihuahuas, and Yorkshire Terriers)。
1.1. Downloading the Dataset
登录Kaggle后,点击图1所示犬种识别比赛网页上的“数据”选项卡,点击“全部下载”按钮下载数据集。在../data中解压缩下载的文件后,将在以下路径中找到整个数据集:
可能已经注意到,上述结构与第13.13节中的CIFAR-10竞赛非常相似,其中文件夹分别训练/和测试/包含训练和测试狗图像,以及标签.csv有训练图像的标签。
类似地,为了更容易开始,提供了上面提到的数据集的小规模样本,“train_valid_test_tiny.zip”. 如果要为Kaggle竞赛使用完整的数据集,还需要将下面的demo变量更改为False。
#@save
d2l.DATA_HUB[‘dog_tiny‘] = (d2l.DATA_URL + ‘kaggle_dog_tiny.zip‘,
‘7c9b54e78c1cedaa04998f9868bc548c60101362‘)
# If you use the full dataset downloaded for the Kaggle competition, change
# the variable below to False
demo = True
if demo:
data_dir = d2l.download_extract(‘dog_tiny‘)
else:
data_dir = os.path.join(‘..‘, ‘data‘, ‘dog-breed-identification‘)
1.2. Organizing the Dataset
组织数据集,即将验证集与训练集分离,并将图像移动到按标签分组的子文件夹中。
下面的reorg_dog_data函数用于读取训练数据标签、分割验证集并组织训练集。
def reorg_dog_data(data_dir, valid_ratio):
labels = d2l.read_csv_labels(os.path.join(data_dir, ‘labels.csv‘))
d2l.reorg_train_valid(data_dir, labels, valid_ratio)
d2l.reorg_test(data_dir)
batch_size = 1 if demo else 128
valid_ratio = 0.1
reorg_dog_data(data_dir, valid_ratio)
2. Image Augmentation
此部分中的图像的大小大于上一部分中的图像。下面是一些可能有用的图像增强操作。
transform_train = gluon.data.vision.transforms.Compose([
# Randomly crop the image to obtain an image with an area of 0.08 to 1 of
# the original area and height to width ratio between 3/4 and 4/3. Then,
# scale the image to create a new image with a height and width of 224
# pixels each
gluon.data.vision.transforms.RandomResizedCrop(224, scale=(0.08, 1.0),
ratio=(3.0/4.0, 4.0/3.0)),
gluon.data.vision.transforms.RandomFlipLeftRight(),
# Randomly change the brightness, contrast, and saturation
gluon.data.vision.transforms.RandomColorJitter(brightness=0.4,
contrast=0.4,
saturation=0.4),
# Add random noise
gluon.data.vision.transforms.RandomLighting(0.1),
gluon.data.vision.transforms.ToTensor(),
# Standardize each channel of the image
gluon.data.vision.transforms.Normalize([0.485, 0.456, 0.406],
[0.229, 0.224, 0.225])])
在测试过程中,只使用明确的图像预处理操作。
transform_test = gluon.data.vision.transforms.Compose([
gluon.data.vision.transforms.Resize(256),
# Crop a square of 224 by 224 from the center of the image
gluon.data.vision.transforms.CenterCrop(224),
gluon.data.vision.transforms.ToTensor(),
gluon.data.vision.transforms.Normalize([0.485, 0.456, 0.406],
[0.229, 0.224, 0.225])])
3. Reading the Dataset
与上一节一样,可以创建一个ImageFolderDataset实例来读取包含原始图像文件的数据集。
train_ds, valid_ds, train_valid_ds, test_ds = [
gluon.data.vision.ImageFolderDataset(
os.path.join(data_dir, ‘train_valid_test‘, folder))
for folder in (‘train‘, ‘valid‘, ‘train_valid‘, ‘test‘)]
在这里,创建DataLoader实例。
train_iter, train_valid_iter = [gluon.data.DataLoader(
dataset.transform_first(transform_train), batch_size, shuffle=True,
last_batch=‘keep‘) for dataset in (train_ds, train_valid_ds)]
valid_iter, test_iter = [gluon.data.DataLoader(
dataset.transform_first(transform_test), batch_size, shuffle=False,
last_batch=‘keep‘) for dataset in (valid_ds, test_ds)]
4. Defining the Model
本次比赛的数据集是ImageNet数据集的一个子集。因此,选择一个在整个ImageNet数据集上预先训练的模型,并使用来提取图像特征,以便输入到定制的小规模输出网络中。Gluon提供了一系列预先训练的模型。这里,将使用经过预先训练的ResNet-34模型。由于竞争数据集是预训练数据集的一个子集,因此只需重用预训练模型输出层的输入,即提取的特征。然后,可以用一个可以训练的小的定制输出网络来代替原来的输出层,例如一系列中两个完全连接的层。不重新训练用于特征提取的预训练模型。这减少了训练时间和存储模型参数梯度所需的内存。
必须注意,在图像增强过程中,使用整个ImageNet数据集的三个RGB通道的平均值和标准差进行标准化。这与预训练模型的规范化是一致的。
def get_net(ctx):
finetune_net = gluon.model_zoo.vision.resnet34_v2(pretrained=True)
# Define a new output network
finetune_net.output_new = nn.HybridSequential(prefix=‘‘)
finetune_net.output_new.add(nn.Dense(256, activation=‘relu‘))
# There are 120 output categories
finetune_net.output_new.add(nn.Dense(120))
# Initialize the output network
finetune_net.output_new.initialize(init.Xavier(), ctx=ctx)
# Distribute the model parameters to the CPUs or GPUs used for computation
finetune_net.collect_params().reset_ctx(ctx)
return finetune_net
在计算损失时,首先利用成员变量特征来获取预先训练模型输出层的输入,即提取的特征。然后,使用这个特性作为小型定制输出网络的输入并计算输出。
loss = gluon.loss.SoftmaxCrossEntropyLoss()
def evaluate_loss(data_iter, net, ctx):
l_sum, n = 0.0, 0
for X, y in data_iter:
y = y.as_in_ctx(ctx)
output_features = net.features(X.as_in_ctx(ctx))
outputs = net.output_new(output_features)
l_sum += float(loss(outputs, y).sum())
n += y.size
return l_sum / n
5. Defining the Training Functions
将根据模型在验证集上的性能来选择模型并调整超参数。模型训练功能训练只训练小型定制输出网络。
def train(net, train_iter, valid_iter, num_epochs, lr, wd, ctx, lr_period,
lr_decay):
# Only train the small custom output network
trainer = gluon.Trainer(net.output_new.collect_params(), ‘sgd‘,
{‘learning_rate‘: lr, ‘momentum‘: 0.9, ‘wd‘: wd})
for epoch in range(num_epochs):
train_l_sum, n, start = 0.0, 0, time.time()
if epoch > 0 and epoch % lr_period == 0:
trainer.set_learning_rate(trainer.learning_rate * lr_decay)
for X, y in train_iter:
y = y.as_in_ctx(ctx)
output_features = net.features(X.as_in_ctx(ctx))
with autograd.record():
outputs = net.output_new(output_features)
l = loss(outputs, y).sum()
l.backward()
trainer.step(batch_size)
train_l_sum += float(l)
n += y.size
time_s = "time %.2f sec" % (time.time() - start)
if valid_iter is not None:
valid_loss = evaluate_loss(valid_iter, net, ctx)
epoch_s = ("epoch %d, train loss %f, valid loss %f, "
% (epoch + 1, train_l_sum / n, valid_loss))
else:
epoch_s = ("epoch %d, train loss %f, "
% (epoch + 1, train_l_sum / n))
print(epoch_s + time_s + ‘, lr ‘ + str(trainer.learning_rate))
6. Training and Validating the Model
现在,可以训练和验证模型。可以调整以下超参数。例如,可以增加纪元的数量。由于lr_period and lr_decay分别设置为10和0.1,因此优化算法的学习率每10个周期将乘以0.1。
ctx, num_epochs, lr, wd = d2l.try_gpu(), 1, 0.01, 1e-4
lr_period, lr_decay, net = 10, 0.1, get_net(ctx)
net.hybridize()
train(net, train_iter, valid_iter, num_epochs, lr, wd, ctx, lr_period,
lr_decay)
epoch 1, train loss 4.879428, valid loss 4.834594, time 8.79 sec, lr 0.01
7. Classifying the Testing Set and Submitting Results on Kaggle
在获得满意的模型设计和超参数后,使用所有训练数据集(包括验证集)对模型进行再训练,然后对测试集进行分类。请注意,预测是由刚刚训练的输出网络做出的。
net = get_net(ctx)
net.hybridize()
train(net, train_valid_iter, None, num_epochs, lr, wd, ctx, lr_period,
lr_decay)
preds = []
for data, label in test_iter:
output_features = net.features(data.as_in_ctx(ctx))
output = npx.softmax(net.output_new(output_features))
preds.extend(output.asnumpy())
ids = sorted(os.listdir(
os.path.join(data_dir, ‘train_valid_test‘, ‘test‘, ‘unknown‘)))
with open(‘submission.csv‘, ‘w‘) as f:
f.write(‘id,‘ + ‘,‘.join(train_valid_ds.synsets) + ‘\n‘)
for i, output in zip(ids, preds):
f.write(i.split(‘.‘)[0] + ‘,‘ + ‘,‘.join(
[str(num) for num in output]) + ‘\n‘)
epoch 1, train loss 4.848448, time 10.14 sec, lr 0.01
执行上述代码后,将生成一个“submission.csv “文件。此文件的格式符合Kaggle竞赛要求。
8. Summary
标签:mit pos 输入 image head stand none width features
原文地址:https://www.cnblogs.com/wujianming-110117/p/13217317.html