标签:针对 mapping tor hand eth 封装数据 文件夹 分派 -name
Spring的web框架围绕DispatcherServlet设计。DispatcherServlet的作用是将请求分发到不同的处理器。从Spring 2.5开始,使用Java 5或者以上版本的用户可以采用基于注解的controller声明方式。
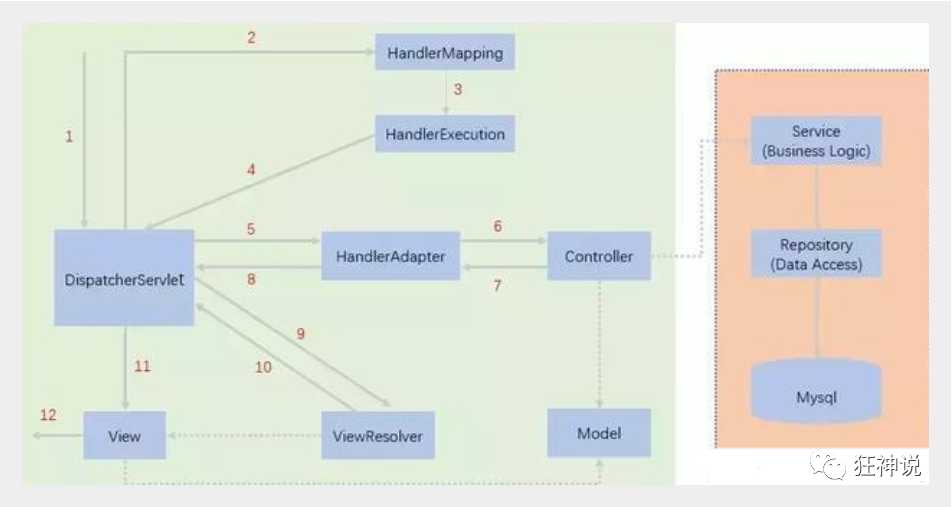
Spring MVC框架像许多其他MVC框架一样, 以请求为驱动 , 围绕一个中心Servlet分派请求及提供其他功能,DispatcherServlet是一个实际的Servlet (它继承自HttpServlet 基类)。我们这里借用狂神说的原理图及流程说明

建立一个普通的Maven项目,并添加Web框架支持。
首先导入依赖包
<!--导入依赖-->
<dependencies>
    <dependency>
        <groupId>junit</groupId>
        <artifactId>junit</artifactId>
        <version>4.12</version>
    </dependency>
    <dependency>
        <groupId>org.springframework</groupId>
        <artifactId>spring-webmvc</artifactId>
        <version>5.2.7.RELEASE</version>
    </dependency>
    <dependency>
        <groupId>javax.servlet</groupId>
        <artifactId>servlet-api</artifactId>
        <version>3.0-alpha-1</version>
    </dependency>
    <dependency>
        <groupId>javax.servlet.jsp</groupId>
        <artifactId>jsp-api</artifactId>
        <version>2.2</version>
    </dependency>
    <dependency>
        <groupId>javax.servlet</groupId>
        <artifactId>jstl</artifactId>
        <version>1.2</version>
    </dependency>
</dependencies>
并设置过滤文件,保证输出配置文件
<!--过滤文件,保证输出配置文件-->
<build>
    <resources>
        <resource>
            <directory>src/main/resources</directory>
            <includes>
                <include>**/*.properties</include>
                <include>**/*.xml</include>
            </includes>
            <filtering>false</filtering>
        </resource>
        <resource>
            <directory>src/main/java</directory>
            <includes>
                <include>**/*.properties</include>
                <include>**/*.xml</include>
            </includes>
            <filtering>false</filtering>
        </resource>
    </resources>
</build>
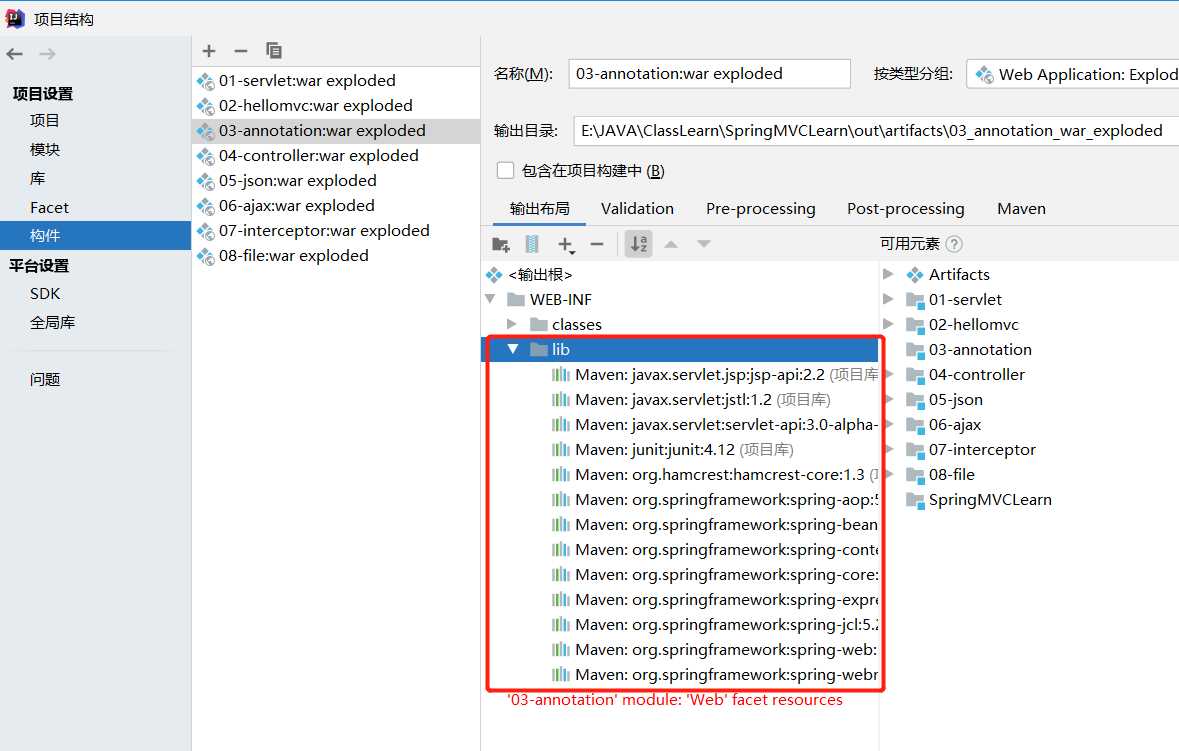
配置完Pom.xml文件后,进入项目结构(快捷键F4),进入构建,选择当前项目,在输出布局中添加lib文件夹及导入包的依赖,目的是保证我们打完的war包中包含我们所使用的依赖包,而不会报错。

<?xml version="1.0" encoding="UTF-8"?>
<web-app xmlns="http://xmlns.jcp.org/xml/ns/javaee"
         xmlns:xsi="http://www.w3.org/2001/XMLSchema-instance"
         xsi:schemaLocation="http://xmlns.jcp.org/xml/ns/javaee http://xmlns.jcp.org/xml/ns/javaee/web-app_4_0.xsd"
         version="4.0">

    <!--配置DispatchServlet:这是SpringMVC的核心,请求转分发器,前端控制器-->
    <servlet>
        <servlet-name>springmvc</servlet-name>
        <servlet-class>org.springframework.web.servlet.DispatcherServlet</servlet-class>
        <!--DispatcherServlet要绑定Spring的配置文件-->
        <init-param>
            <param-name>contextConfigLocation</param-name>
            <param-value>classpath:springmvc-servlet.xml</param-value>
        </init-param>
        <!--启动级别为1,即跟着服务器一起启动-->
        <load-on-startup>1</load-on-startup>
    </servlet>
    <servlet-mapping>
        <servlet-name>springmvc</servlet-name>
        <url-pattern>/</url-pattern>
    </servlet-mapping>
</web-app>
说明:
1.web.xml中最为核心的配置是 DispatcherServlet ,接收请求并拦截请求,控制转发。
2.init-param 需要绑定我们Spring的配置文件。
3./ 和 /* 的区别:< url-pattern > / </ url-pattern > 不会匹配到.jsp, 只针对我们编写的请求;即:.jsp 不会进入spring的 DispatcherServlet类 。< url-pattern > /* </ url-pattern > 会匹配 *.jsp,会出现返回 jsp视图 时再次进入spring的DispatcherServlet 类,导致找不到对应的controller所以报404错。
我们在resources下建议Spring的配置文件springmvc-servlet.xml,并在建立相应的com.tioxy.controller包。
<?xml version="1.0" encoding="UTF-8"?>
<beans xmlns="http://www.springframework.org/schema/beans"
       xmlns:xsi="http://www.w3.org/2001/XMLSchema-instance"
       xmlns:context="http://www.springframework.org/schema/context"
       xmlns:mvc="http://www.springframework.org/schema/mvc"
       xsi:schemaLocation="http://www.springframework.org/schema/beans
       http://www.springframework.org/schema/beans/spring-beans.xsd
       http://www.springframework.org/schema/context
       https://www.springframework.org/schema/context/spring-context.xsd
       http://www.springframework.org/schema/mvc
       https://www.springframework.org/schema/mvc/spring-mvc.xsd">

    <!-- 自动扫描包,让指定包下的注解生效,由IOC容器统一管理 -->
    <context:component-scan base-package="com.tioxy.controller"/>
    <!-- 让Spring MVC不处理静态资源 -->
    <mvc:default-servlet-handler />
    <!--
    支持mvc注解驱动
        在spring中一般采用@RequestMapping注解来完成映射关系
        要想使@RequestMapping注解生效
        必须向上下文中注册DefaultAnnotationHandlerMapping
        和一个AnnotationMethodHandlerAdapter实例
        这两个实例分别在类级别和方法级别处理。
        而annotation-driven配置帮助我们自动完成上述两个实例的注入。
     -->
    <mvc:annotation-driven />

    <!-- 视图解析器 -->
    <bean class="org.springframework.web.servlet.view.InternalResourceViewResolver"
          id="internalResourceViewResolver">
        <!-- 前缀 -->
        <property name="prefix" value="/WEB-INF/jsp/" />
        <!-- 后缀 -->
        <property name="suffix" value=".jsp" />
    </bean>

</beans>
说明:
1.mvc:default-servlet-handler/标签目的是保证比如 .css .js .html文件不经过视图解析器。
2.mvc:annotation-driven/标签,是注册我们适配器和映射器。
3.最后就是视图解析器,我们这里在WEB-INF目录下建jsp文件夹,并建立测试用的hello.jsp,目的是把所有的视图都存放在/WEB-INF/目录下,这样可以保证视图安全,因为这个目录下的文件,客户端不能直接访问。
编写一个controller类,com.tioxy.controller.HelloController
package com.tioxy.controller;

import org.springframework.stereotype.Controller;
import org.springframework.ui.Model;
import org.springframework.web.bind.annotation.RequestMapping;

@Controller
public class HelloController {
    @RequestMapping("/hello")
    public String hello(Model model){
        // 封装数据
        model.addAttribute("msg","Hello.SpringMVCAnnotation!");
        return "hello";// 会被视图解析器处理,这里是要跳转视图的名字
    }
}
说明:
1.@Controller是为了让Spring IOC容器初始化时自动扫描到.
2.@RequestMapping是为了映射请求路径,这里因为类与方法上都有映射所以访问时应该是/HelloController/hello。
3.方法中声明Model类型的参数是为了把Action中的数据带到视图中。
4.方法返回的结果是视图的名称hello,加上配置文件中的前后缀变成WEB-INF/jsp/hello.jsp。
<%@ page contentType="text/html;charset=UTF-8" language="java" %>
<html>
<head>
    <title>Title</title>
</head>
<body>
 ${msg}
</body>
</html>
输入正确的地址

引用说明:
狂神说Java之使用注解开发SpringMVC:https://www.bilibili.com/video/BV1aE41167Tu?p=7
标签:针对 mapping tor hand eth 封装数据 文件夹 分派 -name
原文地址:https://www.cnblogs.com/tioxy/p/13234879.html