标签:etc path prope 扫描 服务 分布式 ber null mes
一:与JPA规范整合
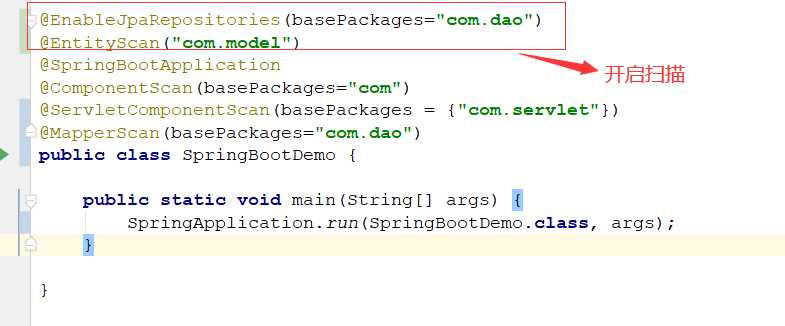
jpa是一套orm的规范,提供api接口,hirebnate就是对jpa的一套实现,下面我们看看springboot如何
与jpa整合
1:添加依赖和配置
		<!--5: 整合jpa-->
		<dependency>
			<groupId>org.springframework.boot</groupId>
			<artifactId>spring-boot-starter-data-jpa</artifactId>
		</dependency>
#自动创建表
spring.jpa.hibernate.ddl-auto:update
#打印 sql 语句
spring.jpa.show-sql:true
2:定义service 、dao以及实体类
@Service
public class StudentServiceImpl implements StudentService {

	@Autowired
	private StudentDao studentDao;

	@Override
	public Student findById(Integer id) {
		Optional<Student> optional = studentDao.findById(id);
		if(optional.isPresent()){
			return optional.get();
		}
		return null;
	}

	@Override
	public Student insertStudent(Student student) {
		return studentDao.save(student);
	}

}
@Repository
public interface StudentDao extends JpaRepository<Student,Integer> {

}
@Data
@Entity
@Table(name="student")
public class Student {

	@Id
	@GeneratedValue(strategy = GenerationType.IDENTITY)
	private Integer id;

	@Column(name="name")
	private String name;

	@Column(name="cardId")
	private String cardId;

}

服务启动从日志看,会创建表:

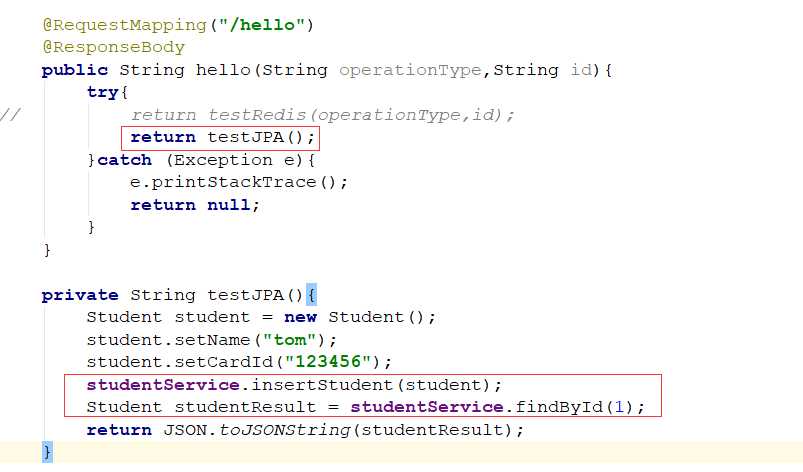
测试类:

生成insert语句,插入数据:


与JPA整合完成,很简单
二:与atomikos整合,实现分布式事务
如果同时在一个方法内使用两个数据源,想实现事务,该怎么办?
1:添加依赖和配置
<dependency>
            <groupId>org.springframework.boot</groupId>
            <artifactId>spring-boot-starter-jta-atomikos</artifactId>
        </dependency>
# Mysql 1
mysql.datasource.test1.url = jdbc:mysql://localhost:3306/enjoy?useUnicode=true&characterEncoding=utf-8
mysql.datasource.test1.username = root
mysql.datasource.test1.password = root
mysql.datasource.test1.minPoolSize = 3
mysql.datasource.test1.maxPoolSize = 25
mysql.datasource.test1.maxLifetime = 20000
mysql.datasource.test1.borrowConnectionTimeout = 30
mysql.datasource.test1.loginTimeout = 30
mysql.datasource.test1.maintenanceInterval = 60
mysql.datasource.test1.maxIdleTime = 60

# Mysql 2
mysql.datasource.test2.url =jdbc:mysql://localhost:3306/study?useUnicode=true&characterEncoding=utf-8
mysql.datasource.test2.username =root
mysql.datasource.test2.password =root
mysql.datasource.test2.minPoolSize = 3
mysql.datasource.test2.maxPoolSize = 25
mysql.datasource.test2.maxLifetime = 20000
mysql.datasource.test2.borrowConnectionTimeout = 30
mysql.datasource.test2.loginTimeout = 30
mysql.datasource.test2.maintenanceInterval = 60
mysql.datasource.test2.maxIdleTime = 60

#日志级别
logging.level.root=info
#所有包下面都以debug级别输出
#logging.level.org.springframework.*=debug

#sql日志
logging.level.com.xiangxue.atomikos.db1.dao=debug
logging.level.com.xiangxue.atomikos.db2.dao=debug
#热部署
#热部署生效
spring.devtools.restart.enabled=true
#设置重启的目录
spring.devtools.restart.additional-paths=src/main/java
#classpath目录下的WEB-INF文件夹内容修改不重启
spring.devtools.restart.exclude=WEB-INF/**
将配置封装到对象上,使用@ConfigurationProperties注解,会把mysql.datasource.test1为前缀的配置封装到对应的属性上,维护到spring
容器缓存中
@Data
@ConfigurationProperties(prefix = "mysql.datasource.test1")
public class DBConfig1 {
    private String url;

    private String username;

    private String password;

    private int minPoolSize;

    private int maxPoolSize;

    private int maxLifetime;

    private int borrowConnectionTimeout;

    private int loginTimeout;

    private int maintenanceInterval;

    private int maxIdleTime;

    private String testQuery;
}
创建数据源DataSource、sqlSessionFactory以及sqlSessionTemplate对象,并且添加@MapperScan扫描,将MapperFactoryBean维护到spring容器中,
key为Mapper文件的全限定名类名,value为MapperFactoryBean对象
@Configuration
@MapperScan(basePackages = "com.xiangxue.jack.atomikos.db1.dao", sqlSessionFactoryRef = "test1SqlSessionFactory",sqlSessionTemplateRef="test1SqlSessionTemplate")
public class Db1Config {

    @Autowired
    DBConfig1 testConfig;

    @Bean(name = "test1DataSource")
    public DataSource testDataSource() {
        MysqlXADataSource mysqlXaDataSource = new MysqlXADataSource();
        mysqlXaDataSource.setUrl(testConfig.getUrl());
        mysqlXaDataSource.setPinGlobalTxToPhysicalConnection(true);
        mysqlXaDataSource.setPassword(testConfig.getPassword());
        mysqlXaDataSource.setUser(testConfig.getUsername());
        mysqlXaDataSource.setPinGlobalTxToPhysicalConnection(true);

        AtomikosDataSourceBean xaDataSource = new AtomikosDataSourceBean();
        xaDataSource.setXaDataSource(mysqlXaDataSource);
        xaDataSource.setUniqueResourceName("test1DataSource");
        xaDataSource.setMinPoolSize(testConfig.getMinPoolSize());
        xaDataSource.setMaxPoolSize(testConfig.getMaxPoolSize());
        xaDataSource.setMaxLifetime(testConfig.getMaxLifetime());
        xaDataSource.setBorrowConnectionTimeout(testConfig.getBorrowConnectionTimeout());
        try {
            xaDataSource.setLoginTimeout(testConfig.getLoginTimeout());
        } catch (SQLException e) {
            e.printStackTrace();
        }
        xaDataSource.setMaintenanceInterval(testConfig.getMaintenanceInterval());
        xaDataSource.setMaxIdleTime(testConfig.getMaxIdleTime());
        xaDataSource.setTestQuery(testConfig.getTestQuery());
        return xaDataSource;
    }

    @Bean(name = "test1SqlSessionFactory")
    public SqlSessionFactory testSqlSessionFactory(@Qualifier("test1DataSource") DataSource dataSource)
            throws Exception {
        SqlSessionFactoryBean bean = new SqlSessionFactoryBean();
        bean.setDataSource(dataSource);
        return bean.getObject();
    }

    @Bean(name = "test1SqlSessionTemplate")
    public SqlSessionTemplate testSqlSessionTemplate(
            @Qualifier("test1SqlSessionFactory") SqlSessionFactory sqlSessionFactory) throws Exception {
        return new SqlSessionTemplate(sqlSessionFactory);
    }
}
创建Mapper类:
public interface CommonMapper1 {

    @Select("select * from people")
    List<People> listPeoples();

    @Insert("insert into people(name) values(#{name})")
    int addPeople(People people);
}
另一个数据源也需要创建DataSource、SqlSessionFactory、sqlSessionTemplate对象,扫描对应的Mapper接口文件路径,和上一个数据源创建方式一样
创建一个service的测试类:在方法上添加@Transactional注解,方法内部,两个不同的mapper新增数据,两个mapper对应不同的数据源
@Service
public class AreaServiceImpl implements AreaService {

    @Autowired
    private CommonMapper1 commonMapper1;

    @Autowired
    private CommonMapper2 commonMapper2;

    @Autowired
    TransactionManager transactionManager;

    @Transactional
    public int saveArea(ConsultConfigArea area) {
        System.out.println(transactionManager);
        JtaTransactionManager jtaTransactionManager = (JtaTransactionManager)transactionManager;
        System.out.println(jtaTransactionManager.getUserTransaction());
        UserTransaction userTransaction = jtaTransactionManager.getUserTransaction();

        People people = new People();
        people.setName("Lucy");
        int count = commonMapper1.addPeople(people);
        System.out.println("插入一条People,count:"+count);

        Student student = new Student();
        student.setCardId("122334");
        student.setName("hello");
        int count1 = commonMapper2.addStudent(student);
        System.out.println("插入一条Student,count1:"+count1);
        int i = 10/0;
        return count;
    }
}
先把会导致异常的这行代码注释掉:


数据插入成功!
现在把会导致运行时异常的代码放开,看看效果

数据没有插入,说明回滚成功!
三:与redis整合
1:添加依赖和配置
		<!--6:整合redis-->
		<dependency>
			<groupId>org.springframework.boot</groupId>
			<artifactId>spring-boot-starter-data-redis</artifactId>
		</dependency>
#Redis数据库索引(默认为0)
spring.redis.database=0
#redis服务器地址
spring.redis.host=127.0.0.1
#redis暴露端口
spring.redis.port=6379
#redis服务器连接密码
spring.redis.password=
#连接池最大连接
spring.redis.pool.max-active=8
#连接池最大阻塞等待时间
spring.redis.pool.max-wait=-1
#连接池中的最大空闲连接
spring.redis.pool.max-idle=8
#连接池中的最小空闲连接
spring.redis.pool.min-idle=0
#连接超时时间
spring.redis.timeout=5000
2:创建缓存管理类
@Configuration
@EnableCaching
public class RedisConfig {

    //缓存管理器
    @Bean
    public CacheManager cacheManager(RedisConnectionFactory redisConnectionFactory) {
        RedisCacheConfiguration redisCacheConfiguration = RedisCacheConfiguration.defaultCacheConfig()
                .entryTtl(Duration.ofHours(1)); // 设置缓存有效期一小时
        return RedisCacheManager
                .builder(RedisCacheWriter.nonLockingRedisCacheWriter(redisConnectionFactory))
                .cacheDefaults(redisCacheConfiguration).build();
    }

    @Bean
    public RedisTemplate<String, Object> redisTemplate(RedisConnectionFactory factory) {

        RedisTemplate<String, Object> template = new RedisTemplate<>();
        // 配置连接工厂
        template.setConnectionFactory(factory);

        //使用Jackson2JsonRedisSerializer来序列化和反序列化redis的value值(默认使用JDK的序列化方式)
        Jackson2JsonRedisSerializer jacksonSeial = new Jackson2JsonRedisSerializer(Object.class);

        ObjectMapper om = new ObjectMapper();
        // 指定要序列化的域,field,get和set,以及修饰符范围,ANY是都有包括private和public
        om.setVisibility(PropertyAccessor.ALL, JsonAutoDetect.Visibility.ANY);
        // 指定序列化输入的类型,类必须是非final修饰的,final修饰的类,比如String,Integer等会跑出异常
        om.enableDefaultTyping(ObjectMapper.DefaultTyping.NON_FINAL);
        jacksonSeial.setObjectMapper(om);

        // 值采用json序列化
        template.setValueSerializer(jacksonSeial);
        //使用StringRedisSerializer来序列化和反序列化redis的key值
        template.setKeySerializer(new StringRedisSerializer());
        // 设置hash key 和value序列化模式
        template.setHashKeySerializer(new StringRedisSerializer());
        template.setHashValueSerializer(jacksonSeial);
        template.afterPropertiesSet();

        return template;
    }
}
创建使用类:
@Component
public class RedisServiceImpl implements RedisService{

	@Autowired
	private UserMapper userMapper;

	@Cacheable(cacheNames = "redisCache",key = "‘jack‘+ #id")
	@Override
	public String queryData(String id) {
		System.out.println("RedisServiceImpl -- queryData");
		List<User> list = userMapper.queryUserById(id);
		return JSON.toJSONString(list);
	}

	@CachePut(cacheNames = "redisCache",key = "‘jack‘+ #id")
	@Override
	public String putCache(String id) {
		System.out.println("RedisServiceImpl -- putCache");
		User user = new User();
		user.setName("Tom");
		user.setAge("30");
		user.setId(id);
		userMapper.updateUser(user);
		return JSON.toJSONString(user);
	}
}
下面我们把redis服务器和应用启动,测试一下:

首先查询redis缓存,缓存中没有数据,然后查询数据库,数据缓存到redis,返回数据,我们来看看redis服务器

数据已经被放入redis缓存中,我们再次从页面查询一次:
没有查询数据库,queryData还是上次查询数据库的日志,但是页面显示正常,说明查询的是redis服务器

那如果我们想修改数据库的数据,会怎么样?

我们来看看redis内存库的数据会不会变化:

说明修改数据库的数据,redis会同步更新
这样springboot和redis的整合就完成了!!!
springboot分析——与其他组件的整合(JPA规范/atomikos/redis)
标签:etc path prope 扫描 服务 分布式 ber null mes
原文地址:https://www.cnblogs.com/warrior4236/p/13279914.html