标签:null 文件 pad java类 名称 标识 private 多网卡 ipaddress
上一篇安装了 xxl-job的服务端,
https://www.cnblogs.com/a393060727/p/13306981.html
接下来是客户端安装。
还是照着官网来。
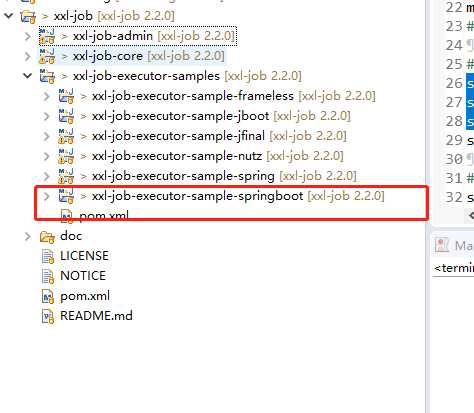
在我们下载的git代码中,有个xxl-job-executor-samples子工程,
这个子工程就是当前支持的各种语言的例子,如何接入的,我当前使用的是springboot,所以这只介绍下springboot接入方式。

我测试,只需要配置几个东西就搞定了。
pom.xml引入核心类包:
<!-- xxl-job任务 -->
        <dependency>
            <groupId>com.xuxueli</groupId>
            <artifactId>xxl-job-core</artifactId>
            <version>2.2.0</version>
        </dependency>
1、配置文件java类,配置文件原封不动
package com.xxl.job.executor.core.config;

import com.xxl.job.core.executor.impl.XxlJobSpringExecutor;
import org.slf4j.Logger;
import org.slf4j.LoggerFactory;
import org.springframework.beans.factory.annotation.Value;
import org.springframework.context.annotation.Bean;
import org.springframework.context.annotation.Configuration;


@Configuration
public class XxlJobConfig {
    private Logger logger = LoggerFactory.getLogger(XxlJobConfig.class);

    @Value("${xxl.job.admin.addresses}")
    private String adminAddresses;

    @Value("${xxl.job.accessToken}")
    private String accessToken;

    @Value("${xxl.job.executor.appname}")
    private String appname;

    @Value("${xxl.job.executor.address}")
    private String address;

    @Value("${xxl.job.executor.ip}")
    private String ip;

    @Value("${xxl.job.executor.port}")
    private int port;

    @Value("${xxl.job.executor.logpath}")
    private String logPath;

    @Value("${xxl.job.executor.logretentiondays}")
    private int logRetentionDays;


    @Bean
    public XxlJobSpringExecutor xxlJobExecutor() {
        logger.info(">>>>>>>>>>> xxl-job config init.");
        XxlJobSpringExecutor xxlJobSpringExecutor = new XxlJobSpringExecutor();
        xxlJobSpringExecutor.setAdminAddresses(adminAddresses);
        xxlJobSpringExecutor.setAppname(appname);
        xxlJobSpringExecutor.setAddress(address);
        xxlJobSpringExecutor.setIp(ip);
        xxlJobSpringExecutor.setPort(port);
        xxlJobSpringExecutor.setAccessToken(accessToken);
        xxlJobSpringExecutor.setLogPath(logPath);
        xxlJobSpringExecutor.setLogRetentionDays(logRetentionDays);

        return xxlJobSpringExecutor;
    }

    /**
     * 针对多网卡、容器内部署等情况,可借助 "spring-cloud-commons" 提供的 "InetUtils" 组件灵活定制注册IP;
     *
     *      1、引入依赖:
     *          <dependency>
     *             <groupId>org.springframework.cloud</groupId>
     *             <artifactId>spring-cloud-commons</artifactId>
     *             <version>${version}</version>
     *         </dependency>
     *
     *      2、配置文件,或者容器启动变量
     *          spring.cloud.inetutils.preferred-networks: ‘xxx.xxx.xxx.‘
     *
     *      3、获取IP
     *          String ip_ = inetUtils.findFirstNonLoopbackHostInfo().getIpAddress();
     */


}
2、配置文件application.properties
# no web
#spring.main.web-environment=false
# log config
#logging.config=classpath:logback.xml
### 这里接入服务端的地址。
xxl.job.admin.addresses=http://192.168.89.190:48080/xxl-job-admin
### xxl-job, access token
xxl.job.accessToken=
### xxl-job 执行应用名称,最好直接跟服务名称一致即可
xxl.job.executor.appname=job-a
### xxl-job executor registry-address: default use address to registry , otherwise use ip:port if address is null
xxl.job.executor.address=
### xxl-job executor server-info
xxl.job.executor.ip=
xxl.job.executor.port=9998
### xxl-job executor log-path
xxl.job.executor.logpath=/data/applogs/xxl-job/jobhandler
### xxl-job 日志保留天数
xxl.job.executor.logretentiondays=7
application.yml
server:
  port: 9090
spring:
  application:
    name: job-a
这里注意下:
如果将application.properties的内容都写到application.yml中后,在配置文件中读取不一定读取到就会报错。所以还是留着在application.properties中吧。
3、执行类加上注解
import org.springframework.stereotype.Service;

import com.xxl.job.core.biz.model.ReturnT;
import com.xxl.job.core.handler.annotation.XxlJob;
import com.xxl.job.core.log.XxlJobLogger;

@Service
public class UserJob {
    /**
     * 1、简单任务示例(Bean模式)
     */
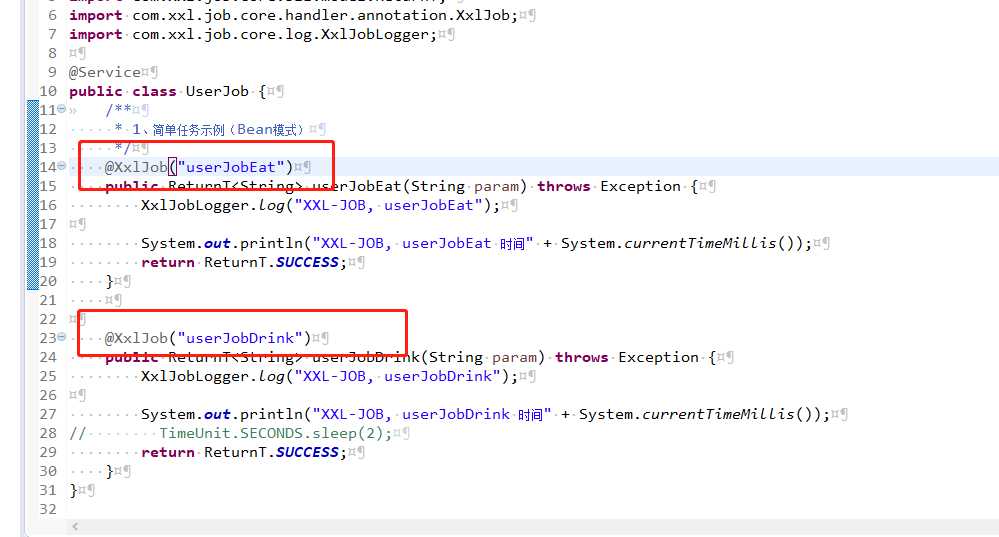
    @XxlJob("userJobEat")
    public ReturnT<String> userJobEat(String param) throws Exception {
        XxlJobLogger.log("XXL-JOB, userJobEat");

        System.out.println("XXL-JOB, userJobEat 时间" + System.currentTimeMillis());
        return ReturnT.SUCCESS;
    }


    @XxlJob("userJobDrink")
    public ReturnT<String> userJobDrink(String param) throws Exception {
        XxlJobLogger.log("XXL-JOB, userJobDrink");

        System.out.println("XXL-JOB, userJobDrink 时间" + System.currentTimeMillis());
//        TimeUnit.SECONDS.sleep(2);
        return ReturnT.SUCCESS;
    }
}
配置任务信息。
登录服务端配置。
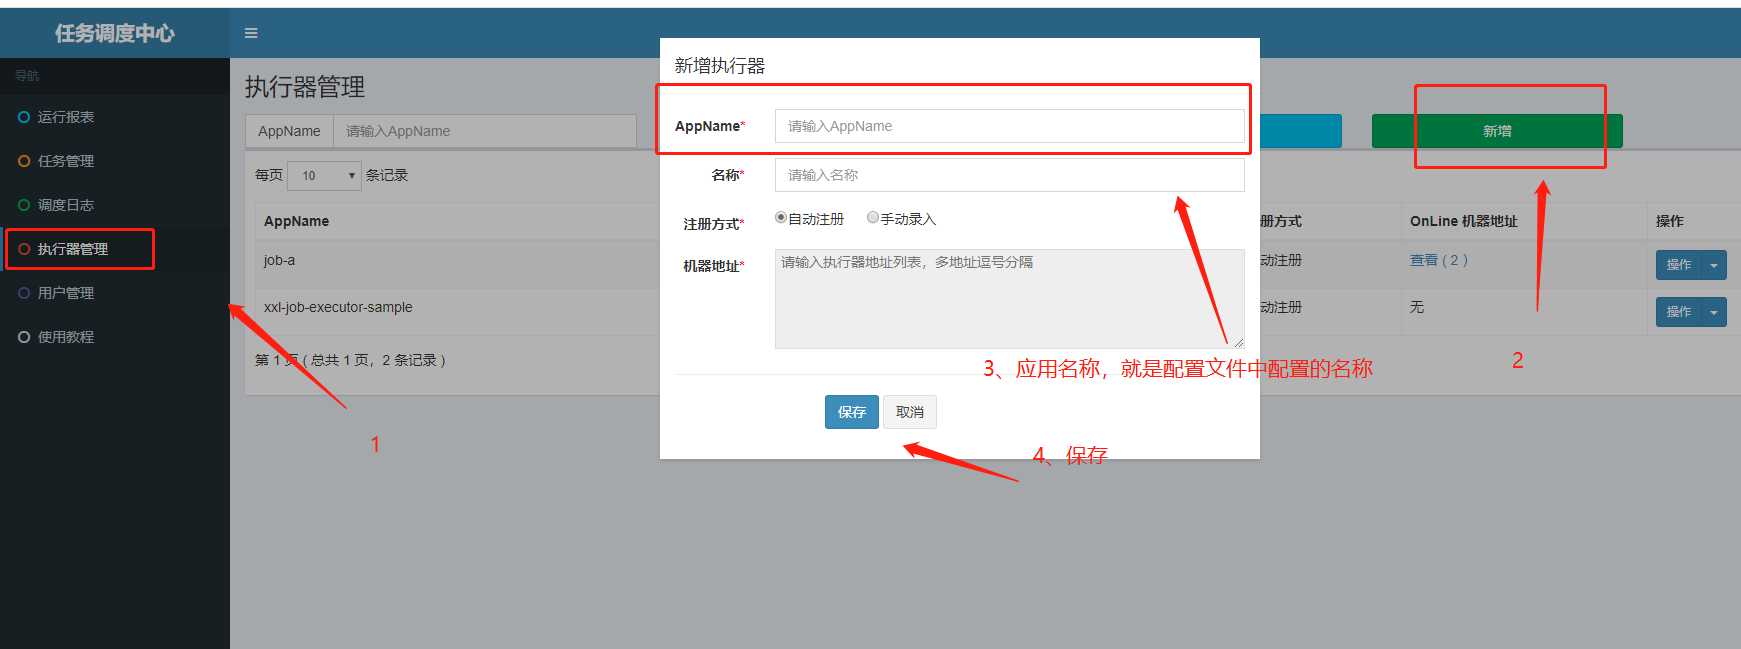
配置执行器:执行器管理/新增/填写信息。。。/保存
这里的appname与配置文件中的 xxl.job.executor.appname 一致,名称随意

2、配置任务信息
任务管理
选择执行器(可以看到当前执行器有多少的任务信息)
点击新增

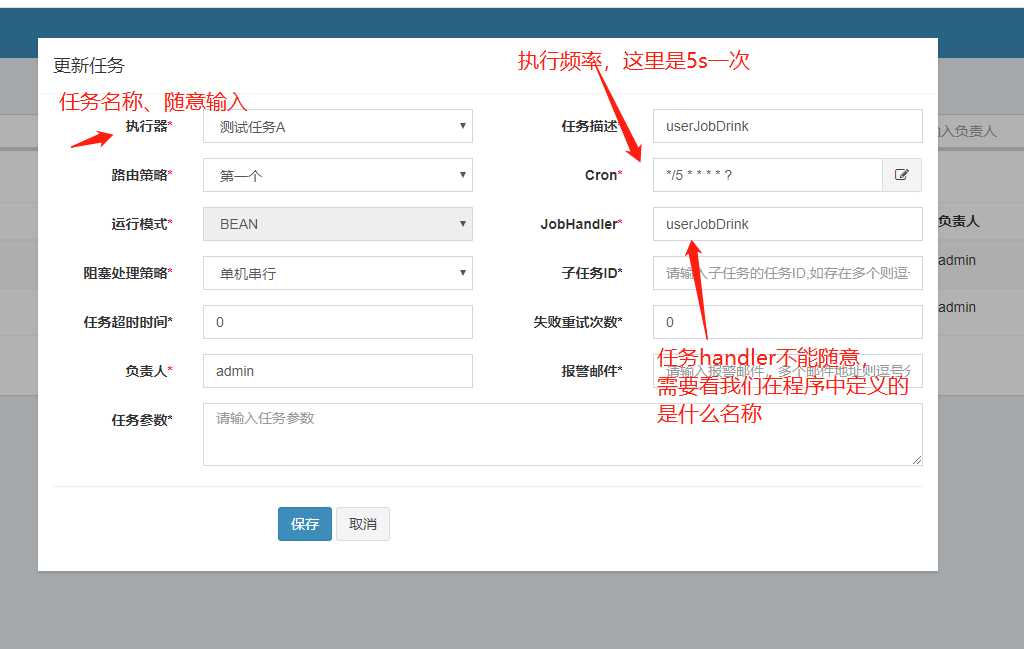
配置一个任务信息
这里的JobHandler必须与程序中的名称一致。

程序中定义的hanbler名称。

测试:
点击保存后,查看客户端日志,可以看到,5s调用一次服务。
在生产的时候,我们可以定义一个标识。。任务未执行完成。多服务器启动的时候,是个竞争关系,A在执行B则不执行了。当然也可以配置广播式(实际中比较少用)

测试OK。
当我们任务执行有问题的时候。可以在管理界面做相应操作,重跑或停止任务。。

后台可以查询到任务执行情况,时间。。

标签:null 文件 pad java类 名称 标识 private 多网卡 ipaddress
原文地址:https://www.cnblogs.com/a393060727/p/13307188.html