
Introduction
Apart from offering a simple, effective way to manage elements and various scripts, jQuery also offers a mechanism for adding methods and extra functionalities to the core module. By using this mechanism, we are also allowed to create a new portion of the code and add reuse it in different pages and projects.
Write Your First jQuery Plugin
To write a plugin, add a new property in the jQuery.fn object where the name of the property will be the name of your plugin.
(function( $ ) {
  $.fn.myPlugin = function() {

    // Do your awesome plugin stuff here

  };
})( jQuery );
Let‘s start adding functionality within your plugin and use it in web pages. In our first example, I will simply fadeout the element.
(function ($) {

    $.fn.myPlugin = function () {

        this.fadeOut(‘normal‘);

    };
})(jQuery);
Now save the file with name “jquery-myPlugin.js” and your plugin is ready to use. Create HTML button and divon your page. Div will fade out on the click of the button.
Plugin for Multiple Elements
You can also write plugin which performs action on the group of element. Suppose we want to change the background color of the element on mouse over. Simply get each element and register hover event for that object. Let’s start the code for hover plugin.
(function ($) {
    $.fn.hoverElement = function () {
        this.each(function () {
            $(this).hover(
                            function () {
                                $(this).addClass(‘hoverTextSel‘);
                            },
                            function () {
                                $(this).removeClass(‘hoverTextSel‘);
                            }
                        ); // end of Hover event

        }); // end for each
    }; // end of functions

})(jQuery);
$(selector).each() method is used to iterate over a jQuery object, array or any collection. This example registers the hover event for the each element of jQuery object.
Chainability
The beauty of the jQuery’s design is, it maintains chainability. You can perform multiple actions in one series. So to maintain the chainability in a plugin, you must make sure your plugin returns the ‘this’ keyword.
 (function ($) {
    $.fn.hoverElement = function () {
      return  this.each(function () {

          $(this).hover(
                            function () {
                                   $(this).addClass(‘hoverTextSel‘);
                            },
                            function () {
                                    $(this).removeClass(‘hoverTextSel‘);
                            }
                        ); // end of Hover event

        }); // end for each
    }; // end of functions

 })(jQuery);
Now you can perform multiple actions in one series.
$(".hoverText2").hoverElement().css({‘color‘:‘red‘});
Customization
If you want to commercialize your plugin, then it should be configurable. For example, we should provide provision to change images, width, height, etc. So users can change the look and feel as per requirement.
For explaining the concept, this example will allow a user to change text, foreground color and background on hover. User can customize the setting as he wants. Now our plugin method will have one argument and the user can pass setting while calling method. See the code below for how the method will look like now.
$.fn.YouPlugin = function (options) {...}
We also need to have default setting object, which will contain default value.
var defaultVal = {
    Text: ‘Your mouse is over‘,
    ForeColor: ‘red‘,
    BackColor: ‘gray‘
};
At that time, we have two different objects, one is passed by user and the second has default value. We will merge these two objects using extend method provided by jQuery.
var obj = $.extend(defaultVal, options);
extend() method merges the contents of two or more objects together into the first object. After merging two objects, we will have one final object, which will be used for setting. The complete code of the plugin is below:
(function ($) {

    $.fn.textHover = function (options) {

        var defaultVal = {

            Text: ‘Your mouse is over‘,
            ForeColor: ‘red‘,
            BackColor: ‘gray‘
        };

        var obj = $.extend(defaultVal, options);

        return this.each(function () {

            var selObject = $(this);

            var oldText = selObject.text();
            var oldBgColor = selObject.css("background-color");
            var oldColor = selObject.css("color");

            selObject.hover(function () {

                selObject.text(obj.Text);
                selObject.css("background-color", obj.BackColor);
                selObject.css("color", obj.ForeColor);
            },
            function () {
                selObject.text(oldText);
                selObject.css("background-color", oldBgColor);
                selObject.css("color", oldColor);
            }
            );
        });
    }
})(jQuery);
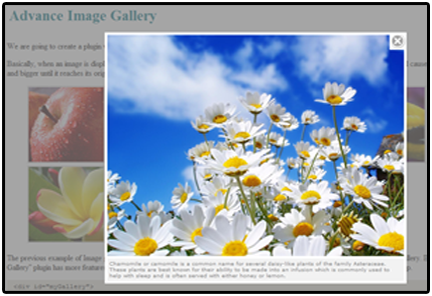
Advance Image Gallery
We are going to create a plugin which is really close to the Lightbox plugin. Lightbox is a very famous image plugin.
Basically, when an image is displayed on the page, a very handy possibility is offered to the user. Clicking on the (small) thumbnail will cause the image to get bigger and bigger until it reaches its original dimensions and is visible at full size on the very same page that the smaller one‘s found!
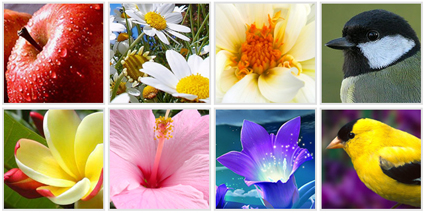
 <div id="myGallery">
    <ul>
        <li>
            <a href="Images/Nature/apple.jpg" title=‘The apple is the pomaceous...‘ />
                <img src="Images/Nature/apple_thumb.jpg" />
            </a>
        </li>
 .
 .
 .
    </ul>
 </div>
Get all the anchor (<a>) elements and pass them to the plugin.
 $(document).ready(function () {
        $("#myGallery a").imageGallery2();
    });
The plugin gets the collection and registers the click event of each element and on the click event, it adds some elements in the page. After adding, it sets image source, animations and register events on these elements.
$(‘Body‘).append("<div id=‘imageGallery2-overlay‘></div>" +
                  "<div id=‘imageGallery2-wrapper‘>" +
                      "<div id=‘imageGallery2-image-container‘>" +
                              "<div id=‘imageGallery2-close-bar‘>
                                  <div id=‘imageGallery2-close-button‘>
                                       <img src=‘Images/close-icon.png‘/>
                                  </div>
                              </div>" +
                              "<div style=‘clear: left; ‘>" +
                              "<div id=‘imageGallery2-loadingImage‘>" +
                                  "<img  src=‘Images/loading.gif‘
                width=‘50‘ height=‘50‘/>" +
                              "</div>" +
                              "<img id=‘imageGallery2-image‘/>" +
                          "</div>" +

                          "</div>" +
                          "<div id=‘imageGallery2-image-text-box‘>" +
                              "<div id=‘imageGallery2-image-caption‘>" +
                              "</div>" +
                          "</div>" +
                  "</div>");
As you can see in the example, we preload full image before displaying it. First, we create an image object and register the onload method of the image object. Then we get the source of image from clicked object and assign image source to the image object.
// preload image before displaying
var objImagePreloader = new Image();

var url = objClick.getAttribute(‘href‘);

imageCaption = objClick.getAttribute(‘title‘);

objImagePreloader.onload = function () {


    $(‘#imageGallery2-image‘).attr(‘src‘, url);
    // Performance an effect in the image container resizing it
    resizeImageContainer(objImagePreloader.width, objImagePreloader.height);

    //    clear onLoad, IE behaves erratically with animated gifs otherwise
    objImagePreloader.onload = function () { };
};
objImagePreloader.src = url;
When onload method calls after loading the image, we set source of <img> and set width, height of the container and animated via width and height. User can close opened image by clicking on image itself or by close button. On close, we simply hide caption of the image first and after that, start animation to 0 width andheight. On the completion of animation, we simply remove the object from the page and on the click of next image, we simply add them again.
function CloseSelectedImage() {
       $("#imageGallery2-image-text-box").hide();

       $(‘#imageGallery2-image-container‘).animate
            ({ width: 0, height: 0 }, 300, function () {
                                   $(‘#imageGallery2-overlay‘).remove();
                                   $(‘#imageGallery2-wrapper‘).remove();
                                    });
}
History
- 28th November, 2011: Initial post