码迷,mamicode.com
首页 > Web开发 > 详细

Mvc4+autofac+jggrid+nhibernate(2)权限管理

时间:2014-11-11 17:57:25      阅读:378      评论:0      收藏:0      [点我收藏+]

标签:des   style   blog   http   io   color   ar   os   使用   

写这篇博文只是介绍下思路,主要目的是为了找工作,所以细节不是很详细,请大家勿喷。

不说废话了先上图。


 bubuko.com,布布扣

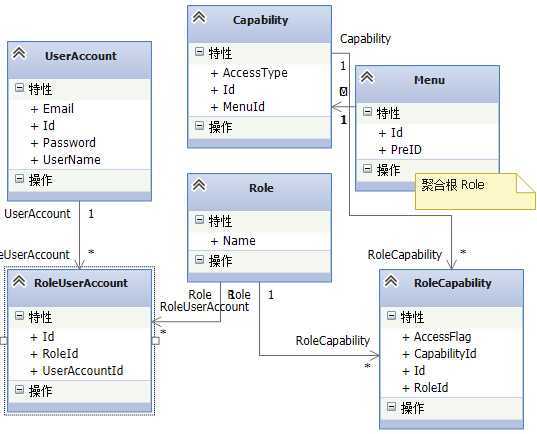
 上面是表之间关系。字段没有写完全,只写了重要的项目中要用到的字段

UserAccount表用户表,保存用户信息,

Role表很重要,做为聚合根来使用,其他与之关联的表,可以通过它来实现,更新,插入,查询操作。

RoleUserAccount多对多关系的关联表。

Menu菜单表,用来生成 树形菜单。他它的字段内容可以根据你使用的树形菜单UI来设计。

Capalibity权限表,一个菜单对应一个权限,这里要说明下AccessType字段,是个枚举类型,包含:None:无权限访问,只读权限,编辑权限,ReadOnly:无权限,只读权限,Edit;无权限,编辑权限,它和RoleCapalibity中的AccessFlag字段相关联。决定了AccessFlag所要显示的选项个数。当读取到这个属性时,模块会这样显示


RoleCapalibity 角色权限关联表:AccessFlag字段有三个值,也是枚举字段,包括:无权限,只读,编辑。它与角色关联,决定了用户访问页面的权限。

2,具体实现过程

 1,先实现核心部分,用户角色编辑页面。如图

bubuko.com,布布扣

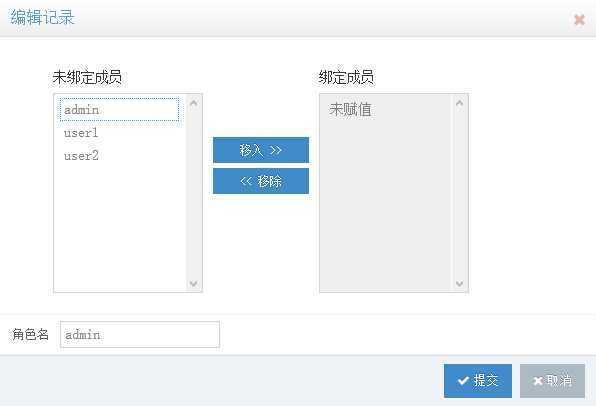
角色关联的用户通过上面的自定义UI实现,左边查询出所用不在这个角色中的用户,右边是这个角色中关联的用户。使用jqgrid实现。客户端代码如下。因为采用了母板页,所以有section节存在,

bubuko.com,布布扣
 1 @section scripts{   
 2    
 3      caption: "角色管理",
 4         url: "/role/GetJson",
 5     multiselect: true,
 6                 colNames: [‘‘, ‘ID‘, ‘角色名‘],
 7                 colModel: [
 8                     
 9                      {classes: ‘form-control‘,name: ‘UserAccounts‘, index: ‘UserAccounts‘, label: ‘UserAccounts‘, sortable: false, editable: true, hidden: true, edittype: ‘custom‘, editoptions: { dataUrl: "/role/GetSelectValue", multiple: true, custom_element: mySelectElem2, custom_value: mySelectValue }, editrules: { edithidden: true, custom:true, custom_func:customerSelectRequired }
10                      },
11 
12                     { name: ‘Id‘, index: ‘Id‘, searchrules: { required: true, integer: true }, sorttype: "int", editable: false },
13                   //要于server端的数据名匹配。
14                     { name: ‘Name‘, index: ‘Name‘, editrules: { required: true }, editable: true, editoptions: { size: "20", maxlength: "30" } },
15                     // { name: ‘sdate‘, index: ‘sdate‘, editable: true, sorttype: "date", unformat: pickDate },
16                     //{ name: ‘stock‘, index: ‘stock‘,  editable: true, edittype: "checkbox", editoptions: { value: "Yes:No" }, unformat: aceSwitch },
17                     //{ name: ‘ship‘, index: ‘ship‘, width: 90, editable: true, edittype: "select", editoptions: { value: "FE:FedEx;IN:InTime;TN:TNT;AR:ARAMEX" } },
18                     //{ name: ‘note‘, index: ‘note‘, width: 150, sortable: false, editable: true, edittype: "textarea", editoptions: { rows: "2", cols: "10" } }
19                 ],
20    }
21 @section beforeInitDataRoleAdd{
22        url: "/role/Create",
23      beforeInitData: function (e) {
24 
25                         $(grid_selector).setColProp(‘UserAccounts‘, { editable: false });
26                         return true;
27                     },
28    
29 
30   
31 
32                     
33     }
34     @section beforeInitDataRoleEdit{
35            url: "/role/Edit",
36         beforeInitData: function (e) {
37 
38         $(grid_selector).setColProp(‘UserAccounts‘, { editable: true });
39         return true;
40         },
41      
42         //mtype:"POST",
43      
44     }
View Code

下面是jqgrid中自定义的编辑控件函数

bubuko.com,布布扣
  1 @section GetElem{
  2       function getSelected(elem) {
  3                 //把select name属性去掉即不会选中时自动包装被选择数据,这样就可以一次把所有数据手工加载到formData中
  4                 var nm=$(elem).attr(‘name‘);
  5                 var textNmArry = nm.split(‘.‘);
  6                 var arryLength = textNmArry.length;
  7                 // var textNm = textNmArry[arryLength - 1];
  8                 var textNm = "UserName";
  9                 var selected = $(elem).find("option");
 10                 if (selected.length !== 0)
 11                     {
 12                    var jsonSelect = [];
 13                 selected.each(function (i, n) {
 14                     var jsting = "{‘Id‘:" + $(this).val() + ",‘" + textNm + "‘:‘" + $(this).text() + "‘}";
 15 
 16 
 17 
 18                     jsonSelect.push(jsting);
 19                 })
 20                
 21                 }
 22 
 23              
 24                 return jsonSelect.join(‘,‘);
 25 }
 26      function mySelectElem2(value, options) {
 27 
 28                 //alert(options.dataUrl);
 29                 var selectStr = "<select class=‘form-control‘ role=‘select‘ style=‘width:150px;height:200px;‘ multiple=‘multiple‘ aria-multiselectable=‘true‘></select>";
 30                 $.ajax({
 31                     url: options.dataUrl,
 32                     type: "GET",
 33                     contentType: "application/json.net",
 34                     data: { roleId: $(grid_selector).jqGrid(‘getGridParam‘, ‘selrow‘) },
 35                     dataType: "json",
 36 
 37                     success: function (data) {
 38 
 39                         var inRoleOption = "", notInRoleOption = "";
 40 
 41                             if (data.inRoleUser[0] !== null) {
 42                         $.each(data.inRoleUser, function (idx, item) {
 43                             inRoleOption = inRoleOption + "<option role=‘option‘ value=‘" + item.Id + "‘>" + item.UserName + "</option>";
 44 
 45                             });
 46                             }
 47                             else
 48                                 inRoleOption = "<option role=‘option‘ value=‘0‘>未赋值</option>";
 49 
 50                             if (data.notInRoleUser[0] !== null) {
 51                                 $.each(data.notInRoleUser, function (idx, item) {
 52                                     notInRoleOption = notInRoleOption + "<option role=‘option‘ value=‘" + item.Id + "‘>" + item.UserName + "</option>"
 53 
 54                                 });
 55                             }
 56                             else
 57                                 notInRoleOption = "<option role=‘option‘ value=‘0‘>未赋值</option>";
 58 
 59                     // alert(data.inRoleUser);
 60                         var celm = $("span.FormElement .customelement");
 61 
 62                         if (celm.length==1) {
 63                             celm.wrap("<div class=‘form-group‘ style=‘float:left;width:150px;‘></div>").before("<label for=‘" + options.name + "‘>绑定成员</label>");
 64                             celm.closest("div").before("<div class=‘form-group‘ style=‘float:left;width:150px;‘><label for=‘SelectedUsers‘>未绑定成员</label><select id=‘SelectedUsers‘ class=‘notSelectedUsers form-control‘ style=‘height:200px;‘ multiple=‘multiple‘></select></div><div class=‘form-group‘ style=‘float:left;padding:70px 10px;‘><button type=‘button‘ id=‘notSelectedUsers_Btn‘ class=‘btn btn-primary btn-xs btn-block‘>移入 >></button><button type=‘button‘ id=‘customelement_Btn‘ class=‘btn btn-primary btn-xs btn-block‘><< 移除</button></div>");
 65                             if (notInRoleOption.match(/未赋值/) != null)
 66                                 $(‘#SelectedUsers‘).append(notInRoleOption).attr("disabled", "disabled");
 67                             else
 68                                 $(‘#SelectedUsers‘).append(notInRoleOption);
 69 
 70                             if (inRoleOption.match(/未赋值/) != null)
 71                                 celm.append(inRoleOption).attr("disabled", "disabled");
 72                             else
 73                                 celm.append(inRoleOption);
 74 
 75 
 76                             $(‘.form-group‘).wrapAll("<div id=‘selectOutWapper‘ style=‘height:200px;‘ />");
 77 
 78                             SelectBtnInteraction();
 79                         }
 80 
 81                     }
 82 
 83 
 84                 });
 85 
 86 
 87                 return $(selectStr);
 88             }
 89 
 90             function mySelectValue(elem, operation, value) {
 91 
 92                 if (operation === ‘get‘) {
 93                     //alert($(elem).val());
 94                     return getSelected(elem);
 95                 } else if (operation === ‘set‘) {
 96 
 97                     $(‘select‘,elem).val(value);
 98                 }
 99             }
100             function SelectBtnInteraction() {
101 
102 
103 
104                     $(‘#selectOutWapper button[type="button"]‘).each(function (index) {
105                         $(this).click(function () {
106 
107                             var btnId = $(this).attr("id");
108                             var selectClass = btnId.substr(0, btnId.indexOf(‘_‘));
109 
110                             var op = $("#selectOutWapper select").not("." + selectClass);
111                             var oo = op.find("option").get(0);
112                             var select1 = $(‘select.‘ + selectClass);
113 
114                                 var options = "";
115 
116                                 select1.find("option:selected").each(function (iex) {
117                                     //alert(iex);
118 
119 
120                                     options = options + "<option role=‘option‘ value=‘" + $(this).val() + "‘>" + $(this).text() + "</option>";
121                                     $(this).remove();
122 
123                                 })
124                                 if (select1.find("option").length == 0) {
125                                     select1.append("<option role=‘option‘ value=‘0‘>未赋值</option>").attr("disabled", "disabled");
126 
127                                 }
128 
129                                 op.append(options);
130 
131                                     if ($(oo).text() === "未赋值" && op.find("option").length > 1) {
132                                         $(oo).remove();
133                                 op.removeAttr("disabled");
134                                     }
135                             })
136 
137 
138 
139 
140                     })
141 
142 
143             }
144      function customerSelectRequired(value, colname) {
145                // alert(value);
146                 if (value.match(/未赋值/)!=null)
147                     return [false, "请选择一项值!"];
148                 else
149                     return [true, ""];
150             }
151 
152 }
153      
View Code

 后台代码,就是查询什么的,就不多说了,说下规约模式,在这里查询我用了规约模式,如图

bubuko.com,布布扣

规约模式介绍见http://www.cnblogs.com/yeagen/archive/2013/05/08/3067147.html 这里介绍的比较复杂但很规范,我用的是从repository中传session和iqueryable<T>entitys 这两个属性到Ispecificate接口中,然后,简单查询只接用entitys即可,复杂查询使用session。用起来很方便,不过就是有些多呀,担心以后项目在这一部分会很累赘,但好处不言面喻,解耦,维护起来更加方便。

2,用户管理,如图

bubuko.com,布布扣

单独的实体管理,在角色用户管理上建立与用户的关联,这里不做关联,照片的上传采用uploadify插件,功能很完,自定义很高。不过有个缺点,因为是用的flash插件来进行上传,所以客户端要提示用户安装falshplayer,并且它还不能传递session和cookie,解决方法在母板页加上,如下代码:

bubuko.com,布布扣
 @if (Request.IsAuthenticated)
    {
    <input type="hidden" id="auth" value=@Request.Cookies[FormsAuthentication.FormsCookieName].Value‘ />
    <input type="hidden" id="ASPSESSID" value=@Session.SessionID‘ />

     }
View Code

然后在global.cs中加入如下代码

bubuko.com,布布扣
 protected void Application_BeginRequest()
        {
      /* we guess at this point session is not already retrieved by application so we recreate cookie with the session id... */
        try
        {
            string session_param_name = "ASPSESSID";
            string session_cookie_name = "ASP.NET_SessionId";

            if (HttpContext.Current.Request.Form[session_param_name] != null)
            {
                UpdateCookie(session_cookie_name, HttpContext.Current.Request.Form[session_param_name]);
            }
            else if (HttpContext.Current.Request.QueryString[session_param_name] != null)
            {
                UpdateCookie(session_cookie_name, HttpContext.Current.Request.QueryString[session_param_name]);
            }
        }
        catch
        {
        }

        try
        {
            string auth_param_name = "AUTHID";
            string auth_cookie_name = FormsAuthentication.FormsCookieName;

            if (HttpContext.Current.Request.Form[auth_param_name] != null)
            {
                UpdateCookie(auth_cookie_name, HttpContext.Current.Request.Form[auth_param_name]);
            }
            else if (HttpContext.Current.Request.QueryString[auth_param_name] != null)
            {
                UpdateCookie(auth_cookie_name, HttpContext.Current.Request.QueryString[auth_param_name]);
            }

        }
        catch
        {
        }
    }

    private void UpdateCookie(string cookie_name, string cookie_value)
    {
        HttpCookie cookie = HttpContext.Current.Request.Cookies.Get(cookie_name);
        if (null == cookie)
        {
            cookie = new HttpCookie(cookie_name);
        }
        cookie.Value = cookie_value;
        HttpContext.Current.Request.Cookies.Set(cookie);
    }
View Code

这样就完美了。

   3,角色权限方面,如图

    bubuko.com,布布扣

呵呵又见面了,不错就是这个界面。采用jqgird父子结构。查询出角色中所属的权限。访问类型是下拉列表,选项改变会相应改变访问权限的内容。访问权限就是此角色对这个页面的访问权限了。思路很简单。

   3,权限管理模块 如图

bubuko.com,布布扣

bubuko.com,布布扣

权限管理与页面是一对一关系。权限名用Controller/Acction来表示,然后加个描述字段来说明此权限的用处,与页面一对一关联。

4,页面菜单管理

bubuko.com,布布扣

菜单菜用树形菜单,与权限建立关联,


5,到此权限关系设定模块就搞定了。等等,然后呢。。。。!,怎么根据权限设定实现页面的管理呢?

思路:在webform页面中,可以使用basewebpage进行高层控制。在mvc4中,本人才疏学浅,没能找到个性basewebpage的方法,不过发现,用全局过滤器就能完全解决这个问题。上代码

bubuko.com,布布扣
 1 using Demo.Site.Models;
 2 using System;
 3 using System.Collections.Generic;
 4 using System.Linq;
 5 using System.Web;
 6 using System.Web.Mvc;
 7 using System.Web.Security;
 8 using Omu.ValueInjecter;
 9 namespace Demo.Site.Web
10 {
11     public class NoAccessAuthorizationAttribute:AuthorizeAttribute
12     {
13        
14         private bool OnInit(HttpContextBase httpContext)
15         {
16              
17             bool isTrue = false;
18             //这里实现用户信息的相关验证业务
19             if (httpContext.Session["UserStateDTO"] != null)
20             {
21                 string cookieName = FormsAuthentication.FormsCookieName;
22                 UserStateDTO UserStateDTO = httpContext.Session["UserStateDTO"] as UserStateDTO;
23                 string passCode = httpContext.Request.Cookies[cookieName].Value.Trim();
24 
25                 string controllerName = httpContext.Request.RequestContext.RouteData.Values["controller"].ToString().ToLower();
26                 string actionName = httpContext.Request.RequestContext.RouteData.Values["action"].ToString().ToLower();
27                 //判断有没有Action操作权限    
28                 MenuDTO mdto = UserStateDTO.MenuDTOs.Where(md => md.Menu.Url.ToLower().Contains("/"+controllerName + "/" + actionName)).FirstOrDefault();
29                             
30                 
31                 if (mdto!=null)
32                 {
33                     //每个页面都要用此对象,防止引用延迟代理出现异常(用=直接赋值),故要直接把值注入。
34                     UserStateDTO.CurrentMenuDTO =new MenuDTO();
35                        UserStateDTO.CurrentMenuDTO.InjectFrom(mdto); 
36                     isTrue=true;
37 
38                 }
39                 
40 
41             }
42             
43             return isTrue;
44         }
45         protected override bool AuthorizeCore(HttpContextBase httpContext)
46         {
47             
48            return OnInit(httpContext) || httpContext.Request.UserAgent== "Shockwave Flash" || httpContext.Request.ContentType.Contains("multipart/form-data")||httpContext.Request.IsAjaxRequest();
49             //用来调试直接返回true。
50            // return true;
51         }
52        
53     }
54 }
View Code
bubuko.com,布布扣然后在app_start注册一下:bubuko.com,布布扣
bubuko.com,布布扣
using System.Web;
using System.Web.Mvc;

namespace Demo.Site.Web
{
    public class FilterConfig
    {
        public static void RegisterGlobalFilters(GlobalFilterCollection filters)
        {
            filters.Add(new HandleErrorAttribute());
            filters.Add(new NoAccessAuthorizationAttribute());
        }
    }
}
View Code

Session["UserStateDTO"]是登录后存储在session中的供页面或登录后,要使用的用户,角色,权限信息。相当于缓存他们,这样再使用信息时,就不用再一次查询数据库了,并且他们不是经常变化的数据。此过滤器允许ajax和上传请求通过。你可以根据自已的需要自已添加要通过的请求。

注意,此过滤器,请求只有通过 这个过滤器,才能在被请求的Controller中使用[AllowAnonymous]特性,不然,即使使用了此特性,也将被过滤器挡回请求。

5,在开发过程中,使用到的前端技术,jquery呀,ajax,html,什么的这些基础的东西就不讲了,说一说UI组件,前期UI组件一定要选择好,不然将会浪费大量精力,因为有些UI组件文档上说是有这种功能,但当用的时候,发现有是有,但是功能很弱,或功能存在很多bug,你不用吧,之前的UI内容 就要全部推翻,来使用新的UI组件,你用吧,老是出问题调试起来麻烦的紧。所以建议还是使用收费的UI,如EXTJS,easyui等。

6,在表单处理这方面,我使用了jqueryform.js,他的配置很简单,就像一个优化了的jqueryAjax请求,并且定制度也很高,上一段代码来研究研究


bubuko.com,布布扣
$(document).ready(function() { 
    var options = { 
        target:        #output1‘,   // target element(s) to be updated with server response 
        beforeSubmit:  showRequest,  // pre-submit callback 
        success:       showResponse  // post-submit callback 
 
        // other available options: 
        //url:       url         // override for form‘s ‘action‘ attribute 
        //type:      type        // ‘get‘ or ‘post‘, override for form‘s ‘method‘ attribute 
        //dataType:  null        // ‘xml‘, ‘script‘, or ‘json‘ (expected server response type) 
        //clearForm: true        // clear all form fields after successful submit 
        //resetForm: true        // reset the form after successful submit 
 
        // $.ajax options can be used here too, for example: 
        //timeout:   3000 
    }; 
 
    // bind form using ‘ajaxForm‘ 
    $(#myForm1).ajaxForm(options); 
}); 
 
View Code

属性都很简单也容易理解,不懂得可以去官网查看http://www.vaikan.com/docs/jquery.form.plugin/jquery.form.plugin.html#code-samples,都是中文的,在这里要说一下

beforeSubmit这个事件,这个事件是所有请求时,第一个触发的,他的一个重要参数就是要上传的表格数据的对象formdata,但是不能在这事件里修改这个表格数据对象,即使像这样,formdata=newObject也是不行的,只能在这里执行验证什么的,通过验证就return true,反之就是不通过,这样的话,如果,我想要在表格传送之前,修改表格数据,比如去掉几个字段不让他们传送到服务器,就没办法了。别急,用konckout.js就能解决所有问题了。

7,konckout.js,

这是一个神器,他适用于mvvm模式,模型-视图-视图模型的意思,ko在这里就是充当一个viewmodel,做为服务器和客户端互通数据的一个桥梁。在ko中保存服务器端返回的数据,把数据绑定到视图上,这样KO就会监视这些数据的改变,当视图数据改变时ko中的数据也会改变,同理,ko中的数据改变,视图上的数据同样改变。并且高度自定义,可以任意处理要传回给服务器端或传到客户端数据。看下代码

bubuko.com,布布扣
     var viewModel={
   
     clear:function(){ko.mapping.fromJS(datajs,viewModel);},

    b_classS:ko.observableArray([{value:arrow icon-angle-down‘,text:<b class="arrow icon-angle-down"></b>arrow icon-angle-down}]), 
    span_classS:ko.observableArray([{value:menu-text‘,text:menu-text}]), 
     i_classS:ko.observableArray([
    {value:icon-text-width‘,text:<i class="icon-text-width"></i> icon-text-width‘},{value:icon-desktop‘,text:<i class="icon-desktop"></i> icon-desktop‘},{value:icon-list‘,text:<i class="icon-list"></i> icon-list‘},{value:icon-edit‘,text:<i class="icon-edit"></i> icon-edit‘},{value:icon-list-alt‘,text:<i class="icon-list-alt"></i> icon-list-alt‘},{value:icon-calendar‘,text:<i class="icon-calendar"></i> icon-calendar‘},{value:icon-picture‘,text:<i class="icon-picture"></i> icon-picture‘},{value:icon-tag‘,text:<i class="icon-tag"></i> icon-tag‘},{value:icon-file-alt‘,text:<i class="icon-file-alt"></i> icon-file-alt‘},{value:icon-leaf‘,text:<i class="icon-leaf"></i> icon-leaf‘},{value:icon-pencil‘,text:<i class="icon-pencil"></i> icon-pencil}
   
    ]), 
      a_classS:ko.observableArray([
    {value:dropdown-toggle‘,text:dropdown-toggle}
    ]), 
    TargetS:ko.observableArray([{value:_target‘,text:另起一页显示‘},{value:self‘,text:本页面显示}]),  
    
    Capabilities:createSelect(opt=="edit" ? "/Menu/GetCapability/"+data.Capability_Id:"/Menu/GetCapability/"),
   
    ParentMenu:createSelect("/Menu/GetParentNodes/" +data.ParentMenuItemId)
     }
        var mapping = {};//没有mapping变量,将不会自动map其他属性,viewmodel中只有自定义的属性。
    
       ko.mapping.fromJS(data,mapping,viewModel);
   
        function createSelect(url) {
           var sel= ko.observableArray(getSelect(url));                   
           return sel;    

    }
    
   
        ko.applyBindings(viewModel,ele);
    return viewModel;
     //ko.toJSON所得结果包括自定义的和ko.mapping.toJSON所得结果不包括自定义属性。
  //alert(ko.mapping.toJSON(viewModel));
    }
View Code

这是在菜单页面管理中,使用的ko来控制页面数据。如果不想要某个字段,在viewmodel对象中去掉即可,然后在jqueryform中,用 options.data=JSON.parse(ko.mapping.toJSON(vm));来传递要送回服务器端的数据就能搞定了。当然还有更高级的应用比如,统计某些数据的总和,只需要定义一个compute函数里面用计算表达式算出统计结果,就可以了。当这个表达式中的任何一个变量改变时都会自动更新结果。最常用的就是购物车,价格结算功能。官方文档上有介绍。详情可以去看文档。

 8,niceValidator

用于表单验证的,功能很全,自定义程序也高,有中文文档。这个很简单易用,就不多说了,需要的看文档。http://niceue.com/validator/

完结!


Mvc4+autofac+jggrid+nhibernate(2)权限管理

标签:des   style   blog   http   io   color   ar   os   使用   

原文地址:http://www.cnblogs.com/shanBlog/p/4089624.html

(0)
(0)
   
举报
评论 一句话评论(0
登录后才能评论!
© 2014 mamicode.com 版权所有  联系我们:gaon5@hotmail.com
迷上了代码!