标签:sql语句 inf 通过 yum 关闭防火墙 应用程序服务器 代码 mysql主从 改变
mysql 实现读写分离的有以下几种:
ProxySQL符合MySQL / MariaDB协议,并原生支持流行的后端:
功能简介:
| 应用层代理 | ProxySQL不仅是负载均衡器,它还了解MySQL协议,可提供端到端MySQL连接处理,实时统计信息和数据库流量检查。 |
|---|---|
| 宕机零变更 | ProxySQL的配置受到了高级路由器设计原则的启发。动态配置内存中的所有内容,持久化到磁盘并推到运行时,所有这些动作都无需停机。 |
| 数据库防火墙 | ProxySQL充当应用程序和数据库之间的网守,从而使DBA可以保护数据库免受恶意活动或有问题的应用程序部署的影响。 |
| 高级规则查询 | 使用ProxySQL丰富的查询规则定义解决查询路由问题,以有效地分发和缓存数据,从而最大程度地提高数据库服务效率。 |
| 数据分片与转换 | 通过基于架构,表或用户在多个服务器之间共享数据库来扩展数据库。实施高级查询规则以即时重写数据以进行转换或数据屏蔽。 |
| 故障转移检测 | ProxySQL通过连续监视数据库后端并在拓扑更改时将流量重新路由到运行正常的节点来自动检测复制拓扑更改。 |
[root@localhost ~]# cat <<EOF | tee /etc/yum.repos.d/proxysql.repo
[proxysql_repo]
name= ProxySQL YUM repository
baseurl=https://repo.proxysql.com/ProxySQL/proxysql-2.0.x/centos/\$releasever
gpgcheck=1
gpgkey=https://repo.proxysql.com/ProxySQL/repo_pub_key
EOF


[root@localhost ~]# yum install proxysql

[root@localhost ~]# systemctl enable --now proxysql
[root@localhost ~]# ss -tanl
State       Recv-Q Send-Q                   Local Address:Port                                  Peer Address:Port
LISTEN      0      100                          127.0.0.1:25                                               *:*
LISTEN      0      128                                  *:6032                                             *:*
LISTEN      0      128                                  *:6033                                             *:*
LISTEN      0      128                                  *:6033                                             *:*
LISTEN      0      128                                  *:6033                                             *:*
LISTEN      0      128                                  *:6033                                             *:*
LISTEN      0      128                                  *:22                                               *:*
LISTEN      0      100                              [::1]:25                                            [::]:*
LISTEN      0      128                               [::]:22                                            [::]:*


mysql -u admin -padmin -h 127.0.0.1 -P6032 --prompt=‘Admin> ‘
ProxySQL管理界面是使用MySQL协议的界面,任何能够通过该界面发送命令的客户端都可以配置它。SQLite3和MySQL使用的SQL语法不同,因此,并非所有在MySQL上运行的命令都可以在SQLite3上运行。例如,尽管USE命令已被管理界面接受,但它不会更改默认架构,因为此功能在SQLite3中不可用。
连接到ProxySQL管理界面时,我们可以看到有一些数据库可用。ProxySQL将SHOW DATABASES命令转换为SQLite3的等效命令。
MySQL [(none)]> show databases;
+-----+---------------+-------------------------------------+
| seq | name          | file                                |
+-----+---------------+-------------------------------------+
| 0   | main          |                                     |
| 2   | disk          | /var/lib/proxysql/proxysql.db       |
| 3   | stats         |                                     |
| 4   | monitor       |                                     |
| 5   | stats_history | /var/lib/proxysql/proxysql_stats.db |
+-----+---------------+-------------------------------------+
5 rows in set (0.00 sec)
数据库说明:
ProxySQL具有一个复杂但易于使用的配置系统,可满足以下需求:
这是通过多级配置系统实现的,其中将设置从运行时移动到内存,然后根据需要持久保存到磁盘。
3层配置包括:
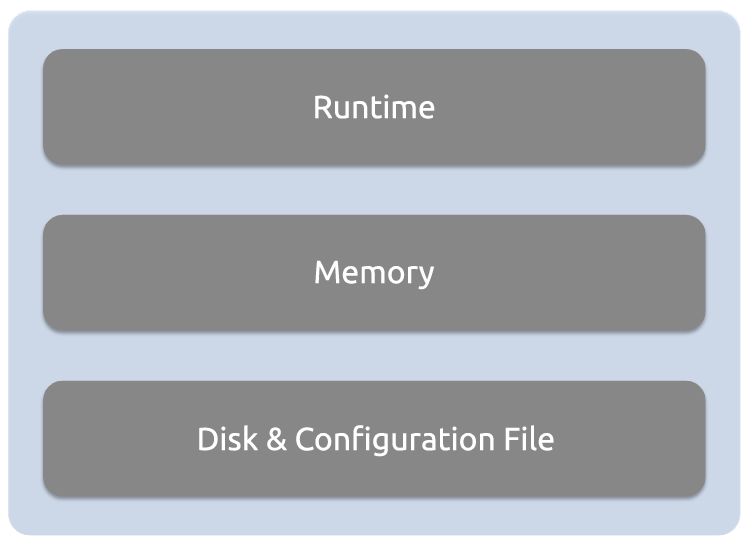
它是 ProxySQL 有关线程运行时读取的数据结构。换句话说,该数据结构中的配置都是已生效的配置。所以,修改了 main 库中的配置后,必须 load 到 runtime 数据结构中才能使其生效。
运行时变量包含与以下内容有关的配置:
管理员永远不能直接修改RUNTIME中配置的内容。必须先经过底层。
memory层表示的是内存数据库,一个由MySQL兼容接口露出的内存数据库(可以理解为main库,因为在内存中,更改配置后要save到disk中)。用户可以使用MySQL客户端连接到该界面,并查看/编辑各种ProxySQL配置表。
通过此接口可用的配置表包括以下表:
DISK层表示磁盘上的SQLite3数据库,默认位置在$(DATADIR)/proxysql.db。DISK数据库可用于将内存中的配置持久保存到磁盘,以便在ProxySQL重新启动后可以使用该配置。 config file 就是传统的配置文件,默认为 /etc/proxysql.cnf , ProxySQL 启动时,主要是从 disk 库中读取配置加载到内存并最终加载到 runtime 生效,只有极少的几个特定配置内容是从 config file 中加载的,除非是第一次初始化 ProxySQL 运行环境(或者disk库为空)。
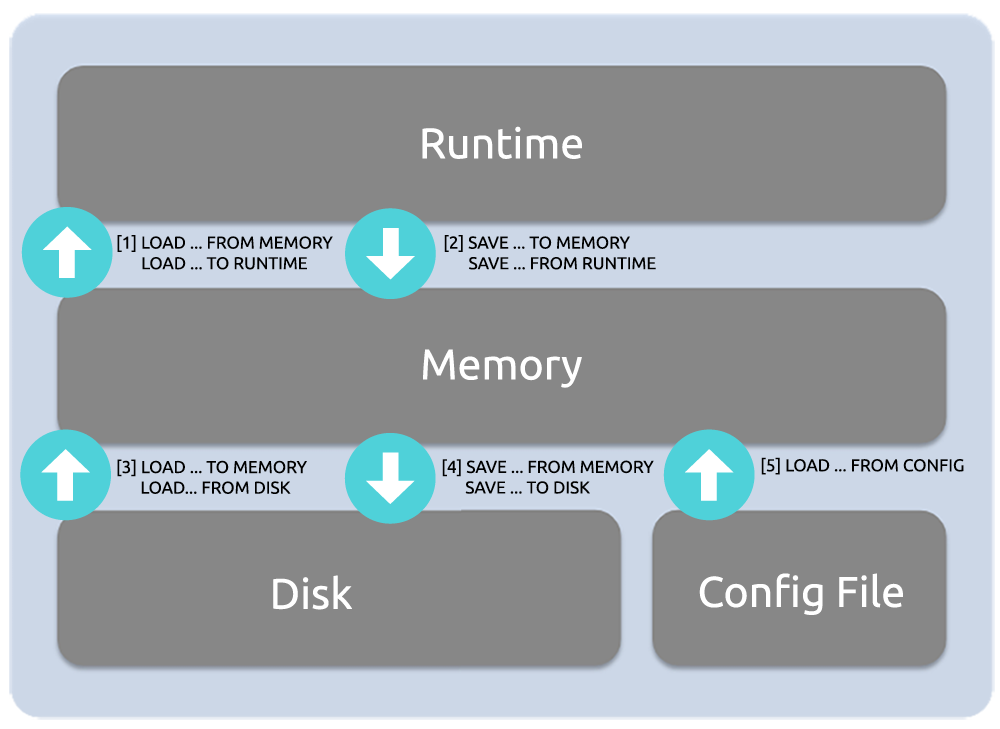
可以使用以下命令语法在各个层之间移动ProxySQL配置,
[1]
LOAD <item> FROM MEMORY / LOAD <item> TO RUNTIME
[2]
SAVE <item> TO MEMORY / SAVE <item> FROM RUNTIME
[3]
LOAD <item> TO MEMORY / LOAD <item> FROM DISK
[4]
SAVE <item> FROM MEMORY / SAVE <item> TO DISK
[5]
LOAD <item> FROM CONFIG
重要说明:在将更改加载到RUNTIME之前,它们不会被激活,并且未保存到DISK的任何更改在ProxySQL重新启动后将不可用。
proxysql提供了两个管理方式:
consle管理方式
web界面管理方式(只作为各种数据的监视)
对应两种管理方式的不同,默认提供两类管理账户:
admin:admin 可以对管理读写的账户
stats:stats 只有读的管理账户,用于web界面的管理方式
当ProxySQL启动后,将监听两个端口:
ProxySQL的admin管理接口是一个使用MySQL协议的接口,所以,可以直接使用mysql客户端、navicat等工具去连接这个管理接口。管理接口的默认用户名和密码admin:admin。
#安装mysql命令
[root@localhost ~]# yum -y install mysql


#登录
[root@localhost ~]# mysql -u admin -padmin -h 127.0.0.1 -P6032
Welcome to the MariaDB monitor.  Commands end with ; or \g.
Your MySQL connection id is 3
Server version: 5.5.30 (ProxySQL Admin Module)

Copyright (c) 2000, 2018, Oracle, MariaDB Corporation Ab and others.

Type ‘help;‘ or ‘\h‘ for help. Type ‘\c‘ to clear the current input statement.

MySQL [(none)]>
admin-admin_credentials 变量控制的是admin管理接口的管理员账户。默认的管理员账户和密码为admin:admin,但是这个默认的用户只能在本地使用。如果想要远程连接到ProxySQL,例如用windows上的navicat连接Linux上的ProxySQL管理接口,必须自定义一个管理员账户。
添加管理员账户
#查看当前用户名和密码
MySQL [(none)]>  select @@admin-admin_credentials;
+---------------------------+
| @@admin-admin_credentials |
+---------------------------+
| admin:admin               |
+---------------------------+
1 row in set (0.00 sec)


#设置管理员帐号root,密码root123!
MySQL [(none)]> set admin-admin_credentials=‘admin:admin;root:root123!‘;
Query OK, 1 row affected (0.00 sec)

MySQL [(none)]>  select @@admin-admin_credentials;
+---------------------------+
| @@admin-admin_credentials |
+---------------------------+
| admin:admin;root,root123! |
+---------------------------+
1 row in set (0.00 sec)

#立即生效
MySQL [(none)]> load admin variables to runtime;
Query OK, 0 rows affected (0.00 sec)


#永久保存到磁盘
MySQL [(none)]> save admin variables to disk;
Query OK, 35 rows affected (0.00 sec)
使用新账户密码从另一台机器登录
[root@mysql-master ~]# mysql -uroot -proot123! -h192.168.32.130 -P6032
Welcome to the MariaDB monitor.  Commands end with ; or \g.
Your MySQL connection id is 13
Server version: 5.5.30 (ProxySQL Admin Module)

Copyright (c) 2000, 2018, Oracle, MariaDB Corporation Ab and others.

Type ‘help;‘ or ‘\h‘ for help. Type ‘\c‘ to clear the current input statement.

MySQL [(none)]>
所有的配置操作都是在修改main库中对应的表
MySQL [(none)]> select * from global_variables where variable_name=‘admin-admin_credentials‘;
+-------------------------+---------------------------+
| variable_name           | variable_value            |
+-------------------------+---------------------------+
| admin-admin_credentials | admin:admin;root:root123! |
+-------------------------+---------------------------+
1 row in set (0.01 sec)
必须要区分admin管理接口的用户名和mysql_users中的用户名
admin管理接口的用户必须不能存在于mysql_users中,这是出于安全的考虑,防止通过admin管理接口用户猜出mysql_users中的用户
admin-stats_credentials 变量控制admin管理接口的普通用户,这个变量中的用户没有超级管理员权限,只能查看monitor库和main库中关于统计的数据,其它库都是不可见的,且没有任何写权限
默认的普通用户名和密码均为 stats ,与admin一样,它默认也只能用于本地登录,若想让人远程查看则要添加查看的专有用户
MySQL [(none)]> select @@admin-stats_credentials;
+---------------------------+
| @@admin-stats_credentials |
+---------------------------+
| stats:stats               |
+---------------------------+
1 row in set (0.00 sec)

#添加专有的查看用户
MySQL [(none)]> set admin-stats_credentials=‘stats:stats;mystats:mystats123!‘;
Query OK, 1 row affected (0.00 sec)

MySQL [(none)]> set admin-stats_credentials=‘stats:stats;mystats:mystats123!‘;
Query OK, 1 row affected (0.00 sec)

MySQL [(none)]> select @@admin-stats_credentials;
+---------------------------------+
| @@admin-stats_credentials       |
+---------------------------------+
| stats:stats;mystats:mystats123! |
+---------------------------------+
1 row in set (0.00 sec)

MySQL [(none)]> load admin variables to runtime;
Query OK, 0 rows affected (0.00 sec)

MySQL [(none)]> save admin variables to disk;
Query OK, 35 rows affected (0.00 sec)
同样,这个变量中的用户必须不能存在于mysql_users表中
使用mystats用户远程连接查看
[root@localhost ~]# mysql -umystats -pmystats123! -h127.0.0.1 -P6032
Welcome to the MariaDB monitor.  Commands end with ; or \g.
Your MySQL connection id is 16
Server version: 5.5.30 (ProxySQL Admin Module)

Copyright (c) 2000, 2018, Oracle, MariaDB Corporation Ab and others.

Type ‘help;‘ or ‘\h‘ for help. Type ‘\c‘ to clear the current input statement.

MySQL [(none)]> show tables from main;
+--------------------------------------+
| tables                               |
+--------------------------------------+
| global_variables                     |
| stats_memory_metrics                 |
| stats_mysql_commands_counters        |
| stats_mysql_connection_pool          |
| stats_mysql_connection_pool_reset    |
| stats_mysql_errors                   |
| stats_mysql_errors_reset             |
| stats_mysql_free_connections         |
| stats_mysql_global                   |
| stats_mysql_gtid_executed            |
| stats_mysql_prepared_statements_info |
| stats_mysql_processlist              |
| stats_mysql_query_digest             |
| stats_mysql_query_digest_reset       |
| stats_mysql_query_rules              |
| stats_mysql_users                    |
| stats_proxysql_servers_checksums     |
| stats_proxysql_servers_metrics       |
| stats_proxysql_servers_status        |
+--------------------------------------+
19 rows in set (0.00 sec)
admin-mysql_ifaces 变量指定admin接口的监听地址,格式为冒号分隔的hostname:port列表。默认监听在 0.0.0.0:6032
注意,允许使用UNIX的domain socket进行监听,这样本主机内的应用程序就可以直接被处理。
例如:
MySQL [(none)]> SET admin-mysql_ifaces=‘0.0.0.0:6060;
Query OK, 1 row affected (0.00 sec)

MySQL [(none)]> load admin variables to runtime;
Query OK, 0 rows affected (0.00 sec)

MySQL [(none)]> save admin variables to disk;
Query OK, 31 rows affected (0.00 sec)
数据库中间件最基本的功能就是实现读写分离, ProxySQL 当然也支持。而且 ProxySQL 支持的路由规则非常灵活,不仅可以实现最简单的读写分离,还可以将读/写都分散到多个不同的组,以及实现分库 sharding (分表sharding的规则比较难写,但也能实现)。
本文只描述通过规则制定的语句级读写分离,不讨论通过 ip/port, client, username, schemaname 实现的读写分离。
下面描述了ProxySQL能实现的常见读写分离类型
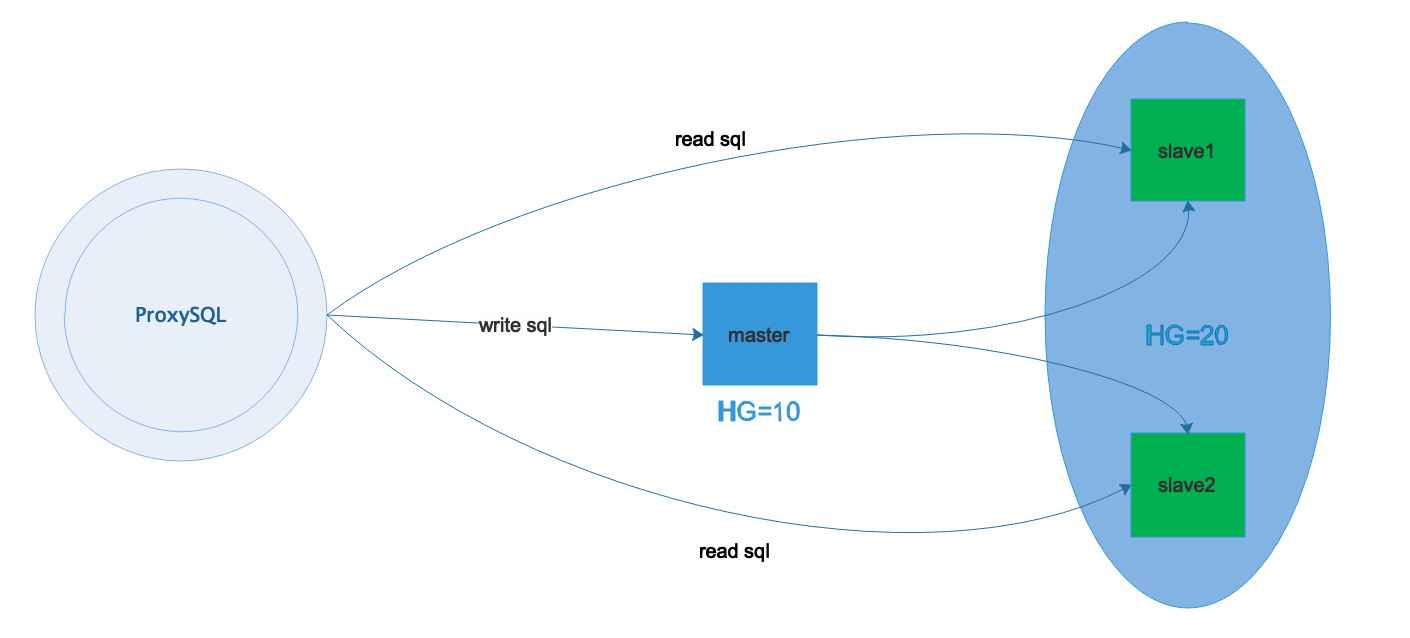
这种模式的读写分离,严格区分后端的master和slave节点,且slave节点必须设置选项read_only=1
在ProxySQL上,分两个组,一个写组HG=10,一个读组HG=20。同时在ProxySQL上开启monitor模块的read_only监控功能,让ProxySQL根据监控到的read_only值来自动调整节点放在HG=10(master会放进这个组)还是HG=20(slave会放进这个组)
这种模式的读写分离是最简单的,只需在mysql_users表中设置用户的默认路由组为写组HG=10,并在mysql_query_rules中加上两条简单的规则(一个select for update,一个select)即可
这种读写分离模式,在环境较小时能满足绝大多数需求。但是需求复杂、环境较大时,这种模式就太过死板,因为一切都是monitor模块控制的
前面那种读写分离模式,是通过 monitor 模块监控 read_only 来调整的,所以每一个后端集群必须只能分为一个写组,一个读组。
但如果想要区分不同的 select ,并将不同的 select 路由到不同的节点上。例如有些查询语句的开销非常大,想让它们独占一个节点/组,其它查询共享一个节点/组,怎么实现?
例如,下面这种模式
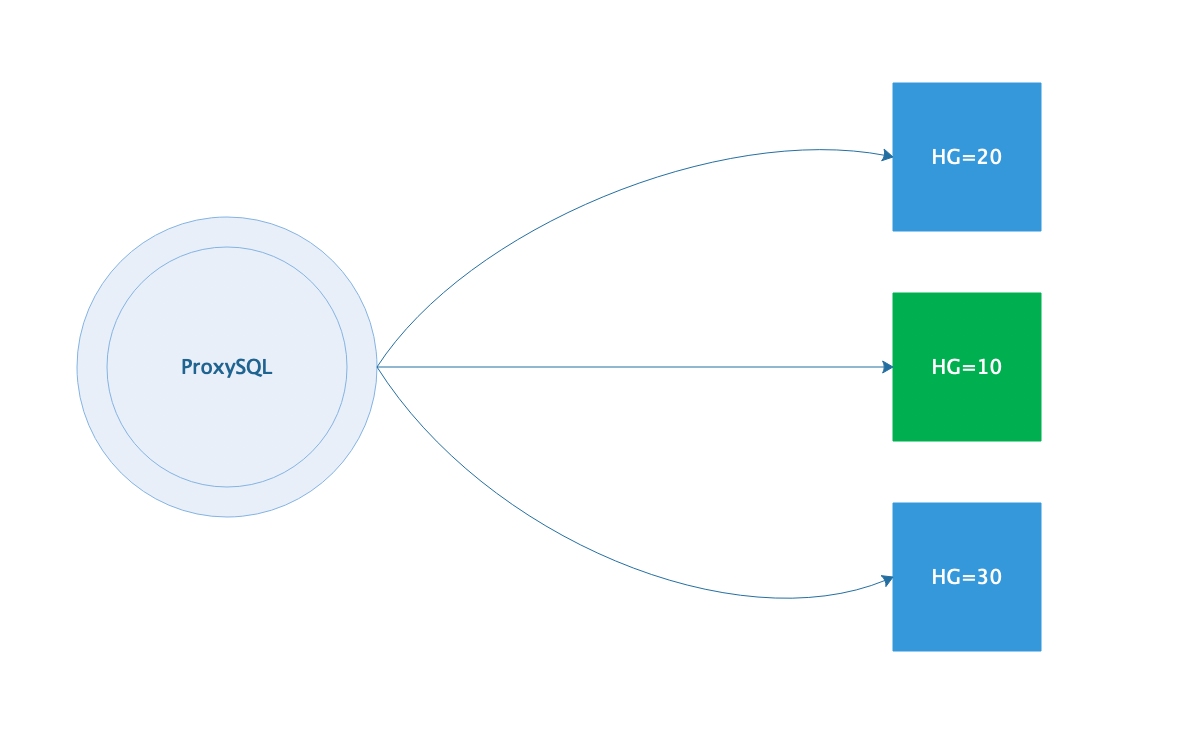
看上去非常简单。但是却能适应各种需求。例如,后端做了分库,对某库的查询要路由到特定的主机组
至于各个主机组是同一个主从集群(下图左边),还是互相独立的主从集群环境(下图右边),要看具体的需求,不过这种读写分离模式都能应付
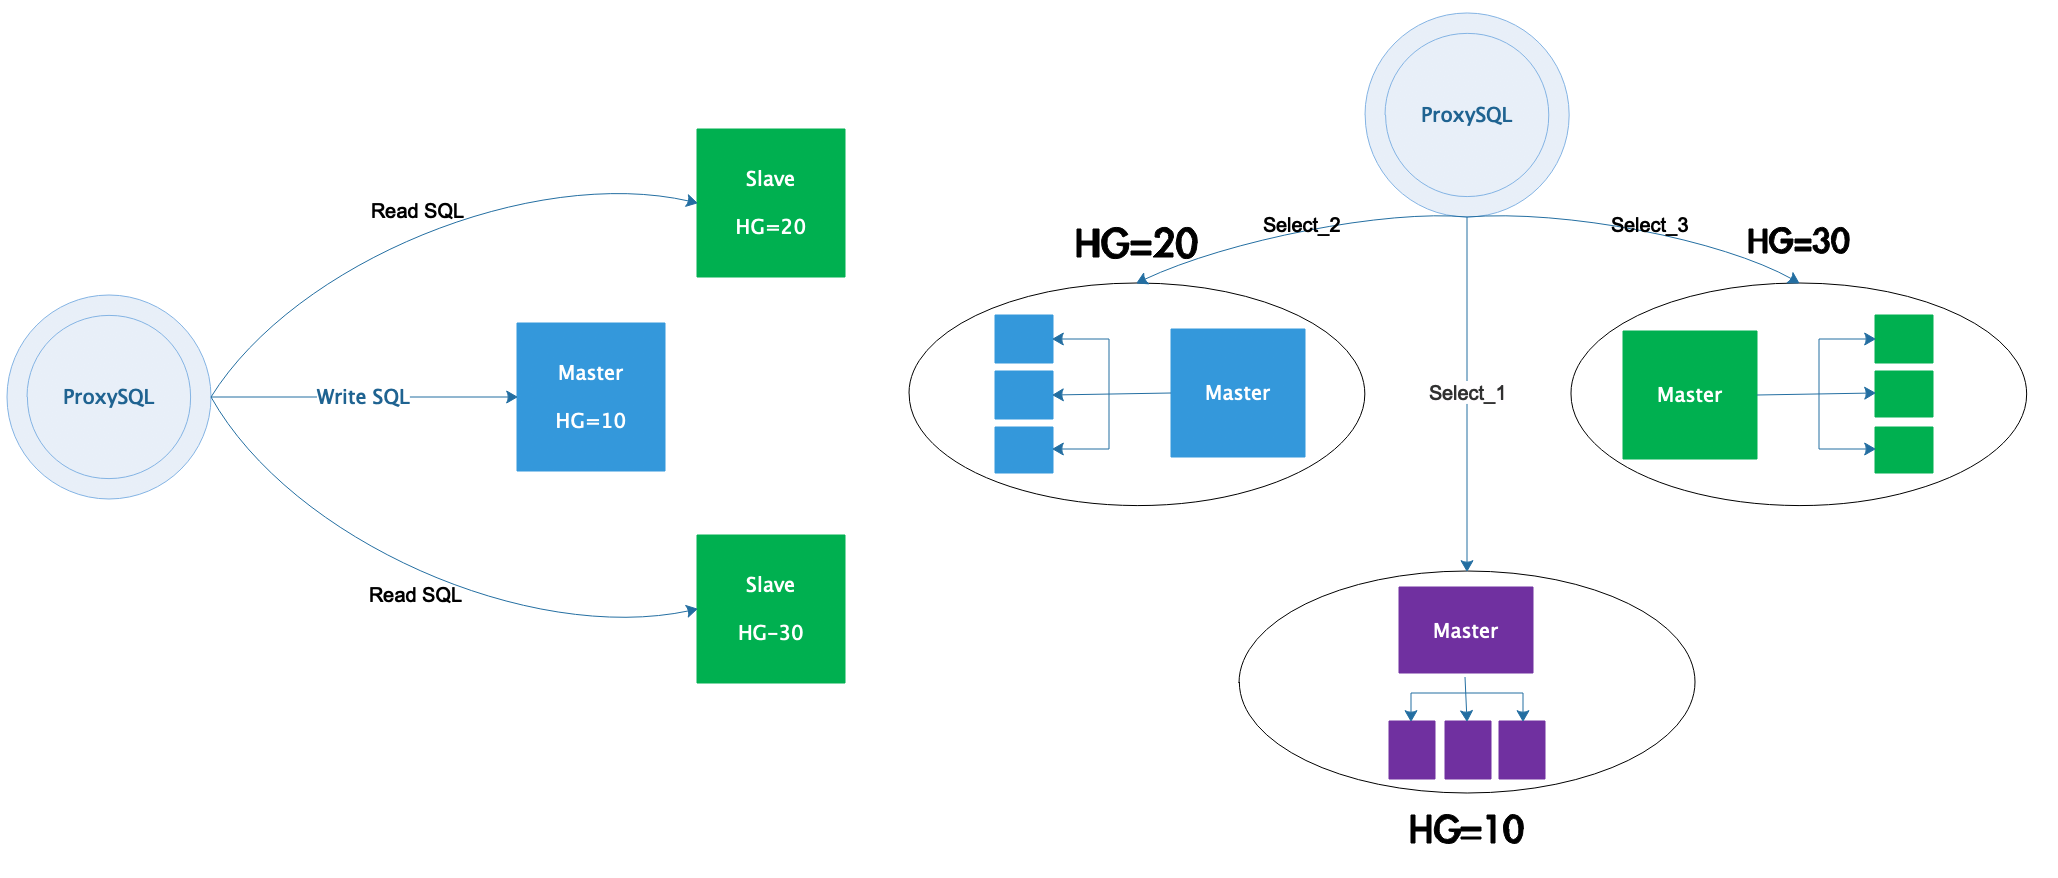
在实现这种模式时,前提是不能开启monitor模块的read_only监控功能,也不要设置mysql_replication_hostgroup 表
例如,下面的配置实现的是上图左边的结构:写请求路由给HG=10,对test1库的select语句路由给HG=20,其它select路由给HG=30
mysql_servers:
+--------------+----------+------+--------+--------+
| hostgroup_id | hostname | port | status | weight |
+--------------+----------+------+--------+--------+
| 10           | host1    | 3306 | ONLINE | 1      |
| 20           | host2    | 3306 | ONLINE | 1      |
| 30           | host3    | 3306 | ONLINE | 1      |
+--------------+----------+------+--------+--------+

mysql_users:
+----------+-------------------+
| username | default_hostgroup |
+----------+-------------------+
| root     | 10                |
+----------+-------------------+

mysql_query_rules:
+---------+-----------------------+----------------------+
| rule_id | destination_hostgroup | match_digest         |
+---------+-----------------------+----------------------+
| 1       | 10                    | ^SELECT.*FOR UPDATE$ |
| 2       | 20                    | ^SELECT.*test1\..*   |
| 3       | 30                    | ^SELECT              |
+---------+-----------------------+----------------------+
查看表结构的方式:
PRAGMA table_info("表名");
环境说明:
| IP | 角色 | 应用 | 系统平台 |
|---|---|---|---|
| 192.168.32.130 | 读写分离解析主机 | proxysql | centos7 |
| 192.168.32.135 | master | mysql5.7 | centos7 |
| 192.168.32.140 | slave | mysql5.7 | centos7 |
所有机器均已关闭防火墙和selinux,并已配置好mysql主从同步
[root@proxysql ~]# cat <<EOF | tee /etc/yum.repos.d/proxysql.repo
[proxysql_repo]
name= ProxySQL YUM repository
baseurl=https://repo.proxysql.com/ProxySQL/proxysql-2.0.x/centos/\$releasever
gpgcheck=1
gpgkey=https://repo.proxysql.com/ProxySQL/repo_pub_key
EOF


[root@proxysql ~]# yum install proxysql
[root@proxysql ~]# systemctl enable --now proxysql
[root@proxysql ~]# ss -tanl
State       Recv-Q Send-Q   Local Address:Port                  Peer Address:Port
LISTEN      0      100          127.0.0.1:25                               *:*
LISTEN      0      128                  *:6032                             *:*
LISTEN      0      128                  *:6033                             *:*
LISTEN      0      128                  *:6033                             *:*
LISTEN      0      128                  *:6033                             *:*
LISTEN      0      128                  *:6033                             *:*
LISTEN      0      128                  *:22                               *:*
LISTEN      0      100              [::1]:25                            [::]:*
LISTEN      0      128               [::]:22
MariaDB [(none)]> grant all on *.* to ‘proxysql‘@‘192.168.32.130‘ identified by ‘proxysql123!‘;
Query OK, 0 rows affected (0.00 sec)

MariaDB [(none)]> flush privileges;
Query OK, 0 rows affected (0.00 sec)
[root@proxysql ~]# yum -y install mariadb
[root@proxysql ~]# mysql -uadmin -padmin -h127.0.0.1 -P6032
MySQL [(none)]> insert into mysql_servers(hostgroup_id,hostname,port,weight,comment) values(10,‘192.168.32.135‘,3306,1,‘Write Group‘);
Query OK, 1 row affected (0.00 sec)

MySQL [(none)]> insert into mysql_servers(hostgroup_id,hostname,port,weight,comment) values(20,‘192.168.32.140‘,3306,1,‘Read group‘);
Query OK, 1 row affected (0.00 sec)

MySQL [(none)]> select hostgroup_id,hostname,port,weight,comment from mysql_servers;
+--------------+----------------+------+--------+-------------+
| hostgroup_id | hostname       | port | weight | comment     |
+--------------+----------------+------+--------+-------------+
| 10           | 192.168.32.135 | 3306 | 1      | Write Group |
| 20           | 192.168.32.140 | 3306 | 1      | Read group  |
+--------------+----------------+------+--------+-------------+
2 rows in set (0.00 sec)
修改后,需要加载到RUNTIME,并保存到disk
MySQL [(none)]> load mysql servers to runtime;
Query OK, 0 rows affected (0.00 sec)

MySQL [(none)]> save mysql servers to disk;
Query OK, 0 rows affected (0.00 sec)
在 proxysql 主机的 mysql_users 表中添加刚才在 master 上创建的账号 proxysql,proxysql 客户端需要使用这个账号来访问数据库
default_hostgroup 默认组设置为写组,也就是1;
当读写分离的路由规则不符合时,会访问默认组的数据库;
MySQL [(none)]> insert into mysql_users(username,password,default_hostgroup,transaction_persistent) values(‘proxysql‘,‘proxysql123!‘,10,1);
Query OK, 1 row affected (0.00 sec)

MySQL [(none)]> select * from mysql_users \G
*************************** 1. row ***************************
              username: proxysql
              password: proxysql123!
                active: 1
               use_ssl: 0
     default_hostgroup: 10
        default_schema: NULL
         schema_locked: 0
transaction_persistent: 1
          fast_forward: 0
               backend: 1
              frontend: 1
       max_connections: 10000
               comment:
1 row in set (0.00 sec)

MySQL [(none)]> load mysql users to runtime;
Query OK, 0 rows affected (0.00 sec)

MySQL [(none)]> save mysql users to disk;
Query OK, 0 rows affected (0.00 sec)
在mysql的 master 端添加属于proxysql的只读账号
MariaDB [(none)]> GRANT SELECT ON *.* TO ‘monitor‘@‘192.168.32.%‘ IDENTIFIED BY ‘monitor‘;
Query OK, 0 rows affected (0.00 sec)

MariaDB [(none)]> flush privileges;
Query OK, 0 rows affected (0.01 sec)
在proxysql主机端修改变量设置健康检测的账号
MySQL [(none)]> set mysql-monitor_username=‘monitor‘;
Query OK, 1 row affected (0.00 sec)

MySQL [(none)]> set mysql-monitor_password=‘monitor‘;
Query OK, 1 row affected (0.00 sec)
在proxysql主机端配置监控的账号
MySQL [(none)]> UPDATE global_variables SET variable_value=‘monitor‘ WHERE variable_name=‘mysql-monitor_username‘;
Query OK, 1 row affected (0.00 sec)

MySQL [(none)]> UPDATE global_variables SET variable_value=‘monitor‘ WHERE variable_name=‘mysql-monitor_password‘;
Query OK, 1 row affected (0.00 sec)

#配置监控间隔
MySQL [(none)]> UPDATE global_variables SET variable_value=‘2000‘ WHERE variable_name IN (‘mysql-monitor_connect_interval‘,‘mysql-monitor_ping_interval‘,‘mysql-monitor_read_only_interval‘);
Query OK, 3 rows affected (0.00 sec)

MySQL [(none)]> SELECT * FROM global_variables WHERE variable_name LIKE ‘mysql-monitor_%‘;
+--------------------------------------------------------------+----------------+
| variable_name                                                | variable_value |
+--------------------------------------------------------------+----------------+
| mysql-monitor_enabled                                        | true           |
| mysql-monitor_connect_timeout                                | 600            |
| mysql-monitor_ping_max_failures                              | 3              |
| mysql-monitor_ping_timeout                                   | 1000           |
| mysql-monitor_read_only_max_timeout_count                    | 3              |
| mysql-monitor_replication_lag_interval                       | 10000          |
| mysql-monitor_replication_lag_timeout                        | 1000           |
| mysql-monitor_groupreplication_healthcheck_interval          | 5000           |
| mysql-monitor_groupreplication_healthcheck_timeout           | 800            |
| mysql-monitor_groupreplication_healthcheck_max_timeout_count | 3              |
| mysql-monitor_groupreplication_max_transactions_behind_count | 3              |
| mysql-monitor_galera_healthcheck_interval                    | 5000           |
| mysql-monitor_galera_healthcheck_timeout                     | 800            |
| mysql-monitor_galera_healthcheck_max_timeout_count           | 3              |
| mysql-monitor_replication_lag_use_percona_heartbeat          |                |
| mysql-monitor_query_interval                                 | 60000          |
| mysql-monitor_query_timeout                                  | 100            |
| mysql-monitor_slave_lag_when_null                            | 60             |
| mysql-monitor_threads_min                                    | 8              |
| mysql-monitor_threads_max                                    | 128            |
| mysql-monitor_threads_queue_maxsize                          | 128            |
| mysql-monitor_wait_timeout                                   | true           |
| mysql-monitor_writer_is_also_reader                          | true           |
| mysql-monitor_username                                       | monitor        |
| mysql-monitor_password                                       | monitor        |
| mysql-monitor_history                                        | 600000         |
| mysql-monitor_connect_interval                               | 2000           |
| mysql-monitor_ping_interval                                  | 2000           |
| mysql-monitor_read_only_interval                             | 2000           |
| mysql-monitor_read_only_timeout                              | 500            |
+--------------------------------------------------------------+----------------+
30 rows in set (0.00 sec)
保存配置
MySQL [(none)]> load mysql variables to runtime;
Query OK, 0 rows affected (0.00 sec)

MySQL [(none)]> save mysql variables to disk;
Query OK, 134 rows affected (0.01 sec)
(使用正则表达式进行读写分离)
需求:
MySQL [(none)]> insert into mysql_query_rules(rule_id,active,match_digest,destination_hostgroup,apply)values(10,1,‘^SELECT.*FOR UPDATE$‘,10,1);
Query OK, 1 row affected (0.00 sec)

MySQL [(none)]> insert into mysql_query_rules(rule_id,active,match_digest,destination_hostgroup,apply)values(20,1,‘^SELECT‘,20,1);
Query OK, 1 row affected (0.00 sec)

MySQL [(none)]> select rule_id,active,match_digest,destination_hostgroup,apply from mysql_query_rules;
+---------+--------+----------------------+-----------------------+-------+
| rule_id | active | match_digest         | destination_hostgroup | apply |
+---------+--------+----------------------+-----------------------+-------+
| 10      | 1      | ^SELECT.*FOR UPDATE$ | 10                    | 1     |
| 20      | 1      | ^SELECT              | 20                    | 1     |
+---------+--------+----------------------+-----------------------+-------+
2 rows in set (0.00 sec)

MySQL [(none)]> load mysql query rules to runtime;
Query OK, 0 rows affected (0.00 sec)

MySQL [(none)]> load admin variables to runtime;
Query OK, 0 rows affected (0.00 sec)

MySQL [(none)]> save mysql query rules to disk;
Query OK, 0 rows affected (0.00 sec)

MySQL [(none)]> save admin variables to disk;
Query OK, 35 rows affected (0.01 sec)
登录用户是刚才我们在 mysql_user 表中创建的用户,端口为6033
[root@proxysql ~]# mysql -uproxysql -pproxysql123! -h127.0.0.1 -P6033
Welcome to the MariaDB monitor.  Commands end with ; or \g.
Your MySQL connection id is 19
Server version: 5.5.30 (ProxySQL)

Copyright (c) 2000, 2018, Oracle, MariaDB Corporation Ab and others.

Type ‘help;‘ or ‘\h‘ for help. Type ‘\c‘ to clear the current input statement.

MySQL [(none)]> show databases;
+--------------------+
| Database           |
+--------------------+
| information_schema |
| mysql              |
| performance_schema |
| test               |
+--------------------+
4 rows in set (0.00 sec)
MySQL [(none)]> show databases;
+--------------------+
| Database           |
+--------------------+
| information_schema |
| mysql              |
| performance_schema |
| test               |
+--------------------+
4 rows in set (0.00 sec)

MySQL [(none)]>
MySQL [(none)]> show databases;
+--------------------+
| Database           |
+--------------------+
| information_schema |
| mysql              |
| performance_schema |
| test               |
+--------------------+
4 rows in set (0.00 sec)

MySQL [(none)]> create database zhangsan;
Query OK, 1 row affected (0.00 sec)

MySQL [(none)]>  select user,host from mysql.user;
+----------+-----------------------+
| user     | host                  |
+----------+-----------------------+
| root     | 127.0.0.1             |
| monitor  | 192.168.32.%          |
| proxysql | 192.168.32.130        |
| root     | ::1                   |
|          | localhost             |
| root     | localhost             |
|          | localhost.localdomain |
| root     | localhost.localdomain |
+----------+-----------------------+
8 rows in set (0.00 sec)
proxysql有个类似审计的功能,可以查看各类SQL的执行情况,其需要在proxysql管理端执行
[root@proxysql ~]# mysql -uadmin -padmin -h127.0.0.1 -P6032
Welcome to the MariaDB monitor.  Commands end with ; or \g.
Your MySQL connection id is 20
Server version: 5.5.30 (ProxySQL Admin Module)

Copyright (c) 2000, 2018, Oracle, MariaDB Corporation Ab and others.

Type ‘help;‘ or ‘\h‘ for help. Type ‘\c‘ to clear the current input statement.

MySQL [(none)]> select * from stats_mysql_query_digest;
+-----------+--------------------+----------+----------------+--------------------+----------------------------------+------------+------------+------------+----------+----------+----------+-------------------+---------------+
| hostgroup | schemaname         | username | client_address | digest             | digest_text                      | count_star | first_seen | last_seen  | sum_time | min_time | max_time | sum_rows_affected | sum_rows_sent |
+-----------+--------------------+----------+----------------+--------------------+----------------------------------+------------+------------+------------+----------+----------+----------+-------------------+---------------+
| 20        | information_schema | proxysql |                | 0x0F02B330C823D739 | select user,host from mysql.user | 1          | 1597505573 | 1597505573 | 825      | 825      | 825      | 0                 | 8             |
| 10        | information_schema | proxysql |                | 0xE5794501FBC3CBC9 | create database zhangsan         | 1          | 1597505465 | 1597505465 | 496      | 496      | 496      | 1                 | 0             |
| 20        | information_schema | proxysql |                | 0x37003A17770DD14B | select mysql.user where id=?     | 1          | 1597505511 | 1597505511 | 1974     | 1974     | 1974     | 0                 | 0             |
| 10        | information_schema | proxysql |                | 0x02033E45904D3DF0 | show databases                   | 2          | 1597505368 | 1597505452 | 2466     | 425      | 2041     | 0                 | 8             |
| 10        | information_schema | proxysql |                | 0x226CD90D52A2BA0B | select @@version_comment limit ? | 1          | 1597505358 | 1597505358 | 0        | 0        | 0        | 0                 | 0             |
+-----------+--------------------+----------+----------------+--------------------+----------------------------------+------------+------------+------------+----------+----------+----------+-------------------+---------------+
5 rows in set (0.00 sec)
MySQL [(none)]> select rule_id,active,match_digest,destination_hostgroup,apply from mysql_query_rules;
+---------+--------+----------------------+-----------------------+-------+
| rule_id | active | match_digest         | destination_hostgroup | apply |
+---------+--------+----------------------+-----------------------+-------+
| 10      | 1      | ^SELECT.*FOR UPDATE$ | 10                    | 1     |
| 20      | 1      | ^SELECT              | 20                    | 1     |
+---------+--------+----------------------+-----------------------+-------+
2 rows in set (0.00 sec)
被正则匹配到的确实能实现简单的读写分离,没有被匹配到的走了默认组,但没有被匹配的也有很大一部分是读操作。正如官方所说,以上配置只是实例,并不是读写分离最好的配置方式。
但需要注意的是,这样的规则只适用于小环境下的读写分离,对于稍复杂的环境,需要对不同语句进行开销分析,对于开销大的语句需要制定专门的路由规则
最常用的优化,继续添加基于正则匹配的路由规则,如:
MySQL [(none)]> insert into mysql_query_rules(rule_id,active,match_digest,destination_hostgroup,apply) values(30,1,"SHOW",20,1),(40,1,‘^SELECT COUNT\(\*\)‘,20,1);
Query OK, 2 rows affected (0.00 sec)

MySQL [(none)]> load mysql query rules to run;
Query OK, 0 rows affected (0.00 sec)

MySQL [(none)]> save mysql query rules to disk;
Query OK, 0 rows affected (0.00 sec)

MySQL [(none)]> select rule_id,active,match_digest,destination_hostgroup,apply from mysql_query_rules;
+---------+--------+----------------------+-----------------------+-------+
| rule_id | active | match_digest         | destination_hostgroup | apply |
+---------+--------+----------------------+-----------------------+-------+
| 10      | 1      | ^SELECT.*FOR UPDATE$ | 10                    | 1     |
| 20      | 1      | ^SELECT              | 20                    | 1     |
| 30      | 1      | SHOW                 | 20                    | 1     |
| 40      | 1      | ^SELECT COUNT\(\*\)  | 20                    | 1     |
+---------+--------+----------------------+-----------------------+-------+
4 rows in set (0.00 sec)
ProxySQL能通过ip、port、client_ip、username、schemaname、digest、match_digest、match_pattern实现不同方式的路由,方式可谓繁多。特别是基于正则匹配的灵活性,使得ProxySQL能满足一些比较复杂的环境。
总的来说,ProxySQL主要是通过digest、match_digest和match_pattern进行规则匹配的。在本文中,只是介绍了匹配规则的基础以及简单的用法
官方更加推荐的是使用digest进行匹配,它能更好的分离读写。官方示例
标签:sql语句 inf 通过 yum 关闭防火墙 应用程序服务器 代码 mysql主从 改变
原文地址:https://www.cnblogs.com/shipment/p/13501512.html