标签:clu 透明 date() iss 框架 retrieve 代码 initial rap
来自专辑
Spring 系列
古时的风筝第 71 篇原创文章
前面已经粗略的讲了 Spring 的 IoC 过程 「看完就懂的 Spring IoC 实现过程」,之所以又从 Spring Boot 的角度来说,是因为现在大多数开发都采用 Spring Boot 了,而且 Spring 官方也推荐使用 Spring Boot,而且Spring Boot 的启动入口比较明显,从入口往下推比较容易。但是,其实这个 IoC 过程中 Spring Boot 并没有做什么,核心的东西还是 Spring 自己的,因为 Spring 除了 XML 配置之外,本身就是支持完全注解的方式的。
IoC,全称 Inversion of Control - 控制反转,还有一种叫法叫做 DI( Dependency Injection)-依赖注入。也可以说控制反转是最终目的,依赖注入是实现这个目的的具体方法。
什么叫控制反转
为什么叫做控制反转呢。
在传统的模式下,我想要使用另外一个非静态对象的时候会怎么做呢,答案就是 new 一个实例出来。
举个例子,假设有一个 Logger 类,用来输出日志的。定义如下:
public class Logger {
   public void log(String text){
       System.out.println("log:" + text);
  }
}
那现在我要调用这个 log 方法,会怎么做呢。
Logger logger = new Logger();
logger.log("日志内容");
对不对,以上就是一个传统的调用模式。何时 new 这个对象实例是由调用方来控制,或者说由我们开发者自己控制,什么时候用就什么时候 new 一个出来。
而当我们用了 IoC 之后,事情就变得不一样了。简单来看,结果就是开发者不需要关心 new 对象的操作了。还是那个 Logger 类,我们在引入 IoC 之后会如何使用它呢?
public class UserController {
   @Autowired
   private Logger logger;

   public void log(){
       logger.log("please write a log");
  }
}
开发者不创建对象,但是要保证对象被正常使用,不可能没有 new 这个动作,这说不通。既然如此,肯定是谁帮我们做了这个操作,那就是 Spring 框架做了,准确的说是 Spring IoC Container 帮我们做了。这样一来,控制权由开发者转变成了第三方框架,这就叫做控制反转。
什么叫依赖注入
依赖注入的主谓宾补充完整,就是将调用者所依赖的类实例对象注入到调用者类。拿前面的那个例子来说,UserController 类就是调用者,它想要调用 Logger 实例化对象出来的 log 方法,logger 作为一个实例化(也就是 new 出来的)对象,就是 UserController 的依赖对象,我们在代码中没有主动使用 new 关键字,那是因为 Spring IoC Container 帮我们做了,这个对于开发者来说透明的操作就叫做注入。
注入的方式有三种:构造方法的注入、setter 的注入和注解注入,前两种方式基本上现在很少有人用了,开发中更多的是采用注解方式,尤其是 Spring Boot 越来越普遍的今天。我们在使用 Spring 框架开发时,一般都用 @Autowired,当然有时也可以用 @Resource
@Autowired
private IUserService userService;
@Autowired
private Logger logger;
Spring IoC Container
前面说了注入的动作其实是 Spring IoC Container 帮我们做的,那么 Spring IoC Container 究竟是什么呢?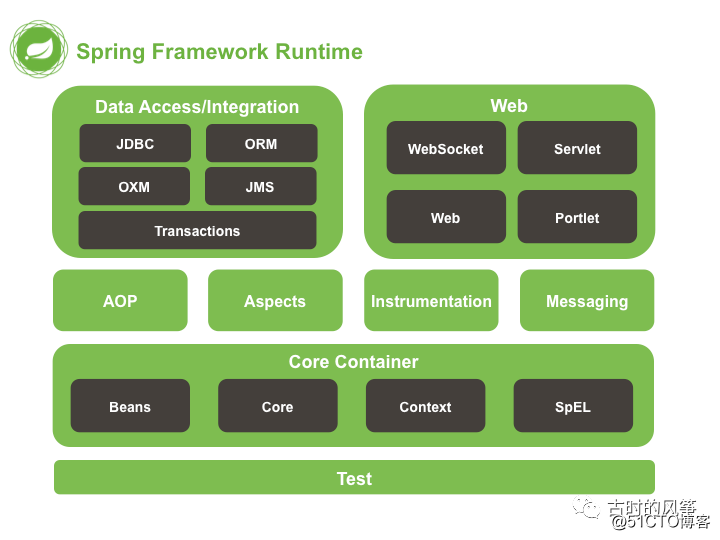
本次要讨论的就是上图中的 Core Container 部分,包括 Beans、Core、Context、SpEL 四个部分。
Container 负责实例化,配置和组装Bean,并将其注入到依赖调用者类中。Container 是管理 Spring 项目中 Bean 整个生命周期的管理者,包括 Bean 的创建、注册、存储、获取、销毁等等。
Spring Boot 的 IoC
前面一直都是在以 Spring 的角度介绍 IoC,那 Spring Boot IoC 的核心还是 Spring IoC,只是具体细节上有些不一样而已。
首先 Spring Boot 其实就是对 Spring 的更进一步包装,省去了 XML 的配置,取而代之的以注解的形式,另外 Spring Boot 采用自动装配机制,帮我们省去了很多的配置,但是纠其内在,还是 Spring。
我们一般把 ApplicationContext叫做容器,XML 方式有具体的实现子类,注解有具体的实现子类,Spring Boot 采用完全注解方式,它里面的容器就是 AnnotationConfigServletWebServerApplicationContext。
Spring Boot 的 启动过程其实就是 Spring 的启动过程,只不过在 Spring 的基础上加了一些 Spring Boot 的特性,比如 Banner。Spring 有可能是采用 XML 配置的方式,而 Spring Boot 则完全采用注解的方式,完成自动装配。
Spring Boot 的启动过程分析起来其实比 Spring 要简单,因为它的入口明晰,就下面这么一行。所以顺着 run 方法进去,一路跟下去就是了。
SpringApplication.run(Application.class, args);启动过程会根据项目中的 application.yaml 或者 application.properties 配置文件进行自动配置。
整体流程概括
整个的 IoC 过程是很复杂的,涉及到的内容极多,不可能用一篇文章说清楚,本篇只介绍 IoC 过程最核心的逻辑。核心逻辑总结起来就几个步骤,我专门画了一个简单流程图来说明。
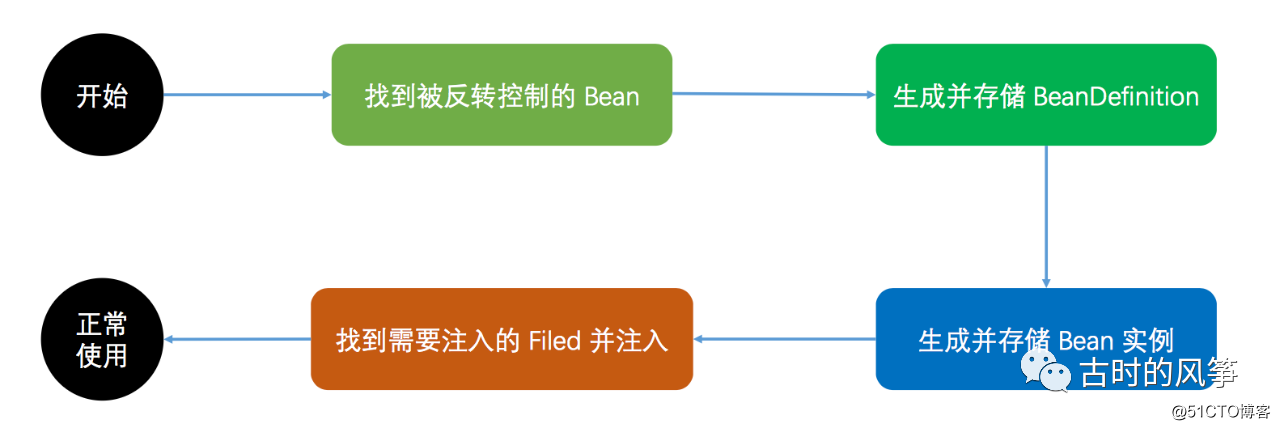
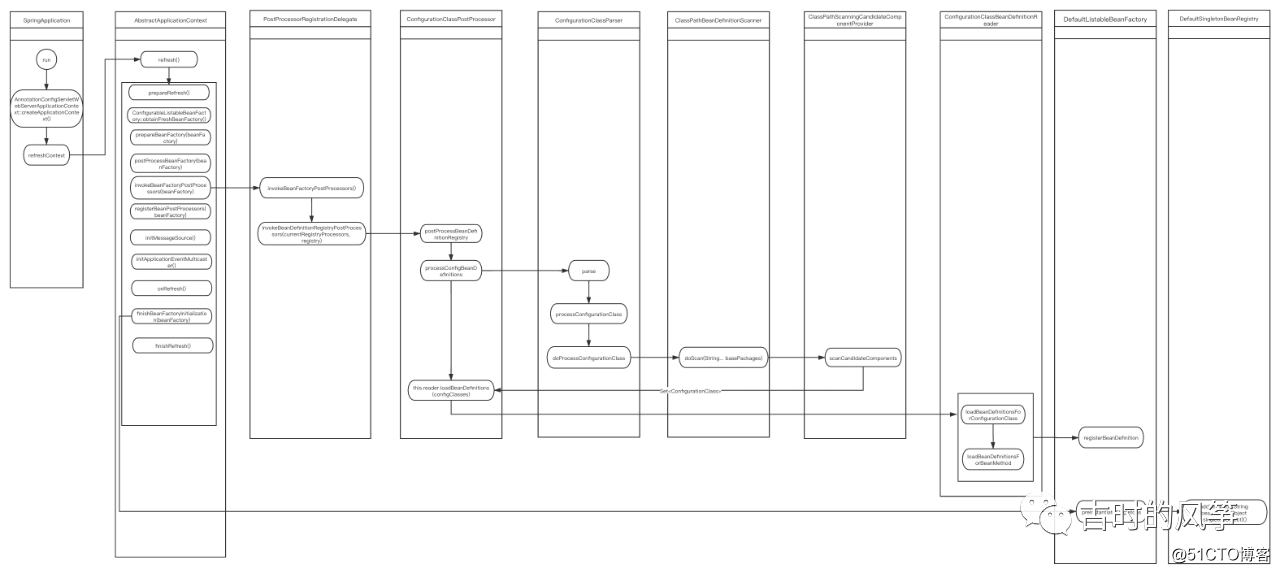
以上是简化的概念版的流程,实际上整个过程要繁杂的多,经过多次的源码调试之后,我画了下面的这张泳道图出来,尽量清楚的表现出 IoC 的过程。先看图吧,获取高清大图,请在公众号内回复「ioc」。
经典的 refresh 方法
从 run 方法进来,就开始执行经典的 refresh 方法中,可以说,Spring IoC 的秘密都藏在这里。
public void refresh() throws BeansException, IllegalStateException {
 synchronized (this.startupShutdownMonitor) {
  // Prepare this context for refreshing.
  prepareRefresh();
  // Tell the subclass to refresh the internal bean factory.
  ConfigurableListableBeanFactory beanFactory = obtainFreshBeanFactory();
  // Prepare the bean factory for use in this context.
  prepareBeanFactory(beanFactory);
  try {
   // Allows post-processing of the bean factory in context subclasses.
   postProcessBeanFactory(beanFactory);
   //找到所有的@Component 和 @ManagedBean注解的类
   //和 @Bean 注解的方法,生成对应的 BeanDefinition 注册到 BeanDefinitionMap中
   invokeBeanFactoryPostProcessors(beanFactory);
   // Register bean processors that intercept bean creation.
   registerBeanPostProcessors(beanFactory);
   // Initialize message source for this context.
   initMessageSource();
   // Initialize event multicaster for this context.
   initApplicationEventMulticaster();
   // Initialize other special beans in specific context subclasses.
   onRefresh();
   // Check for listener beans and register them.
   registerListeners();
   // 注册非懒加载的 Bean 实例到 singletonObjects 中
   finishBeanFactoryInitialization(beanFactory);
   // Last step: publish corresponding event.
   finishRefresh();
  }
  catch (BeansException ex) {
   destroyBeans();
   cancelRefresh(ex);
   throw ex;
  }
  finally {
   resetCommonCaches();
  }
}
}
IoC 过程的核心就在 invokeBeanFactoryPostProcessors(beanFactory)和finishBeanFactoryInitialization(beanFactory);这两个方法中,前者的最主要作用就是生成 BeanDefinition,后者的主要作用就是生成 Bean 实例。
Bean 的注入过程概括起来就是两步,第一步是生成对应的 BeanDefinition,然后存到 beanDefinitionMap 中,beanDefinitionMap 的定义如下:
private final Map<String, BeanDefinition> beanDefinitionMap = new ConcurrentHashMap<>(256)第二步,将 BeanDefinition 实例化成对应的 Bean 实例,然后存到 singletonObjects 中,singletonObjects 的定义如下:
private final Map<String, Object> singletonObjects = new ConcurrentHashMap<>(256);找到那些要被容器控制的 Bean 类
要被容器控制的 Bean 类,是用注解 @Component、@ManagedBean标识,当然我们程序中很多地方都不会直接用 @Component,而是用它的子类注解,包括 @Service、@Controller、@Repository ,间接的还有 @RestController 。另外还有一类是用 @Bean 注解标识的方法体。
举个我们经常会用到的例子,下面的这两段代码,分别使用 @Service 和 @Bean注解,来表示一个服务类和一个方法 Bean。这两个就是待注入的对象,也就是说经过 Spring 的一番运作,它们两个要存到 singletonObjects 中。
 @Service
 public class UserServiceImpl implements IUserService {

    @Override
    public User getUser(Integer id) {
        User user = new User();
        user.setId(id);
        user.setName("用户"+id);
        user.setAge(18);
        return user;
    }
 }
@Bean
public Logger logger(){
   return new Logger();
}
public class Logger {
   public void log(String text){
       System.out.println("log:" + text);
  }
}
通过上面的泳道图来看,从方法 invokeBeanFactoryPostProcessors(beanFactory)进入之后,会走到ConfigurationClassPostProcessor这个类的 processConfigBeanDefinitions() 方法,这个方法通过 parser.parse() 方法找到带有 @Component注解的类,然后加入到 parser.configurationClasses 属性中,configurationClasses 属性是一个 map,其key 和 value 都是 ConfigurationClass, 里面存的是主要的类的元数据信息,比如加载器、注解等等,其中除了我们主动在项目中用注解声明的类,还有 Spring Boot 内置的几十个类,最后通过 ConfigurationClassBeanDefinitionReader类的 loadBeanDefinitions方法将这些 ConfigurationClass生成对应的 BeanDefinition,然后存到到 beanDefinitionMap 中。
以下是 processConfigBeanDefinitions()方法的主要流程,省略了很多代码。
public void processConfigBeanDefinitions(BeanDefinitionRegistry registry) {
 List<BeanDefinitionHolder> configCandidates = new ArrayList<>();
 String[] candidateNames = registry.getBeanDefinitionNames();
// ...
 // Parse each @Configuration class
 ConfigurationClassParser parser = new ConfigurationClassParser(
   this.metadataReaderFactory, this.problemReporter, this.environment,
   this.resourceLoader, this.componentScanBeanNameGenerator, registry);
 Set<BeanDefinitionHolder> candidates = new LinkedHashSet<>(configCandidates);
 Set<ConfigurationClass> alreadyParsed = new HashSet<>(configCandidates.size());
 do {
 // 找到带有 @Component 注解的类
  parser.parse(candidates);
  parser.validate();
  Set<ConfigurationClass> configClasses = new LinkedHashSet<>(parser.getConfigurationClasses());
  configClasses.removeAll(alreadyParsed);
  // Read the model and create bean definitions based on its content
  if (this.reader == null) {
   this.reader = new ConfigurationClassBeanDefinitionReader(
     registry, this.sourceExtractor, this.resourceLoader, this.environment,
     this.importBeanNameGenerator, parser.getImportRegistry());
  }
  this.reader.loadBeanDefinitions(configClasses);
  alreadyParsed.addAll(configClasses);
}
如何找到 @Component注解的呢
接上面代码,进入 parser.parse() 方法,这个方法传入的参数是 Spring Boot 启动类,为什么是启动类呢,回到上面的那张泳道图,parse() 方法会调用到 ClassPathBeanDefinitionScanner类的 doScan(String... basePackages) 方法,注意这个方法的参数是一个可变成集合,而且参数名 basePackages 我们很熟悉 ,没错,就是我们在启动类使用注解 @ComponentScan指定的扫描包,如果不指定默认就是全部扫描。
doScan 方法中的关键调用就是下面这行,findCandidateComponents方法遍历指定包下的所有类,查找其中符合条件的类。
Set<BeanDefinition> candidates = findCandidateComponents(basePackage);具体到某个方法,那就是下面这个方法,在 ClassPathScanningCandidateComponentProvider类中。
protected boolean isCandidateComponent(MetadataReader  metadataReader) throws IOException {
        for (TypeFilter tf : this.excludeFilters) {
            if (tf.match(metadataReader, getMetadataReaderFactory())) {
                return false;
            }
        }
        for (TypeFilter tf : this.includeFilters) {
            if (tf.match(metadataReader, getMetadataReaderFactory())) {
                return isConditionMatch(metadataReader);
            }
        }
        return false;
}
其中 this.includeFilters 就是 @Component 和 @ManagedBean ,也就是包含这两个注解中的其中一个的。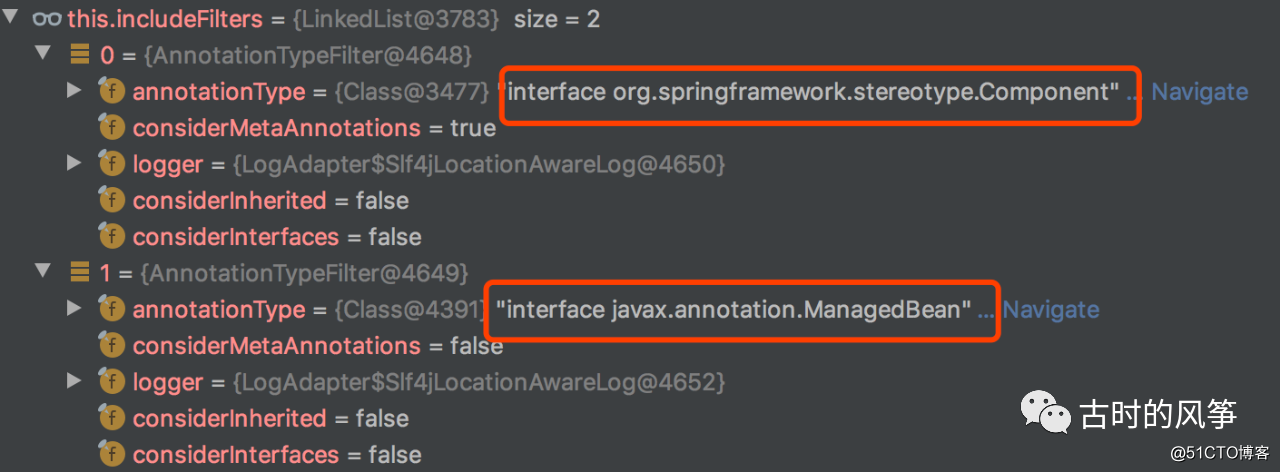
如何找到 @Bean 注解的方法
别忘了还有一种声明 Bean 的方式,就是使用 @Bean 注解在某个方法上,这种 Bean 是在哪块找到的呢。
关键信息在 ConfigurationClassParser 类的 doProcessConfigurationClass 方法,其实上面说的 doScan 也在这个方法内,这个方法是一个递归调用,它会寻找当前类的继承类、接口类以及@Import引入的类,当然还包括了 @ComponentScan指定的包或者类,另外,就是这里要说的 @Bean 注解标识的方法。
具体的方法段如下:
Set<MethodMetadata> beanMethods = retrieveBeanMethodMetadata(sourceClass);
for (MethodMetadata methodMetadata : beanMethods) {
  configClass.addBeanMethod(new BeanMethod(methodMetadata, configClass));
}
最后在把这些 @Bean注解的方法,通过 loadBeanDefinitions方法真正转化成 BeanDefinition ,然后存到 beanDefinitionMap 中。
实例化 Bean
而 finishBeanFactoryInitialization(beanFactory); 完成 Bean 的实例化,并把 Bean 实例放到真正该去的地方 singletonObjects 中。
有一点很重要,Bean 并不是用到的时候才实例化,而是在启动的时候就完成实例化了,除非是你主动设置成懒加载的模式,也就是加了 @Lazy 注解的。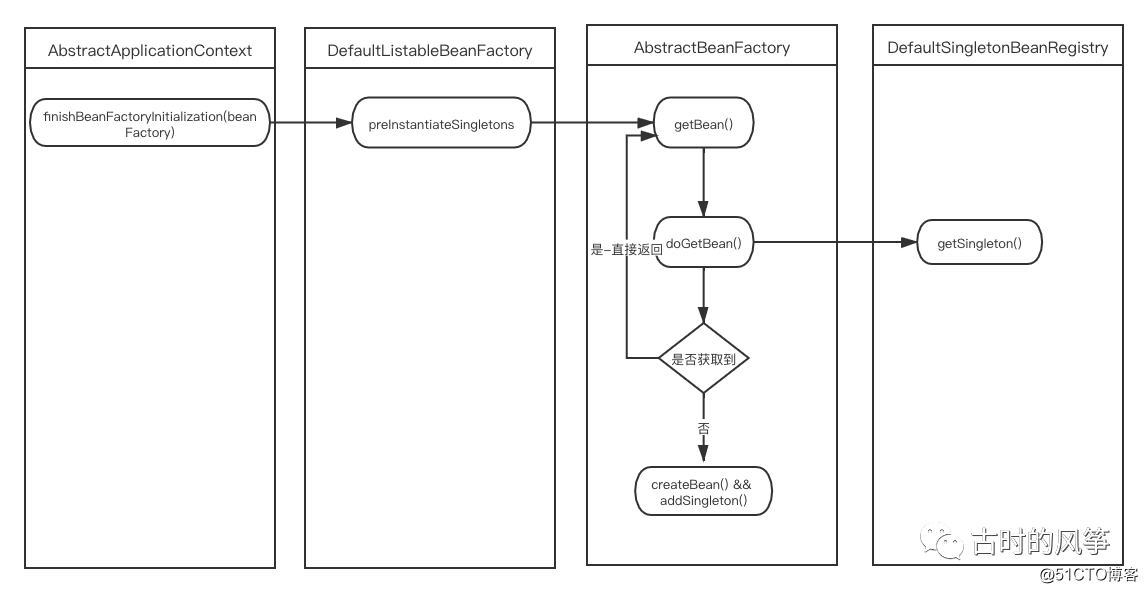
上图就是 Bean 实例化的一个过程。
@Autowired 何时被查找的
我们上面声明了这两个 Bean,那肯定要有地方使用它们吧,比如这样:
@Autowired
private IUserService userService;
@Autowired
private Logger logger;
在 Bean 实例化的同时,还要做一件非常重要的事情,那就是发现那些使用了 @Autowired 注解的 Field ,给它赋值,也就是对应的 Bean 实例。
整个过程如图所示: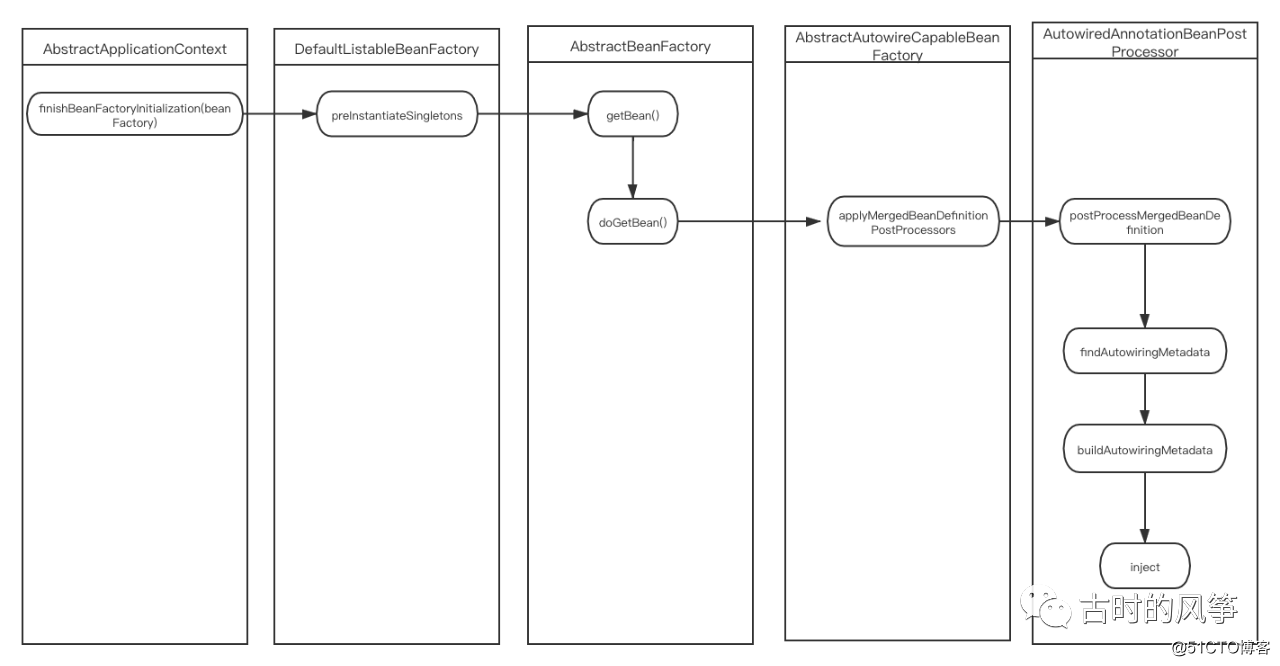
applyMergedBeanDefinitionPostProcessors这个方式是用来做 BeanDefinition 后处理的。
protected void applyMergedBeanDefinitionPostProcessors(RootBeanDefinition mbd, Class<?> beanType, String beanName) {
 for (BeanPostProcessor bp : getBeanPostProcessors()) {
  if (bp instanceof MergedBeanDefinitionPostProcessor) {
   MergedBeanDefinitionPostProcessor bdp = (MergedBeanDefinitionPostProcessor) bp;
   bdp.postProcessMergedBeanDefinition(mbd, beanType, beanName);
  }
}
}
后处理器有很多个,每一个都有不同的功能,循环每个后处理器,完成其各自的功能。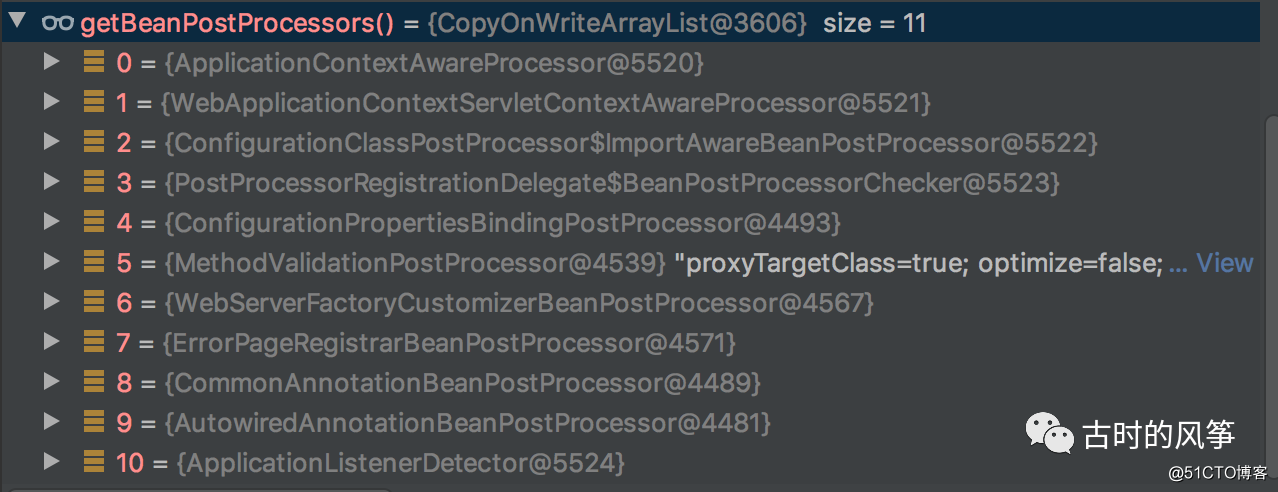
其中就包括了AutowiredAnnotationBeanPostProcessor,会执行它的 postProcessMergedBeanDefinition方法。
@Override
public void postProcessMergedBeanDefinition(RootBeanDefinition beanDefinition, Class<?> beanType, String beanName) {
 InjectionMetadata metadata = findAutowiringMetadata(beanName, beanType, null);
 metadata.checkConfigMembers(beanDefinition);
}
其中 buildAutowiringMetadata方法就是寻找 @Autowired 注解的具体逻辑。
private InjectionMetadata buildAutowiringMetadata(final Class<?> clazz) {
 if (!AnnotationUtils.isCandidateClass(clazz, this.autowiredAnnotationTypes)) {
  return InjectionMetadata.EMPTY;
}
 List<InjectionMetadata.InjectedElement> elements = new ArrayList<>();
 Class<?> targetClass = clazz;
 do {
  final List<InjectionMetadata.InjectedElement> currElements = new ArrayList<>();
  ReflectionUtils.doWithLocalFields(targetClass, field -> {
   MergedAnnotation<?> ann = findAutowiredAnnotation(field);
   if (ann != null) {
    if (Modifier.isStatic(field.getModifiers())) {
     if (logger.isInfoEnabled()) {
      logger.info("Autowired annotation is not supported on static fields: " + field);
    }
     return;
    }
    boolean required = determineRequiredStatus(ann);
    currElements.add(new AutowiredFieldElement(field, required));
  }
  });
 //...
 return InjectionMetadata.forElements(elements, clazz);
}
通过反射找到所有 Field,然后筛选出 @Autowired注解的 Field,其实除了 @Autowired 还会找到 @Value 标识的 Field。
最后通过 inject方法给 Field 赋值,其实就是反射中的 invoke 方法。
public void inject(Object target, @Nullable String beanName, @Nullable PropertyValues pvs) throws Throwable {
 Collection<InjectedElement> checkedElements = this.checkedElements;
 Collection<InjectedElement> elementsToIterate =
  (checkedElements != null ? checkedElements : this.injectedElements);
 if (!elementsToIterate.isEmpty()) {
  for (InjectedElement element : elementsToIterate) {
   if (logger.isTraceEnabled()) {
    logger.trace("Processing injected element of bean ‘" + beanName + "‘: " + element);
  }
   element.inject(target, beanName, pvs);
  }
 }
}虽然内容看上去不少,但是其中还是有很多细节没有讲清楚。
另外,读源码真是个头疼的过程,枯燥、繁琐,再把分析源码的过程写成文儿就更枯燥了,太费脑子了。虽然之前也看过,但是隔段时间就忘的差不多了,原理性的东西还是要多读、多看、多记录。
获取本文高清泳道图请在公众号内回复「ioc」
不容易呀,给个在看吧。
公众号:古时的风筝, 一个不只有技术的技术公众号。
我是风筝,一个主业 Java,同时也擅长 Python、React 的斜杠开发者。你可选择现在就关注我,或者看看历史文章再关注也不迟。
技术交流还可以加群或者直接加我微信。

从 Spring Boot 出发,分析 Spring IoC 过程(熬夜看源码,头疼)
标签:clu 透明 date() iss 框架 retrieve 代码 initial rap
原文地址:https://blog.51cto.com/14909424/2524926