标签:tail reload 系统管 jpg toggle oid rom multipart 源码
如果你还没有阅读基于web的机票管理系统设计与实现(一),请点击查看,获取详细资料请关注公众号:C you again
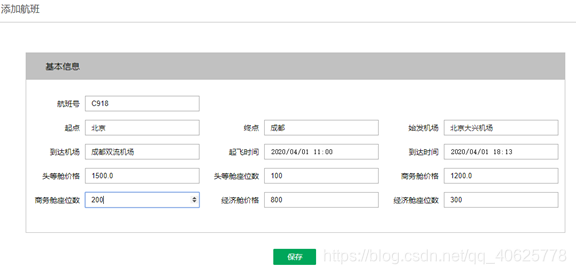
系统管理员登录后台系统后,点击侧边栏的航班信息管理按钮会出现下拉列表菜单,继续点击添加航班信息按钮可以进行添加航班信息操作。添加航班时输入航班号、起点、终点、始发机场、到达机场等信息,如下图所示。

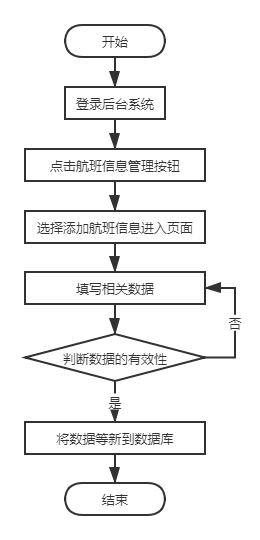
添加航班信息的过程如下:后台系统管理员进入添加航班信息页面后,填写航班号、起点、终点、始发机场、到达机场等相关信息后点击保存按钮,这是会随机生成flightId并与数据库中已经存在的flightId进行比较,保证航班Id唯一,之后继续判断输入的机票价格,航班座位数等数据是否有效,核对信息的有效性和完整性,最后存入数据库。具体流程如下图所示。

主要代码:
@RequestMapping("addFlight")
	public Result addFlight(@RequestBody Flight flight ) {
		//设置日期格式
		SimpleDateFormat df = new SimpleDateFormat("yyyyMMddHHmmss");
		// new Date()为获取当前系统时间
        flight.setFlightId("F"+df.format(new Date()));
        try {
        	flightManageService.addFlight(flight);
        	return new Result(true,"添加成功");
		} catch (Exception e) {
			e.printStackTrace();
			return new Result(false,"添加失败");
		}
}
系统管理员登录系统后有查看航班列表的权限,航班列表界面有添加航班,删除航班,搜索航班信息,航班信息详情,航班信息修改等功能,具体见下图,各个功能详细说明如表5.1所示。


主要代码这里以航班查询功能service层代码为例:
public PageResult search(int pageNum, int pageSize, String searchEntity) {
		PageHelper.startPage(pageNum,pageSize);
		List<Flight> flightsList=flightManageMapper.select(searchEntity);
		Page<Flight> page=(Page<Flight>) flightsList;
		return new PageResult(page.getTotal(), page.getResult());
	}
订单信息列表是订单信息管理模块的一个子功能,展示的是前台所有用户的机票订单信息,如下图所示。系统管理员可以对订单进行查询,删除操作,各个功能详细说明如表5.2所示。


主要代码这里以订单删除功能dao层的mapper代码为例:
<?xml version="1.0" encoding="UTF-8"?>
<!DOCTYPE mapper PUBLIC "-//mybatis.org//DTD Mapper 3.0//EN" "http://mybatis.org/dtd/mybatis-3-mapper.dtd" >
<mapper namespace="com.cafuc.mapper.IOrderManageMapper">
  <delete id="delete" parameterType="String">
    delete from `order` where order_id in
    <foreach collection="selectIds" item="ids" open="(" close=")" separator=",">
      #{ids}
    </foreach>
  </delete>
</mapper>
用户信息列表是用户信息管理模块的子功能,它是指把前台系统所有注册用户信息以列表的形式展示给后台系统管理员,方便系统管理员精确定位到每一个机票预订系统的使用者,对其进行管理,用户信息列表的界面如下图所示。系统管理员有查找系统使用用户和删除违反平台规定用户的权利,各个功能详细说明如表5.3所示。


主要代码以用户搜索功能dao层的mapper代码为例:
<?xml version="1.0" encoding="UTF-8"?>
<!DOCTYPE mapper PUBLIC "-//mybatis.org//DTD Mapper 3.0//EN" "http://mybatis.org/dtd/mybatis-3-mapper.dtd" >
<mapper namespace="com.cafuc.mapper.IUserManageMapper">
  <select id="select" resultType="com.cafuc.pojo.User">
     select DISTINCT * from `user` as u where
		u.user_name like concat(‘%‘,#{searchEntity},‘%‘)
  </select>
</mapper>
留言评论是前台系统使用者完成注册后具有的功能,用户可以通过留言评论功能对所购班次机票进行全方位的评价,也可以对其在使用过程中遇到的问题进行反馈,等待工作员处理。后台系统管理员对用户留言具有管理的权限,见下图。各功能详情见表5.4。


主要代码以后台系统留言评论模块controller层DiscussManageController.java类例:
package com.cafuc.controller;
import javax.annotation.Resource;
import org.springframework.web.bind.annotation.RequestMapping;
import org.springframework.web.bind.annotation.RestController;
import com.cafuc.pojo.PageResult;
import com.cafuc.pojo.Result;
import com.cafuc.service.IDiscussManageService;
import com.cafuc.service.IOrderManageService;

@RestController
@RequestMapping("discussManage")
public class DiscussManageController {
	@Resource
	private IDiscussManageService discussManageService;
	@RequestMapping("search")
	public PageResult search(int pageNum ,int pageSize,String searchEntity){
		System.out.println(pageNum+" "+pageSize+" "+searchEntity);
		PageResult pageResult=discussManageService.search(pageNum, pageSize, searchEntity);
		return pageResult;
	}
	@RequestMapping("deleteBySelectIds")
	public Result deleteBySelectIds(String []selectIds) {
        try {
        	discussManageService.deleteBySelectIds(selectIds);
        	return new Result(true,"删除成功");
		} catch (Exception e) {
			// TODO: handle exception
			e.printStackTrace();
			return new Result(false,"删除失败");
		}
	}
}
广告作为网站的必要元素,在机票系统的前台页面也有广告展示的功能,后台增加了相应的管理模块,界面如下图所示。

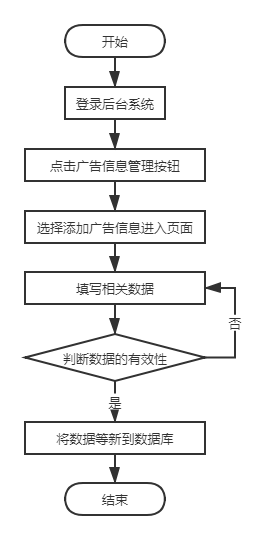
后台系统添加广告的步骤:管理员登录后台系统后点击广告管理按钮,在出现的下拉列表选项中选择添加广告信息并点击进入广告添加页面,在页面输入广告图片、广告链接,广告说明等信息,点击保存按钮,进行数据校验,检查数据的有效性和完整性,保证数据无误之后将数据信息持久化到mysql数据库。流程图如下图所示。

主要代码以后台系统controller层ContentManageController.java类例:
@RequestMapping("addContent")
	public void addContent(@RequestParam("file") MultipartFile file,HttpServletRequest request,HttpServletResponse response)
	throws IOException {
		String describe="";
		String url="";
		String picture="";
		if(request.getParameter("describe")!=null) {
			describe=request.getParameter("describe");
		}
		if(request.getParameter("url")!=null) {
			url=request.getParameter("url");
		}
		// 判断文件是否为空,空则返回失败页面
		if (!file.isEmpty()) {
			try {
				// 获取文件存储路径(绝对路径)
				String path = request.getServletContext().getRealPath("/WEB-INF/file");
				// 获取原文件名
				String fileName = file.getOriginalFilename();
				// 创建文件实例
				File filePath = new File(path, fileName);
				// 如果文件目录不存在,创建目录
				if (!filePath.getParentFile().exists()) {
					filePath.getParentFile().mkdirs();
					System.out.println("创建目录" + filePath);
				}
				picture=filePath+"";
				// 写入文件
				file.transferTo(filePath);
				Content content=new Content();
				//设置日期格式
				SimpleDateFormat df = new SimpleDateFormat("yyyyMMddHHmmss");
				// new Date()为获取当前系统时间
				content.setContentId("C"+df.format(new Date()));
				content.setDescribe(describe);
				content.setPicture(picture);
				content.setUrl(url);
			    contentManageServiceImpl.addContent(content);
			    response.sendRedirect(request.getContextPath()+"/admin/list_content.html");
			} catch (Exception e) {
				e.printStackTrace();
				response.sendRedirect(request.getContextPath()+"/admin/add_content.html");
			}
		}
		else {
			response.sendRedirect(request.getContextPath()+"/admin/add_content.html");
		}

	}
后台系统管理员完成添加广告以后跳转到广告信息列表页面,本页面展示的是添加到数据库的所有广告信息,如下图所示,系统管理员可以通过查询,删除等操作来管理广告信息,详情见表5.5。


后台系统管理员可以查看个人的用户名,密码,邮箱,手机号等信息,由于时间有限,这里以只实现了查看用户名,密码的功能,见下图所示,其他功能后期添加。

由于系统管理员在登陆系统后把个人信息存到redis数据库中,在页面初始化时从redis数据库中查找处个人信息从到cookie中,查看个人信息就是从cookie中提取数据并设置到页面中,具体代码如下:
//初始化
$scope.adminEntity={};
$scope.init=function () {
	console.log($.cookie(‘key‘));
	adminManageService.init($.cookie(‘key‘)).success(function (res) {
	      console.log(res)
	      $scope.adminEntity=res;
	    });
}
后台系统管理员也对用户名,密码,邮箱,手机号等信息进行修改,点击个人信息修改按钮进入页面修改个人信息,修改后点击保存等检查填写的信息无误后提示完成修改,为了确保用户名字段的唯一性,用户名一项无法修改。主要代码以controller层为例:
@RequestMapping("editAdmin")
	public Result editAdmin(@RequestBody AdminUser adminUser){

		try {
			adminManageServiceImpl.editAdmin(adminUser);
			redisTemplate.boundValueOps(adminUser.getUser()).set(adminUser);
			return new Result(true, "修改成功");
		} catch (Exception e) {
			// TODO: handle exception
			e.printStackTrace();
			return new Result(false, "修改失败");
		}
	}
用户在进行机票预定,留言评论等功能时需要登录前台系统后才能进行,在浏览器地址栏输入http://localhost:8081/flyTicket-portal-web/default/login.html回车进入如下图所示界面。

用户进行到登录界面,输入正确的用户名和密码就可以登录到前台系统,登录顺序图如下图所示。

主要代码以controller层代码为例:
app.controller(‘portalLoginManageController‘,function($scope,$controller,portalLoginManageService){
	$controller(‘baseController‘,{$scope:$scope});
	//初始化
	 $scope.userEntity={userName:null,userPwd:null};
	 $scope.login=function(){
		 if($scope.userEntity.userName==null || $scope.userEntity.userName.trim()==""){
			 alert("用户名为空");
		 }
		 else{
			 if($scope.userEntity.userPwd==null || $scope.userEntity.userPwd.trim()==""){
				 alert("密码为空");
			 }
			 else{			 portalLoginManageService.login($scope.userEntity).success(function(res){
					 if(res.result==false){
						 alert(res.message)
					 }
					 else{
						 window.location.href="index.html#?key="+$scope.userEntity.userName;
					 }
				 });
			 }
		 };
	 }
});
在浏览器地址栏输入http://localhost:8081/flyTicket-portal-web/default/index.html出现如下图所示界面,首页面展示所有航班信息。每一条信息包含出发城市、到达城市、出发机场、到达机场,出发时间、到达时间、机票价格等信息。

用户可以通过航班查询功能精确查找到所需信息,节省时间简化操作。通过输入航班类型、出发时间、出发城市、到达城市等搜索条件实现航班查询。比图以成都为到达城市为例,搜索结果如下图所示。

代码以dao层PortalManageMapper.xml类例:
<?xml version="1.0" encoding="UTF-8"?>
<!DOCTYPE mapper PUBLIC "-//mybatis.org//DTD Mapper 3.0//EN" "http://mybatis.org/dtd/mybatis-3-mapper.dtd" >
<mapper namespace="com.cafuc.mapper.IPortalManageMapper">
  <select id="select" resultType="com.cafuc.pojo.Flight">
     select * from flight as f
      <where>
        <if test="flightStartTime1 !=null and flightStartTime1 !=‘‘">
          and f.flight_start_time like concat(‘%‘,#{flightStartTime1},‘%‘)
        </if>
        <if test="flightStartPlace !=null and flightStartPlace !=‘‘">
          and f.flight_start_place like concat(‘%‘,#{flightStartPlace},‘%‘)
        </if>
        <if test="flightEndPlace !=null and flightEndPlace !=‘‘">
          and f.flight_end_place like concat(‘%‘,#{flightEndPlace},‘%‘)
        </if>
     </where>
  </select>
</mapper>
航班信息详情是对某一航班信息的详细情况进行展示,如下图所示。用户点击选定航班,航班详细信息以下拉列表的形式展现给用户。

主要代码如下:
//保留n位小数
	$scope.weishu=function(price,n){
		return new Number(price).toFixed(n);
	}
	//下拉详情
	$scope.lists=function(flightNumber){
		//收缩状态
		if($("#F_"+flightNumber).is(":visible")){
			$scope.reloadList();
		}
		$("#F_"+flightNumber).animate({
		      height:‘toggle‘
		    });
	}
	//判断最低价
	$scope.minPrice=function(flightHighPrice,flightMiddlePrice,flightBasePrice){
		return (flightHighPrice<=flightMiddlePrice?flightHighPrice:flightMiddlePrice)<=flightBasePrice?(flightHighPrice<=flightMiddlePrice?flightHighPrice:flightMiddlePrice):flightBasePrice
	}
	//判断是否有票
	$scope.isKickets=function(kicketsNumber,flightNumber,temp){
		/*console.log(flightNumber)*/
		if(kicketsNumber>0){
			$("#"+temp+"_"+flightNumber).css({
				color:"green"
			});
			return "有票";
		}
		else{
			$("#"+temp+"_"+flightNumber).css({
				color:"red"
			});
			return "无票";
		}
	}
游客访问前台系统时,在页面头部显示“请登录”字样,如下图所示信息,而网站用户登录后则显示“您好,XXX”字样,如下图所示。


点击前台系统右上角“留言板”按钮进入都留言页面如下图所示。留言评论是前台系统使用者完成注册后具有的功能,用户可以通过留言评论功能对所购班次机票进行全方位的评价,也可以对其在使用过程中遇到的问题进行反馈。

主要代码以前台系统controller层DiscussManageController.java类例:
package com.cafuc.controller;
import java.text.ParseException;
import java.text.SimpleDateFormat;
import java.util.List;
import javax.annotation.Resource;
import org.apache.commons.collections.FastArrayList;
import org.springframework.beans.factory.annotation.Autowired;
import org.springframework.data.redis.core.RedisTemplate;
import org.springframework.web.bind.annotation.RequestBody;
import org.springframework.web.bind.annotation.RequestMapping;
import org.springframework.web.bind.annotation.RestController;
import com.cafuc.pojo.Discuss;
import com.cafuc.pojo.Flight;
import com.cafuc.pojo.PageResult;
import com.cafuc.pojo.Result;
import com.cafuc.service.IDiscussManageService;
import com.cafuc.service.IPortalManageService;
@RestController
@RequestMapping("discussManage")
public class DiscussManageController {
	@Resource
	private IDiscussManageService discussManageService;
	@RequestMapping("addDiscuss")
	public Result addDiscuss(@RequestBody Discuss discuss){
		try {
			System.out.println(discuss);
			discussManageService.addDiscuss(discuss);
			return new Result(true, "评论成功");
		} catch (Exception e) {
			// TODO: handle exception
			e.printStackTrace();
			return new Result(false, "评论失败");
		}
	}
	@RequestMapping("init")
	public List<Discuss> init(){
		return discussManageService.init();
	}
}
订单填写是机票预定中不可缺少的步骤之一,用户找到自己所需班次后点击订票按钮进入订单信息填写页面,用户所填写的信息包括乘机人信息和联系人信息量大模块,如下图所示。填写完信息后点击提交订单按钮,等待验证数据的有效性,确定填写无误后完成提交,填写订单的前提是用户已经登录系统。

填写订单信息完成订单提交后弹出订单详情页面提示用户检查航班信息和填写的用户信息,如下图所示。确保信息无误后点击确认付款按钮跳转到订单支付页面。

订单确认功能主要代码如下:
@RequestMapping("/ack")
	public void ack(Order order,HttpServletRequest request,HttpServletResponse response) throws IOException {
		try {
			if(order.getOrderDate() ==null) {
				order.setOrderDate(new Date());
			}
			HttpSession httpSession=request.getSession();
			httpSession.setAttribute("order", order);
			System.out.println(request.getSession().getAttribute("order"));
			response.sendRedirect(request.getContextPath()+"/pay/index.jsp");
		} catch (Exception e) {
			// TODO: handle exception
			e.printStackTrace();
		}
	}
机票预订系统的订单支付功能使用的是支付宝沙箱环境支付,蚂蚁沙箱环境 (Beta) 是协助开发者进行接口功能开发及主要功能联调的辅助环境。登录支付宝沙箱平台依次完成生成买家和卖家账号信息、生成RSA秘钥、设置公钥信息、设置应用网关等应用环境配置。完成配置后下载官方测试代码,本系统选择的是电脑应用java版本,然后将下载的项目导入到eclipse工作空间。最后设置核心配置文件信息,打开flyTicket-portal-web项目下com.alipay.config包中的AlipayConfig.java文件配置如下信息:
//沙箱APPID
public static final String app_id = "这里需要自己申请";
//沙箱私钥
public static final String merchant_private_key = "这里需要自己申请";
//支付宝公钥
public static final String alipay_public_key = "这里需要自己申请";
//沙箱网关地址
public static final String gatewayUrl = "https://openapi.alipaydev.com/gateway.do";
//服务器异步通知页面路径 需http://格式的完整路径,不能加?id=123这类自定义参数,必须外网可以正常访问
public static String notify_url = "http://localhost:8081/flyTicket-portal-web/pay/notify_url.jsp";
//页面跳转同步通知页面路径 需http://格式的完整路径,不能加?id=123这类自定义参数,必须外网可以正常访问
public static String return_url = "http://localhost:8081/flyTicket-portal-web/orderManage/complete";
完成以上配置后就可以实现订单支付功能了。点击确认付款后跳转到如下图所示界面。

点击付款按钮后如下图所示,可以登录账户付款,也可以使用手机端沙箱支付宝完成付款。

完成付款后如下图所示

主要代码如下:
//支付完成后
@RequestMapping("complete")
public void complete(HttpServletRequest request,HttpServletResponse response) throws IOException {
	System.out.println(request.getSession().getAttribute("order"));
	Order order=(Order)request.getSession().getAttribute("order");
	try {
		//将数据插入到订单表中
		orderManageService.insertOrder(order);
		//更改库存
		Flight flight=orderManageService.findOneByFlightNumber(order.getFlightNumber());
		if(order.getGrade().equals("f")) {
			flight.setFlightHighNumber(flight.getFlightHighNumber()-1);
		}
		else if(order.getGrade().equals("b")) {
			flight.setFlightMiddleNumber(flight.getFlightMiddleNumber()-1);
		}
		else {
			flight.setFlightBaseNumber(flight.getFlightBaseNumber()-1);
		}
		orderManageService.updatesNum(flight);
		} catch (Exception e) {
			e.printStackTrace();
		}
		response.sendRedirect(request.getContextPath()+"/default/index.html");
	}
获取源码请关注公众号:C you again,回复“基于web的机票管理系统”或者“机票管理系统”

标签:tail reload 系统管 jpg toggle oid rom multipart 源码
原文地址:https://www.cnblogs.com/cyouagain/p/13872458.html