标签:val dem select names not varchar service into imp
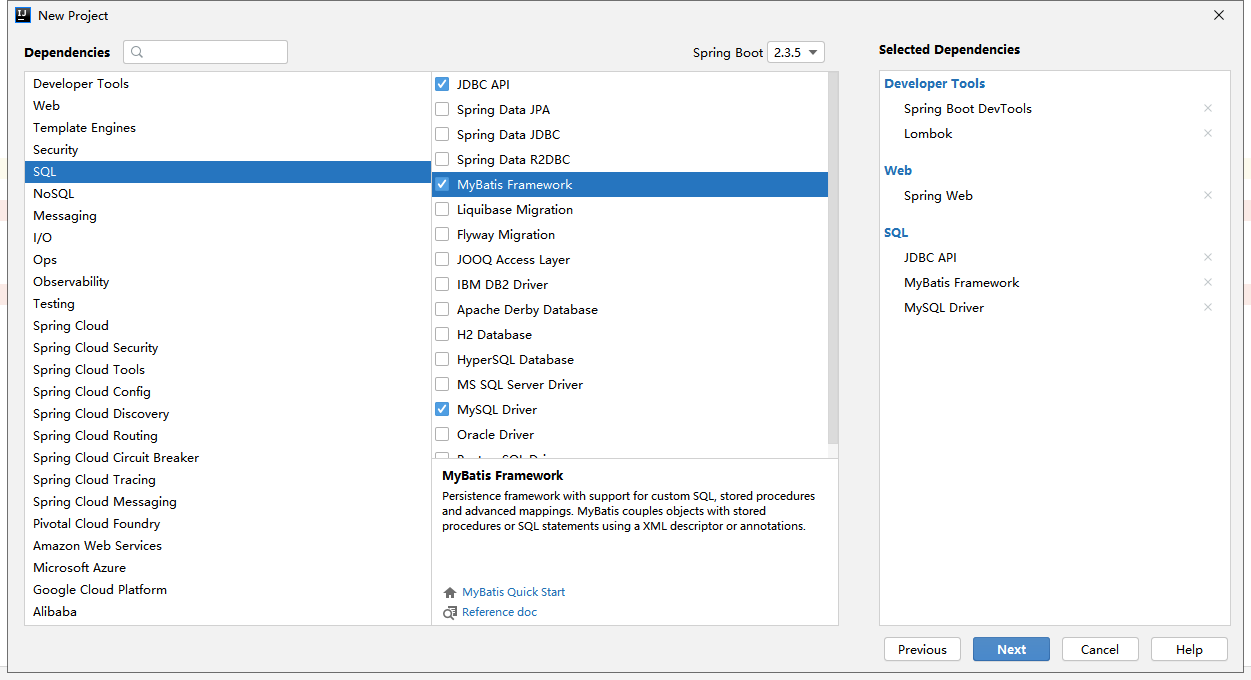
需要的pom依赖列表如下图右侧:

create database nyf;
USE nyf;

CREATE TABLE category_ (
  id int(11) NOT NULL AUTO_INCREMENT,
  name varchar(32) DEFAULT NULL,
  PRIMARY KEY (id)
) ENGINE=MyISAM AUTO_INCREMENT=1 DEFAULT CHARSET=utf8;

USE nyf;
INSERT INTO category_ VALUES (null,‘category1‘);
INSERT INTO category_ VALUES (null,‘category2‘);
接下来的步骤其实就像做一个普通的访问数据库的项目一样。
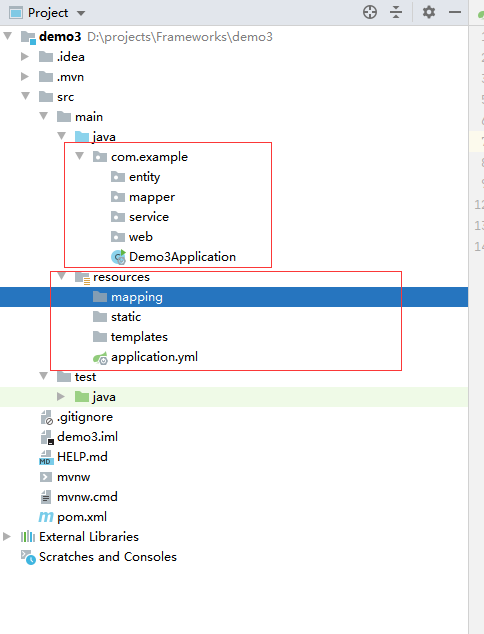
把启动类Demo3Application换到com.example包下,也就就跟entity这样的包同级的目录。
启动类中要加个注解:
@MapperScan("com.example.mapper") //扫描的mapper目录
建立如下目录结构:

准备实体类
package com.example.entity;

import lombok.Data;

@Data
public class Category {
    private int id;
    private String name;

    @Override
    public String toString() {
        return "Category [id=" + id + ", name=" + name + "]";
    }

}
准备编写mapper接口,其实也就是dao层,这里不需要写实现类,访问数据库的SQL语句会写在映射文件中。
package com.example.mapper;

import com.example.entity.Category;
import org.springframework.stereotype.Repository;

@Repository
public interface CategoryMapper {
    Category getCategory(int id);
}
准备编写服务层
package com.example.service;

import com.example.entity.Category;
import com.example.mapper.CategoryMapper;
import org.springframework.beans.factory.annotation.Autowired;
import org.springframework.stereotype.Service;

@Service
public class CategoryService {
    @Autowired
    CategoryMapper categoryMapper;

    public Category getCategory(int id){
        return categoryMapper.getCategory(id);
    }
}
编写controller
package com.example.web;

import com.example.service.CategoryService;
import org.springframework.beans.factory.annotation.Autowired;
import org.springframework.stereotype.Controller;
import org.springframework.web.bind.annotation.PathVariable;
import org.springframework.web.bind.annotation.RequestMapping;
import org.springframework.web.bind.annotation.ResponseBody;

@Controller
public class CategoryController {
    @Autowired
    CategoryService categoryService;

    @RequestMapping("test/{id}")
    @ResponseBody
    public String test(@PathVariable int id){
        return categoryService.getCategory(id).toString();
    }
}
编写映射文件CategoryMapper.xml,放在resouces下的mapping目录下。
<?xml version="1.0" encoding="UTF-8"?>
<!DOCTYPE mapper PUBLIC "-//mybatis.org//DTD Mapper 3.0//EN" "http://mybatis.org/dtd/mybatis-3-mapper.dtd">
<mapper namespace="com.example.mapper.CategoryMapper">

    <select id="getCategory" resultType="com.example.entity.Category">
        select * from category_ where id = #{id}
    </select>

</mapper>
最后把resources目录下的application.properties改名为application.yml,这个格式写配置更简洁。
server:
  port: 8080

spring:
  datasource:
    driver-class-name: com.mysql.cj.jdbc.Driver
    username: root
    password: root
    url: jdbc:mysql://localhost:3306/nyf?useUnicode=true&characterEncoding=utf-8&useSSL=true&serverTimezone=UTC

mybatis:
  mapper-locations: classpath*:/mapping/*.xml
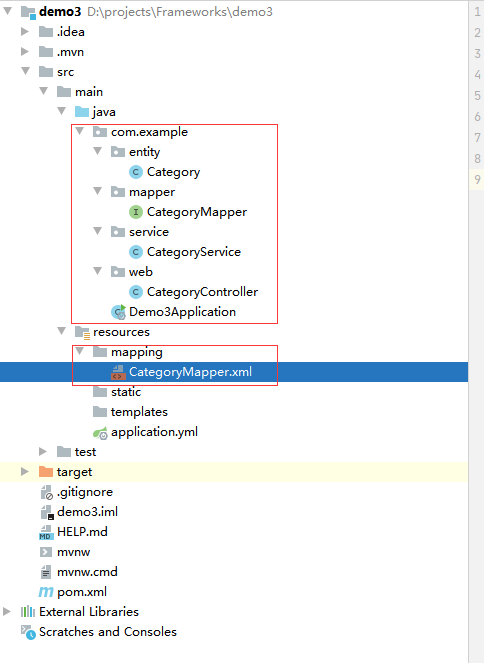
写好的目录如下:

然后启动项目,在浏览器中输入http://localhost:8080/test/1测试一下应该输出下面这样的一条:
Category [id=1, name=category1]
SpringBoot整合MyBatis的主要地方就在于application.yml这个文件和xml配置文件了,关于MyBatis的配置只有一条,除了要建立一个xml映射文件,前边的步骤就跟不整合MyBatis一样,是不是比SpringMVC配置简单多了?
标签:val dem select names not varchar service into imp
原文地址:https://www.cnblogs.com/nyfblog/p/13906577.html