标签:bean getc dea bsp 注册 wing mat data string
以最简单的jdbc事务为例:
<!-- 数据源以Sping自带为例,每次请求均返回一个新的连接 -->
<bean id="dataSource" class="org.springframework.jdbc.datasource.DriverManagerDataSource">
    <property name="driverClassName" value="${jdbc.driverClassName}" />
    <property name="url" value="${jdbc.url}" />
    <property name="username" value="${jdbc.username}" />
    <property name="password" value="${jdbc.password}" />
</bean>
<bean id="transactionManager" class="org.springframework.jdbc.datasource.DataSourceTransactionManager">
    <property name="dataSource" ref="dataSource"/>
</bean>
<tx:annotation-driven transaction-manager="transactionManager"/>
TxNamespaceHandler.init:
@Override
public void init() {
    registerBeanDefinitionParser("advice", new TxAdviceBeanDefinitionParser());
    registerBeanDefinitionParser("annotation-driven",
        new AnnotationDrivenBeanDefinitionParser());
    registerBeanDefinitionParser("jta-transaction-manager", new JtaTransactionManagerBeanDefinitionParser());
}
明显解析的入口便在AnnotationDrivenBeanDefinitionParser.parse:
@Override
public BeanDefinition parse(Element element, ParserContext parserContext) {
    registerTransactionalEventListenerFactory(parserContext);
    String mode = element.getAttribute("mode");
    if ("aspectj".equals(mode)) {
        // mode="aspectj"
        registerTransactionAspect(element, parserContext);
    } else {
        // mode="proxy"
        AopAutoProxyConfigurer.configureAutoProxyCreator(element, parserContext);
    }
    return null;
}
下面分部分进行说明。
第一部分用于向Spring容器注册TransactionalEventListener工厂,TransactionalEventListener是Spring4.2引入的新特性,允许我们自定义监听器监听事务的提交或其它动作。
即configureAutoProxyCreator方法,此方法的最终作用便是在Spring容器中加入这样的bean结构:
BeanFactoryTransactionAttributeSourceAdvisor->TransactionInterceptor->AnnotationTransactionAttributeSource
其中AnnotationTransactionAttributeSource用于解析@Transactional注解的相关属性。
与aop模块类似,入口位于configureAutoProxyCreator里注册的bean: InfrastructureAdvisorAutoProxyCreator,其类图:
此类的特殊之处从其名字上可以体现: 只考虑Spring内部使用的基础设施Advisor。
为类创建代理的入口位于AbstractAutoProxyCreator.postProcessAfterInitialization:
@Override
public Object postProcessAfterInitialization(Object bean, String beanName) throws BeansException {
    if (bean != null) {
        Object cacheKey = getCacheKey(bean.getClass(), beanName);
        if (!this.earlyProxyReferences.contains(cacheKey)) {
            return wrapIfNecessary(bean, beanName, cacheKey);
        }
    }
    return bean;
}
wrapIfNecessary核心逻辑:
protected Object wrapIfNecessary(Object bean, String beanName, Object cacheKey) {
    // Create proxy if we have advice.
    Object[] specificInterceptors = getAdvicesAndAdvisorsForBean(bean.getClass(), beanName, null);
    if (specificInterceptors != DO_NOT_PROXY) {
        this.advisedBeans.put(cacheKey, Boolean.TRUE);
        Object proxy = createProxy(
            bean.getClass(), beanName, specificInterceptors, new SingletonTargetSource(bean));
        this.proxyTypes.put(cacheKey, proxy.getClass());
        return proxy;
    }
}
getAdvicesAndAdvisorsForBean用于去容器中寻找适合当前bean的Advisor,其最终调用AbstractAdvisorAutoProxyCreator.findEligibleAdvisors:
protected List<Advisor> findEligibleAdvisors(Class<?> beanClass, String beanName) {
    List<Advisor> candidateAdvisors = findCandidateAdvisors();
    List<Advisor> eligibleAdvisors = findAdvisorsThatCanApply(candidateAdvisors, beanClass, beanName);
    extendAdvisors(eligibleAdvisors);
    if (!eligibleAdvisors.isEmpty()) {
        //按照@Ordered排序
        eligibleAdvisors = sortAdvisors(eligibleAdvisors);
    }
    return eligibleAdvisors;
}
这个方法在spring-aop中已经详细说明过了,这里再强调一下具体的查找逻辑:
对于spring事务来说,我们有唯一的Advisor: BeanFactoryTransactionAttributeSourceAdvisor,其类图:
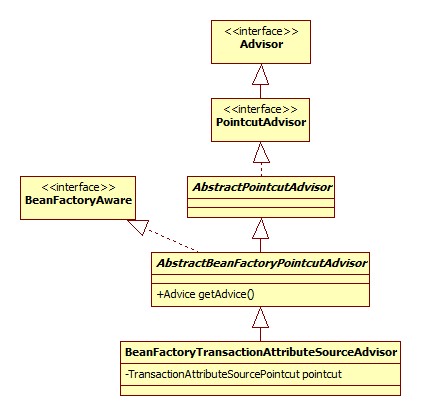
可以看出,BeanFactoryTransactionAttributeSourceAdvisor其实是一个PointcutAdvisor,所以是否可以匹配取决于其Pointcut。此Advisor的pointcut是一个TransactionAttributeSourcePointcut对象,类图:
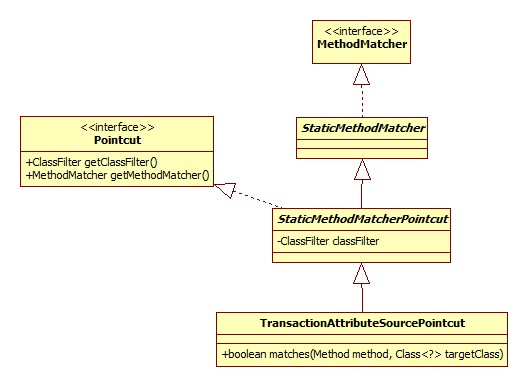
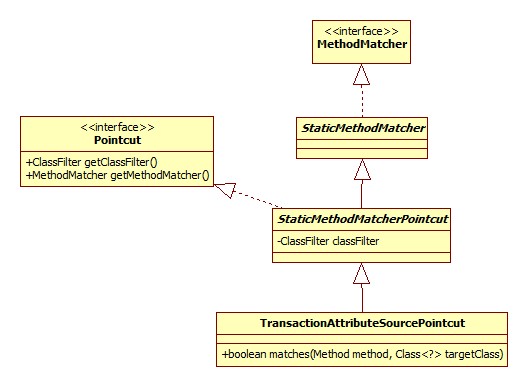
Pointcut的核心在于其ClassFilter和MethodMatcher。
ClassFilter:
位于StaticMethodMatcherPointcut:
private ClassFilter classFilter = ClassFilter.TRUE;
即: 类检查全部通过。
MethodMatcher:
TransactionAttributeSourcePointcut.matches:
@Override
public boolean matches(Method method, Class<?> targetClass) {
    //如果已经是事务代理,那么不应该再次代理
    if (TransactionalProxy.class.isAssignableFrom(targetClass)) {
        return false;
    }
    TransactionAttributeSource tas = getTransactionAttributeSource();
    return (tas == null || tas.getTransactionAttribute(method, targetClass) != null);
}
getTransactionAttribute方法使用了缓存的思想,但其核心逻辑位于AbstractFallbackTransactionAttributeSource.computeTransactionAttribute:
protected TransactionAttribute computeTransactionAttribute(Method method, Class<?> targetClass) {
    // Don‘t allow no-public methods as required.
    if (allowPublicMethodsOnly() && !Modifier.isPublic(method.getModifiers())) {
        return null;
    }
    // Ignore CGLIB subclasses - introspect the actual user class.
    Class<?> userClass = ClassUtils.getUserClass(targetClass);
    // The method may be on an interface, but we need attributes from the target class.
    // If the target class is null, the method will be unchanged.
    Method specificMethod = ClassUtils.getMostSpecificMethod(method, userClass);
    // If we are dealing with method with generic parameters, find the original method.
    specificMethod = BridgeMethodResolver.findBridgedMethod(specificMethod);
    // First try is the method in the target class.
    TransactionAttribute txAtt = findTransactionAttribute(specificMethod);
    if (txAtt != null) {
        return txAtt;
    }
    // Second try is the transaction attribute on the target class.
    txAtt = findTransactionAttribute(specificMethod.getDeclaringClass());
    if (txAtt != null && ClassUtils.isUserLevelMethod(method)) {
        return txAtt;
    }
    if (specificMethod != method) {
        // Fallback is to look at the original method.
        txAtt = findTransactionAttribute(method);
        if (txAtt != null) {
            return txAtt;
        }
        // Last fallback is the class of the original method.
        txAtt = findTransactionAttribute(method.getDeclaringClass());
        if (txAtt != null && ClassUtils.isUserLevelMethod(method)) {
            return txAtt;
        }
    }
    return null;
}
很明显可以看出,首先去方法上查找是否有相应的事务注解(比如@Transactional),如果没有,那么再去类上查找。
以JDK动态代理为例,JdkDynamicAopProxy.invoke简略版源码:
@Override
public Object invoke(Object proxy, Method method, Object[] args) throws Throwable {
    List<Object> chain = this.advised.getInterceptorsAndDynamicInterceptionAdvice(method, targetClass);
    if (chain.isEmpty()) {.
        //没有可用的拦截器,直接调用原方法
        Object[] argsToUse = AopProxyUtils.adaptArgumentsIfNecessary(method, args);
        retVal = AopUtils.invokeJoinpointUsingReflection(target, method, argsToUse);
    } else {
        // We need to create a method invocation...
        invocation = new ReflectiveMethodInvocation(proxy, target, method, args, targetClass, chain);
        // Proceed to the joinpoint through the interceptor chain.
        Object retVal = invocation.proceed();
    }
}
即getInterceptorsAndDynamicInterceptionAdvice方法,其原理是:
遍历所有使用的 Advisor,获得其Advice,将Advice转为MethodInterceptor。那么是如何转的呢?
根据Spring的定义,Advice可以是一个MethodInterceptor,也可以是类似于Aspectj的before, after通知。转换由DefaultAdvisorAdapterRegistry.getInterceptors完成:
@Override
public MethodInterceptor[] getInterceptors(Advisor advisor) throws UnknownAdviceTypeException {
    List<MethodInterceptor> interceptors = new ArrayList<MethodInterceptor>(3);
    Advice advice = advisor.getAdvice();
    if (advice instanceof MethodInterceptor) {
        interceptors.add((MethodInterceptor) advice);
    }
    for (AdvisorAdapter adapter : this.adapters) {
        if (adapter.supportsAdvice(advice)) {
            interceptors.add(adapter.getInterceptor(advisor));
        }
    }
    if (interceptors.isEmpty()) {
        throw new UnknownAdviceTypeException(advisor.getAdvice());
    }
    return interceptors.toArray(new MethodInterceptor[interceptors.size()]);
}
AdvisorAdapter接口用以支持用户自定义的Advice类型,并将自定义的类型转为拦截器。默认adapters含有MethodBeforeAdviceAdapter、AfterReturningAdviceAdapter和ThrowsAdviceAdapter三种类型,用以分别支持MethodBeforeAdvice、AfterReturningAdvice和ThrowsAdvice。
对于我们的BeanFactoryTransactionAttributeSourceAdvisor来说,有且只有一个拦截器: TransactionInterceptor.
ReflectiveMethodInvocation.proceed:
@Override
public Object proceed() throws Throwable {
    if (this.currentInterceptorIndex == this.interceptorsAndDynamicMethodMatchers.size() - 1) {
        //拦截器执行完毕,调用原本的方法
        return invokeJoinpoint();
    }
    Object interceptorOrInterceptionAdvice =
            this.interceptorsAndDynamicMethodMatchers.get(++this.currentInterceptorIndex);
    if (interceptorOrInterceptionAdvice instanceof InterceptorAndDynamicMethodMatcher) {
        InterceptorAndDynamicMethodMatcher dm =
                (InterceptorAndDynamicMethodMatcher) interceptorOrInterceptionAdvice;
        if (dm.methodMatcher.matches(this.method, this.targetClass, this.arguments)) {
            return dm.interceptor.invoke(this);
        } else {
            // Dynamic matching failed.
            return proceed();
        }
    } else {
        //调用拦截器的invoke方法
        return ((MethodInterceptor) interceptorOrInterceptionAdvice).invoke(this);
    }
}
可以看出,这其实是一个逐个调用拦截器的invoke方法,最终调用原本方法(被代理方法)的过程。所以,事务添加的核心逻辑(入口)在TransactionInterceptor的invoke方法。
invoke方法:
@Override
public Object invoke(final MethodInvocation invocation) throws Throwable {
    Class<?> targetClass = (invocation.getThis() != null ?
             AopUtils.getTargetClass(invocation.getThis()) : null);
    // Adapt to TransactionAspectSupport‘s invokeWithinTransaction...
    return invokeWithinTransaction(invocation.getMethod(), targetClass, new InvocationCallback() {
        @Override
        public Object proceedWithInvocation() throws Throwable {
            //事务执行完毕后调用链继续向下执行
            return invocation.proceed();
        }
    });
}
invokeWithinTransaction简略版源码(仅保留PlatformTransactionManager部分):
protected Object invokeWithinTransaction(Method method, Class<?> targetClass, final InvocationCallback invocation){
    // If the transaction attribute is null, the method is non-transactional.
    final TransactionAttribute txAttr = getTransactionAttributeSource()
        .getTransactionAttribute(method, targetClass);
    final PlatformTransactionManager tm = determineTransactionManager(txAttr);
    //得到方法名
    final String joinpointIdentification = methodIdentification(method, targetClass);
    if (txAttr == null || !(tm instanceof CallbackPreferringPlatformTransactionManager)) {
        // Standard transaction demarcation with getTransaction and commit/rollback calls.
        TransactionInfo txInfo = createTransactionIfNecessary(tm, txAttr, joinpointIdentification);
        Object retVal = null;
        try {
            // This is an around advice: Invoke the next interceptor in the chain.
            // This will normally result in a target object being invoked.
            retVal = invocation.proceedWithInvocation();
        } catch (Throwable ex) {
            // target invocation exception
            completeTransactionAfterThrowing(txInfo, ex);
            throw ex;
        } finally {
            cleanupTransactionInfo(txInfo);
        }
        commitTransactionAfterReturning(txInfo);
        return retVal;
    }
}
determineTransactionManager方法用以确定使用的事务管理器:
protected PlatformTransactionManager determineTransactionManager(TransactionAttribute txAttr) {
    //如果没有事务属性,那么仅从缓存中查找,找不到返回null
    if (txAttr == null || this.beanFactory == null) {
        return getTransactionManager();
    }
    String qualifier = txAttr.getQualifier();
    //如果@Transactional注解配置了transactionManager或value属性(用以决定使用哪个事务管理器):
    //首先查找缓存,找不到再去容器中按名称寻找
    if (StringUtils.hasText(qualifier)) {
        return determineQualifiedTransactionManager(qualifier);
    } else if (StringUtils.hasText(this.transactionManagerBeanName)) {
        return determineQualifiedTransactionManager(this.transactionManagerBeanName);
    } else {
        //去容器中按类型(Class)查找
        PlatformTransactionManager defaultTransactionManager = getTransactionManager();
        if (defaultTransactionManager == null) {
            defaultTransactionManager = this.beanFactory.getBean(PlatformTransactionManager.class);
            this.transactionManagerCache.putIfAbsent(
                    DEFAULT_TRANSACTION_MANAGER_KEY, defaultTransactionManager);
        }
        return defaultTransactionManager;
    }
}
对于我们使用的DataSourceTransactionManager,类图:
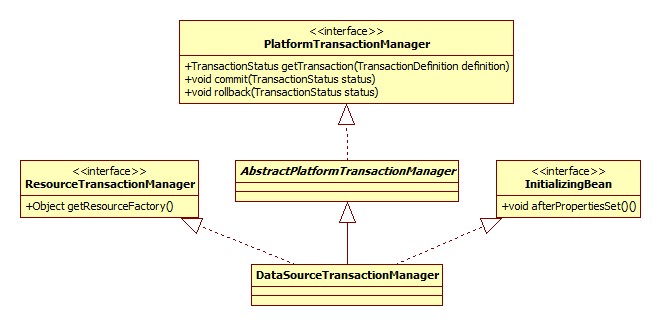
afterPropertiesSet方法只是对dataSource进行了检查。
DriverManagerDataSource类图:
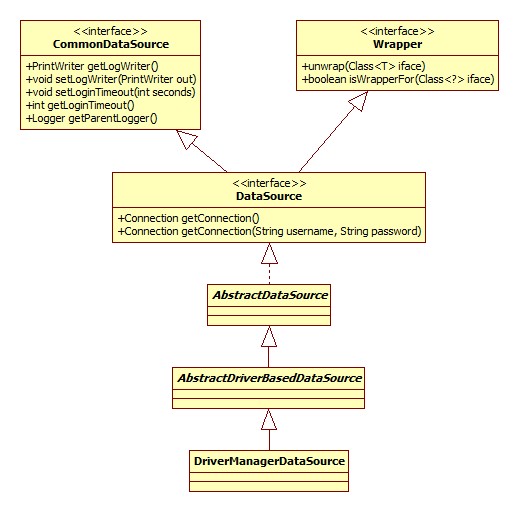
其中CommonDataSource、Wrapper、DataSource均位于javax.sql包下。
invocation.proceedWithInvocation()便是我们的逻辑,而createTransactionIfNecessary便是在逻辑执行前开启事务。
TransactionAspectSupport.createTransactionIfNecessary:
protected TransactionInfo createTransactionIfNecessary(
    PlatformTransactionManager tm, TransactionAttribute txAttr, final String joinpointIdentification) {
    // If no name specified, apply method identification as transaction name.
    if (txAttr != null && txAttr.getName() == null) {
        txAttr = new DelegatingTransactionAttribute(txAttr) {
            @Override
            public String getName() {
                return joinpointIdentification;
            }
        };
    }
    TransactionStatus status = null;
    if (txAttr != null) {
        if (tm != null) {
            status = tm.getTransaction(txAttr);
        }
    }
    return prepareTransactionInfo(tm, txAttr, joinpointIdentification, status);
}
此部分的核心逻辑在getTransaction和prepareTransactionInfo方法,源码较长,下面依然按部分整理。
目的在于支撑事务的传播性。
源码位于DataSourceTransactionManager.doGetTransaction,核心逻辑在TransactionSynchronizationManager.doGetResource:
private static Object doGetResource(Object actualKey) {
    Map<Object, Object> map = resources.get();
    if (map == null) {
        return null;
    }
    Object value = map.get(actualKey);
    // Transparently remove ResourceHolder that was marked as void...
    if (value instanceof ResourceHolder && ((ResourceHolder) value).isVoid()) {
        map.remove(actualKey);
        // Remove entire ThreadLocal if empty...
        if (map.isEmpty()) {
            resources.remove();
        }
        value = null;
    }
    return value;
}
actualKey实际上是DataSource对象,resources是一个ThreadLocal对象,其声明源码:
private static final ThreadLocal<Map<Object, Object>> resources =
            new NamedThreadLocal<Map<Object, Object>>("Transactional resources");
从这里可以得出结论:
是否存在事务指的是在当前线程、当前数据源(DataSource)中是否存在处于活动状态的事务。
如果检测到已存在事务,那么就要考虑事务的传播特性(行为).此部分源码位于AbstractPlatformTransactionManager.handleExistingTransaction,下面按照不同的传播特性展开。
即当前方法需要在非事务的环境下执行,如果有事务存在,那么抛出异常。相关源码:
if (definition.getPropagationBehavior() == TransactionDefinition.PROPAGATION_NEVER) {
    throw new IllegalTransactionStateException(
        "Existing transaction found for transaction marked with propagation ‘never‘");
}
与前者的区别在于,如果有事务存在,那么将事务挂起,而不是抛出异常。
if (definition.getPropagationBehavior() == TransactionDefinition.PROPAGATION_NOT_SUPPORTED) {
    Object suspendedResources = suspend(transaction);
    boolean newSynchronization = (getTransactionSynchronization() == SYNCHRONIZATION_ALWAYS);
    return prepareTransactionStatus(
        definition, null, false, newSynchronization, debugEnabled, suspendedResources);
}
此部分的核心在于suspend方法,最终调用TransactionSynchronizationManager.doUnbindResource:
private static Object doUnbindResource(Object actualKey) {
    Map<Object, Object> map = resources.get();
    if (map == null) {
        return null;
    }
    Object value = map.remove(actualKey);
    // Remove entire ThreadLocal if empty...
    if (map.isEmpty()) {
        resources.remove();
    }
    // Transparently suppress a ResourceHolder that was marked as void...
    if (value instanceof ResourceHolder && ((ResourceHolder) value).isVoid()) {
        value = null;
    }
    return value;
}
可以看出,所谓的事务挂起其实就是一个移除当前线程、数据源活动事务对象的过程。
同时注意getTransaction方法返回的是一个TransactionStatus对象,被挂起的事务的各种状态都被保存在此对象中。
那么挂起这个操作到底是如何实现(起作用)的呢?
DataSourceTransactionManager.doSuspend:
@Override
protected Object doSuspend(Object transaction) {
    DataSourceTransactionObject txObject = (DataSourceTransactionObject) transaction;
    txObject.setConnectionHolder(null);
    ConnectionHolder conHolder = (ConnectionHolder)
            TransactionSynchronizationManager.unbindResource(this.dataSource);
    return conHolder;
}
其实玄机就在于将ConnectionHolder设为null这一行,因为一个ConnectionHolder对象就代表了一个数据库连接,将ConnectionHolder设为null就意味着我们下次要使用连接时,将重新从连接池获取,而新的连接的自动提交是为true的。
if (definition.getPropagationBehavior() == TransactionDefinition.PROPAGATION_REQUIRES_NEW) {
    SuspendedResourcesHolder suspendedResources = suspend(transaction);
    boolean newSynchronization = (getTransactionSynchronization() != SYNCHRONIZATION_NEVER);
    DefaultTransactionStatus status = newTransactionStatus(
            definition, transaction, true, newSynchronization, debugEnabled, suspendedResources);
    doBegin(transaction, definition);
    prepareSynchronization(status, definition);
    return status;
}
可以看出,这其实是一个挂起当前活动事务并创建新事务的过程,doBegin方法是事务开启的核心,将在后面进行说明。
其意义:
PROPAGATION_NESTED 开始一个 "嵌套的" 事务, 它是已经存在事务的一个真正的子事务. 嵌套事务开始执行时, 它将取得一个 savepoint. 如果这个嵌套事务失败, 我们将回滚到此 savepoint. 嵌套事务是外部事务的一部分, 只有外部事务结束后它才会被提交.
摘自: 解惑 spring 嵌套事务
核心源码(忽略JTA部分):
if (definition.getPropagationBehavior() == TransactionDefinition.PROPAGATION_NESTED) {
    if (useSavepointForNestedTransaction()) {
        // Create savepoint within existing Spring-managed transaction,
        // through the SavepointManager API implemented by TransactionStatus.
        // Usually uses JDBC 3.0 savepoints. Never activates Spring synchronization.
        DefaultTransactionStatus status =
            prepareTransactionStatus(definition, transaction, false, false, debugEnabled, null);
        status.createAndHoldSavepoint();
        return status;
    }
}
关键在于如何创建SavePoint, AbstractTransactionStatus.createAndHoldSavepoint:
public void createAndHoldSavepoint() throws TransactionException {
    setSavepoint(getSavepointManager().createSavepoint());
}
DefaultTransactionStatus.getSavepointManager:
@Override
protected SavepointManager getSavepointManager() {
    if (!isTransactionSavepointManager()) {
        throw new NestedTransactionNotSupportedException(
            "Transaction object [" + getTransaction() + "] does not support savepoints");
    }
    return (SavepointManager) getTransaction();
}
可以看出,SavepointManager实际上从Transaction强转而来,Transaction在Spring都是用Object引用的,那么这到底是个什么东西?
安装Mysql数据库(或其它支持jdbc)并正确配置数据库连接.
定义两个bean,代表我们的业务逻辑:
TransactionBean:
@Component
public class TransactionBean {
    private NestedBean nestedBean;
    public NestedBean getNestedBean() {
        return nestedBean;
    }
    public void setNestedBean(NestedBean nestedBean) {
        this.nestedBean = nestedBean;
    }

    @Transactional(propagation = Propagation.REQUIRED)
    public void process() {
        System.out.println("事务执行");
        nestedBean.nest();
    }
}
NestedBean:
@Component
public class NestedBean {
    @Transactional(propagation = Propagation.NESTED)
    public void nest() {
        System.out.println("嵌套事务");
    }
}
配置文件:
<bean id="nestedBean" class="base.transaction.NestedBean" />
<bean class="base.transaction.TransactionBean">
  <property name="nestedBean" ref="nestedBean" />
</bean>
入口:
public static void main(String[] args) {
  ClassPathXmlApplicationContext context = new ClassPathXmlApplicationContext("config.xml");
    TransactionBean bean = context.getBean(TransactionBean.class);
    bean.process();
}
这样将断点打在合适的位置便可以得到事务对象究竟是什么。
注意:
nest方法必须在一个单独的业务bean中,否则对nest的调用并不会导致事务获取的触发。这是由JDK动态代理的实现机制决定的,调用当前类的方法并不会触发代理逻辑(InvocationHandler)。
这一点可以运行demo:test.proxy.JDKProxy看出。
运行debug可以发现,对于DataSourceTransactionManager,事务对象其实是其内部类DataSourceTransactionObject.
DataSourceTransactionObject的类图如下:
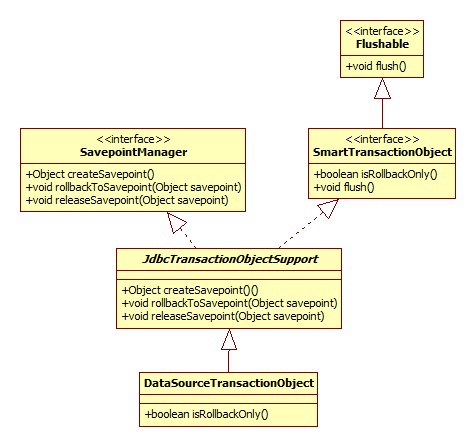
位于java.sql包下,对于Mysql来说,由Mysql驱动提供实现,类图:
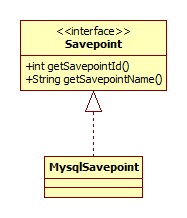
下面来看一下Savepoint到底是如何被创建的。
JdbcTransactionObjectSupport.createSavepoint简略版源码:
@Override
public Object createSavepoint() throws TransactionException {
    ConnectionHolder conHolder = getConnectionHolderForSavepoint();
    return conHolder.createSavepoint();
}
ConnectionHolder.createSavepoint:
public Savepoint createSavepoint() throws SQLException {
    this.savepointCounter++;
    return getConnection().setSavepoint(SAVEPOINT_NAME_PREFIX + this.savepointCounter);
}
我们可以得出这样的结论:
Savepoint由java SQL标准定义,具体实现由数据库完成。从mysql的客户端可以直接执行命令savepoint xx可以看出这一点。
略。
如果之前不存在事务,那么就需要创建了,核心逻辑位于DataSourceTransactionManager.doBegin:
@Override
protected void doBegin(Object transaction, TransactionDefinition definition) {
    //此时,txObject不为null,只是其核心的ConnectHolder属性为null
    DataSourceTransactionObject txObject = (DataSourceTransactionObject) transaction;
    Connection con = null;
    if (txObject.getConnectionHolder() == null ||
            txObject.getConnectionHolder().isSynchronizedWithTransaction()) {
        Connection newCon = this.dataSource.getConnection();
        //获得连接,可以看出ConnectionHolder是对Connection的包装
        txObject.setConnectionHolder(new ConnectionHolder(newCon), true);
    }
    txObject.getConnectionHolder().setSynchronizedWithTransaction(true);
    con = txObject.getConnectionHolder().getConnection();
    //设置是否只读和隔离级别
    Integer previousIsolationLevel = DataSourceUtils.prepareConnectionForTransaction(con, definition);
    txObject.setPreviousIsolationLevel(previousIsolationLevel);
    // Switch to manual commit if necessary. This is very expensive in some JDBC drivers,
    // so we don‘t want to do it unnecessarily (for example if we‘ve explicitly
    // configured the connection pool to set it already).
    if (con.getAutoCommit()) {
        txObject.setMustRestoreAutoCommit(true);
        con.setAutoCommit(false);
    }
    txObject.getConnectionHolder().setTransactionActive(true);
    int timeout = determineTimeout(definition);
    if (timeout != TransactionDefinition.TIMEOUT_DEFAULT) {
        txObject.getConnectionHolder().setTimeoutInSeconds(timeout);
    }
    // Bind the session holder to the thread.
    if (txObject.isNewConnectionHolder()) {
        TransactionSynchronizationManager.bindResource(getDataSource(), txObject.getConnectionHolder());
    }
}
到这里便可以得出结论:
Spring事务的开启实际上是将数据库的自动提交设为false。
其实就是对jdbc相应方法的封装,不再展开。
事务的本质其实是对数据库自动提交的关闭与开启,传播特性是Spring提出、实现、控制的概念,而隔离级别是对数据库实现的封装。
标签:bean getc dea bsp 注册 wing mat data string
原文地址:https://www.cnblogs.com/Sirius-/p/13934745.html