标签:remove rip 功能 type learn artifact required fan ESS
Swagger是一款功能强大的api框架,支持在线接口文档的ui界面,还提供了在线测试功能,此外,它还支持流行的Restful风格接口。
简单介绍restful风格。
介绍SpringBoot与Swagger-ui快速整合。
介绍Swagger-ui常用注解。
REST(Representational State Transfer):表述性状态传递,它是一种针对网络应用的设计和开发方式,可以降低开发的复杂性,提高系统的可伸缩性。
简单来说,HTTP协议本身是无状态的协议,客户端想要操作服务器,可以通过请求资源的方式,将"状态"进行传递。
一、导入依赖
        <properties>
        <swagger.version>2.9.2</swagger.version>
    	</properties>

        <!--swagger2官方依赖-->
		<dependency>
            <groupId>io.springfox</groupId>
            <artifactId>springfox-swagger2</artifactId>
            <version>${swagger.version}</version>
        </dependency>
        <dependency>
            <groupId>io.springfox</groupId>
            <artifactId>springfox-swagger-ui</artifactId>
            <version>${swagger.version}</version>
        </dependency>
二、编写Swagger的配置文件
@Configuration
@EnableSwagger2
public class SwaggerConfig {
    @Bean
    public Docket createRestApi() {
        return new Docket(DocumentationType.SWAGGER_2)
                .apiInfo(apiInfo())
                .pathMapping("/")
                .select()
           		 //为当前包下controller生成API文档
                .apis(RequestHandlerSelectors.basePackage("com.hyh.fireworks.web"))
                // 为有@Api注解的Controller生成API文档
                //.apis(RequestHandlerSelectors.withClassAnnotation(Api.class))
                // 为有@ApiOperation注解的方法生成API文档
                //.apis(RequestHandlerSelectors.withMethodAnnotation(ApiOperation.class))
                .paths(PathSelectors.any())
                .build();
    }

    private ApiInfo apiInfo() {
        return new ApiInfoBuilder()
                .title("Swagger接口文档")
                .description("Fireworks 博客网站 接口文档 ")
                .contact(new Contact("天乔巴夏", "https://www.hyhwky.com", "1332790762@qq.com"))
                .version("1.0")
                .build();
    }
}
三、在实体类model上应用注解
@Data
@AllArgsConstructor
@NoArgsConstructor
@ApiModel(value = "User对象", description = "用户表")
public class User implements Serializable {

    private static final long serialVersionUID = 1L;

    @ApiModelProperty(value = "id")
    private Integer id;

    @ApiModelProperty(value = "用户名")
    private String name;

    @ApiModelProperty(value = "年龄")
    private Integer age;
}
四、在接口上应用注解
注:以下注解不加也是可以测试成功的,不过为了文档的可读性,建议加上方法注释。
@Api(tags = "User控制器") //修饰整个类,描述Controller的作用
@RestController
@RequestMapping("/users")
public class UserController {

    private static final List<User> USERS = new ArrayList<>();

    static {
        USERS.add(new User(1,"hyh",12));
        USERS.add(new User(2,"summer day",18));
        USERS.add(new User(3,"天乔巴夏",20));
    }

    @GetMapping("/{id}")
    @ApiOperation("获取指定user")
    public User getUser(@PathVariable @ApiParam(value = "id",required = true,defaultValue = "3") Integer id){
        return USERS.get(id - 1);
    }

    @DeleteMapping("/{id}")
    @ApiOperation("删除指定user")
    @ApiImplicitParam(name = "id", value = "user id", required = true, dataType = "Integer",paramType = "path")
    public String deleteUser(@PathVariable Integer id){
        USERS.remove(id - 1);
        return "success";
    }

    @PostMapping()
    @ApiOperation("新增用户")
    public String postUser(@RequestBody User user){
        USERS.add(user);
        return "success";
    }

    @PutMapping("/{id}")
    @ApiOperation("更新用户")
    @ApiImplicitParams({
            @ApiImplicitParam(name = "id", value = "id", required = true, dataType = "Integer",paramType = "path"),
            @ApiImplicitParam(name = "user", value = "user 实体", required = true, dataType = "User")
    })
    public String putUser(@PathVariable Integer id , @RequestBody User user){
        user.setId(id);
        USERS.set(id - 1,user);
        return "success";
    }

    @GetMapping()
    @ApiOperation("用户列表")
    public List<User> getUsers(){
        return USERS;
    }

    @ApiIgnore //生成接口文档时,忽略该接口
    @GetMapping("/ignore")
    public String ignoreTest(){
        return "ignore";
    }
}
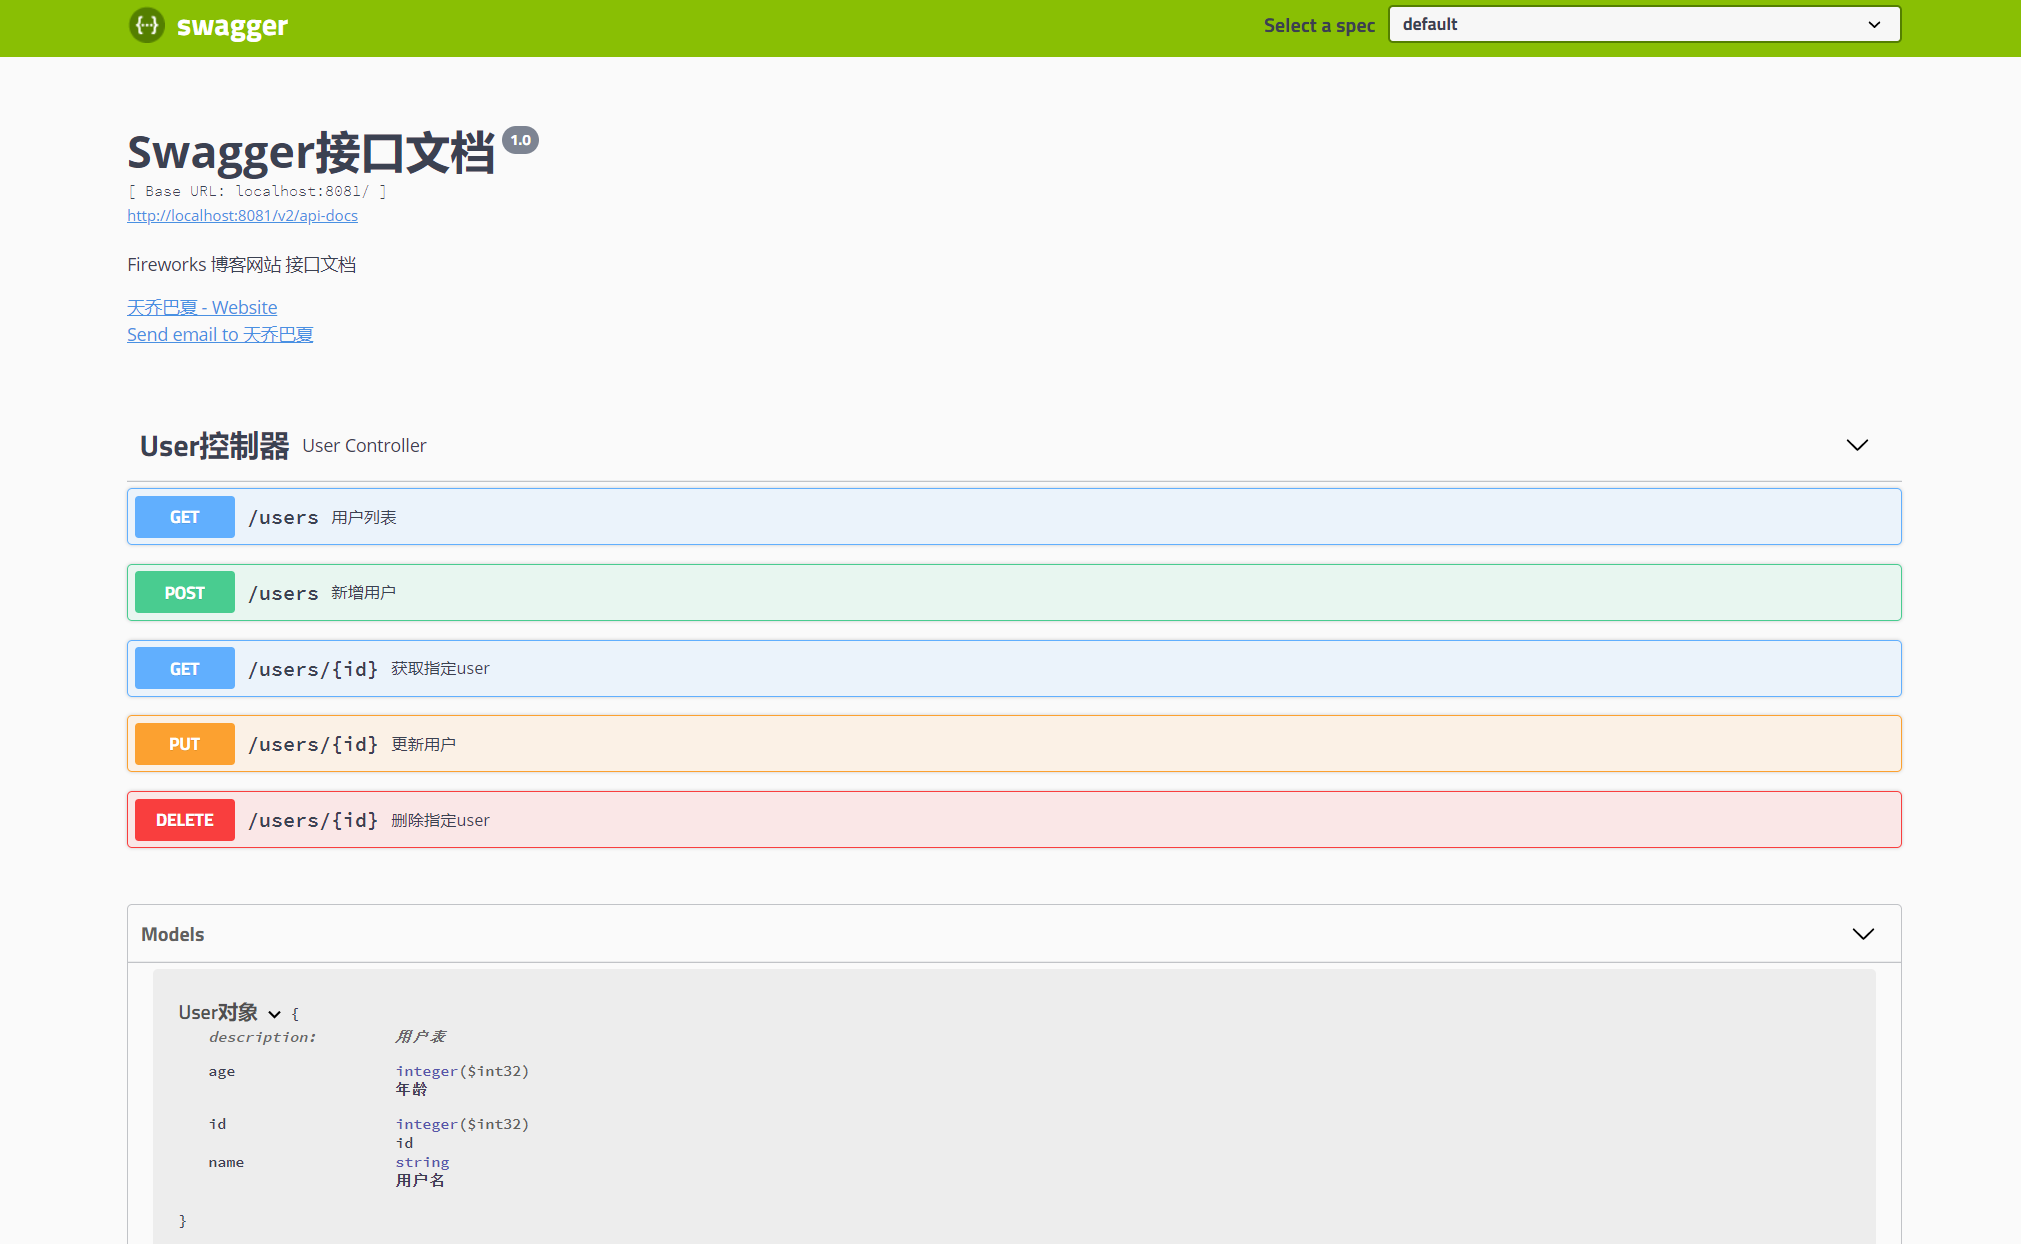
五、访问http://localhost:8081/swagger-ui.html即可看到效果

文档及源码地址:https://github.com/SpringForAll/spring-boot-starter-swagger,内有详细文档说明,利用Spring Boot的自动化配置特性来实现快速的将swagger2引入spring boot应用来生成API文档,简化原生使用swagger2的整合代码。
感兴趣的小伙伴可以照着文档上的demo自己测试一下哈。
本文内容均为对优秀博客及官方文档总结而得,原文地址均已在文中参考阅读处标注。最后,文中的代码样例已经全部上传至Gitee:https://gitee.com/tqbx/springboot-samples-learn,另有其他SpringBoot的整合哦。
SpringBoot整合Swagger-ui快速生成在线API文档
标签:remove rip 功能 type learn artifact required fan ESS
原文地址:https://www.cnblogs.com/summerday152/p/13943808.html