标签:console url 增加 reg data mit 代码 fail mamicode
有时 需要把异步返回的结果当条件来进行判断。所以 把异步变同步
使用Promise 配合 async 和 awit
// 提交数据
    //async关键词
    async submit(e) {
        var that = this,file_url = ‘‘;
        //res为上方法请求返回的res.data内容
        var res = await that.uploadimg(that.data.ImgsArr[0])
        wx.request({
            url: httpsRequest.httpsUrl + resHttp.feedback,
            data: {},
            method: "post",
            header: {
                ‘content-type‘: ‘application/x-www-form-urlencoded‘,
                "requesttype": "wxapp",
                "token": that.data.tokens
            },
            success(res) {
                console.log(res);
                wx.showToast({
                    title: res.data.msg,
                    icon: ‘success‘
                })
            }
        })

    },

//图片上传
    uploadimg:function(a){
        var tt = this
        return new Promise((resolve, reject) =>{
            wx.uploadFile({
                filePath: a,
                name: ‘file‘,
                url: httpsRequest.httpsUrl + resHttp.fileImgIsVideo,
                header: {
                    "content-type": "application/x-www-form-urlencoded",
                    "requesttype": "wxapp",
                    "token": tt.data.tokens
                },
                success(res) {
                	//resolve作用提示小程序请求已结束
                    resolve(JSON.parse(res.data))
                },
                fail (err) {
                  reject(err)
                }
            });
        });
    },
如果有心,在微信小程序官方文档中搜索 async 可以找到“工具?开发辅助?代码编译”页面中提到了对 async/await 的支持情况,是在“增加编译”小节的一个表格中,摘录一段:
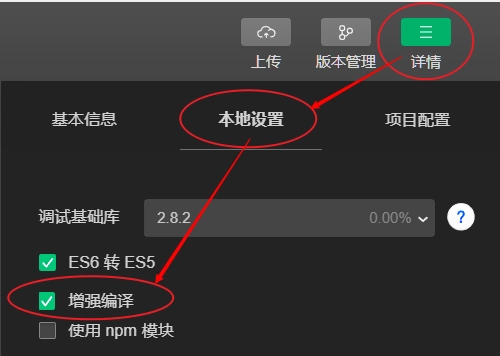
总之呢,就是,只要把“微信开发者工具”更新到 v1.02.1904282 以上,就不需要干 npm install regenerator 这之类的事情,只需要修改一个配置项就能使用 async/await 特性了。这个配置就在“工具栏?详情?本地设置”页面中。

为了快速验证 async/await 可用,在 app.js 的 onLaunch() 事件函数中加一段代码:
(async () => {
    const p = await new Promise(resolve => {
        setTimeout(() => resolve("hello async/await"), 1000);
    });
    console.log(p);
})();
在短暂的自动编译运行之后,在调试器界面的 Console 页签中可以看到输出:
hello async/await
标签:console url 增加 reg data mit 代码 fail mamicode
原文地址:https://www.cnblogs.com/liliuyu/p/13959924.html