标签:赋值 framework 个性 factor 部分 坐标 oca htm parent
SSM项目的整合,以及SSM项目转SpringBoot项目的注意事项。SSM项目来说,其中的要点就是整合Spring、MyBatis和Spring MVC三大框架。SSM项目的着重整合点是Spring和MyBatis,Spring与Spring MVC之间的联系,是交由web.xml文件去建立的;Spring相当于MyBatis与Spring MVC之间的粘合剂,其本质上是一种组合的关系。SSM项目整合的难点只有一个,即需要将原本MyBatis的DataSource、SqlSession交由Spring去控制和创建。DataSource交由Spring管理的另一个意义,是可以使用Spring的TransactionManager对数据库事务进行统一管理。MyBatis和Spring,步骤如下:
DataSource,交由Spring容器管理;MyBatis将使用DataSource创建SqlSession对象,并交由Spring容器管理;Spring将使用DataSource创建TransactionManager对象,并交由Spring容器管理;Java配置类@Configuration统一加载@Import包含以上Bean的类;.xml形式配置<bean>对象,在Java配置类中可以使用@ImportResource注解加载进行加载。JdbcConfig中创建DataSource对象引用,会注册为Spring Bean,交由Spring容器管理,其中:
@PropertySource:用于引入resources目录下的jdbc.properties配置文件,其中配置了相关的数据库源参数;@Value:使用占位符${}可以通过.properties配置文件中的键获取其值,程序将自动将值赋值到当前字段中;@Bean:方法返回的对象将被Spring容器管理。package cn.dylanphang.config;
import com.mchange.v2.c3p0.ComboPooledDataSource;
import org.springframework.beans.factory.annotation.Value;
import org.springframework.context.annotation.Bean;
import org.springframework.context.annotation.PropertySource;
import javax.sql.DataSource;
import java.beans.PropertyVetoException;
/**
* 创建数据库连接池Bean。
*/
@PropertySource("classpath:jdbc.properties")
public class JdbcConfig {
@Value("${jdbc.driver}")
private String driver;
@Value("${jdbc.url}")
private String url;
@Value("${jdbc.username}")
private String username;
@Value("${jdbc.password}")
private String password;
@Value("${jdbc.testConnectionOnCheckout}")
private boolean testConnectionOnCheckout;
@Value("${jdbc.testConnectionOnCheckin}")
private boolean textConnectionOnCheckin;
@Value("${jdbc.idleConnectionTestPeriod}")
private int idleConnectionTestPeriod;
@Value("${jdbc.initialPoolSize}")
private int initialPoolSize;
@Value("${jdbc.minPoolSize}")
private int minPoolSize;
@Value("${jdbc.maxPoolSize}")
private int maxPoolSize;
/**
* 使用c3p0连接池
*
* @return DataSource
*/
@Bean(name = {"dataSource"})
public DataSource dataSource() {
try {
ComboPooledDataSource cpds = new ComboPooledDataSource();
cpds.setDriverClass(driver);
cpds.setJdbcUrl(url);
cpds.setUser(username);
cpds.setPassword(password);
cpds.setTestConnectionOnCheckout(testConnectionOnCheckout);
cpds.setTestConnectionOnCheckin(textConnectionOnCheckin);
cpds.setIdleConnectionTestPeriod(idleConnectionTestPeriod);
cpds.setInitialPoolSize(initialPoolSize);
cpds.setMinPoolSize(minPoolSize);
cpds.setMaxPoolSize(maxPoolSize);
return cpds;
} catch (PropertyVetoException e) {
e.printStackTrace();
}
return null;
}
}
MyBatis使用DataSource创建SqlSession对象引用,注册为Spring Bean,交由Spring容器管理,其中:
classpath*::将在resources目录下查找指定的文件;SqlSessionTemplate:Spring所提供的SqlSession的实现类。package cn.dylanphang.config;
import org.apache.ibatis.session.SqlSessionFactory;
import org.mybatis.spring.SqlSessionFactoryBean;
import org.mybatis.spring.SqlSessionTemplate;
import org.springframework.beans.factory.annotation.Autowired;
import org.springframework.context.annotation.Bean;
import org.springframework.context.annotation.Import;
import org.springframework.core.io.Resource;
import org.springframework.core.io.support.PathMatchingResourcePatternResolver;
import javax.sql.DataSource;
@Import(JdbcConfig.class)
public class MyBatisConfig {
private final DataSource dataSource;
@Autowired
public MyBatisConfig(DataSource dataSource) {
this.dataSource = dataSource;
}
@Bean
public SqlSessionFactory sqlSessionFactory() {
try {
SqlSessionFactoryBean sqlSessionFactoryBean = new SqlSessionFactoryBean();
sqlSessionFactoryBean.setDataSource(dataSource);
PathMatchingResourcePatternResolver resolver = new PathMatchingResourcePatternResolver();
Resource[] resources = resolver.getResources("classpath*:cn/dylanphang/mapper/*Mapper.xml");
sqlSessionFactoryBean.setMapperLocations(resources);
return sqlSessionFactoryBean.getObject();
} catch (Exception e) {
e.printStackTrace();
}
return null;
}
@Bean("sqlSession")
public SqlSessionTemplate sqlSessionTemplate(@Autowired SqlSessionFactory sqlSessionFactory) {
return new SqlSessionTemplate(sqlSessionFactory);
}
}
Spring使用DataSource创建TransactionManager对象引用,注册为Spring Bean,交由Spring容器管理:package cn.dylanphang.config;
import org.springframework.beans.factory.annotation.Autowired;
import org.springframework.context.annotation.Bean;
import org.springframework.context.annotation.Import;
import org.springframework.jdbc.datasource.DataSourceTransactionManager;
import org.springframework.transaction.TransactionManager;
import javax.sql.DataSource;
/**
* @author dylan
*/
@Import(JdbcConfig.class)
public class TransactionManagerConfig {
private final DataSource dataSource;
public TransactionManagerConfig(@Autowired DataSource dataSource) {
this.dataSource = dataSource;
}
/**
* 可以直接在业务层中使用注解Transactional对事务进行管理,该种事务管理要求抛出RuntimeException或Error,对于其他类型的异常,
* 将不做回滚处理。需要扩大处理异常的范围,需要在注解中传入rollbackFor = Exception.class,扩大异常抓取的范围。
*
* @return DataSourceTransactionManager对象
*/
@Bean
public TransactionManager transactionManager() {
return new DataSourceTransactionManager(dataSource);
}
}
Java配置类统一加载以上配置类:
SpringConfiguration最终由web.xml配置,交由web容器加载;@ComponentScan:Spring除了加载必要的环境所依赖的Bean对象之外,还需要加载用户自定义类的Bean对象,使用@ComponentScan设定Spring加载自定义Bean的包路径;excludeFilters:用于排除扫描指定注解。该属性接收一个@Filter类的参数,该类在@ComponectScan中,而@Filter类则默认接收一个注解类型的类对象作为参数;@Import:用于加载类文件,其中Jdbc.class已经在MybatisConfig.class和TransactionManagerConfig.class中加载过了,可以不再进行二次加载;@EnableTransactionManagement:是否允许Spring事务管理。package cn.dylanphang.config;
import org.springframework.context.annotation.*;
import org.springframework.stereotype.Controller;
import org.springframework.transaction.annotation.EnableTransactionManagement;
/**
* @author dylan
*/
@Configuration
@ComponentScan(
basePackages = "cn.dylanphang",
excludeFilters = {
@ComponentScan.Filter({Controller.class})
})
@Import({MyBatisConfig.class, TransactionManagerConfig.class})
@EnableTransactionManagement
public class SpringConfiguration {
}
Spring MVC只需要完成标准配置即可,选用.xml配置的方式:
<context:component-scan>:同样需要设置包扫描,并只需要管理@Controller注解;<mvc:annotation-driven/>:开启注解支持;InternalResourceViewResolver:视图解析器,当你需要返回一个逻辑视图并需要解析为物理视图时,需要配置;CommonsMultipartResolver:当你在Controller方法中使用对象MutilpartFile时,需要配置。<?xml version="1.0" encoding="UTF-8"?>
<beans xmlns="http://www.springframework.org/schema/beans"
xmlns:mvc="http://www.springframework.org/schema/mvc"
xmlns:context="http://www.springframework.org/schema/context"
xmlns:xsi="http://www.w3.org/2001/XMLSchema-instance"
xsi:schemaLocation="
http://www.springframework.org/schema/beans
http://www.springframework.org/schema/beans/spring-beans.xsd
http://www.springframework.org/schema/mvc
http://www.springframework.org/schema/mvc/spring-mvc.xsd
http://www.springframework.org/schema/context
http://www.springframework.org/schema/context/spring-context.xsd">
<!-- 配置spring创建容器时要扫描的包 -->
<context:component-scan base-package="cn.dylanphang.controller">
<context:include-filter type="annotation" expression="org.springframework.stereotype.Controller"/>
</context:component-scan>
<!-- 配置视图解析器 -->
<bean id="viewResolver" class="org.springframework.web.servlet.view.InternalResourceViewResolver">
<property name="prefix" value="/WEB-INF/page/"/>
<property name="suffix" value=".jsp"/>
</bean>
<!-- 配置文件解析器对象,要求id名称必须为multipartResolver-->
<bean id="multipartResolver" class="org.springframework.web.multipart.commons.CommonsMultipartResolver">
<!-- 配置文件上传的最大size为10mb -->
<property name="maxUploadSize" value="10485760"/>
</bean>
<!-- 配置spring开启注解mvc的支持 -->
<mvc:annotation-driven/>
</beans>
jsp视图了,如果使用SpringBoot构建项目,那么完全不会使用jsp视图。但即使如此,知道得越多总是越好的,至少在面对一些历史遗留的代码时,不会慌。SpringBoot构建时,会展示如何开启SpringBoot对jsp视图的支持。Spring与MyBatis的整合,及Spring MVC的基础配置后,就可以开始最后的整合工作了。web.xml文件将以上两部分进行整合即可,配置文件如下:
web容器将加载web.xml配置文件,首先读取标签<context-param>和<listener>,此时Spring和MyBatis整合的配置类将被加载进内存,各种Bean会被创建出来并放入Spring的容器ApplicationContext中进行统一管理;web容器紧接着会读取<filter>标签并加载相关配置;web容器最后将读取<servlet>标签,此时会加载Spring MVC的配置文件,其中配置的<bean>也会被加载进内存。<!DOCTYPE web-app PUBLIC
"-//Sun Microsystems, Inc.//DTD Web Application 2.3//EN"
"http://java.sun.com/dtd/web-app_2_3.dtd" >
<web-app>
<display-name>Archetype Created Web Application</display-name>
<!-- 当Spring使用的是配置类时,需要提供一个用于加载配置类的对象AnnotationConfigWebApplicationContext -->
<context-param>
<param-name>contextClass</param-name>
<param-value>org.springframework.web.context.support.AnnotationConfigWebApplicationContext</param-value>
</context-param>
<!-- contextConfigLocation中,即可以配置“classpath*:xxx.xml”文件,也可配置Java配置类 -->
<context-param>
<param-name>contextConfigLocation</param-name>
<param-value>cn.dylanphang.config.SpringConfiguration</param-value>
</context-param>
<!--
配置过滤器,解决中文乱码的问题;
服务器启动的时候就会创建该Filter,将init-param中的参数加载,注入到CharacterEncodingFilter类中,
浏览器每次发送请求都会经过这个过滤器,然后调用doFilterInternal方法
-->
<filter>
<filter-name>characterEncodingFilter</filter-name>
<filter-class>org.springframework.web.filter.CharacterEncodingFilter</filter-class>
<!-- 指定字符集 -->
<init-param>
<param-name>encoding</param-name>
<param-value>UTF-8</param-value>
</init-param>
</filter>
<!-- 指定对哪些资源使用characterEncodingFilter规则 -->
<!-- 配置为"/*"的时候,即对路径型url和后缀型url都会进行拦截 -->
<filter-mapping>
<filter-name>characterEncodingFilter</filter-name>
<url-pattern>/*</url-pattern>
</filter-mapping>
<!-- listener监听器必须配置 -->
<listener>
<listener-class>org.springframework.web.context.ContextLoaderListener</listener-class>
</listener>
<!-- 前端/核心控制器加载Spring MVC -->
<servlet>
<servlet-name>dispatcherServlet</servlet-name>
<servlet-class>org.springframework.web.servlet.DispatcherServlet</servlet-class>
<!-- 配置Servlet的初始化参数,读取springmvc中的配置,并创建spring容器 -->
<init-param>
<param-name>contextConfigLocation</param-name>
<param-value>classpath*:springmvc.xml</param-value>
</init-param>
<!-- 但为正整数的时候,即配置servlet启动时加载该DispatcherServlet对象 -->
<load-on-startup>1</load-on-startup>
</servlet>
<!-- 配置为"/"的时候,即对路径型url进行拦截,但不会拦截后缀型url -->
<servlet-mapping>
<servlet-name>dispatcherServlet</servlet-name>
<url-pattern>/</url-pattern>
</servlet-mapping>
</web-app>
SSM环境已经搭建完毕。SpringBoot项目呢?在此之前,你需要了解一些前置知识。SpringBoot来说,它已经帮我们整合了web容器、Spring MVC及MyBatis了,并且事务管理的对象也提前自动创建了,但这不意味着无事可做,你仍需要稍微进行一些自定义的配置。DataSource的参数配置,你仍然需要告诉SpringBoot你的数据库在哪、用户名密码是什么等;MyBatis中Mapper.xml路径,需要告诉SpringBoot需要在哪个目录中查找你的Mapper.xml文件。SpringBoot的自动配置,SpringBoot默认会使用一些初始参数加载相关的Bean对象,对于用户来说,我们完全可以在application.properties或application.yml中修改创建这些Bean的初始参数。SpringBoot项目,你可以不引入任何的依赖,但如果后续你需要用到相关的支持自动配置的框架,则需要自行寻找并添加到项目的pom.xml文件中,在以下网址中,你可以看到一些SpringBoot支持自动配置的框架:
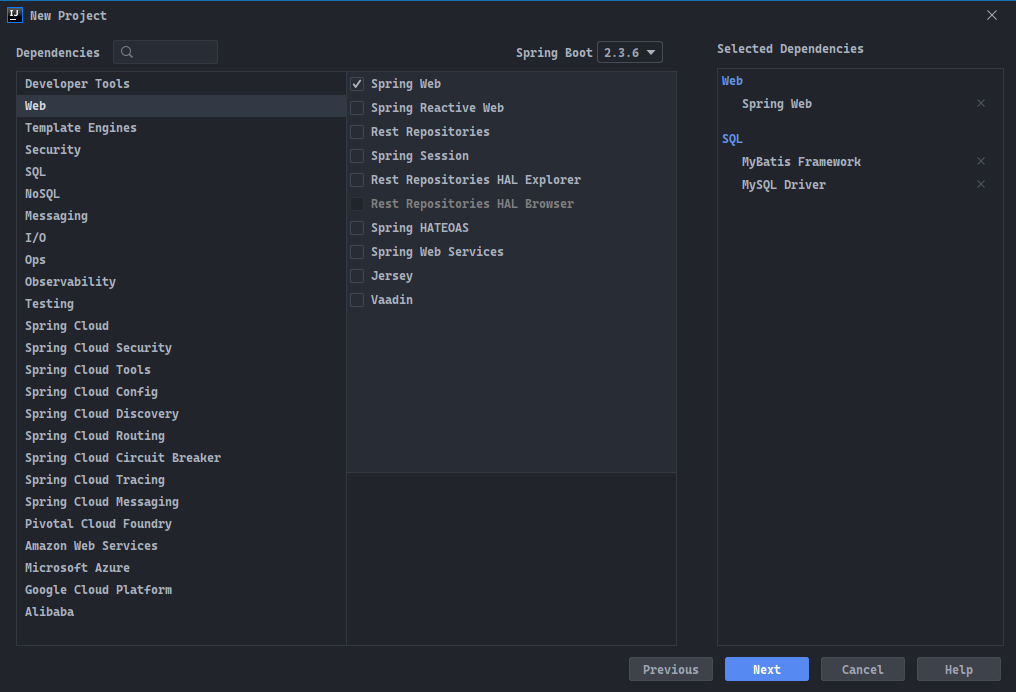
SpringBoot会在项目构建时添加这些框架的自动配置依赖到项目的pom.xml文件中,免去手动查找的繁琐步骤:
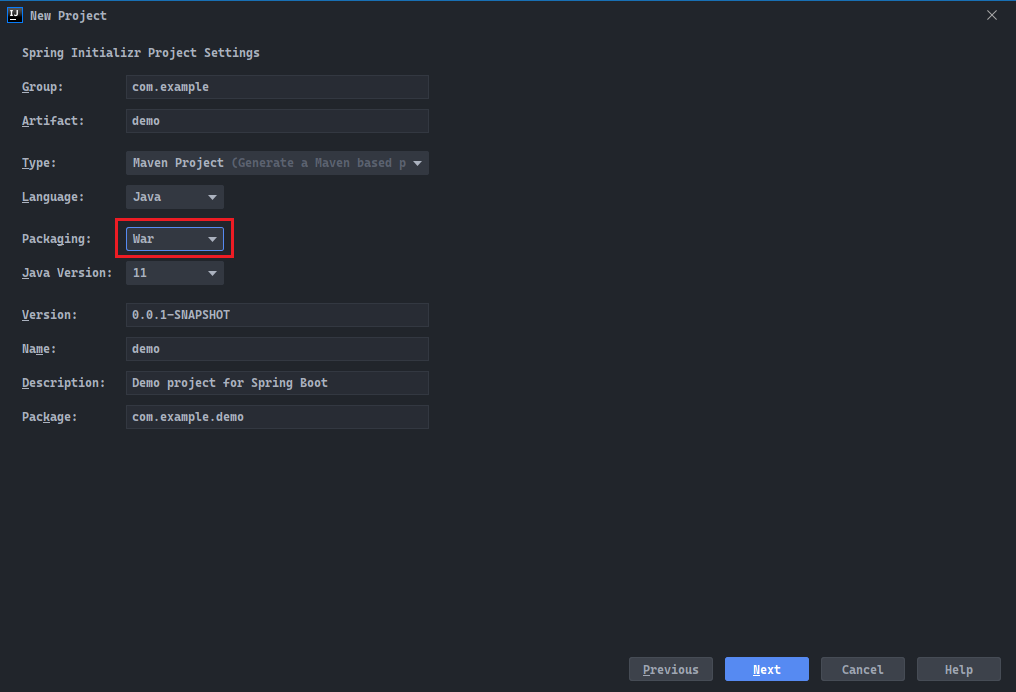
war包的SpringBoot项目来说,项目构建完毕会自动生成一个ServletInitializer类,该类实现了WebApplicationInitializer,可以看做是web.xml的替代,一般情况下用不上;Application类上的注解,也可以转移到ServletInitializer类上,但是没有必要;jar包,将配置注解标注在Application类上。

SpringBoot将在项目的pom.xml中添加以下坐标:<?xml version="1.0" encoding="UTF-8"?>
<project xmlns="http://maven.apache.org/POM/4.0.0" xmlns:xsi="http://www.w3.org/2001/XMLSchema-instance"
xsi:schemaLocation="http://maven.apache.org/POM/4.0.0 https://maven.apache.org/xsd/maven-4.0.0.xsd">
<modelVersion>4.0.0</modelVersion>
<parent>
<groupId>org.springframework.boot</groupId>
<artifactId>spring-boot-starter-parent</artifactId>
<version>2.3.6.RELEASE</version>
<relativePath/> <!-- lookup parent from repository -->
</parent>
<groupId>com.example</groupId>
<artifactId>demo</artifactId>
<version>0.0.1-SNAPSHOT</version>
<packaging>war</packaging>
<name>demo</name>
<description>Demo project for Spring Boot</description>
<properties>
<java.version>11</java.version>
</properties>
<dependencies>
<dependency>
<groupId>org.springframework.boot</groupId>
<artifactId>spring-boot-starter-web</artifactId>
</dependency>
<dependency>
<groupId>org.mybatis.spring.boot</groupId>
<artifactId>mybatis-spring-boot-starter</artifactId>
<version>2.1.3</version>
</dependency>
<dependency>
<groupId>mysql</groupId>
<artifactId>mysql-connector-java</artifactId>
<scope>runtime</scope>
</dependency>
<dependency>
<groupId>org.springframework.boot</groupId>
<artifactId>spring-boot-starter-tomcat</artifactId>
<scope>provided</scope>
</dependency>
<dependency>
<groupId>org.springframework.boot</groupId>
<artifactId>spring-boot-starter-test</artifactId>
<scope>test</scope>
<exclusions>
<exclusion>
<groupId>org.junit.vintage</groupId>
<artifactId>junit-vintage-engine</artifactId>
</exclusion>
</exclusions>
</dependency>
</dependencies>
<build>
<plugins>
<plugin>
<groupId>org.springframework.boot</groupId>
<artifactId>spring-boot-maven-plugin</artifactId>
</plugin>
</plugins>
</build>
</project>
SSM项目中,我们使用了c3p0的数据库连接池(详细请参见JdbcConfig.java源码),由于是项目的迁移实验,因此需要同样的依赖到SpringBoot项目中。DataSource,比如使用druid数据库连接池,在pom.xml中添加以下依赖引入druid坐标:<dependency>
<groupId>com.alibaba</groupId>
<artifactId>druid</artifactId>
<version>1.1.23</version>
</dependency>
SpringBoot连接到MySQL中,还需要提供url、username和password等信息。resources目录下的SpringBoot配置文件application.properties,添加以下配置即可完成对DataSource配置:spring.datasource.type=com.alibaba.druid.pool.DruidDataSource
spring.datasource.url=jdbc:mysql://localhost:3306/upload_download?serverTimezone=GMT%2B8&useAffectedRows=true
spring.datasource.username=root
spring.datasource.password=root
spring.datasource.type即可,不需要配置driver的信息,SpringBoot会自动查找并使用MySQL的驱动,当然你也可以选择手动配置驱动的全限定类名。SpringBoot将自动使用以上的配置信息,去创建一个DruidDataSource。DataSource一样简单,我们只需要在application.properties中添加以下代码:mybatis.mapper-locations=classpath:mapper/*.xml
SpringBoot存放Mapper.xml的路径在resources/mapper/目录下,SpringBoot将自动为相关的Mapper类匹配对应的Mapper.xml,此时仅要求Mapper类与其映射文件Mapper.xml同名。SpringBoot知道Mapper.java所在的包的位置,有两种方法:
Mapper.java中使用@Mapper注解;ServletInitializer或Application类上使用@MapperScan注解。Mapper上添加注解@Mapper,如下:
@Repository,会导致@Autowried注解的字段报错,但不会影响程序正常运行;@Repository注解,可以选择使用@Resource注解替代@Autowried,此时字段不会报错。package cn.dylanphang.uploaddownload2.mapper;
import cn.dylanphang.uploaddownload2.pojo.Student;
import org.apache.ibatis.annotations.Mapper;
import org.springframework.stereotype.Repository;
import java.util.List;
/**
* @author dylan
*/
@Repository
@Mapper
public interface StudentMapper {
/**
* 查询所有信息。
*
* @return List对象
*/
List<Student> findAll();
/**
* 保存所有信息
*
* @param list List对象
*/
void saveAll(List<Student> list);
}
ServletInitializer上使用@MapperScan注解,配置Mapper类的包名:
@MapperScan注解,可以省去Mapper类中的@Repository和@Mapper注解;Mapper的依赖注入,既可以使用@Resource,也可以使用@Autowired。package cn.dylanphang.uploaddownload2;
import org.mybatis.spring.annotation.MapperScan;
import org.springframework.boot.builder.SpringApplicationBuilder;
import org.springframework.boot.web.servlet.support.SpringBootServletInitializer;
/**
* @author dylan
*/
@MapperScan({"cn.dylanphang.uploaddownload2.mapper"})
public class ServletInitializer extends SpringBootServletInitializer {
@Override
protected SpringApplicationBuilder configure(SpringApplicationBuilder application) {
return application.sources(UploadDownload2Application.class);
}
}
SpringBoot中存放静态资源页面的目录一般是resource/templates,通过一些第三方的视图模板库如Thymeleaf,可以在静态页面中使用代码调用Controller中Model存储的数据。SSM大多使用的是.jsp,项目启动后默认的访问资源位于webapp/目录下,你只要将index.jsp或index.html放置于该目录下,页面即可被访问到。而Spring MVC视图解析器的配置,多数指向的是/WEB-INF/**/.jsp页面。SpringBoot默认并不支持.jsp视图,更不用提及根本不存在项目中的webapp目录了。SSM项目转为新的SpringBoot项目中,我们必须要解决这个问题。如何免去重新编写页面逻辑,直接使用原本的jsp视图呢?可以通过自定义Spring MVC视图解析器,以及添加支持.jsp视图的相关依赖解决这个问题。SpringBoot支持部分个性化配置Spring MVC的功能,当然也支持全覆盖地配置,我们需要编写一个Java配置类,并让该配置类去实现WebMvcConfigurer接口:
configureViewResolvers方法,并使用ViewResolverRegistry注册自定义的jsp视图解析器。package cn.dylanphang.uploaddownload2.config;
import org.springframework.context.annotation.Configuration;
import org.springframework.web.servlet.config.annotation.ViewResolverRegistry;
import org.springframework.web.servlet.config.annotation.WebMvcConfigurer;
/**
* 如果你旧项目需要转SpringBoot,需要定义此配置类,覆盖默认的视图解析器。
* 在此类中不添加@EnableWebMvc注解,则会保留SpringBoot原本的Mvc配置;否则,会覆盖所有的SpringBoot对Spring MVC的默认配置。
*
* 在application.properties中配置:spring.mvc.view.prefix/spring.mvc.view.suffix是没有作用的!!!
*
* @author dylan
*/
@Configuration
public class PersonalMvcConfig implements WebMvcConfigurer {
@Override
public void configureViewResolvers(ViewResolverRegistry registry) {
registry.jsp("/WEB-INF/page/", ".jsp");
}
}
jsp视图所指向的资源目录,因此需要在main目录下新建一个webapp目录,并在webapp目录下放置旧的jsp视图资源。webapp创建完毕。SpringBoot至此jsp视图,需要额外添加支持jsp视图的依赖:<!-- 转SpringBoot项目之后,原生不支持JSP,需要添加以下依赖,否则.jsp会跳转下载页面 -->
<dependency>
<groupId>org.apache.tomcat.embed</groupId>
<artifactId>tomcat-embed-jasper</artifactId>
<version>9.0.39</version>
<exclusions>
<exclusion>
<groupId>org.apache.tomcat.embed</groupId>
<artifactId>tomcat-embed-core</artifactId>
</exclusion>
</exclusions>
</dependency>
tomcat-embed-core依赖已经被spring-boot-starter-tomcat关联了,可以使用<exclusion>排除它。SSM项目已经完美转为SpringBoot项目。SpringBoot中总是优先访问Controller,如果你具有首页或登录页面,可以配置一个RouterController,在其中编写方法,当访问指定url的时候,跳转到指定的页面,如首页、登录页面;Controller跳转的页面总是在视图解析器指向的目录下;因此某些页面的url可能需要在转为新项目之后,作相关的调整,同样某些页面的存放路径,也需要进行调整;getRealPath获取到的路径可能不一致,往路径中存放文件时,文件可能出现在意料之外的目录中,此时就需要对相关代码进行调整。SpringBoot创建项目更为推荐使用第三方的视图模板库,Java Servlet Page已经渐渐被淘汰了;JSON数据。标签:赋值 framework 个性 factor 部分 坐标 oca htm parent
原文地址:https://www.cnblogs.com/phax2/p/14208586.html