码迷,mamicode.com
首页 > 数据库 > 详细

Python Web实战:Python+Django+MySQL实现基于Web版的增删改查

时间:2021-02-06 11:49:51      阅读:0      评论:0      收藏:0      [点我收藏+]

标签:lap   roo   get   word   超时   unset   简单   ima   blog   

1、

Python Web实战:Python+Django+MySQL实现基于Web版的增删改查

https://blog.csdn.net/u013737132/article/details/106037696/?utm_medium=distribute.pc_relevant_download.none-task-blog-baidujs-1.nonecase&depth_1-utm_source=distribute.pc_relevant_download.none-task-blog-baidujs-1.nonecase


目录

前言

本篇使用Python Web框架Django连接和操作MySQL数据库学生信息管理系统(SMS),主要包含对学生信息增删改查功能,旨在快速入门Python Web,少走弯路。效果演示在项目实战最后一节,文章结尾有整个项目的源码地址。

开发环境

  • 开发工具:Pycharm 2020.1
  • 开发语言:Python 3.8.0
  • Web框架:Django 3.0.6
  • 数据库:MySQL5.7
  • 操作系统:Windows 10

项目实战

1.创建项目(sms)

File->New Project->Django
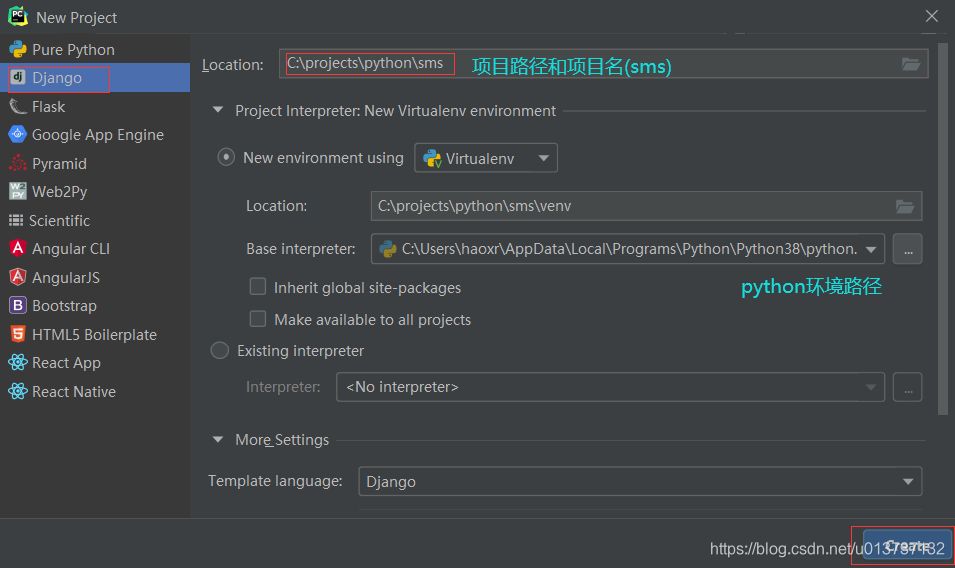
技术图片

稍等片刻,项目的目录结构如下图
技术图片

项目创建后确认是否已安装Django和mysqlclient解释器,如何确认?file->Settings

技术图片

如果没有请在Terminal终端输入以下命令完成安装

pip install django
pip install mysqlclient
  • 1
  • 2

技术图片

如果在执行pip install 报错Read time out请设置延长下超时时间,默认15s,网络不好情况下很易超时

pip --default-timeout=180 install -U django
pip --default-timeout=180 install -U mysqlclient
  • 1
  • 2

参数-U是–upgrade简写,把安装的包升级到最新版本

2.创建应用(sims)

打开Pycharm的Terminal终端,输入以下命令创建sims应用

python manage.py startapp sims
  • 1

应用创建后要在项目的settings.py文件里的INSTALLED_APPS下面添加smis完成应用注册
技术图片

3.Django配置MySQL

在本地MySQL创建sms数据库,修改项目的settings连接信息由默认的sqlite修改为MySQL
技术图片

DATABASES = {
     ‘default‘: {
        ‘ENGINE‘: ‘django.db.backends.mysql‘,
        ‘NAME‘:  ‘sms‘,
        ‘USER‘: ‘root‘,
        ‘PASSWORD‘: ‘123456‘,
        ‘HOST‘: ‘127.0.0.1‘,
        ‘PORT‘: 3306
     }
}
  • 1
  • 2
  • 3
  • 4
  • 5
  • 6
  • 7
  • 8
  • 9
  • 10

测试连接,依次点击Pycharm右上角的Database->±>Data Source->MySQL
技术图片

下载连接驱动和配置数据库连接信息
技术图片
点击Test Connection测试连接,连接通过点击OK出现如下的结构信息表示连接本地MySQL成功
技术图片

4.数据模型创建(M)

在应用sims下models.py添加Student模型

技术图片

class Student(models.Model):
    student_no = models.CharField(max_length=32, unique=True)
    student_name = models.CharField(max_length=32)
  • 1
  • 2
  • 3

5.数据模型迁移

Terminal终端输入以下两条命令,其作用第一条生成文件记录模型的变化;第二条是将模型变化同步至数据库,我们可以在数据库生成对应的表结构。

python manage.py makemigrations sims

python manage.py migrate sims
  • 1
  • 2
  • 3

生成数据表结构如下所示技术图片

6.路由配置

本质可以理解请求路径url和处理方法的映射配置,首先在项目sms的urls.py文件中添加sims的路由配置

from django.contrib import admin
from django.urls import path
from django.conf.urls import url, include

urlpatterns = [
    path(‘admin/‘, admin.site.urls),
    url(r‘^sims/‘, include(‘sims.urls‘))
]
  • 1
  • 2
  • 3
  • 4
  • 5
  • 6
  • 7
  • 8

然后在sims添加一个名为urls.py的文件,添加路由配置如下
技术图片

# coding=utf-8
from django.conf.urls import url
from . import views

urlpatterns = [
    url(r‘^$‘, views.index),
    url(r‘^add/$‘, views.add),
    url(r‘^edit/$‘, views.edit),
    url(r‘^delete/$‘, views.delete)
]
  • 1
  • 2
  • 3
  • 4
  • 5
  • 6
  • 7
  • 8
  • 9
  • 10

7.处理函数(V)

在应用sims的视图层文件views.py添加对应学生信息增删改查的处理函数,这里我使用的原生SQL,便于深入理解其执行过程。后面有时间我会在github上添加Django框架提供的操作数据库方式。

import MySQLdb
from django.shortcuts import render, redirect


# Create your views here.
# 学生信息列表处理函数
def index(request):
    conn = MySQLdb.connect(host="localhost", user="root", passwd="123456", db="sms", charset=‘utf8‘)
    with conn.cursor(cursorclass=MySQLdb.cursors.DictCursor) as cursor:
        cursor.execute("SELECT id,student_no,student_name FROM sims_student")
        students = cursor.fetchall()
    return render(request, ‘student/index.html‘, {‘students‘: students})

# 学生信息新增处理函数
def add(request):
    if request.method == ‘GET‘:
        return render(request, ‘student/add.html‘)
    else:
        student_no = request.POST.get(‘student_no‘, ‘‘)
        student_name = request.POST.get(‘student_name‘, ‘‘)
        conn = MySQLdb.connect(host="localhost", user="root", passwd="123456", db="sms", charset=‘utf8‘)
        with conn.cursor(cursorclass=MySQLdb.cursors.DictCursor) as cursor:
            cursor.execute("INSERT INTO sims_student (student_no,student_name) "
                           "values (%s,%s)", [student_no, student_name])
            conn.commit()
        return redirect(‘../‘)

# 学生信息修改处理函数
def edit(request):
    if request.method == ‘GET‘:
        id = request.GET.get("id")
        conn = MySQLdb.connect(host="localhost", user="root", passwd="123456", db="sms", charset=‘utf8‘)
        with conn.cursor(cursorclass=MySQLdb.cursors.DictCursor) as cursor:
            cursor.execute("SELECT id,student_no,student_name FROM sims_student where id =%s", [id])
            student = cursor.fetchone()
        return render(request, ‘student/edit.html‘, {‘student‘: student})
    else:
        id = request.POST.get("id")
        student_no = request.POST.get(‘student_no‘, ‘‘)
        student_name = request.POST.get(‘student_name‘, ‘‘)
        conn = MySQLdb.connect(host="localhost", user="root", passwd="123456", db="sms", charset=‘utf8‘)
        with conn.cursor(cursorclass=MySQLdb.cursors.DictCursor) as cursor:
            cursor.execute("UPDATE sims_student set student_no=%s,student_name=%s where id =%s",
                           [student_no, student_name, id])
            conn.commit()
        return redirect(‘../‘)

# 学生信息删除处理函数
def delete(request):
    id = request.GET.get("id")
    conn = MySQLdb.connect(host="localhost", user="root", passwd="123456", db="sms", charset=‘utf8‘)
    with conn.cursor(cursorclass=MySQLdb.cursors.DictCursor) as cursor:
        cursor.execute("DELETE FROM sims_student WHERE id =%s", [id])
        conn.commit()
    return  redirect(‘../‘)
  • 1
  • 2
  • 3
  • 4
  • 5
  • 6
  • 7
  • 8
  • 9
  • 10
  • 11
  • 12
  • 13
  • 14
  • 15
  • 16
  • 17
  • 18
  • 19
  • 20
  • 21
  • 22
  • 23
  • 24
  • 25
  • 26
  • 27
  • 28
  • 29
  • 30
  • 31
  • 32
  • 33
  • 34
  • 35
  • 36
  • 37
  • 38
  • 39
  • 40
  • 41
  • 42
  • 43
  • 44
  • 45
  • 46
  • 47
  • 48
  • 49
  • 50
  • 51
  • 52
  • 53
  • 54
  • 55

8.模板页面(T)

技术图片

  • 学生信息列表页
<!DOCTYPE html>
<html lang="en">
<head>
    <meta charset="UTF-8">
    <title>学生列表</title>
</head>
<body>
<table border="1px" width="100%" style="border-collapse: collapse;">
    <a href="../sims/add">添加学生</a>
    <tr>
        <th>编号</th>
        <th>姓名</th>
        <th>学号</th>
        <th>操作</th>
    </tr>
    {% for student in students %}
        <tr>
            <td align="center">{{ forloop.counter }} </td>
            <td align="center">{{ student.student_name }} </td>
            <td align="center">{{ student.student_no }} </td>
            <td align="center">
                <a href="../sims/edit/?id={{ student.id }}">
                    编辑
                </a>
                <a href="../sims/delete/?id={{ student.id }}">
                    删除
                </a>
            </td>
        </tr>
    {% endfor %}
</table>
</body>
</html>
  • 1
  • 2
  • 3
  • 4
  • 5
  • 6
  • 7
  • 8
  • 9
  • 10
  • 11
  • 12
  • 13
  • 14
  • 15
  • 16
  • 17
  • 18
  • 19
  • 20
  • 21
  • 22
  • 23
  • 24
  • 25
  • 26
  • 27
  • 28
  • 29
  • 30
  • 31
  • 32
  • 33
  • 学生信息新增页
<!DOCTYPE html>
<html lang="en">
<head>
    <meta charset="UTF-8">
    <title>学生添加</title>
    <style>
        form {
            margin: 20px auto;
            width: 500px;
            border: 1px solid #ccc;
            padding: 20px
        }
    </style>
</head>
<body>
<form method="post" action="../add/">
    {% csrf_token %}
    <table>
        <tr>
            <th>姓名</th>
            <td><input name="student_name"></td>
        </tr>
        <tr>
            <th>学号</th>
            <td><input name="student_no"/></td>
        </tr>
        <tr>
            <td colspan="2">
                <input type="submit"/>
            </td>
        </tr>
    </table>
</form>
</body>
</html>
  • 1
  • 2
  • 3
  • 4
  • 5
  • 6
  • 7
  • 8
  • 9
  • 10
  • 11
  • 12
  • 13
  • 14
  • 15
  • 16
  • 17
  • 18
  • 19
  • 20
  • 21
  • 22
  • 23
  • 24
  • 25
  • 26
  • 27
  • 28
  • 29
  • 30
  • 31
  • 32
  • 33
  • 34
  • 35
  • 学生信息编辑页
<!DOCTYPE html>
<html lang="en">
<head>
    <meta charset="UTF-8">
    <title>学生编辑</title>
    <style>
        form {
            margin: 20px auto;
            width: 500px;
            border: 1px solid #ccc;
            padding: 20px
        }
    </style>
</head>
<body>
<form method="post" action="../edit/">
    {% csrf_token %}
    <input type="hidden" name="id" value="{{ student.id }}"/>
    <table>
        <tr>
            <th>姓名</th>
            <td><input name="student_name" value="{{ student.student_name }}"></td>
        </tr>
        <tr>
            <th>学号</th>
            <td><input name="student_no" value="{{ student.student_no }}"/></td>
        </tr>
        <tr>
            <td colspan="2">
                <input type="submit"/>
            </td>
        </tr>
    </table>
</form>
</body>
</html>
  • 1
  • 2
  • 3
  • 4
  • 5
  • 6
  • 7
  • 8
  • 9
  • 10
  • 11
  • 12
  • 13
  • 14
  • 15
  • 16
  • 17
  • 18
  • 19
  • 20
  • 21
  • 22
  • 23
  • 24
  • 25
  • 26
  • 27
  • 28
  • 29
  • 30
  • 31
  • 32
  • 33
  • 34
  • 35
  • 36

9.启动web服务测试

Terminal终端输入以下命令启动web服务

python manage.py runserver
  • 1

技术图片

服务启动后,打开浏览器输入http://127.0.0.1:8000/sims/即可进入学生信息管理列表页

10.功能界面演示

最后最重要的事情,看效果。我这里简单演示下,话不多说,看动态图
技术图片

结语

至此,基于Python+Django+MySQL环境搭建一个拥有增删改查功能的Python Web就完成了。希望能够真正帮到大家快速入门Python Web开发。如果在搭建过程中您有遇到什么问题,欢迎在下方留言,看到我会立即回复的!可以的话给个关注哦,谢谢您!

附录

最后附上项目整个源码的github仓库地址 https://github.com/hxrui/python-diango-web.git,欢迎star交流学习。

Python Web实战:Python+Django+MySQL实现基于Web版的增删改查

标签:lap   roo   get   word   超时   unset   简单   ima   blog   

原文地址:https://www.cnblogs.com/yaok430/p/14378040.html

(0)
(0)
   
举报
评论 一句话评论(0
登录后才能评论!
© 2014 mamicode.com 版权所有  联系我们:gaon5@hotmail.com
迷上了代码!