标签:ret stc 调用 mat 表示 host redis。 author 工具类
摘要:首先介绍如何在Windows系统安装Redis环境,然后在Spring Boot 项目中集成 Redis,最后简单地做了一个使用Jedis操作redis连接池的测试用例。
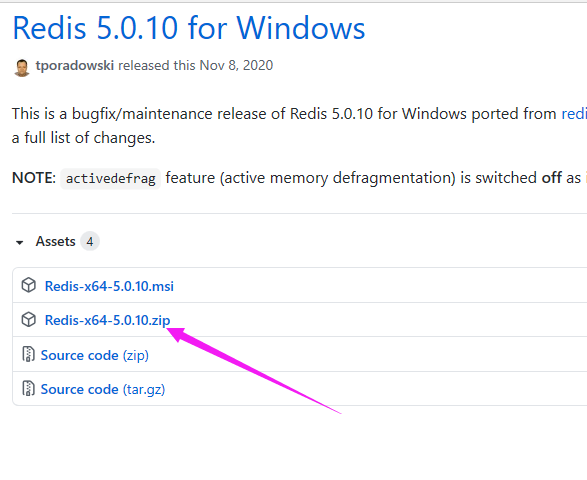
??这里介绍如何在 windows 10 系统安装 Redis 5.0.10,希望对没有接触过Redis或刚接触Redis的小伙伴有些许帮助。如果已经安装Redis,请跳过本节。安装包下载地址: https://github.com/tporadowski/redis/releases。
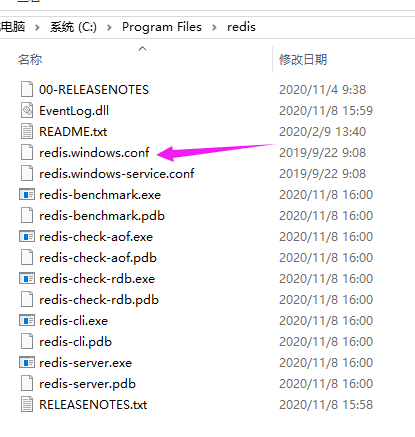
??安装Redis。下载安装包后右键解压到硬盘某个目录下,我安装的是64位Redis,放在了目录C:\Program Files\redis中:
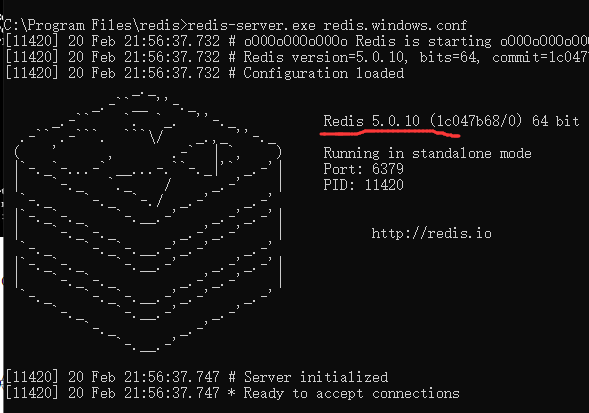
??启动Redis。在命令行窗口进入redis目录后,执行如下命令开启服务:
redis-server.exe redis.windows.conf
??注意加上redis.windows.conf。这个窗口要保持开启,关闭时redis服务会自动关闭。
??另外开启一个命令行窗口,进入redis目录下后执行如下命令:
redis-cli.exe -h 127.0.0.1 -p 6379
??IP地址127.0.0.1为redis服务所部署服务器的IP地址。因为是本机安装,故直接使用127.0.0.1启动。Redis默认端口是6379,可以通过编辑文件 redis.windows.conf 修改里面的端口号。
??如果redis设置了密码,可以添加参数-a指定密码,例如:
redis-cli.exe -h 127.0.0.1 -p 6379 -a yourPassword
??向Redis设置键值对:
set myKey abc
??取出键值对:
get myKey

??至此,安装、启动和测试完毕。主要就是按照参考文献[1]操作一遍,如果需要在Linux环境安装,就去参考文献[1]瞧瞧吧!
??Redis服务器连接密码默认为空,可以通过在控制台执行命令 auth yourPassword设置密码,其中,yourPassword为你自己的密码,自行更改,设置成功时Redis返回字符串 OK。
??所用软件开发环境如下:
??? java version 13.0.1
??? IntelliJ IDEA 2019.3.2 (Ultimate Edition)
??? Spring Boot 2.3.0.RELEASE
???Redis 5.0.10
??添加Redis依赖:
<dependency>
   <groupId>org.springframework.boot</groupId>
   <artifactId>spring-boot-starter-redis</artifactId>
</dependency>
<dependency>
    <groupId>redis.clients</groupId>
    <artifactId>jedis</artifactId>
    <version>3.1.0</version>
</dependency>
??Jedis为我们提供了多种操作Redis的方式:单机单连接方式、单机连接池方式和多机分布式+连接池方式。这里演示使用单个Redis实例的单机连接池方式。在application.properties中新增Jedis的相关配置:
spring.redis.host=127.0.0.1
spring.redis.database=0
spring.redis.port=6379
# 我的redis没有设置密码,故缺省密码
spring.redis.password=
# 连接超时时间 单位 ms(毫秒)
spring.redis.timeout=10
# 连接池中的最大空闲连接,默认值也是8
spring.redis.jedis.pool.max-idle=10
#连接池中的最小空闲连接,默认值也是0
spring.redis.jedis.pool.min-idle=3
# 连接池最大jedis实例个数,如果赋值为-1,则表示不限制;pool如果已经全部分配,则状态变为exhausted(耗尽)。
spring.redis.jedis.pool.max-active=200
# 可用连接的最大等待时间,单位毫秒,默认值为-1,表示永不超时。如果超时,则直接抛出JedisConnectionException
spring.redis.jedis.pool.max-wait=10000
??创建Jedis连接池配置类JedisPoolFactory:
package com.eg.wiener.config;

import org.springframework.beans.factory.annotation.Value;
import org.springframework.context.annotation.Bean;
import org.springframework.context.annotation.Configuration;
import redis.clients.jedis.JedisPool;
import redis.clients.jedis.JedisPoolConfig;

@Configuration
public class JedisPoolFactory {
    @Value("${spring.redis.host}")
    private String host;

    @Value("${spring.redis.port}")
    private int port;

    @Value("${spring.redis.password}")
    private String password;

    @Value("${spring.redis.timeout}")
    private int timeout;

    @Value("${spring.redis.jedis.pool.max-active}")
    private int maxActive;

    @Value("${spring.redis.jedis.pool.max-idle}")
    private int maxIdle;

    @Value("${spring.redis.jedis.pool.min-idle}")
    private int minIdle;

    @Value("${spring.redis.jedis.pool.max-wait}")
    private long maxWaitMillis;

    /**
     * 初始化Redis连接池
     */
    @Bean
    public JedisPool generateJedisPoolFactory() {
        JedisPoolConfig poolConfig = new JedisPoolConfig();
        poolConfig.setMaxTotal(maxActive);
        poolConfig.setMaxIdle(maxIdle);
        poolConfig.setMinIdle(minIdle);
        poolConfig.setMaxWaitMillis(maxWaitMillis);
          // 连接耗尽时是否阻塞, false报异常,true阻塞直到超时, 默认true
        poolConfig.setBlockWhenExhausted(Boolean.TRUE);
        JedisPool jedisPool = new JedisPool(poolConfig, host, port, timeout);
         // 若设置了Redis密码,请调用如下构造函数
//        JedisPool jedisPool = new JedisPool(poolConfig, host, port, timeout, password);
        return jedisPool;
    }
}
??若设置了Redis密码,请调用构造函数 new JedisPool(poolConfig, host, port, timeout, password)。
??创建Redis工具类JedisUtil,由于是测试系统是否成功整合redis,所以在工具类中仅仅添加几个方法:
package com.eg.wiener.utils;

import org.springframework.beans.factory.annotation.Autowired;
import org.springframework.stereotype.Component;
import redis.clients.jedis.Jedis;
import redis.clients.jedis.JedisPool;

@Component
public class JedisUtil {

    @Autowired
    private JedisPool jedisPool;

    /**
     * 存储字符串键值对,永久有效
     * @param key
     * @param value
     * @return
     * @author hw
     * @date 2018年12月14日
     */
    public String set(String key, String value) {
        Jedis jedis = jedisPool.getResource();
        try {
            return jedis.set(key, value);
        } catch (Exception e) {
            return "-1";
        } finally {
            // 业务操作完成,将连接归还连接池
             jedisPool.returnResource(jedis);
        }
    }

    /**
     * 根据传入key获取指定Value
     * @param key
     * @return
     * @author hw
     * @date 2018年12月14日
     */
    public String get(String key) {
        Jedis jedis = jedisPool.getResource();
        try {
            return jedis.get(key);
        } catch (Exception e) {
            return "-1";
        } finally {
            jedis.close();
        }
    }

    /**
     * 删除字符串键值对
     * @param key
     * @return
     * @author hw
     * @date 2018年12月14日
     */
    public Long del(String key) {
        Jedis jedis = jedisPool.getResource();
        try {
            return jedis.del(key);
        } catch (Exception e) {
            return -1L;
        } finally {
            jedis.close();
        }
    }
    /**
     * 校验Key值是否存在
     */
    public Boolean exists(String key) {
        Jedis jedis = null;
        try {
            jedis = jedisPool.getResource();
            return jedis.exists(key);
        } catch (Exception e) {
            return false;
        } finally {
             // 归还连接
            jedis.close();
        }
    }
}
??这里通过连接池来获取Jedis实例。由于连接池资源有限,所以,业务操作结束后要及时把Jedis实例还给连接池。在UserController类中创建测试用例,一个负责向redis写数据,一个负责读,代码如下:
/**
 * @author Wiener
 */
@RestController
@RequestMapping("/user")
public class UserController {
    private static Logger logger = LoggerFactory.getLogger(UserController.class);

    @Autowired
    private JedisUtil jedisUtil;

    // http://localhost:8087/wiener/user/testRedisSave?id=1090330
    @RequestMapping("/testRedisSave")
    public Object testRedisSave(Long id) {
        jedisUtil.del("userId:"+id);
        jedisUtil.set("userId:"+id, "测试地址是 " + UUID.randomUUID().toString());
        return null;
    }
    // http://localhost:8087/wiener/user/testRedisGet?id=1090330
    @RequestMapping("/testRedisGet")
    public String testRedisGet(Long id) {
        String myStr= jedisUtil.get("userId:"+ id);
        if(!StringUtils.isEmpty(myStr)) {
            return myStr;
        }
        return null;
    }
}
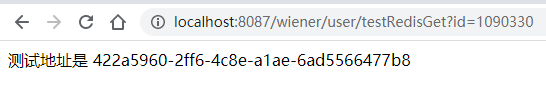
??在浏览器请求写入数据的API后,调用读取testRedisGet函数,执行结果如下图所示,说明配置JedisPool成功:
??关于Spring Boot项目集成Jedis操作Redis连接池就先介绍到这里,如果您觉得本文对您有帮助,请点一下“推荐”按钮,您的【推荐】将是我最大的写作动力!欢迎各位转载,但是未经作者本人同意,转载文章之后必须在文章页面明显位置给出作者和原文连接,否则保留追究法律责任的权利。
Spring Boot 整合Jedis连接Redis和简单使用
标签:ret stc 调用 mat 表示 host redis。 author 工具类
原文地址:https://www.cnblogs.com/east7/p/14454061.html