标签:java routing 组件 weixin 声明 生产 lan ati save
前面一篇博客中提到了使用原生java代码进行测试RabbitMQ实现多种交换机类型的队列场景。但是在项目中我们一般使用SpringBoot项目,而且RabbitMQ天生对于Spring的支持是非常良好的,所以这里基于SpringBoot我搭建了一个模拟购买商品订单下单并发送消息使用RabbitMQ消息队列的场景来分析实现不同模式下的场景。
也是对于SpringBoot整合RabbitMQ的一种总结。
使用到的模型如下图所示,在下订单处理的同时,采用消息队列生产者向MQ消息中间件中生产消息发送给对应的队列,创建消费者来消费队列中的消息调用服务。
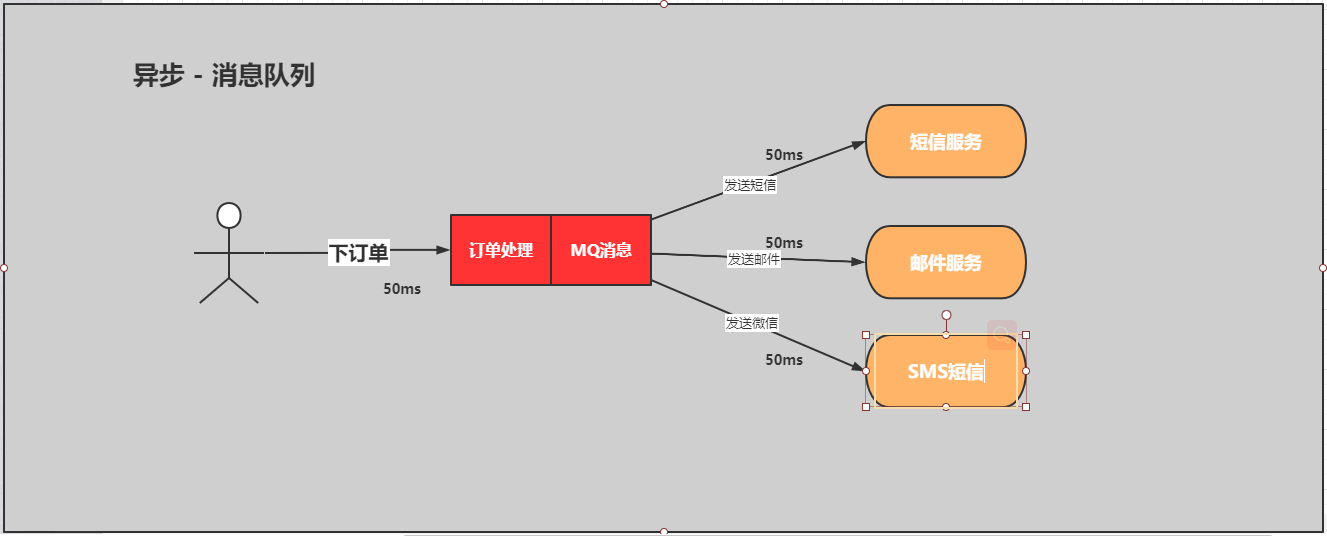
项目构建我采用的是IDEA中Spring Initializr构建器创建的SpringBoot Maven项目,这部分主要是使用到了Spring RabbitMQ与SpringBoot Web的依赖组件。
由于原生支持,在IDEA中勾选对应的选项即可,非常简单,无需考虑多余的Maven Repository引入。
创建SpringBoot项目主要有springboot-order-rabbitmq-consumer与springboot-order-rabbitmq-producer两个Module。

这里还是简单说明一下pom.xml与application.yml配置:
pom.xml

 <dependencies>
        <!--rabbitmq starter依赖-->
        <dependency>
            <groupId>org.springframework.boot</groupId>
            <artifactId>spring-boot-starter-amqp</artifactId>
        </dependency>
        <dependency>
            <groupId>org.springframework.boot</groupId>
            <artifactId>spring-boot-starter-web</artifactId>
        </dependency>

        <dependency>
            <groupId>org.springframework.boot</groupId>
            <artifactId>spring-boot-starter-test</artifactId>
            <scope>test</scope>
        </dependency>
        <dependency>
            <groupId>org.springframework.amqp</groupId>
            <artifactId>spring-rabbit-test</artifactId>
            <scope>test</scope>
        </dependency>
        <dependency>
            <groupId>junit</groupId>
            <artifactId>junit</artifactId>
            <scope>test</scope>
        </dependency>
    </dependencies>
application.yml

# 服务端口
server:
  port: 8080
# 配置rabbitmq服务
spring:
  rabbitmq:
    username: admin
    password: admin
    virtual-host: /
    host: 127.0.0.1  #基于本地windows RabbitMQ测试,云服务填写对应地址即可
    port: 5672
RabbitMQ中消息队列模式主要常用的模式就是:fanout、direct、topic模式,这里我主要讲解fanout与direct进行配置类构建生产者消费者。
整合生成消息队列(交换机、Queues及绑定关系、Routing key)可以从生产者端也可从消费者端进行。
主要构建方式有两种:
①配置类生成交换机与队列
②注解形式绑定交换机队列关系(topic使用注解方式构建)
这里先说第一种配置类方式:
使用配置类生成消息生产者队列主要配置类说明:
主要配置类XxxTypeRabbitConfig

//注意:XxxType表示是交换机类型:可以是Fanout/Direct/Topic/Headers
@Configuration
public class XxxTypeRabbitConfig {
    //使用注入方式声明对应的Queue
    @Bean
    public Queue emailQueue() {
        // durable:是否持久化,默认是false,持久化队列:会被存储在磁盘上,当消息代理重启时仍然存在,暂存队列:当前连接有效
        // exclusive:默认也是false,只能被当前创建的连接使用,而且当连接关闭后队列即被删除。此参考优先级高于durable
        // autoDelete:是否自动删除,当没有生产者或者消费者使用此队列,该队列会自动删除。
        //一般设置一下队列的持久化就好,其余两个就是默认false
        return new Queue("email.xxxType.queue", true);
    }
    @Bean
    public Queue smsQueue() {
        return new Queue("sms.xxxType.queue", true);
    }
    @Bean
    public Queue weixinQueue() {
        return new Queue("weixin.xxxType.queue", true);
    }

    //声明交换机,不同的交换机类型不同:DirectExchange/FanoutExchange/TopicExchange/HeadersExchange
    @Bean
    public XxxTypeExchange xxxTypeOrderExchange() {
        return new XxxTypeExchange("xxxType_order_exchange", true, false);
    }

    //绑定关系:将队列和交换机绑定, 并设置用于匹配键:routingKey
    @Bean
    public Binding bindingXxxType1() {
        return BindingBuilder
                .bind(weixinQueue())  //绑定哪个Queue
                .to(fanoutOrderExchange());  //是哪个交换机
    }
    @Bean
    public Binding bindingXxxType2() {
        return BindingBuilder.bind(smsQueue()).to(xxxTypeOrderExchange());
    }

    @Bean
    public Binding bindingXxxType3() {
        return BindingBuilder.bind(emailQueue()).to(xxxTypeOrderExchange());
    }
}
消息发送类,主要给创建的队列填充消息,这里主要用到RabbitTemplate类调用convertAndSend方法进行对应交换机消息队列的发送:

@Service
public class OrderService {
    @Autowired
    private RabbitTemplate rabbitTemplate;
    // 1: 定义交换机
    private String exchangeName = "";
    // 2: 路由key
    private String routeKey = "";

    //XxxType类型交换机
    public void makeOrderXxxType(Long userId, Long productId, int num) {
        exchangeName = "xxxType_order_exchange";
        routeKey = "";
        // 1: 模拟用户下单
        String orderNumer = UUID.randomUUID().toString();
        // 2: 根据商品id productId 去查询商品的库存
        // int numstore = productSerivce.getProductNum(productId);
        // 3:判断库存是否充足
        // if(num >  numstore ){ return  "商品库存不足..."; }
        // 4: 下单逻辑
        // orderService.saveOrder(order);
        // 5: 下单成功要扣减库存
        // 6: 下单完成以后
        System.out.println("用户 " + userId + ",订单编号是:" + orderNumer);
        // 发送订单信息给RabbitMQ xxxType
        rabbitTemplate.convertAndSend(exchangeName, routeKey, orderNumer);
    }

}
①创建交换机与队列生成配置类,注意fanout这里绑定Queues的时候不要设置routing key,是采用广播订阅发送的方式:
/**
 * @Description:  fanout交换机类型就是对应的消息采用广播订阅模式,订阅绑定交换机的队列都应该收到消息
 * @Author: fengye
 * @Date: 2021/4/16 14:29
 */
@Configuration
public class FanoutRabbitConfig {
    //使用注入方式声明对应的Queue
    @Bean
    public Queue emailQueue() {
        // durable:是否持久化,默认是false,持久化队列:会被存储在磁盘上,当消息代理重启时仍然存在,暂存队列:当前连接有效
        // exclusive:默认也是false,只能被当前创建的连接使用,而且当连接关闭后队列即被删除。此参考优先级高于durable
        // autoDelete:是否自动删除,当没有生产者或者消费者使用此队列,该队列会自动删除。
        //一般设置一下队列的持久化就好,其余两个就是默认false
        return new Queue("email.fanout.queue", true);
    }
    @Bean
    public Queue smsQueue() {
        return new Queue("sms.fanout.queue", true);
    }
    @Bean
    public Queue weixinQueue() {
        return new Queue("weixin.fanout.queue", true);
    }

    //声明交换机,不同的交换机类型不同:DirectExchange/FanoutExchange/TopicExchange/HeadersExchange
    @Bean
    public FanoutExchange fanoutOrderExchange() {
        return new FanoutExchange("fanout_order_exchange", true, false);
    }

    //绑定关系:将队列和交换机绑定, 并设置用于匹配键:routingKey
    @Bean
    public Binding bindingFanout1() {
        return BindingBuilder
                .bind(weixinQueue())  //绑定哪个Queue
                .to(fanoutOrderExchange());  //是哪个交换机
    }
    @Bean
    public Binding bindingFanout2() {
        return BindingBuilder.bind(smsQueue()).to(fanoutOrderExchange());
    }

    @Bean
    public Binding bindingFanout3() {
        return BindingBuilder.bind(emailQueue()).to(fanoutOrderExchange());
    }
}
②消息队列发送到Queue,使用OrderService进行发送,主要用到了RabbitTemplate:
@Service
public class OrderService {
    @Autowired
    private RabbitTemplate rabbitTemplate;
    // 1: 定义交换机
    private String exchangeName = "";
    // 2: 路由key
    private String routeKey = "";

    //Fanout类型交换机
    public void makeOrderFanout(Long userId, Long productId, int num) {
        exchangeName = "fanout_order_exchange";
        routeKey = "";
        // 1: 模拟用户下单
        String orderNumer = UUID.randomUUID().toString();
        // 2: 根据商品id productId 去查询商品的库存
        // int numstore = productSerivce.getProductNum(productId);
        // 3:判断库存是否充足
        // if(num >  numstore ){ return  "商品库存不足..."; }
        // 4: 下单逻辑
        // orderService.saveOrder(order);
        // 5: 下单成功要扣减库存
        // 6: 下单完成以后
        System.out.println("用户 " + userId + ",订单编号是:" + orderNumer);
        // 发送订单信息给RabbitMQ fanout
        rabbitTemplate.convertAndSend(exchangeName, routeKey, orderNumer);
    }
}
③生产者方启动测试类向fanout_order_exchange交换机队列发送消息,存储到消息队列中:
@SpringBootTest
class RabbitmqApplicationTests {

    @Autowired
    private OrderService orderService;

    @Test
    void fanoutTest() throws InterruptedException {
        for (int i = 0; i < 10; i++) {
            Thread.sleep(1000);
            Long userId = 100L + i;
            Long productId = 10001L + i;
            int num = 10;
            orderService.makeOrderFanout(userId, productId, num);
        }
    }
}
运行结果:
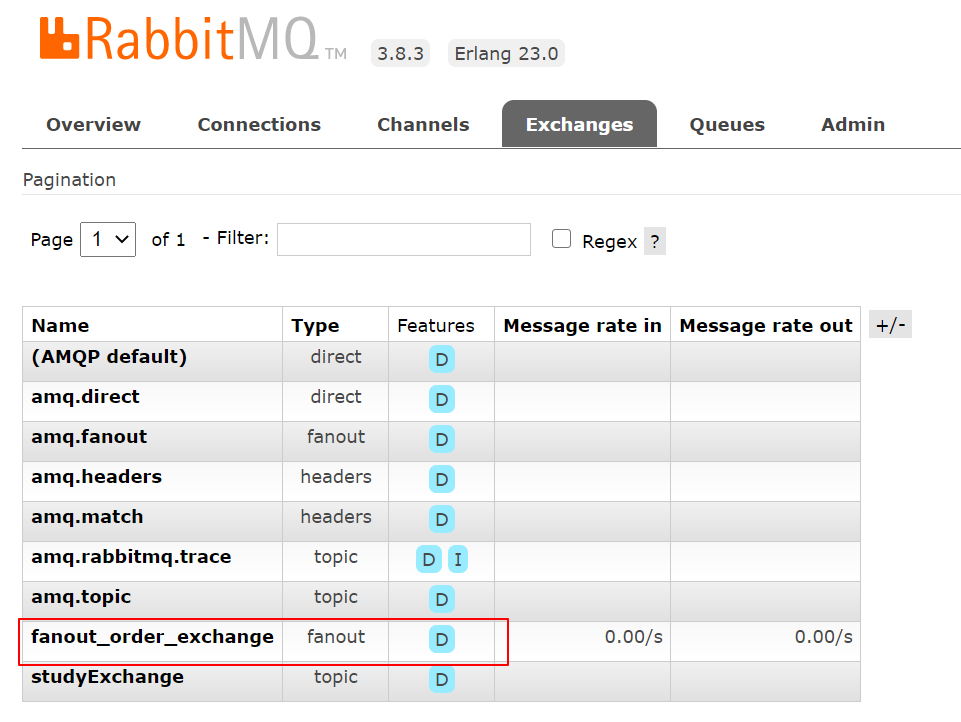
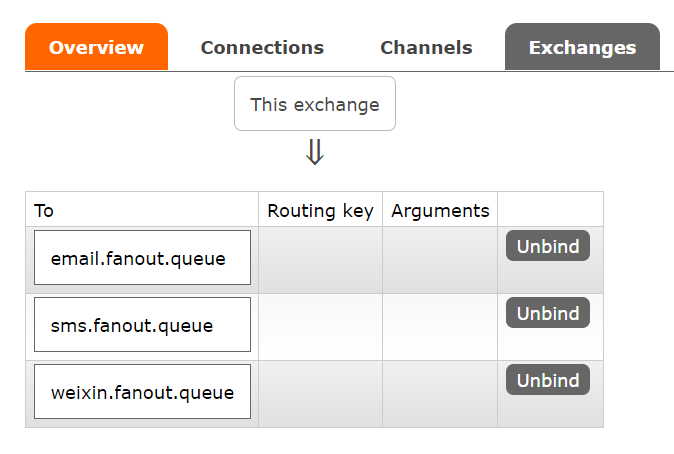
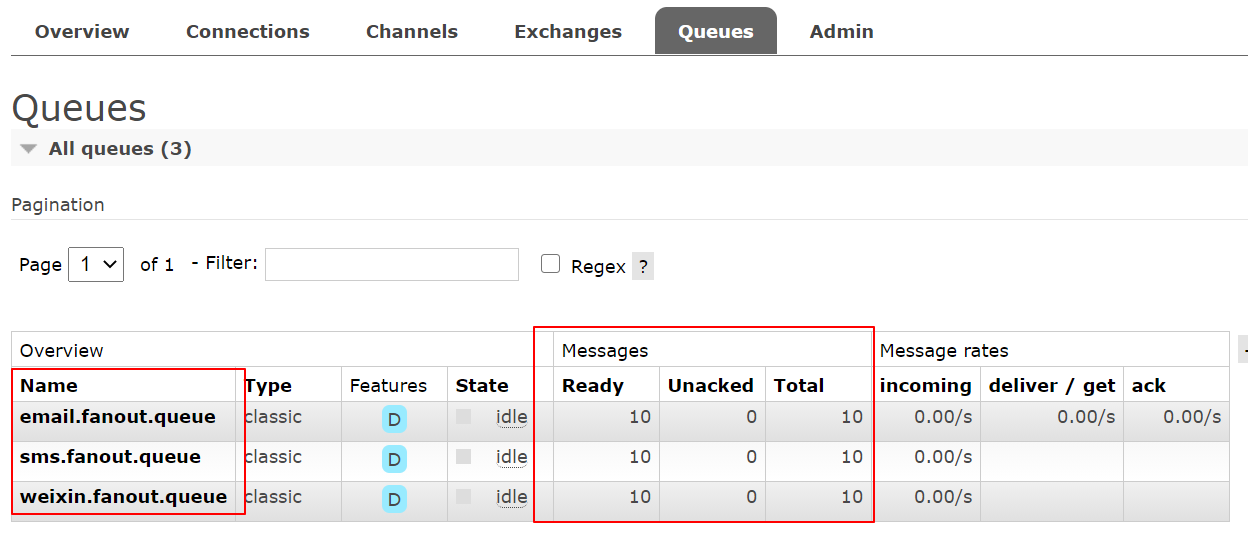
生成队列并存储10条消息。
①配置类实现消息消费者队列比较简单,主要就是使用@RabbitListener绑定对应的队列,并使用@RabbitHandler接收消息对应中的参数信息即可,注意选择合适的数据类型接收:
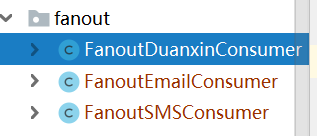
对应消息队列类配置:
//通过@RabbitListener绑定队列接收消息
@RabbitListener(queues = {"weixin.fanout.queue"})
@Component
public class FanoutDuanxinConsumer {
    //队列中的消息会通过@RabbitHandler注解注入到方法参数中,就可以获取到队列中的消息
    @RabbitHandler
    public void reviceMessage(String message){
        System.out.println("weixin fanout----接收到了订单信息是:->" + message);
    }
}


@RabbitListener(queues = {"email.fanout.queue"})
@Component
public class FanoutEmailConsumer {
    @RabbitHandler
    public void reviceMessage(String message){
        System.out.println("email fanout----接收到了订单信息是:->" + message);
    }
}


@RabbitListener(queues = {"sms.fanout.queue"})
@Component
public class FanoutSMSConsumer {
    @RabbitHandler
    public void reviceMessage(String message){
        System.out.println("sms fanout----接收到了订单信息是:->" + message);
    }
}
启动消息接收者consumer SpringBoot项目:
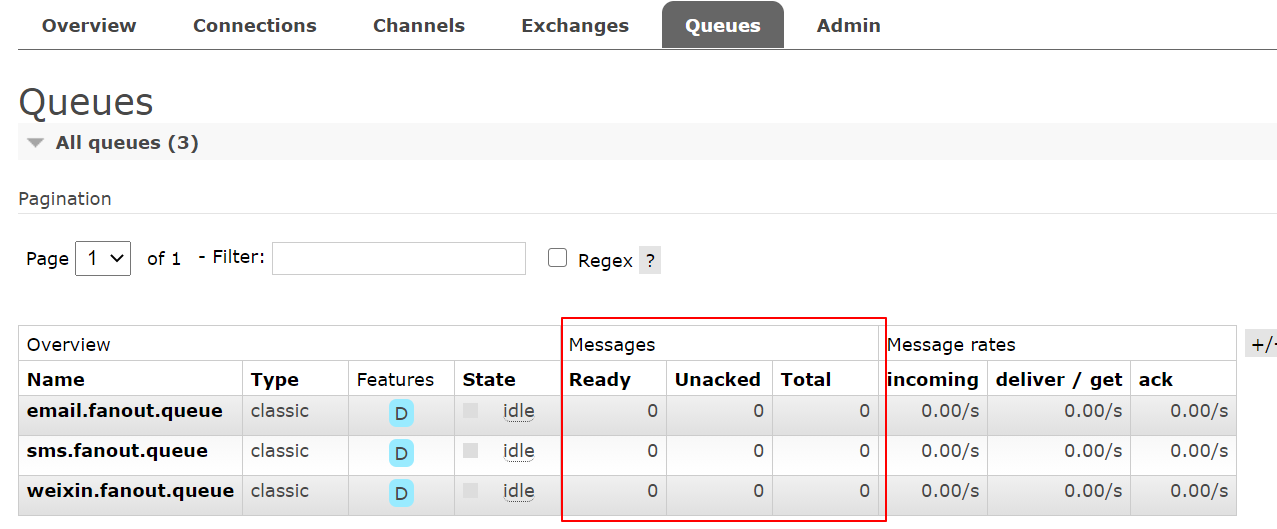
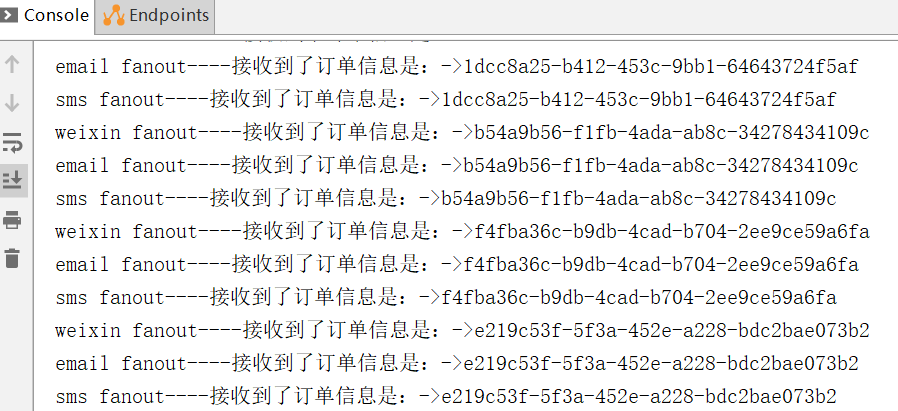
可以看到消息队列存储消息已被消费,控制台打印出了对应的消息信息。
Direct模式消息生产者基于配置类构建与Fanout一样,这里简单说明一下配置类的增加的代码就行:
修改XxxTypeConfig基类为DirectExchange:
/**
 * @Description:  direct交换机类型采用routing key与Queue进行绑定,通过key不同一对一进行消息传递
 * @Author: fengye
 * @Date: 2021/4/16 14:29
 */
@Configuration
public class DirectRabbitConfig {
    //使用注入方式声明对应的Queue
    @Bean
    public Queue emailQueue() {
        // durable:是否持久化,默认是false,持久化队列:会被存储在磁盘上,当消息代理重启时仍然存在,暂存队列:当前连接有效
        // exclusive:默认也是false,只能被当前创建的连接使用,而且当连接关闭后队列即被删除。此参考优先级高于durable
        // autoDelete:是否自动删除,当没有生产者或者消费者使用此队列,该队列会自动删除。
        //一般设置一下队列的持久化就好,其余两个就是默认false
        return new Queue("email.direct.queue", true);
    }
    @Bean
    public Queue smsQueue() {
        return new Queue("sms.direct.queue", true);
    }
    @Bean
    public Queue weixinQueue() {
        return new Queue("weixin.direct.queue", true);
    }

    //声明交换机,不同的交换机类型不同:DirectExchange/FanoutExchange/TopicExchange/HeadersExchange
    @Bean
    public DirectExchange directOrderExchange() {
        return new DirectExchange("direct_order_exchange", true, false);
    }

    //绑定关系:将队列和交换机绑定, 并设置用于匹配键:routingKey
    @Bean
    public Binding bindingFanout1() {
        return BindingBuilder
                .bind(weixinQueue())  //绑定哪个Queue
                .to(directOrderExchange())  //是哪个交换机
                .with("weixin");   //对应什么key
    }
    @Bean
    public Binding bindingFanout2() {
        return BindingBuilder.bind(smsQueue()).to(directOrderExchange()).with("sms");
    }

    @Bean
    public Binding bindingFanout3() {
        return BindingBuilder.bind(emailQueue()).to(directOrderExchange()).with("email");
    }
}
对应消息发送Service类:
@Service
public class OrderService {
    @Autowired
    private RabbitTemplate rabbitTemplate;
    // 1: 定义交换机
    private String exchangeName = "";
    // 2: 路由key
    private String routeKey = "";

    //Direct类型交换机
    public void makeOrderDirect(Long userId, Long productId, int num) {
        exchangeName = "direct_order_exchange";
        routeKey = "weixin";
        // 1: 模拟用户下单
        String orderNumer = UUID.randomUUID().toString();
        // 2: 根据商品id productId 去查询商品的库存
        // int numstore = productSerivce.getProductNum(productId);
        // 3:判断库存是否充足
        // if(num >  numstore ){ return  "商品库存不足..."; }
        // 4: 下单逻辑
        // orderService.saveOrder(order);
        // 5: 下单成功要扣减库存
        // 6: 下单完成以后
        System.out.println("用户 " + userId + ",订单编号是:" + orderNumer);
        // 发送订单信息给RabbitMQ fanout
        rabbitTemplate.convertAndSend(exchangeName, routeKey, orderNumer);
    }
}
执行测试类进行测试:
@SpringBootTest
class RabbitmqApplicationTests {

    @Autowired
    private OrderService orderService;

    @Test
    void directTest() throws InterruptedException {
        for (int i = 0; i < 10; i++) {
            Thread.sleep(1000);
            Long userId = 100L + i;
            Long productId = 10001L + i;
            int num = 10;
            orderService.makeOrderDirect(userId, productId, num);
        }
    }
}
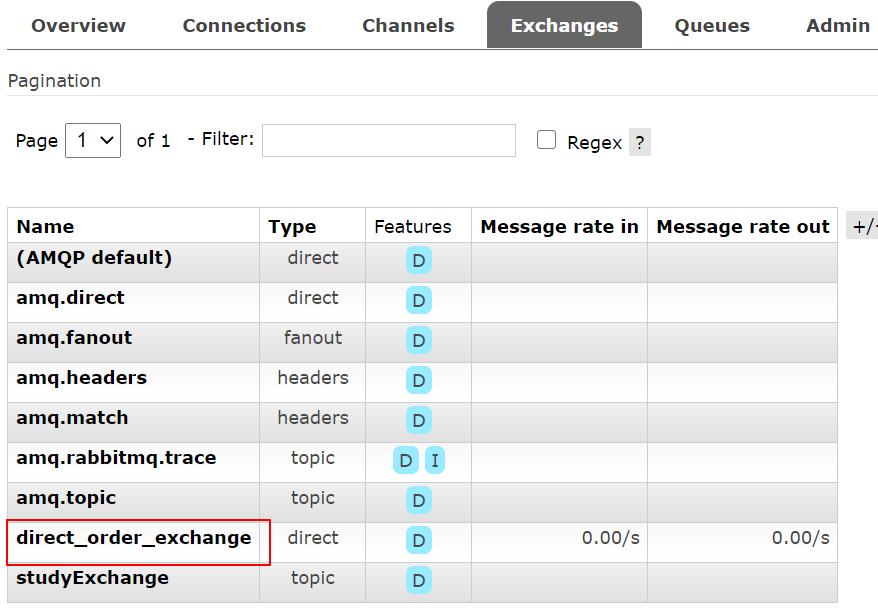
运行结果:
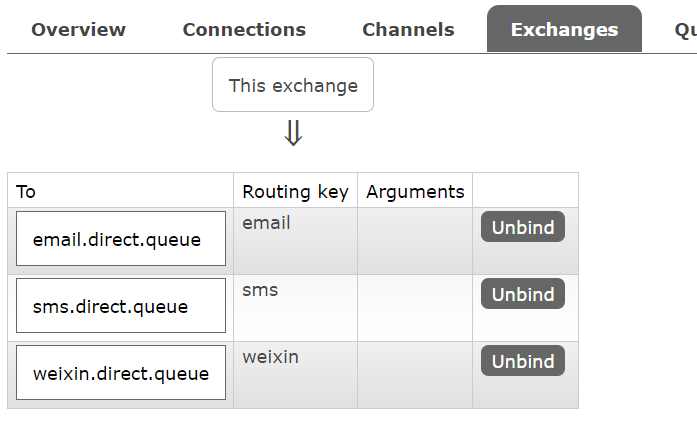
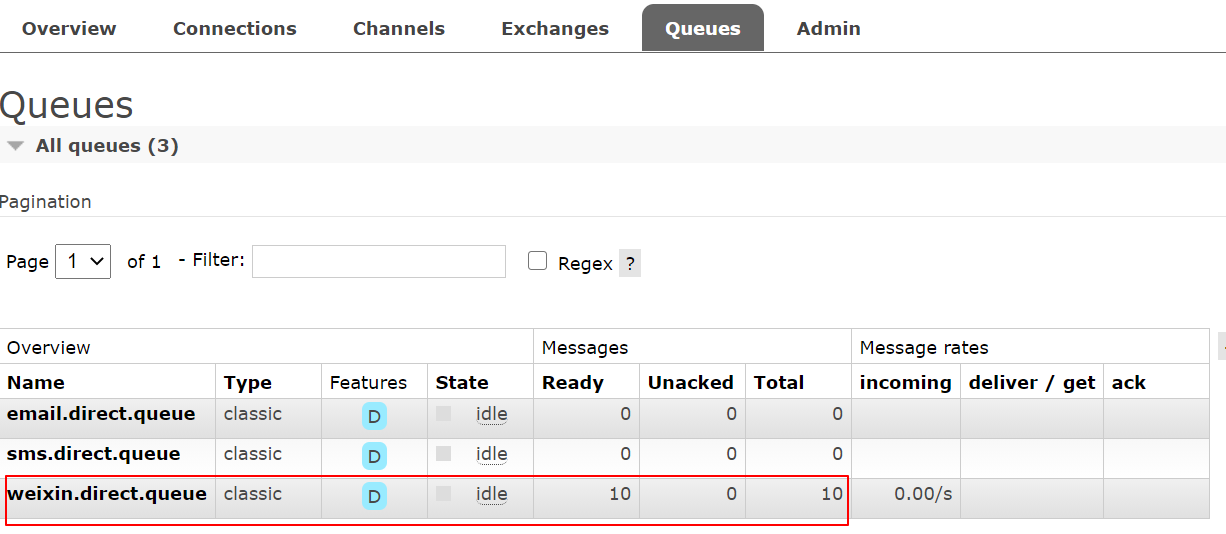
可以看到DirectQueue消息队列已经生成并存储到对应的weixin路由Key的队列中:
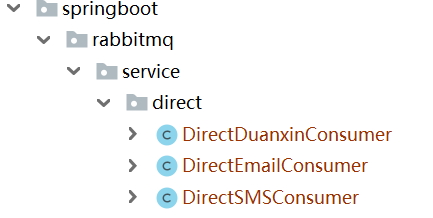
①创建对应的消息队列消费者类,使用@RabbitListener、@RabbitHandler进行监听并绑定消息获取结果,这部分与上面的Fanout模式消费者是一样的:
//通过@RabbitListener绑定队列接收消息
@RabbitListener(queues = {"weixin.direct.queue"})
@Component
public class DirectDuanxinConsumer {
    //队列中的消息会通过@RabbitHandler注解注入到方法参数中,就可以获取到队列中的消息
    @RabbitHandler
    public void reviceMessage(String message){
        System.out.println("duanxin direct queue----接收到了订单信息是:->" + message);
    }
}

@RabbitListener(queues = {"email.direct.queue"})
@Component
public class DirectEmailConsumer {
    @RabbitHandler
    public void reviceMessage(String message){
        System.out.println("email direct----接收到了订单信息是:->" + message);
    }
}

@RabbitListener(queues = {"sms.direct.queue"})
@Component
public class DirectSMSConsumer {
    @RabbitHandler
    public void reviceMessage(String message){
        System.out.println("sms direct----接收到了订单信息是:->" + message);
    }
}
②启动SpringBoot项目进行消费测试:
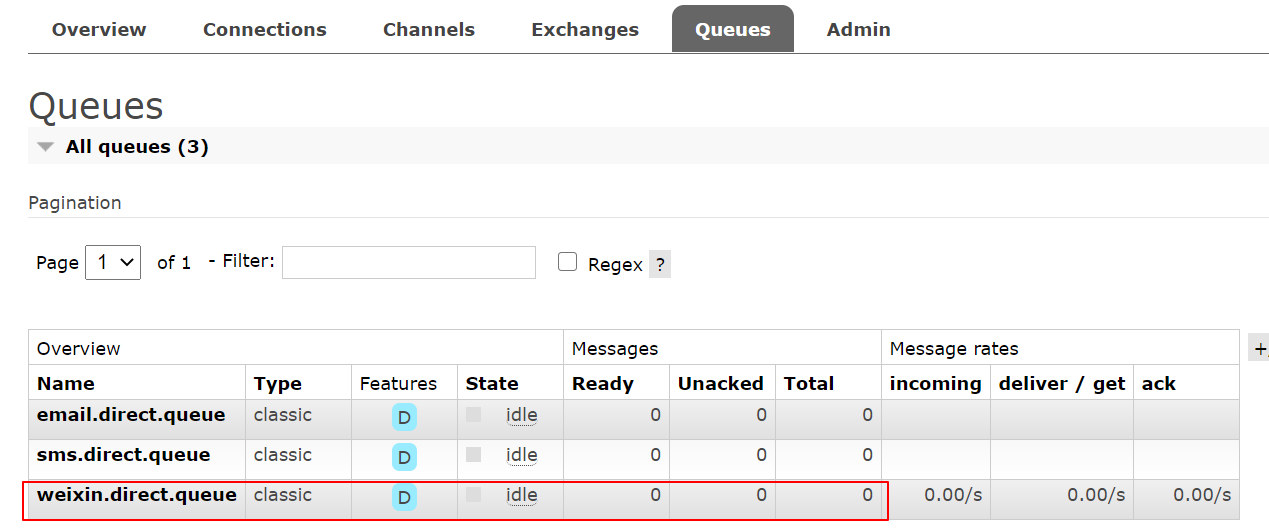
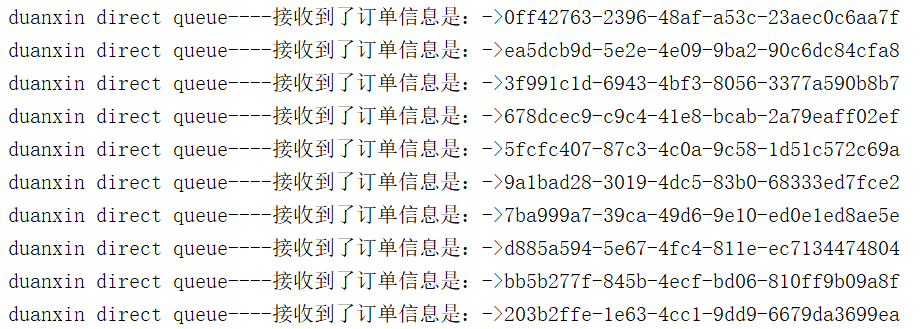
可以看到消息队列中绑定weixin端队列收到了10条消息。
使用注解方式实现消息队列主要是从消费者进行交换机与Queues队列的绑定关系建立,并使用@Component进行注入,可以比较简单地处理交换机与队列之间的绑定关系,随SpringBoot项目一启动就同时创建Exchange与Queues队列的关系。
下面总的说一下主要的注解:
//通过@RabbitListener绑定队列接收消息
// bindings其实就是用来确定队列和交换机绑定关系
@RabbitListener(bindings = @QueueBinding(
    //队列名字,绑定对应的队列接收消息
    value = @Queue(value = "weixin.xxxType.queue", autoDelete = "false"),
    //交换机名字,必须和生产者中交换机名相同;指定绑定的交换机类型
    exchange = @Exchange(value = "xxxType_order_exchange", type = ExchangeTypes.XXXType),
    key = "com.#"
))
//队列中的消息会通过@RabbitHandler注解注入到方法参数中,就可以获取到队列中的消息
@RabbitHandler
topic模式这里从消息消费者Springboot项目入手,优先创建出RabbitMQ上的消息队列与交换机进行绑定,基于@RabbitListener与@QueueBinding会随项目启动自动创建消息队列:
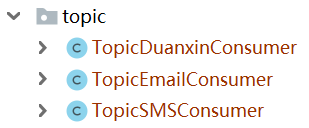
//通过@RabbitListener绑定队列接收消息
// bindings其实就是用来确定队列和交换机绑定关系
@RabbitListener(bindings = @QueueBinding(
    //队列名字,绑定对应的队列接收消息
    value = @Queue(value = "weixin.topic.queue", autoDelete = "false"),
    //交换机名字,必须和生产者中交换机名相同;指定绑定的交换机类型
    exchange = @Exchange(value = "topic_order_exchange", type = ExchangeTypes.TOPIC),
    key = "com.#"
))
@Component
public class TopicDuanxinConsumer {
    //队列中的消息会通过@RabbitHandler注解注入到方法参数中,就可以获取到队列中的消息
    @RabbitHandler
    public void reviceMessage(String message){
        System.out.println("duanxin topic----接收到了订单信息是:->" + message);
    }
}


@RabbitListener(bindings = @QueueBinding(
        //队列名字,绑定对应的队列接收消息
        value = @Queue(value = "email.topic.queue", autoDelete = "false"),
        //交换机名字,必须和生产者中交换机名相同;指定绑定的交换机类型
        exchange = @Exchange(value = "topic_order_exchange", type = ExchangeTypes.TOPIC),
        key = "#.order.#"
))
@Component
public class TopicEmailConsumer {
    //队列中的消息会通过@RabbitHandler注解注入到方法参数中,就可以获取到队列中的消息
    @RabbitHandler
    public void reviceMessage(String message){
        System.out.println("email topic----接收到了订单信息是:->" + message);
    }

}


@RabbitListener(bindings = @QueueBinding(
        //队列名字,绑定对应的队列接收消息
        value = @Queue(value = "sms.topic.queue", autoDelete = "false"),
        //交换机名字,必须和生产者中交换机名相同;指定绑定的交换机类型
        exchange = @Exchange(value = "topic_order_exchange", type = ExchangeTypes.TOPIC),
        key = "*.course.*"
))
@Component
public class TopicSMSConsumer {
    //队列中的消息会通过@RabbitHandler注解注入到方法参数中,就可以获取到队列中的消息
    @RabbitHandler
    public void reviceMessage(String message){
        System.out.println("sms topic----接收到了订单信息是:->" + message);
    }
}
启动SpringBoot消费者项目,进行验证:
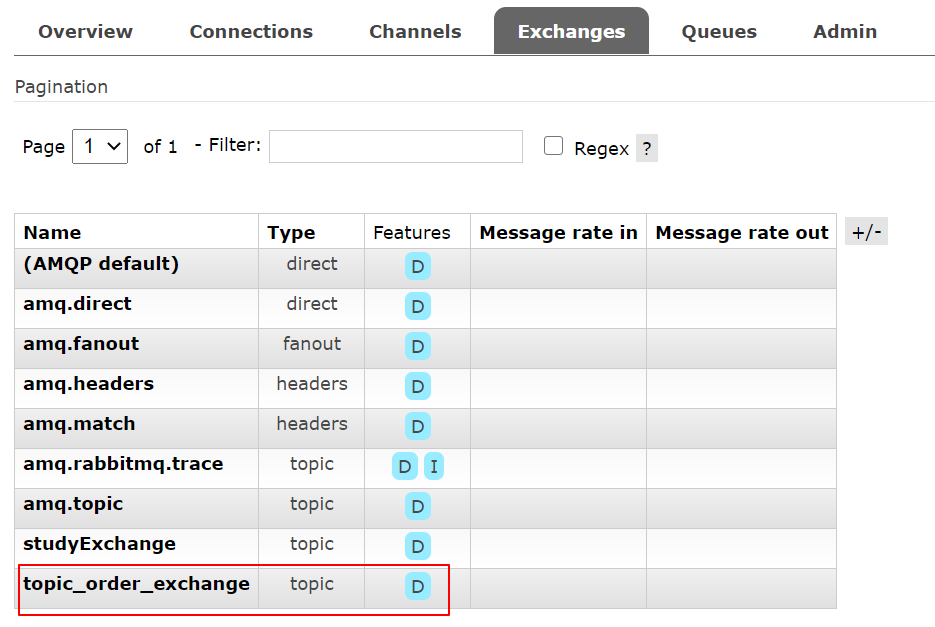
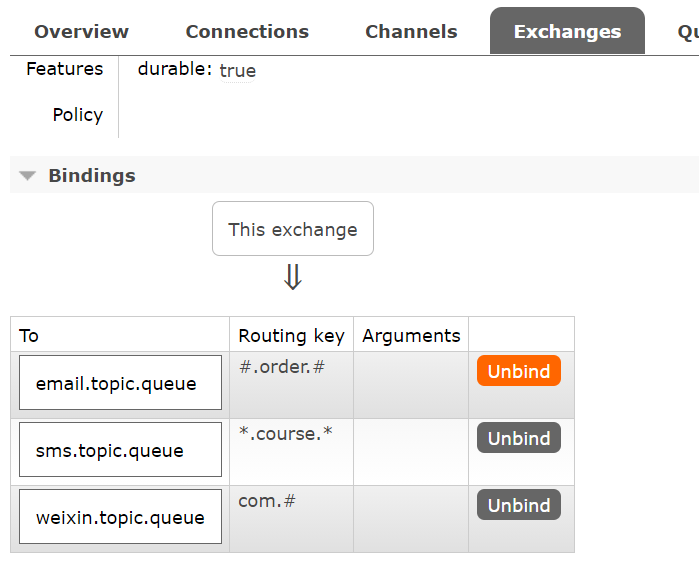
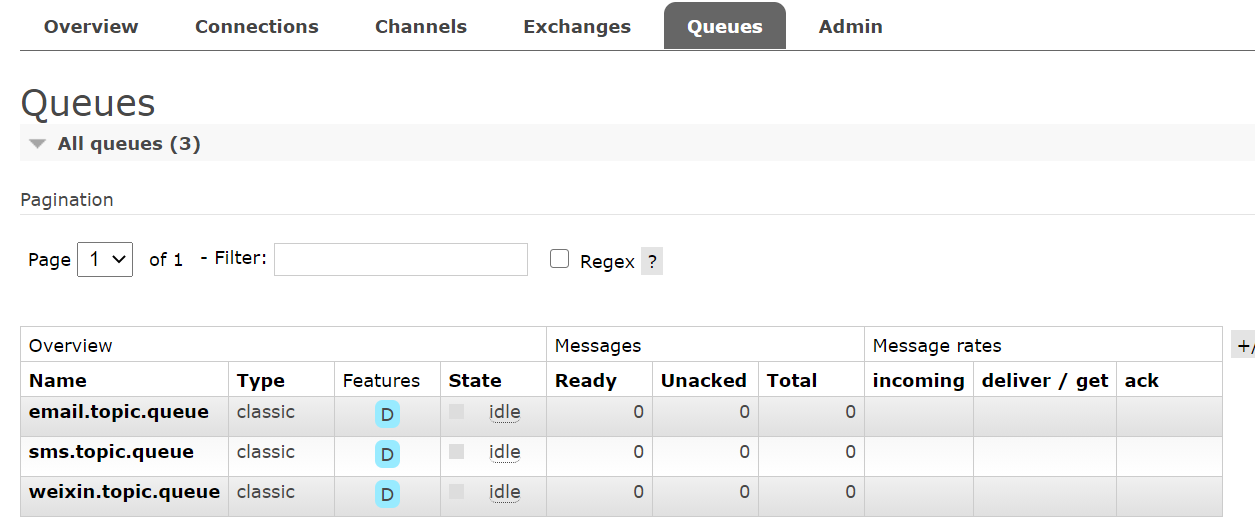
使用注解配置无需再创建对应的配置类Config来绑定Exchange与Queues的关系了。
直接使用Sevice调用服务发送消息即可。
①服务调用、向队列中发送消息:
@Service
public class OrderService {
    @Autowired
    private RabbitTemplate rabbitTemplate;
    // 1: 定义交换机
    private String exchangeName = "";
    // 2: 路由key
    private String routeKey = "";


    //Topic类型交换机
    public void makeOrderTopic(Long userId, Long productId, int num) {
        exchangeName = "topic_order_exchange";
        routeKey = "com.course.user";
        // 1: 模拟用户下单
        String orderNumer = UUID.randomUUID().toString();
        // 2: 根据商品id productId 去查询商品的库存
        // int numstore = productSerivce.getProductNum(productId);
        // 3:判断库存是否充足
        // if(num >  numstore ){ return  "商品库存不足..."; }
        // 4: 下单逻辑
        // orderService.saveOrder(order);
        // 5: 下单成功要扣减库存
        // 6: 下单完成以后
        System.out.println("用户 " + userId + ",订单编号是:" + orderNumer);
        // 发送订单信息给RabbitMQ fanout
        rabbitTemplate.convertAndSend(exchangeName, routeKey, orderNumer);
    }
}
②服务测试:
@SpringBootTest
class RabbitmqApplicationTests {

    @Autowired
    private OrderService orderService;

    @Test
    void topicTest() throws InterruptedException {
        for (int i = 0; i < 10; i++) {
            Thread.sleep(1000);
            Long userId = 100L + i;
            Long productId = 10001L + i;
            int num = 10;
            orderService.makeOrderTopic(userId, productId, num);
        }
    }
}
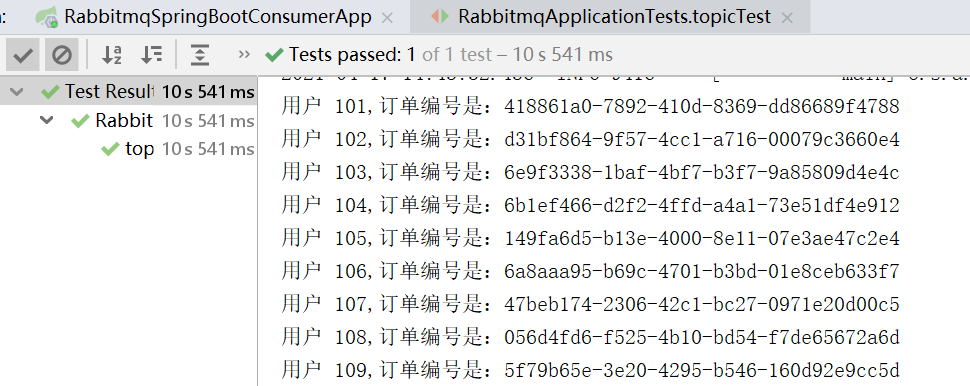
消息发送:
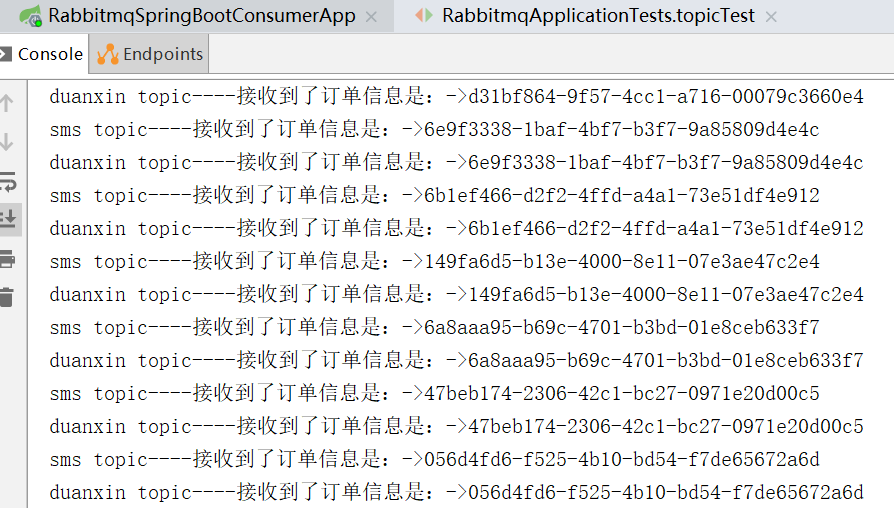
消费方consumer服务(消费者服务不停止)接收消息:
本博客示例涉及代码均已上传至Github:
【MQ中间件】RabbitMQ -- SpringBoot整合RabbitMQ(3)
标签:java routing 组件 weixin 声明 生产 lan ati save
原文地址:https://www.cnblogs.com/yif0118/p/14670751.html