标签:16px 情况 常用 使用 image 指定 www ash 参数
2. pandas.DataFrame ([data],[index]) 根据行建立数据
3. pandas.DataFrame ({dic}) 根据列建立数据
4. pandas.DataFrame([list])根据数据建立列数据
7. 使用 pandas.MultiIndex 显式创建多级行索引
1. pandas.Series(data=None, index=None, dtype=None, name=None, copy=False, fastpath=False )
data:支持多种数据类型
index:可选参数,数据索引,如为空则是由0开始的整数排序,索引确定后只能查看不能修改
dtype: 数据类型,可为空
name: 列名,可为空
 1 # index 为空时,默认由0开始顺序排列
 2 list=pd.Series([‘a‘,‘b‘,‘c‘])
 3 print(list)
 4 --------------------------------------------------------
 5 out:
 6 1 a
 7 2 b
 8 3 c
 9 =======================================================
10
11 #使用 index 输入
12 list=pd.Series([‘Leslie‘,‘Jack‘,‘Mike‘],[2,1,3])
13 print(list)
14 --------------------------------------------------------
15 out:
16 2 Leslie
17 1 Jack
18 3 Mike
19 ========================================================
20
21 # 以dic字典输入数据
22 list=pd.Series({2:‘Leslie‘,1:‘Jack‘,3:‘Mike‘})
23 print(list)
24 --------------------------------------------------------
25 out:
26 2 Leslie
27 1 Jack
28 3 Mike
29 ========================================================
30
31 #显示筛选结果
32 list=pd.Series({2:‘Leslie‘,1:‘Jack‘,3:‘Mike‘},[2,3])
33 print(list)
34 --------------------------------------------------------
35 out:
36 2 Leslie
37 3 Mike
38 =========================================================
39
40 #指定列名name
41 price=pd.Series([‘68‘,‘90‘],name=‘price‘,index=[‘JAVA IN ACTION‘,‘Python Data Science Handbook‘])
42 print(price)
43 --------------------------------------------------------
44 out:
45 JAVA IN ACTION                  68
46 Python Data Science Handbook    90
47 Name: price, dtype: object
注意:列名默认以0开始的整数
2. pandas.DataFrame ([data],[index]) 根据行建立数据
DataFrame可看作panads的行索引,最基础是通过单个已有的series对象创建DataFrame
data: 被panads序列化的行数据集
index:行索引集合,为空时将由0开始按整数排列
1 java=pd.Series({‘price‘:68,‘count‘:1})
2 python=pd.Series({‘price‘:90,‘count‘:1})
3 frame=pd.DataFrame(data=[java,python],index=[‘JAVA IN ACTION‘,‘Python Data Science Handbook‘])
4 print(frame)
输出

注意:data, index 参数必须是集合,否则会报错
3. pandas.DataFrame ({dic}) 根据列建立数据
可通过此方法利用字典建立列数据
1 #每本书的价格列
2 price=pd.Series({‘JAVA IN ACTION‘:68,‘Python Data Science Handbook‘:90})
3 #每本书的数据列
4 count=pd.Series({‘JAVA IN ACTION‘:1,‘Python Data Science Handbook‘:1})
5 #使用字典建立DataFrame
6 frame=pd.DataFrame({‘price‘:price,‘count‘:count})
7 print(frame)
结果与上面一样,系统会根据行索引绑定数据

4. pandas.DataFrame([list])根据数据建立列数据
注意:使用 list 与 dic 最大不同在 dic 在调用于生成列时先通过 index 指定行索引
1 price1=pd.Series([‘68‘,‘90‘],name=‘price1‘,index=[‘JAVA IN ACTION‘,‘Python Data Science Handbook‘])
2 count1=pd.Series([‘1‘,‘1‘],name=‘count1‘,index=[‘JAVA IN ACTION‘,‘Python Data Science Handbook‘])
3 frame1=pd.DataFrame([price1,count1])
4 print(frame1)
对比上面例子,当以数组建立 DataFrame 时,数组内的数据默认为行数据

data=pandas.Series([‘Leslie‘,‘Rose‘,‘Jack‘,‘Mike‘])
显式索引即 data[ ‘Leslie‘ : ‘Jack‘] 作切片时,结果包含最后一个索引即 Jack
隐式索引即 data[ 0 : 2 ]作切片时,结果不包含最后一个
为了避免混淆,建议使用 loc(显式)、iloc(隐式)
data[ ‘Leslie‘ : ‘Jack‘] 等效于 data.loc[ ‘Leslie‘ : ‘Jack‘]
data[ 0 : 2 ]等效于data.iloc[ 0 : 2 ]
同时,loc 也可作为数据的筛选条件
1 age=pd.Series({‘Leslie‘:28,‘Jack‘:32,‘Rose‘:18})
2 address=pd.Series({‘Jack‘:‘Beijing‘,‘Rose‘:‘Shanghai‘,‘Leslie‘:‘Guangzhou‘})
3 person=pd.DataFrame({‘address‘:address,‘age‘:age})
4 print(person.loc[person[‘age‘]<30])
显示结果

多条件筛选
1 age=pd.Series({‘Leslie‘:28,‘Jack‘:32,‘Rose‘:18})
2 address=pd.Series({‘Jack‘:‘Beijing‘,‘Rose‘:‘Shanghai‘,‘Leslie‘:‘Guangzhou‘})
3 person=pd.DataFrame({‘address‘:address,‘age‘:age})
4 print(person.loc[(person[‘age‘]<30) & (person[‘age‘]>20)])
![]()
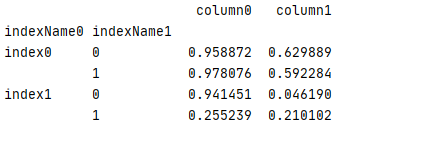
将 index 行索引分成多维级别
1 test=pd.DataFrame(data=np.random.rand(4,2),
2                    index=[[‘index0‘,‘index0‘,‘index1‘,‘index1‘],[0,1,0,1]],
3                    columns=[‘column0‘,‘column1‘])
4 print(test)
结果

可为多级行索引建立名称,容易管理
1 test1=pd.DataFrame(data=np.random.rand(4,2),
2                    index=[[‘index0‘,‘index0‘,‘index1‘,‘index1‘],[0,1,0,1]],
3                    columns=[‘column0‘,‘column1‘])
4 test1.index.names=[‘indexName0‘,‘indexName1‘]
5 print(test1)
结果
7. 使用 pandas.MultiIndex 显式创建多级行索引
使用数组方法 MultiIndex.from_arrays ()
1 data=[[‘Python Learning from Scratch‘,‘1‘,‘68‘],[‘Pro Apahe Hadoop‘,‘1‘,‘105‘],[‘Python Crash Course‘,‘2‘,‘89‘]
2     ,[‘Beginning Python From Novice‘,‘1‘,‘76‘],[‘Python Appclications‘,‘2‘,‘120‘],[‘Deep Learning with TensorFlow‘,‘1‘,‘58‘]]
3 index=pd.MultiIndex.from_arrays([[‘Leslie‘,‘Leslie‘,‘Jack‘,‘Jack‘,‘Mike‘,‘Mike‘],[2020,2021,2020,2021,2020,2021]])
4 column=[‘Book‘,‘Count‘,‘Price‘]
5 book=pd.DataFrame(data=data,index=index,columns=column)
使用索引值的元组方法 MultiIndex.from_tuples()
1 data=[[‘Python Learning from Scratch‘,‘1‘,‘68‘],[‘Pro Apahe Hadoop‘,‘1‘,‘105‘],[‘Python Crash Course‘,‘2‘,‘89‘]
2     ,[‘Beginning Python From Novice‘,‘1‘,‘76‘],[‘Python Appclications‘,‘2‘,‘120‘],[‘Deep Learning with TensorFlow‘,‘1‘,‘58‘]]
3 index=pd.MultiIndex.from_tuples([(‘Leslie‘,2020),(‘Leslie‘,2021),(‘Jack‘,2020),(‘Jack‘,2021),(‘Mike‘,2020),(‘Mike‘,2021)])
4 column=[‘Book‘,‘Count‘,‘Price‘]
5 book=pd.DataFrame(data=data,index=index,columns=column)
使用笛卡乐积方法 MultiIndex.from_product ()
1 data=[[‘Python Learning from Scratch‘,‘1‘,‘68‘],[‘Pro Apahe Hadoop‘,‘1‘,‘105‘],[‘Python Crash Course‘,‘2‘,‘89‘]
2     ,[‘Beginning Python From Novice‘,‘1‘,‘76‘],[‘Python Appclications‘,‘2‘,‘120‘],[‘Deep Learning with TensorFlow‘,‘1‘,‘58‘]]
3 index=pd.MultiIndex.from_product([[‘Leslie‘,‘Jack‘,‘Mike‘],[2020,2021]])
4 column=[‘Book‘,‘Count‘,‘Price‘]
5 book=pd.DataFrame(data=data,index=index,columns=column)
上面3种方法可获取相同结果,3种方法有不同的使用场景

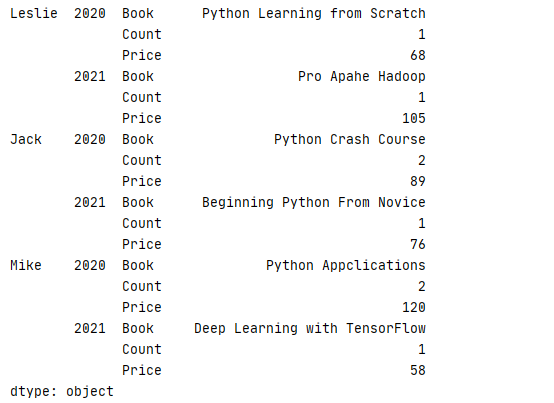
继续以上面例子为例,使用 stack(level) 可以把 DataFrame 升维,使用 unstack(level) 可能把 DataFrame 降维
注意:数据升维降维后都将返回一个数据集的副本,修改其值不会影响原数据
 1 data=[[‘Python Learning from Scratch‘,1,68],[‘Pro Apahe Hadoop‘,1,105],[‘Python Crash Course‘,2,89]
 2     ,[‘Beginning Python From Novice‘,1,76],[‘Python Appclications‘,2,120],[‘Deep Learning with TensorFlow‘,1,58]]
 3 index=pd.MultiIndex.from_tuples([(‘Leslie‘,2020),(‘Leslie‘,2021),(‘Jack‘,2020),(‘Jack‘,2021),(‘Mike‘,2020),(‘Mike‘,2021)])
 4 column=[‘Book‘,‘Count‘,‘Price‘]
 5 book=pd.DataFrame(data=data,index=index,columns=column)
 6 //计算总体价格
 7 total=book[‘Price‘]*book[‘Count‘]
 8 print(str(total)+‘\n‘)
 9 //降维显示,把二维的行索引转化为列
10 print(total.unstack())
结果

使用 level 参数可以设置降维的层级,level 为 0 即把多维行的第一维度进行转换 ( 即name参数 ),level 为 1 即把多维行的第二维度进行转换 ( 即 year 参数 )
1 data=[[‘Python Learning from Scratch‘,1,68],[‘Pro Apahe Hadoop‘,1,105],[‘Python Crash Course‘,2,89]
2     ,[‘Beginning Python From Novice‘,1,76],[‘Python Appclications‘,2,120],[‘Deep Learning with TensorFlow‘,1,58]]
3 index=pd.MultiIndex.from_tuples([(‘Leslie‘,2020),(‘Leslie‘,2021),(‘Jack‘,2020),(‘Jack‘,2021),(‘Mike‘,2020),(‘Mike‘,2021)])
4 column=[‘Book‘,‘Count‘,‘Price‘]
5 book=pd.DataFrame(data=data,index=index,columns=column)
6 //计算总价
7 total=book[‘Price‘]*book[‘Count‘]
8 //把第一维name进行降维
9 print(total.unstack(level=0))
可见结果刚好与上面的例子相反,若把level设置为1,则结果跟上面相同

使用 stack 把数据进行升维,level 使用与 unstack 类似
1 data=[[‘Python Learning from Scratch‘,1,68],[‘Pro Apahe Hadoop‘,1,105],[‘Python Crash Course‘,2,89]
2     ,[‘Beginning Python From Novice‘,1,76],[‘Python Appclications‘,2,120],[‘Deep Learning with TensorFlow‘,1,58]]
3 index=pd.MultiIndex.from_tuples([(‘Leslie‘,2020),(‘Leslie‘,2021),(‘Jack‘,2020),(‘Jack‘,2021),(‘Mike‘,2020),(‘Mike‘,2021)])
4 column=[‘Book‘,‘Count‘,‘Price‘]
5 book=pd.DataFrame(data=data,index=index,columns=column)
6 print(book.stack())
结果
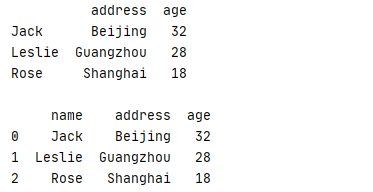
索引重置的另外两个常用方法 reset_index() 与 set_index()
reset_index(self,level, drop: bool = False, inplace: bool = False, col_level: Hashable = 0, col_fill: Label = "") 把行标签转换成列
level:默认为 None,从索引中删除给定的级别,默认情况下删除所有级别。
drop: 默认为 False 不要尝试将索引插入 DataFrame 列,这会将索引重置为默认的整数索引。
inplace:bool, 默认为 False,修改DataFrame到位(不要创建新对象)。
col_level:int 或 str, 默认为 0,如果列有多个级别,请确定将标签插入到哪个级别。默认情况下,它被插入到第一级。
col_fill:object, 默认为空,如果列具有多个级别,请确定如何命名其他级别。如果为None,则重复索引名称。
1 age=pd.Series({‘Leslie‘:28,‘Jack‘:32,‘Rose‘:18})
2 address=pd.Series({‘Jack‘:‘Beijing‘,‘Rose‘:‘Shanghai‘,‘Leslie‘:‘Guangzhou‘})
3 person=pd.DataFrame({‘address‘:address,‘age‘:age})
4 print(str(person)+"\n")
5 #把name转换成列,转换后列名默认为index
6 person=person.reset_index()
7 #把列名改为name
8 person.rename(columns={‘index‘:‘name‘},inplace=True)
9 print(person)
显示结果
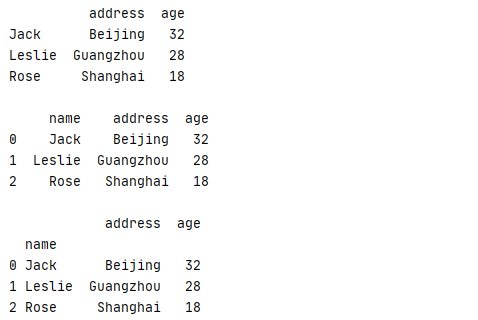
set_index(keys, drop=True, append=False, inplace=False, verify_integrity=False)
keys:label or array-like or list of labels/arrays,这个是需要设置为索引的列名,可以是单个列名,或者是多个列名
drop:bool, default True,删除要用作新索引的列
append:bool, default False,添加新索引
inplace:bool, default False,是否要覆盖数据集
verify_integrity:bool, default False,检查新索引是否重复
 1 age=pd.Series({‘Leslie‘:28,‘Jack‘:32,‘Rose‘:18})
 2 address=pd.Series({‘Jack‘:‘Beijing‘,‘Rose‘:‘Shanghai‘,‘Leslie‘:‘Guangzhou‘})
 3 person=pd.DataFrame({‘address‘:address,‘age‘:age})
 4 print(str(person)+"\n")
 5 #把行索引name转换成列,默认列名为index
 6 person=person.reset_index()
 7 #把列名改为name
 8 person.rename(columns={‘index‘:‘name‘},inplace=True)
 9 print(str(person)+"\n")
10 #重新把列name转换成行索引
11 person=person.set_index([‘name‘],append=True)
12 print(person)
运行结果
def insert(loc, column, value, allow_duplicates=False) 可以直接组DataFrame添加列
1 age=pd.Series({‘Leslie‘:28,‘Jack‘:32,‘Rose‘:18})
2 address=pd.Series({‘Jack‘:‘Beijing‘,‘Rose‘:‘Shanghai‘,‘Leslie‘:‘Guangzhou‘})
3 person=pd.DataFrame({‘address‘:address,‘age‘:age})
4 person.insert(2,‘sex‘,[’male‘,‘male‘,‘female‘])
运行结果

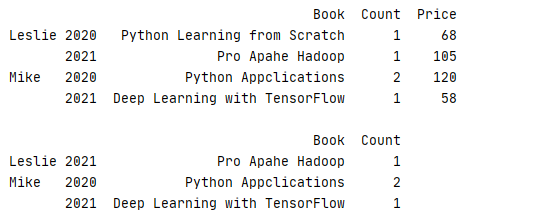
如果在使用 MultiIndex 不是有序索引,那在切片时候系统经常会报以下错误(注意:数据排序后返回的将是原数据的一个副本,副本值修改不会改变原数据值)

此时可使用 sort_index() 或 sortlevel() 先对数据进行排序再进行切片
1 data=[[‘Python Learning from Scratch‘,1,68],[‘Pro Apahe Hadoop‘,1,105],[‘Python Crash Course‘,2,89]
2     ,[‘Beginning Python From Novice‘,1,76],[‘Python Appclications‘,2,120],[‘Deep Learning with TensorFlow‘,1,58]]
3 index=pd.MultiIndex.from_tuples([(‘Leslie‘,2020),(‘Leslie‘,2021),(‘Jack‘,2020),(‘Jack‘,2021),(‘Mike‘,2020),(‘Mike‘,2021)])
4 column=[‘Book‘,‘Count‘,‘Price‘]
5 book=pd.DataFrame(data=data,index=index,columns=column)
6 #先按 index 进行排序
7 book=book.sort_index()
8 print(str(book.loc[‘Leslie‘:,:])+‘\n‘)
9 print(book.loc[(‘Leslie‘,2021):,:‘Count‘])
运行结果
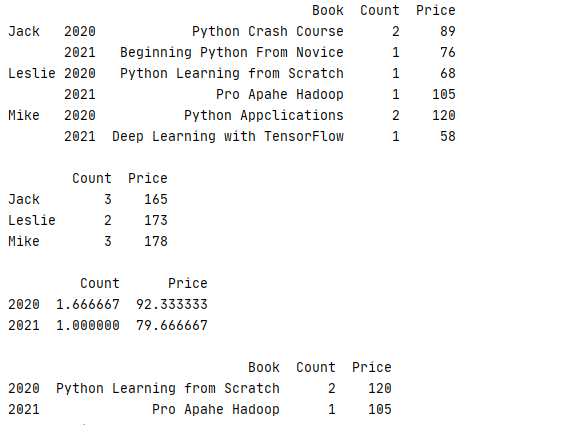
用户还可以使用 mean()、sum()、max() 等方法对多级索引进行数据统计,也可使用 level 参数设置所统计的维度
 1 data=[[‘Python Learning from Scratch‘,1,68],[‘Pro Apahe Hadoop‘,1,105],[‘Python Crash Course‘,2,89]
 2     ,[‘Beginning Python From Novice‘,1,76],[‘Python Appclications‘,2,120],[‘Deep Learning with TensorFlow‘,1,58]]
 3 index=pd.MultiIndex.from_tuples([(‘Leslie‘,2020),(‘Leslie‘,2021),(‘Jack‘,2020),(‘Jack‘,2021),(‘Mike‘,2020),(‘Mike‘,2021)])
 4 column=[‘Book‘,‘Count‘,‘Price‘]
 5 book=pd.DataFrame(data=data,index=index,columns=column)
 6 book=book.sort_index()
 7 #原始数据
 8 print(str(book)+‘\n‘)
 9 #以name为纬度计算每年总价
10 print(str(book.sum(level=0))+‘\n‘)
11 #以year为纬度设计平均数
12 print(str(book.mean(level=1))+‘\n‘)
13 #以year为纬度计算最大值
14 print(book.max(level=1))
运行结果,可见在计算平均值和总值时关于Book等不匹配的字段系统全自动忽略
pd.concat( objs: Union[Iterable["NDFrame"], Mapping[Label, "NDFrame"]],axis=0,join="outer",
ignore_index: bool = False,keys=None,levels=None,names=None,
verify_integrity: bool = False,sort: bool = False,copy: bool = True,)
concat 默认会将所在列进行合并,确失列默认为 NaN 表示,index 默认允许重复(若不想要重复索引,可以把 ignore_index 设置为 True)
若把 verify_intergrity 设置为 True,一旦出现重复索引,系统就抛出异常
 1 data2=[[‘Python Learning from Scratch‘,68,‘Eric Matthes‘],[‘Pro Apahe Hadoop‘,72,‘Magnus Lie‘],[‘Python Crash Course‘,98,‘Wes Mckinney‘]]
 2 data3=[[‘Beginning Python From Novice‘,‘Brandon Rhodes‘],[‘Python Appclications‘,‘John Goerzen‘],[‘Deep Learning with TensorFlow‘,‘Md Rezaul‘]]
 3
 4 column2=[‘Book‘,‘Price‘,‘Author‘]
 5 column3=[‘Book‘,‘Author‘]
 6
 7 book2=pd.DataFrame(data=data2,columns=column2).sort_index()
 8 book3=pd.DataFrame(data=data3,columns=column3).sort_index()
 9
10 print(pd.concat([book2,book3]))
运行结果

若想要去掉缺失列,可以把参数 join 设置为 ‘ inner ‘
 1 data2=[[‘Python Learning from Scratch‘,68,‘Eric Matthes‘],[‘Pro Apahe Hadoop‘,72,‘Magnus Lie‘],[‘Python Crash Course‘,98,‘Wes Mckinney‘]]
 2 data3=[[‘Beginning Python From Novice‘,‘Brandon Rhodes‘],[‘Python Appclications‘,‘John Goerzen‘],[‘Deep Learning with TensorFlow‘,‘Md Rezaul‘]]
 3
 4 column2=[‘Book‘,‘Price‘,‘Author‘]
 5 column3=[‘Book‘,‘Author‘]
 6
 7 book2=pd.DataFrame(data=data2,columns=column2).sort_index()
 8 book3=pd.DataFrame(data=data3,columns=column3).sort_index()
 9
10 print(pd.concat([book2,book3],join=‘inner‘))
运行结果

pandas.merge (left, right, how: str = "inner", on=None, left_on=None, right_on=None,
left_index: bool = False, right_index: bool = False, sort: bool = False,
suffixes=("_x", "_y"), copy: bool = True, indicator: bool = False, validate=None)
merge 是最常用的合并连接,用法与SQL数据库中的使用方法极为相似,支持一对一,一对多,多对多方式
在缺失值时,merge也会用 NaN 代替,与 concat 不一样的是 merge 默认会自动生成新的索引
方法可通过on参数与配置关联列,若为空时,则默认为 left / right 的交集作为链接条件,此例中即为 Book 列
 1 _book=[[‘Python Learning from Scratch‘,‘Eric Matthes‘],[‘Pro Apahe Hadoop‘,‘Magnus Lie‘],[‘Python Crash Course‘,‘Wes Mckinney‘],
 2        [‘Beginning Python From Novice‘,‘Brandon Rhodes‘],[‘Python Appclications‘,‘John Goerzen‘],[‘Deep Learning with TensorFlow‘,‘Md Rezaul‘]]
 3 column1=[‘Book‘,‘Author‘]
 4 book=pd.DataFrame(data=_book,columns=column1)
 5
 6 _price=[[‘Python Learning from Scratch‘,68,2],[‘Pro Apahe Hadoop‘,105,3],[‘Python Crash Course‘,89,1]
 7     ,[‘Beginning Python From Novice‘,76,2],[‘Python Appclications‘,120],[‘Deep Learning with TensorFlow‘,58,3]]
 8
 9 column2=[‘Book‘,‘Price‘,‘Count‘]
10 price=pd.DataFrame(data=_price,columns=column2)
11
12 print(pd.merge(book,price,on=‘Book‘))
运行结果,index=4 的书本没有设定 Count 时,系统默认为 NaN

当关联列的名称不同时,可通过 left_on 和 right_on 分开指定列名
 1 _book=[[‘Python Learning from Scratch‘,‘Eric Matthes‘],[‘Pro Apahe Hadoop‘,‘Magnus Lie‘],[‘Python Crash Course‘,‘Wes Mckinney‘],
 2        [‘Beginning Python From Novice‘,‘Brandon Rhodes‘],[‘Python Appclications‘,‘John Goerzen‘],[‘Deep Learning with TensorFlow‘,‘Md Rezaul‘]]
 3 column1=[‘Name‘,‘Author‘]
 4 book=pd.DataFrame(data=_book,columns=column1)
 5
 6 _price=[[‘Python Learning from Scratch‘,68,2],[‘Pro Apahe Hadoop‘,105,3],[‘Python Crash Course‘,89,1]
 7     ,[‘Beginning Python From Novice‘,76,2],[‘Python Appclications‘,120],[‘Deep Learning with TensorFlow‘,58,3]]
 8 price=pd.DataFrame(data=_price,columns=column2)
 9
10 pd.set_option(‘display.max_columns‘,None)
11 print(pd.merge(book,price,left_on=‘Name‘,right_on=‘Book‘))
运行结果
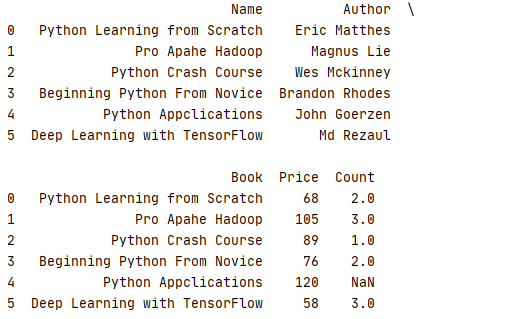
为了避免关系列Name与Book同时显示,可以通过 drop()方法把重复列去掉
 1 _book=[[‘Python Learning from Scratch‘,‘Eric Matthes‘],[‘Pro Apahe Hadoop‘,‘Magnus Lie‘],[‘Python Crash Course‘,‘Wes Mckinney‘],
 2        [‘Beginning Python From Novice‘,‘Brandon Rhodes‘],[‘Python Appclications‘,‘John Goerzen‘],[‘Deep Learning with TensorFlow‘,‘Md Rezaul‘]]
 3 column1=[‘Name‘,‘Author‘]
 4 book=pd.DataFrame(data=_book,columns=column1)
 5
 6 _price=[[‘Python Learning from Scratch‘,68,2],[‘Pro Apahe Hadoop‘,105,3],[‘Python Crash Course‘,89,1]
 7     ,[‘Beginning Python From Novice‘,76,2],[‘Python Appclications‘,120],[‘Deep Learning with TensorFlow‘,58,3]]
 8 column2=[‘Book‘,‘Price‘,‘Count‘]
 9 price=pd.DataFrame(data=_price,columns=column2)
10
11 pd.set_option(‘display.max_columns‘,None)
12 print(pd.merge(book,price,left_on=‘Name‘,right_on=‘Book‘).drop(‘Name‘,axis=1))
运行结果

也可能通过 left_index 和 right_index 来通过索引进行合并
 1 _book=[[‘Python Learning from Scratch‘,‘Eric Matthes‘],[‘Pro Apahe Hadoop‘,‘Magnus Lie‘],[‘Python Crash Course‘,‘Wes Mckinney‘],
 2        [‘Beginning Python From Novice‘,‘Brandon Rhodes‘],[‘Python Appclications‘,‘John Goerzen‘],[‘Deep Learning with TensorFlow‘,‘Md Rezaul‘]]
 3 column1=[‘Name‘,‘Author‘]
 4 book=pd.DataFrame(data=_book,columns=column1)
 5
 6 _price=[[‘Python Learning from Scratch‘,68,2],[‘Pro Apahe Hadoop‘,105,3],[‘Python Crash Course‘,89,1]
 7     ,[‘Beginning Python From Novice‘,76,2],[‘Python Appclications‘,120,1],[‘Deep Learning with TensorFlow‘,58,3]]
 8 column2=[‘Book‘,‘Price‘,‘Count‘]
 9 price=pd.DataFrame(data=_price,columns=column2)
10
11 pd.set_option(‘display.max_columns‘,None)
12 print(pd.merge(book,price,left_index=True,right_index=True).drop(‘Name‘,axis=1))
运行结果

以上例子中都是默认使用内链接 how=‘inner‘ 返回数据的交集, 也可通过设置 how=’outer‘ 返回并集
book 集合中不存在书本 Deep Learning with TensorFlow 的信息,所以默认情况下,合并数据后应该只剩下5行数据
 1 _book=[[‘Python Learning from Scratch‘,‘Eric Matthes‘],[‘Pro Apahe Hadoop‘,‘Magnus Lie‘],[‘Python Crash Course‘,‘Wes Mckinney‘],
 2        [‘Beginning Python From Novice‘,‘Brandon Rhodes‘],[‘Python Appclications‘,‘John Goerzen‘]]
 3 column1=[‘Name‘,‘Author‘]
 4 book=pd.DataFrame(data=_book,columns=column1)
 5
 6 _price=[[‘Python Learning from Scratch‘,68,2],[‘Pro Apahe Hadoop‘,105,3],[‘Python Crash Course‘,89,1]
 7     ,[‘Beginning Python From Novice‘,76,2],[‘Python Appclications‘,120,1],[‘Deep Learning with TensorFlow‘,58,3]]
 8 column2=[‘Book‘,‘Price‘,‘Count‘]
 9 price=pd.DataFrame(data=_price,columns=column2)
10
11 pd.set_option(‘display.max_columns‘,None)
12 print(pd.merge(book,price,left_index=True,right_index=True,how=‘inner‘).drop(‘Name‘,axis=1))
运行结果

把 how设置为 outer后,运行结果

同理,通过把 how 设置为 left / right,可以使用左右链接
 1 _book=[[‘Python Learning from Scratch‘,‘Eric Matthes‘],[‘Pro Apahe Hadoop‘,‘Magnus Lie‘],[‘Python Crash Course‘,‘Wes Mckinney‘],
 2        [‘Beginning Python From Novice‘,‘Brandon Rhodes‘],[‘Python Appclications‘,‘John Goerzen‘]]
 3 column1=[‘Name‘,‘Author‘]
 4 book=pd.DataFrame(data=_book,columns=column1)
 5
 6 _price=[[‘Python Learning from Scratch‘,68,2],[‘Pro Apahe Hadoop‘,105,3],[‘Python Crash Course‘,89,1]
 7     ,[‘Beginning Python From Novice‘,76,2],[‘Deep Learning with TensorFlow‘,58,3]]
 8 column2=[‘Book‘,‘Price‘,‘Count‘]
 9 price=pd.DataFrame(data=_price,columns=column2)
10
11 pd.set_option(‘display.max_columns‘,None)
12 print(pd.merge(book,price,left_on=‘Name‘,right_on=‘Book‘,how=‘left‘).drop(‘Name‘,axis=1))
运行结果
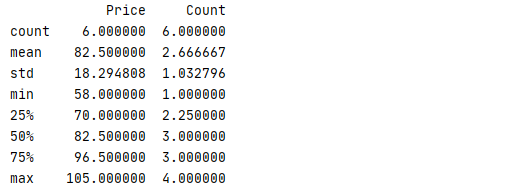
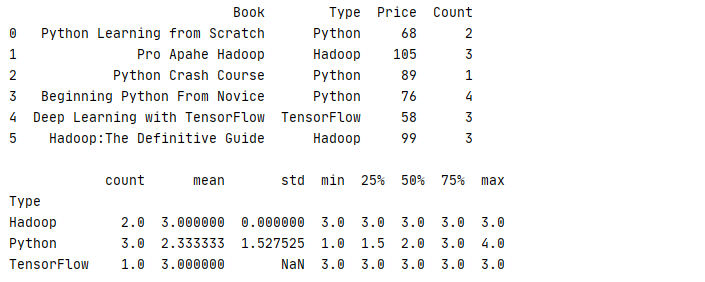
panads 中还有一个非常方便统计的 describe 函数,它作用是对每一列的若干个常用统计函数(count、mean、std、min 等)进行计算
1 _book=[[‘Python Learning from Scratch‘,‘Python‘,68,2],[‘Pro Apahe Hadoop‘,‘Hadoop‘,105,3],[‘Python Crash Course‘,‘Python‘,89,1]
2     ,[‘Beginning Python From Novice‘,‘Python‘,76,4],[‘Deep Learning with TensorFlow‘,‘TensorFlow‘,58,3],[‘Hadoop:The Definitive Guide‘,‘Hadoop‘,99,3]]
3 column=[‘Book‘,‘Type‘,‘Price‘,‘Count‘]
4 book=pd.DataFrame(data=_book,columns=column)
5 print(book.describe())
运行结果
groupby可以使数据进行分组后再计算,常用的累计方式有 count 计算行数量、mean 平均值 、median中位数 、min 最小值 、max 最大值、std 标准差 、var 方差 、mad 均值绝对偏差 、prod 所有项乘积 、sum 所有项求和等方法
1 _book=[[‘Python Learning from Scratch‘,‘Python‘,68,2],[‘Pro Apahe Hadoop‘,‘Hadoop‘,105,3],[‘Python Crash Course‘,‘Python‘,89,1]
2     ,[‘Beginning Python From Novice‘,‘Python‘,76,2],[‘Deep Learning with TensorFlow‘,‘TensorFlow‘,58,3],[‘Hadoop:The Definitive Guide‘,‘Hadoop‘,99,3]]
3 column=[‘Book‘,‘Type‘,‘Price‘,‘Count‘]
4 book=pd.DataFrame(data=_book,columns=column)
5
6 print(book.groupby(‘Type‘).sum())
运行结果

也可专门针对某一列进分组运算
1 _book=[[‘Python Learning from Scratch‘,‘Python‘,68,2],[‘Pro Apahe Hadoop‘,‘Hadoop‘,105,3],[‘Python Crash Course‘,‘Python‘,89,1]
2     ,[‘Beginning Python From Novice‘,‘Python‘,76,4],[‘Deep Learning with TensorFlow‘,‘TensorFlow‘,58,3],[‘Hadoop:The Definitive Guide‘,‘Hadoop‘,99,3]]
3 column=[‘Book‘,‘Type‘,‘Price‘,‘Count‘]
4 book=pd.DataFrame(data=_book,columns=column)
5 print(str(book)+‘\n‘)
6 print(book.groupby(‘Type‘)[‘Count‘].describe())
运行结果
除了普通计算,在分组后还可以进行 aggregate 累计、filter 过滤、transform 转换、apply 应用等操作
通过 aggregate 可针对不同列进行不同的累计操作,例子中就是计算各类书本的平均价格与销售总数
1 _book=[[‘Python Learning from Scratch‘,‘Python‘,68,2],[‘Pro Apahe Hadoop‘,‘Hadoop‘,105,3],[‘Python Crash Course‘,‘Python‘,89,1]
2     ,[‘Beginning Python From Novice‘,‘Python‘,76,4],[‘Deep Learning with TensorFlow‘,‘TensorFlow‘,58,3],[‘Hadoop:The Definitive Guide‘,‘Hadoop‘,99,3]]
3 column=[‘Book‘,‘Type‘,‘Price‘,‘Count‘]
4 book=pd.DataFrame(data=_book,columns=column)
5 print(str(book)+‘\n‘)
6 print(book.groupby(‘Type‘).aggregate({‘Price‘:‘mean‘,‘Count‘:‘sum‘}))
运行结果
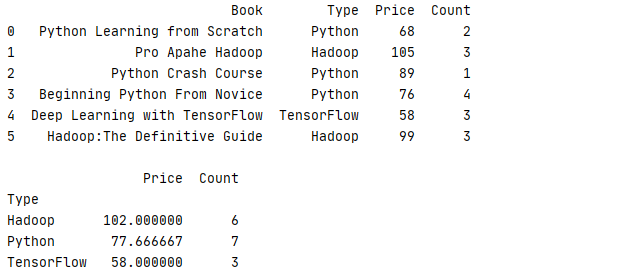
使用 filter 就是常用的条件过滤,只有符合过滤条件的数据才会被算到分组计算当中
func传入的参数是 group 的分组的数据集,而返回是 bool,通过返回值判断此组数据是否符合筛选条件
下面的例子就是找出销量总数大于 6 的书本
1 def func(x):
2     return sum(x[‘Count‘])>6
3
4 _book=[[‘Python Learning from Scratch‘,‘Python‘,68,2],[‘Pro Apahe Hadoop‘,‘Hadoop‘,105,3],[‘Python Crash Course‘,‘Python‘,89,1]
5     ,[‘Beginning Python From Novice‘,‘Python‘,76,4],[‘Deep Learning with TensorFlow‘,‘TensorFlow‘,58,3],[‘Hadoop:The Definitive Guide‘,‘Hadoop‘,99,3]]
6 column=[‘Book‘,‘Type‘,‘Price‘,‘Count‘]
7 book=pd.DataFrame(data=_book,columns=column)
8 print(str(book)+‘\n‘)
9 print(book.groupby(‘Type‘).filter(func))
运行结果
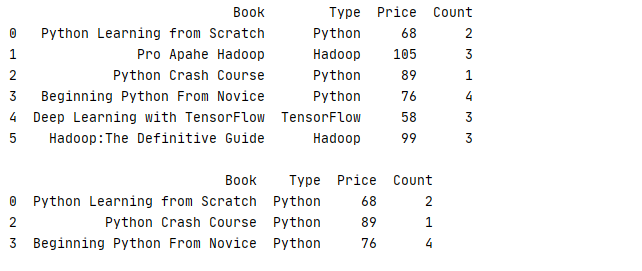
transform 可以对分组内全部数据进行运算后返回一个全新的数据组,最常见的就是计算数据与平均的差别
1 _book=[[‘Python Learning from Scratch‘,‘Python‘,68,2],[‘Pro Apahe Hadoop‘,‘Hadoop‘,105,3],[‘Python Crash Course‘,‘Python‘,89,1]
2     ,[‘Beginning Python From Novice‘,‘Python‘,76,4],[‘Deep Learning with TensorFlow‘,‘TensorFlow‘,58,3],[‘Hadoop:The Definitive Guide‘,‘Hadoop‘,99,3]]
3 column=[‘Book‘,‘Type‘,‘Price‘,‘Count‘]
4 book=pd.DataFrame(data=_book,columns=column)
5 print(str(book)+‘\n‘)
6 print(book.groupby(‘Type‘)[‘Price‘].transform(lambda x:x-x.mean()))
运行结果
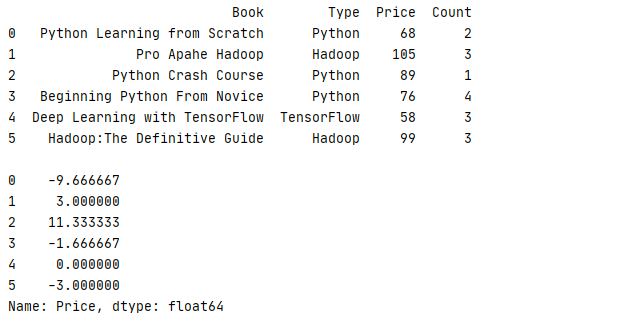
apply 可以对每个分组里的数据进行任意方法操作,唯一不同的是它输入的参数是一个 DataFrame,返回的则是一个数据集
下面例子就是统计每组数据内不同书本所占的销售占比
 1 def data(x):
 2     x.insert(4,‘Rate‘,‘‘)
 3     x[‘Rate‘] = x[‘Count‘]/sum(x[‘Count‘])*100
 4     return x
 5
 6 _book=[[‘Python Learning from Scratch‘,‘Python‘,68,2],[‘Pro Apahe Hadoop‘,‘Hadoop‘,105,3],[‘Python Crash Course‘,‘Python‘,89,1]
 7     ,[‘Beginning Python From Novice‘,‘Python‘,76,4],[‘Deep Learning with TensorFlow‘,‘TensorFlow‘,58,3],[‘Hadoop:The Definitive Guide‘,‘Hadoop‘,99,3]]
 8 column=[‘Book‘,‘Type‘,‘Price‘,‘Count‘]
 9 book=pd.DataFrame(data=_book,columns=column)
10 11 print(book.groupby(‘Type‘).apply(data).sort_values(‘Type‘))
运行结果

groupby 除了可以根据列等分组外,可以根据索引,数据,列表等多种方式进行分组,前提是数组长度必须与DataFrame的长度一致
下面的例子数据就是根据预先定义的数组进行分组的
1 _book=[[‘Python Learning from Scratch‘,‘Python‘,68,2],[‘Pro Apahe Hadoop‘,‘Hadoop‘,105,3],[‘Python Crash Course‘,‘Python‘,89,1]
2     ,[‘Beginning Python From Novice‘,‘Python‘,76,4],[‘Deep Learning with TensorFlow‘,‘TensorFlow‘,58,3],[‘Hadoop:The Definitive Guide‘,‘Hadoop‘,99,3]]
3 column=[‘Book‘,‘Type‘,‘Price‘,‘Count‘]
4 book=pd.DataFrame(data=_book,columns=column)
5 print(str(book)+‘\n‘)
6 index=[0,1,0,2,1,3]
7 print(book.groupby(index).sum())
运行结果
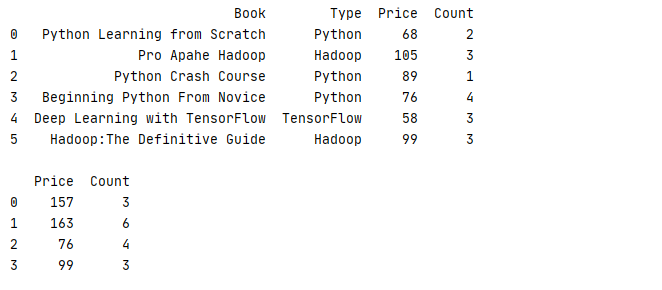
除了使用数组以外,还可以使用字典对数据进行分组
下面的例子把Type为 Python、TensorFlow的书本归入AI类,把Type为Hadoop归入BD类再进行统计
1 _book=[[‘Python Learning from Scratch‘,‘Python‘,68,2],[‘Pro Apahe Hadoop‘,‘Hadoop‘,105,3],[‘Python Crash Course‘,‘Python‘,89,1]
2     ,[‘Beginning Python From Novice‘,‘Python‘,76,4],[‘Deep Learning with TensorFlow‘,‘TensorFlow‘,58,3],[‘Hadoop:The Definitive Guide‘,‘Hadoop‘,99,3]]
3 column=[‘Book‘,‘Type‘,‘Price‘,‘Count‘]
4 book=pd.DataFrame(data=_book,columns=column).set_index(‘Type‘)
5 print(str(book)+‘\n‘)
6 mapping={‘Python‘:‘AI‘,‘TensorFlow‘:‘AI‘,‘Hadoop‘:‘BD‘}
7 print(book.groupby(mapping).sum())
运行结果
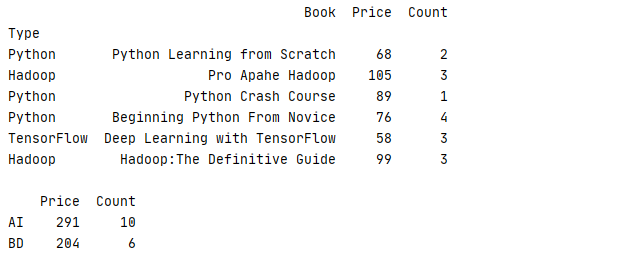
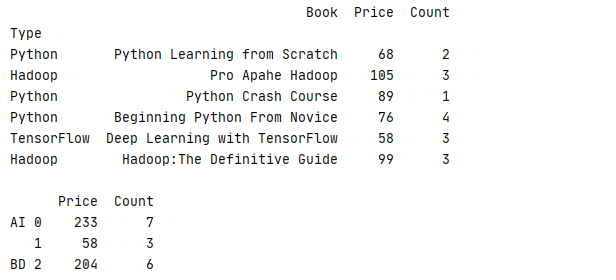
另外,数据还可以根据组合键进行分组,从而返回一个多级索引的结果
下面的例子把Type为 Python、TensorFlow的书本归入AI类,把Type为Hadoop归入BD类再进行统计,在AI中再分别统计 Python、TesnsorFlow数据
1 _book=[[‘Python Learning from Scratch‘,‘Python‘,68,2],[‘Pro Apahe Hadoop‘,‘Hadoop‘,105,3],[‘Python Crash Course‘,‘Python‘,89,1]
2     ,[‘Beginning Python From Novice‘,‘Python‘,76,4],[‘Deep Learning with TensorFlow‘,‘TensorFlow‘,58,3],[‘Hadoop:The Definitive Guide‘,‘Hadoop‘,99,3]]
3 column=[‘Book‘,‘Type‘,‘Price‘,‘Count‘]
4 book=pd.DataFrame(data=_book,columns=column).set_index(‘Type‘)
5 print(str(book)+‘\n‘)
6 index=[0,2,0,0,1,2]
7 mapping={‘Python‘:‘AI‘,‘TensorFlow‘:‘AI‘,‘Hadoop‘:‘BD‘}
8 print(book.groupby([mapping,index]).sum())
运行结果
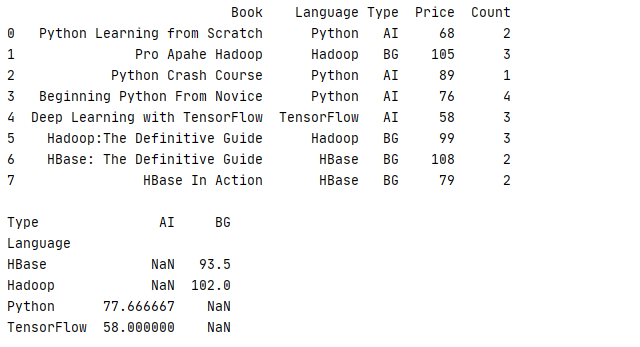
试想一下,如果有一组数据,它包含了书本的开发语言(Language)、类型(Tpye)、单价(Price)、销售数量(Count),现在想根据书本的的Language、Type去统计书本的平均价格 Price,如果用回上一节的例子,我们可以通过 groupby 来实现
1 _book=[[‘Python Learning from Scratch‘,‘Python‘,‘AI‘,68,2],[‘Pro Apahe Hadoop‘,‘Hadoop‘,‘BG‘,105,3],[‘Python Crash Course‘,‘Python‘,‘AI‘,89,1]
2     ,[‘Beginning Python From Novice‘,‘Python‘,‘AI‘,76,4],[‘Deep Learning with TensorFlow‘,‘TensorFlow‘,‘AI‘,58,3]
3     ,[‘Hadoop:The Definitive Guide‘,‘Hadoop‘,‘BG‘,99,3],[‘HBase: The Definitive Guide‘,‘HBase‘,‘BG‘,108,2],[‘HBase In Action‘,‘HBase‘,‘BG‘,79,2]]
4 column=[‘Book‘,‘Language‘,‘Type‘,‘Price‘,‘Count‘]
5 book=pd.DataFrame(data=_book,columns=column)
6 print(str(book)+‘\n‘)
7 8 print(str(book.groupby([‘Language‘,‘Type‘])[‘Price‘].mean().unstack())+‘\n‘)
运行结果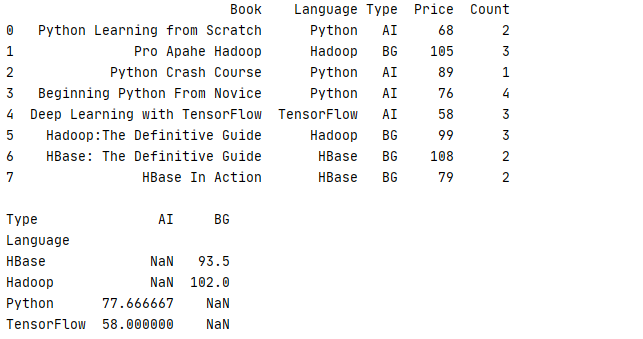
然而这种操作看起来比较繁琐,而且可读性差,往往开发人员需要仔细看一段时间才能明白其中用意,有见及此系统为开发人员准备了一个方法去实现此功能
pivot_table(values=None,index=None, columns=None,aggfunc="mean",
fill_value=None,margins=False,dropna=True, margins_name="All",observed=False)
使用以下方法,可以更简单得到相同的效果,而且可读性更强,因为 aggfunc 默认是计算平均值,所以如果统计的是单列,可以不用输入 aggfunc
1 _book=[[‘Python Learning from Scratch‘,‘Python‘,‘AI‘,68,2],[‘Pro Apahe Hadoop‘,‘Hadoop‘,‘BG‘,105,3],[‘Python Crash Course‘,‘Python‘,‘AI‘,89,1]
2     ,[‘Beginning Python From Novice‘,‘Python‘,‘AI‘,76,4],[‘Deep Learning with TensorFlow‘,‘TensorFlow‘,‘AI‘,58,3]
3     ,[‘Hadoop:The Definitive Guide‘,‘Hadoop‘,‘BG‘,99,3],[‘HBase: The Definitive Guide‘,‘HBase‘,‘BG‘,108,2],[‘HBase In Action‘,‘HBase‘,‘BG‘,79,2]]
4 column=[‘Book‘,‘Language‘,‘Type‘,‘Price‘,‘Count‘]
5 book=pd.DataFrame(data=_book,columns=column)
6 print(str(book)+‘\n‘)
7 print(book.pivot_table(values=‘Price‘,index=‘Language‘,columns=‘Type‘))
运行结果
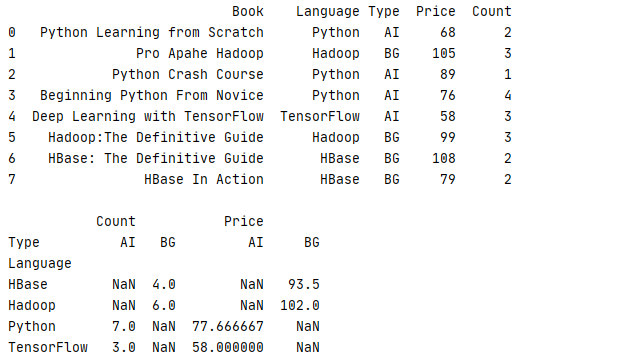
如果需要进行多列计算,刚可以通过 aggfunc 参数为不同的列设置不同的算法,下面的例子就是统计平均价格 Price 和总体数量 Count
1 _book=[[‘Python Learning from Scratch‘,‘Python‘,‘AI‘,68,2],[‘Pro Apahe Hadoop‘,‘Hadoop‘,‘BG‘,105,3],[‘Python Crash Course‘,‘Python‘,‘AI‘,89,1]
2     ,[‘Beginning Python From Novice‘,‘Python‘,‘AI‘,76,4],[‘Deep Learning with TensorFlow‘,‘TensorFlow‘,‘AI‘,58,3]
3     ,[‘Hadoop:The Definitive Guide‘,‘Hadoop‘,‘BG‘,99,3],[‘HBase: The Definitive Guide‘,‘HBase‘,‘BG‘,108,2],[‘HBase In Action‘,‘HBase‘,‘BG‘,79,2]]
4 column=[‘Book‘,‘Language‘,‘Type‘,‘Price‘,‘Count‘]
5 book=pd.DataFrame(data=_book,columns=column)
6 print(str(book)+‘\n‘)
7 print(book.pivot_table(index=‘Language‘,columns=‘Type‘,aggfunc={‘Price‘:np.mean,‘Count‘:‘sum‘}))
运行结果
本章只是对 Pandas 常用方法的进行简单介绍,希望对各位的开发有所帮助,想要更深入地了解其用法,可以参考 pandas 的官网说明 https://pandas.pydata.org/
由于时间仓促,文章难免有出现错漏的地方,敬请点评
对 .Python 开发有兴趣的朋友欢迎加入QQ群:790518786 共同探讨 !
对 JAVA 开发有兴趣的朋友欢迎加入QQ群:174850571 共同探讨!
对 .NET 开发有兴趣的朋友欢迎加入QQ群:162338858 共同探讨 !
Python 基础教程
作者:风尘浪子
https://www.cnblogs.com/leslies2/p/14764130.html
原创作品,转载时请注明作者及出处
Python 基础教程 —— Pandas 库常用方法实例说明
标签:16px 情况 常用 使用 image 指定 www ash 参数
原文地址:https://www.cnblogs.com/leslies2/p/14764130.html