标签:class system xsd odi data one ret getname int
·在前面的博客中,我们已经提到过构造器注入的方法。详情请参照IOC创建对象的方法。
依赖注入:Set注入!
依赖:bean对象的创建依赖于容器!
【环境搭建】
1.复杂类型
public class Address {
    private String address;

    public String getAddress() {
        return address;
    }

    public void setAddress(String address) {
        this.address = address;
    }
}
2.真实测试对象
@Data
public class Student {
    private String name;
    private Address address;
    private String[] books;
    private List<String> hobbies;
    private Map<String, String> card;
    private Set<String> games;
    private String wife;
    private Properties info;
}
使用了Lombok插件,自动生持股setter和getter方法。
3.beans.xml
<?xml version="1.0" encoding="UTF-8"?>
<beans xmlns="http://www.springframework.org/schema/beans"
       xmlns:xsi="http://www.w3.org/2001/XMLSchema-instance"
       xsi:schemaLocation="http://www.springframework.org/schema/beans
        https://www.springframework.org/schema/beans/spring-beans.xsd">

    <bean id="student" class="com.gazikel.pojo.Student">
        <property name="name" value="Gazikel"></property>
    </bean>

</beans>
4.测试类
public static void main(String[] args) {
    ApplicationContext context = new ClassPathXmlApplicationContext("beans.xml");

    Student student = (Student) context.getBean("student");
    System.out.println(student.getName());
}
完善注入
<?xml version="1.0" encoding="UTF-8"?>
<beans xmlns="http://www.springframework.org/schema/beans"
       xmlns:xsi="http://www.w3.org/2001/XMLSchema-instance"
       xsi:schemaLocation="http://www.springframework.org/schema/beans
        https://www.springframework.org/schema/beans/spring-beans.xsd">

    <bean id="address" class="com.gazikel.pojo.Address">
        <property name="address" value="河北省邯郸市"></property>
    </bean>
    <bean id="student" class="com.gazikel.pojo.Student">
        <property name="name" value="Gazikel"></property>
        <property name="address" ref="address"></property>
        <property name="books">
            <array>
                <value>Java从入门到精通</value>
                <value>Mybatis从入门到精通</value>
                <value>Spring从入门到精通</value>
                <value>SpringMVC从入门到精通</value>
            </array>
        </property>
        <property name="hobbies">
            <list>
                <value>抽烟</value>
                <value>喝酒</value>
                <value>烫头</value>
            </list>
        </property>
        <property name="card">
            <map>
                <entry key="身份证" value="132406200101212554"></entry>
                <entry key="校园卡" value="20194077"></entry>
            </map>
        </property>
        <property name="games">
            <set>
                <value>LOL</value>
                <value>GTA5</value>
            </set>
        </property>
        <property name="wife">
            <null/>
        </property>
        <property name="info">
            <props>
                <prop key="url">http://localhost:8080</prop>
                <prop key="username">root</prop>
                <prop key="password">123456</prop>
            </props>
        </property>
    </bean>

</beans>
我们可以使用c命名空间和p命名空间进行注入。
xmlns:p="http://www.springframework.org/schema/p"
xmlns:c="http://www.springframework.org/schema/c"
p标签对应的set方式注入,在之前我们可能是这样写:
<bean name="classic" class="com.example.ExampleBean">
    <property name="email" value="someone@somewhere.com"/>
</bean>
使用p标签后:
<bean name="p-namespace" class="com.example.ExampleBean" p:email="someone@somewhere.com"/>
注意:
c命名和p命名不能直接使用,需要导入约束

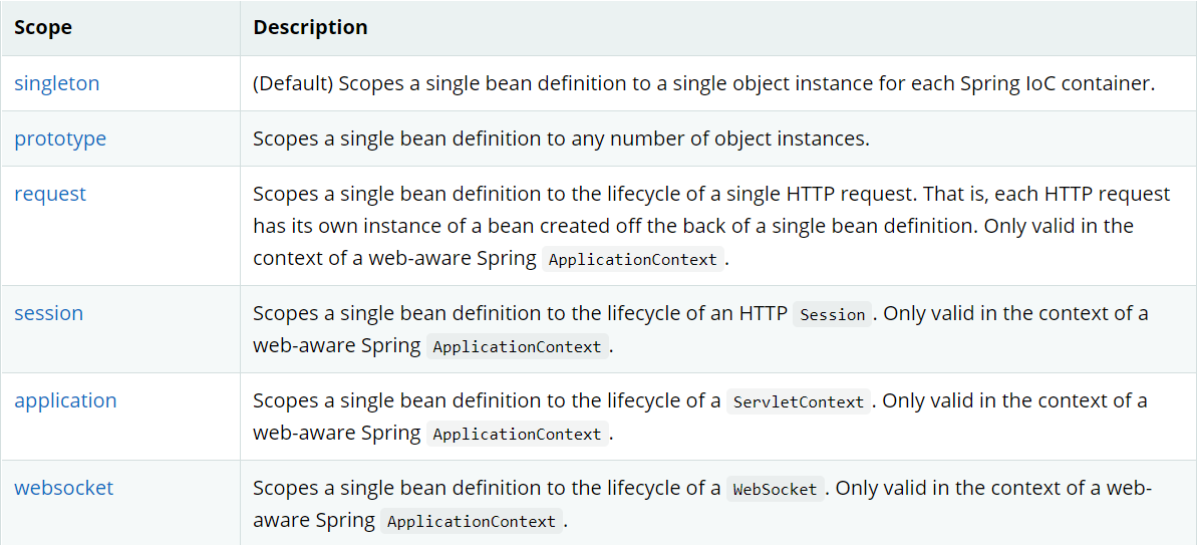
1.单例模式(Spring默认机制)
2.原型模式:每次从容器中get的时候,都会产生一个新的对象!
3.其余在web开发中才会应用到
标签:class system xsd odi data one ret getname int
原文地址:https://www.cnblogs.com/Gazikel/p/14907280.html