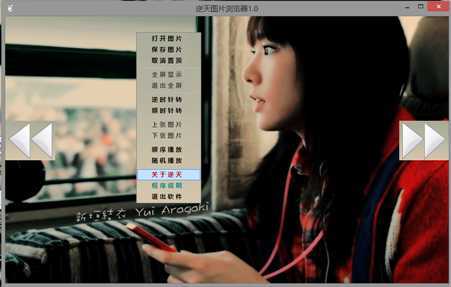
一、设计图纸:
二、代码分析:(赶时间写的,写了快50分钟了,如果有解释不详细的可以问)
1、打开指定图片 OpenFileDiaog控件,先设置过滤器,然后再打开图片,显示在picturebox上
OpenFileDialog openFile = new OpenFileDialog();
openFile.Filter = "jpg图像(*.jpg)|*.jpg|png图像(*.png)|*.png|bmp图像(*.bmp)|*.bmp|所有格式(*.*)|*.*";
openFile.Title = "逆天只允许你打开一张图片";
if (openFile.ShowDialog() == DialogResult.OK)
{
string filePath = openFile.FileName;
ShowPhoto(filePath, PictureBoxSizeMode.Zoom);//调用显示图片的方法---方法看下面
int lastIndex = filePath.LastIndexOf(@"\");
paths = Directory.GetFiles(filePath.Substring(0, lastIndex));//真正获得该目录下所有文件的路径
}
2、越界智能提醒 放个lable上面,不用就visible=false,用就设置为true,再设置下按钮自动隐藏显现
private void MainForm_Load(object sender, EventArgs e)
{
lbl1.Visible = false;//智能提示默认不可见
}
#region 按钮显示和隐藏
public void VisibleFalse()
{
pbtnLeft.Visible = false;
pbtnRight.Visible = false;
}
public void VisibleTrue()
{
pbtnLeft.Visible = true;
pbtnRight.Visible = true;
}
private void pbtnLeft_MouseLeave(object sender, EventArgs e)
{
VisibleFalse();
}
private void pbtnRight_MouseLeave(object sender, EventArgs e)
{
VisibleFalse();
}
private void pictureBox1_MouseLeave(object sender, EventArgs e)
{
VisibleTrue();
}
#endregion
3、置顶显示图片 置顶是TopMost,显示图片因为非常常用就封装一个方法
// 置顶
if (topmost1.Checked == false)
{
this.TopMost = false;
topmost1.Text = " 窗 体 置 顶";
}
else
{
this.TopMost = true;
topmost1.Text = " 取 消 置 顶";
}
//显示图片
public void ShowPhoto(string filePath, PictureBoxSizeMode mode) //PictureBoxSizeMode 枚举类型(以什么方式显示)
{
pictureBox1.ImageLocation = filePath;
pictureBox1.SizeMode = mode;
}
4、键盘控制切换 这个放在MainForm_KeyDown事件中,如果你想放在picturebox中那记得聚焦一下
private void MainForm_KeyDown(object sender, KeyEventArgs e)//触发按键时
{
if (e.KeyCode == Keys.Left || e.KeyCode == Keys.Up)//上一张
{
GetLeft();
}
if (e.KeyCode == Keys.Right || e.KeyCode == Keys.Down)//下一张
{
GetRight();
}
if (e.Control == true && e.KeyCode == Keys.S)
{
SavePhoto();
}
}
5、幻灯片的模式 思路就是Timer控件+Random,产生随机数组(下标),根据这个随机数来显示,Timer控件,每1秒调用一次下一张的方法【??注意Timer的启用和关闭,不施放资源会越来越卡的!!!】
//顺序播放________________________________________________________________________________________
if (sequence.Checked == true)
{
timer2.Enabled = true;
timer2.Start();
sequence.Text = " 取 消 播 放";
}
else
{
sequence.Text = " 顺 序 播 放";
timer2.Stop();
}
private void timer2_Tick(object sender, EventArgs e)//顺序播放
{
GetRight();
}
public void GetRight() //下一张
{
try
{
i++;
if (i >= paths.Length)
{
i = 0;
lbl1.Visible = true;
timer1.Enabled = true;//节约资源
timer1.Start();
}
ShowPhoto(paths[i], PictureBoxSizeMode.Zoom);
}
catch
{
timer2.Stop();
sequence.Text = " 顺 序 播 放";
MessageBox.Show("亲,你还没右键打开图片呢!", "逆天友情提醒");
}
}
//逆序播放________________________________________________________________________________________
try
{
if (random.Checked == true)
{
timer3.Enabled = true;
timer3.Start();
random.Text = " 取 消 播 放";
}
else
{
timer3.Stop();
random.Text = " 随 机 播 放";
}
}
catch
{
MessageBox.Show("亲,你确定你打开了图片?", "逆天友情提醒");
}
private void timer3_Tick(object sender, EventArgs e)//随机播放
{
try
{
Random r = new Random();
int n = r.Next(0, paths.Length);
pictureBox1.ImageLocation = paths[n];
}
catch
{
timer3.Stop();
random.Text = " 随 机 播 放";
MessageBox.Show("亲,你还没打开图片呢!");
}
}
6、图片可以另存 利用了savaFile控件,设置过滤器,获取保存后的图片名字,给image创建一个对象用来接收pictureBox上的图片,image.sava()就可以了[如果你想保存旋转之后的图片就直接右击保存或者Ctrl+S]
SaveFileDialog savaFile = new SaveFileDialog();
savaFile.Filter = "jpg图像(*.jpg)|*.jpg|png图像(*.png)|*.png|bmp图像(*.bmp)|*.bmp|所有格式(*.*)|*.*"; //过滤器
savaFile.Title = "很喜欢这张图片吧~";
if (savaFile.ShowDialog() == DialogResult.OK)
{
string name = savaFile.FileName;
Image image = pictureBox1.Image;
image.Save(name);
}
7、图片全屏显示 思路是这样的,把窗体边框样式设置为None,然后让窗体最大化
this.FormBorderStyle = System.Windows.Forms.FormBorderStyle.None;
this.WindowState = FormWindowState.Maximized;
8、图片旋转功能 系统自带Image.RotateFlip(RotateFlipType)方法,用完后记得pictureBox1.Refresh()一下
//逆时针转
pictureBox1.Image.RotateFlip(RotateFlipType.Rotate90FlipXY);
pictureBox1.Refresh();
//顺时针转
pictureBox1.Image.RotateFlip(RotateFlipType.Rotate90FlipNone);
pictureBox1.Refresh();
9、浅浅的小说明
还有图片删除跟旋转后保存旋转后的图像就下次再说吧
本来准备弄一个靠边隐藏之类的优化的,时间问题就下次弄吧(8期以后)
10、异常一定到位
一个程序大Bug不能有! 不是程序没Bug而是你没找到Bug!
开放过程中多注意点,把每个if else都考虑到,实例化对象时候把未将对象实例化考虑进去,可以省很多事情
很多枚举类型的东西不需要都记得,你记不得时候打个【空格】他就自动出来了
11、★新增:拖拽功能
窗体加载时候加这一句话:this.pictureBox1.AllowDrop = true; PictureBox两个事件:DragEnter(拖拽时发生) DragDrop(拖拽完成时发生)
#region PictureBox支持拖拽
private void pictureBox1_DragEnter(object sender, DragEventArgs e)
{
if (e.Data.GetDataPresent(DataFormats.FileDrop))
{
e.Effect = DragDropEffects.Link;
}
else
{
e.Effect = DragDropEffects.None;
}
}
private void pictureBox1_DragDrop(object sender, DragEventArgs e)
{
string fileName = ((System.Array)e.Data.GetData(DataFormats.FileDrop)).GetValue(0).ToString();
ShowPhoto(fileName, PictureBoxSizeMode.Zoom);//调用显示图片的方法
int lastIndex = fileName.LastIndexOf(@"\");
paths = Directory.GetFiles(fileName.Substring(0, lastIndex));//真正获得该目录下所有文件的路径
this.pictureBox1.Image = Image.FromFile(fileName);
}
#endregion