标签:android style blog http io ar os 使用 sp
之前写过关于Android中ListView的用法,其中可以使用ArrayAdapter,SimpleAdapter,BaseAdapter去实现,这次主要使用的ExpandableListView展示一种两层的效果,ExpandableListView是android中可以实现下拉list的一个控件类似于QQ那种我好友之后就是一排自己的好友,就是两层效果,实现的话使用SimpleExpandableListAdapter即可。
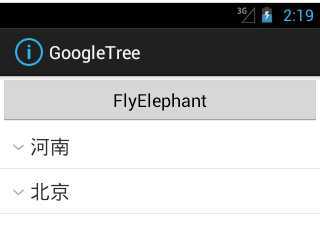
先看下效果吧:
main中xml代码:
  <Button
        android:onClick="test"
        android:layout_width="fill_parent"
        android:layout_height="wrap_content"
        android:text="FlyElephant" />

    <ExpandableListView
        android:id="@id/android:list"
        android:layout_width="fill_parent"
        android:layout_height="fill_parent"
        android:drawSelectorOnTop="false" />
定义一个省份的province.xml:
<?xml version="1.0" encoding="utf-8"?>
<LinearLayout xmlns:android="http://schemas.android.com/apk/res/android"
    android:layout_width="match_parent"
    android:layout_height="match_parent"
    android:orientation="vertical" >

    <TextView
        android:id="@+id/list_provinceText"
        android:layout_width="fill_parent"
        android:layout_height="fill_parent"
        android:paddingBottom="8px"
        android:paddingLeft="30px"
        android:paddingRight="5px"
        android:paddingTop="8px"
        android:textSize="20sp" />

</LinearLayout>
定义了一个地区的child.xml:
<?xml version="1.0" encoding="utf-8"?>
<LinearLayout xmlns:android="http://schemas.android.com/apk/res/android"
    android:layout_width="match_parent"
    android:layout_height="match_parent"
    android:orientation="vertical" >


       <TextView
        android:id="@+id/child_text"
        android:layout_width="fill_parent"
        android:layout_height="fill_parent"
        android:paddingBottom="8px"
        android:paddingLeft="30px"
        android:paddingRight="5px"
        android:paddingTop="8px"
        android:textSize="20sp" />

</LinearLayout>
主要实现代码,代码中都已经注释,就不用细说了,如有疑问可以评论区讨论:
       // 创建一级条目
        List<Map<String, String>> provinces = new ArrayList<Map<String, String>>();
        //创建两个省份一级条目
        Map<String, String> firstProvince= new HashMap<String, String>();
        firstProvince.put("province", "河南");
        Map<String, String> secondProvince= new HashMap<String, String>();
        secondProvince.put("province", "北京");
        provinces.add(firstProvince);
        provinces.add(secondProvince);
        // 创建一级条目下的的二级地区条目
        List<Map<String, String>> childList1= new ArrayList<Map<String, String>>();
        //同样是在一级条目目录下创建两个对应的二级条目目录
        Map<String, String> child1= new HashMap<String, String>();
        child1.put("child", "郑州");
        Map<String, String> child2 = new HashMap<String, String>();
        child2.put("child", "开封");
        childList1.add(child1);
        childList1.add(child2);
        //同上
        List<Map<String, String>> childList2 = new ArrayList<Map<String, String>>();
        Map<String, String> child3 = new HashMap<String, String>();
        child3.put("child", "海淀");
        Map<String, String> child4 = new HashMap<String, String>();
        child4.put("child", "昌平");
        childList2.add(child3);
        childList2.add(child4);
        // 将二级条目放在一个集合里,供显示时使用
        List<List<Map<String, String>>> childs = new ArrayList<List<Map<String, String>>>();
        childs.add(childList1);
        childs.add(childList2);
        /**
         * 使用SimpleExpandableListAdapter显示ExpandableListView
         * 参数1.上下文对象Context
         * 参数2.一级条目目录集合
         * 参数3.一级条目对应的布局文件
         * 参数4.fromto,就是map中的key,指定要显示的对象
         * 参数5.与参数4对应,指定要显示在groups中的id
         * 参数6.二级条目目录集合
         * 参数7.二级条目对应的布局文件
         * 参数8.fromto,就是map中的key,指定要显示的对象
         * 参数9.与参数8对应,指定要显示在childs中的id
         */
        SimpleExpandableListAdapter adapter = new SimpleExpandableListAdapter(
                this, provinces, R.layout.list_group, new String[] { "province" },
                new int[] { R.id.list_groupText }, childs, R.layout.child,
                new String[] { "child" }, new int[] { R.id.child_text });
        setListAdapter(adapter);
忘说了, mainActivity需要继承ExpandableListActivity,看下最终的效果吧:

Android数据适配-ExpandableListView
标签:android style blog http io ar os 使用 sp
原文地址:http://www.cnblogs.com/xiaofeixiang/p/4106921.html