标签:style blog http io ar color os sp strong
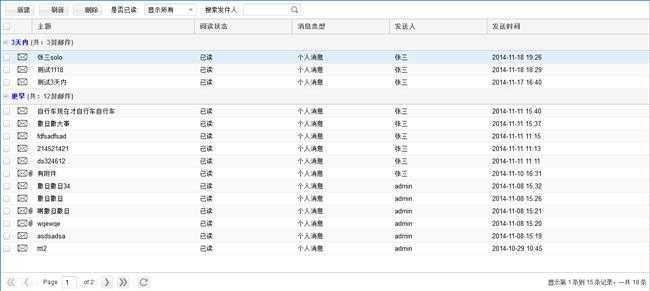
照例,先贴效果图:

本人比较满意,短时间开发的邮箱功能,这是收件箱,还有配套的发件箱与删除箱。
简单说下思路:
1、配置model、store,用的是MVC模式,可参考第一篇学习笔记。
2、页面简单布局:
Ext.define(‘KitchenSink.view.mail.InBox‘, {
    extend: ‘Ext.grid.Panel‘,
    alias : ‘widget.inbox‘,
    xtype: ‘inbox‘,
    autoHeight:true,
    bodyStyle:‘width:100%‘,
    autoWidth:true,
    requires:[
        ‘KitchenSink.store.mail.InBoxStore‘,
    ],
    initComponent : function() {
        inStore = Ext.create(‘KitchenSink.store.mail.InBoxStore‘, {});//实例化store
        this.store = inStore;
        this.store.load();
    this.columns = [{
                    header : ‘主题‘,
                    dataIndex : ‘theme‘,
                    width: ‘25%‘,
                    flex : 1
                },{
                    header : ‘阅读状态‘,
                    dataIndex : ‘readFlag‘,
                    width: ‘15%‘,

                },{
                    header : ‘消息类型‘,
                    dataIndex : ‘messageType‘,
                    width: ‘15%‘
                },{
                    header : ‘发送人‘,
                    dataIndex : ‘sender‘,
                    width: ‘15%
                },{
                    header : ‘发送时间‘,
                    dataIndex : ‘sendtime‘,
                    width: ‘25%‘
                }];

        this.callParent(arguments);
    }

});
3、调节细节,增加功能。
在这我说下各种细节功能的实现,大部分功能实现在initComponent中,根据个人需要也可写在外面。
a.新建/刷新按钮
initComponent中添加:
this.dockedItems = [{
            xtype: ‘toolbar‘,
               items: [{//实现新建按钮
                   iconCls: ‘icon-add‘,
                text: ‘新建‘,
                scope: this,
                action: ‘add‘  //这个是必须,给 Controller
            }, {
                iconCls: ‘icon-fresh‘,
                text: ‘刷新‘,
                action: ‘fresh‘,
                scope: this,
                    handler: function(btn, pressed){
                    btn.up(‘panel‘).store.reload();
                }
            }]
新建的事件为在此处理,交由Controller处理,具体实现位置自定,如按照我这种,需加:action: ‘add‘。
b.下拉框:
{    //实现下拉框
                fieldLabel : ‘  是否已读‘,
                labelWidth: 70,
                width: 180,
                id : ‘ifread‘,
                name: ‘ifread‘,
                allowBlank : false,
                xtype : ‘combo‘,
                editable : false,
                mode : ‘local‘,
                triggerAction : ‘all‘,
                store :  [[1,‘显示所有‘],[2,‘未读‘], [3,‘已读‘]],
                value : 1,
                listeners:{//监听下拉框事件
                       select : function() {
                          var readtag= Ext.getCmp("ifread").getValue();
                          inStore.load({params:{ifread:readtag}});//设置store参数,读取store
                     }
                }
c.分页:
{//实现分页
            xtype:‘pagingtoolbar‘,
            store:inStore,
            dock:‘bottom‘,
            displayInfo:true,
            displayMsg: ‘显示第 {0} 条到 {1} 条记录,一共 {2} 条‘,
            emptyMsg: "没有数据"
        }
d.邮件与附件小图标:
this.columns = [{//实现图标
                    header : ‘‘,
                    dataIndex : ‘attachFlag‘,
                    width: ‘3%‘,
                    renderer:function(val, cellmeta, record, rowIndex, columnIndex, store){  //设置未读颜色
                       if(‘1‘ == val) {
                        return "<div align=‘left‘><img src=‘/mail/mail.png‘ border=‘0‘><img src=‘/mail/attach.gif‘ border=‘0‘></div>";
                       }else return "<div align=‘left‘><img src=‘/mail/mail.png‘ border=‘0‘></div>";
                    }
                }]
加在Column中,attachTag为后台处理后传来的是否有附件的标志。
同样,对某列,某条数据的处理,只需在列中加入renderer:function,依dataIndex返回值处理返回至页面该块的html代码。
e.整条数据格式处理:
viewConfig: {//用以设置行特殊格式
        enableTextSelection: ‘true‘,
        getRowClass:function(record, index, rowParams, store){
            if(record.get(‘readFlag‘)=="未读")
                return"row-s";
            else return "row-f";
        }
    },
其中row-s与row-f是事先定义好的css,判断record中数据,返回需要格式。
f.定时刷新:
setInterval(function() {// 定时刷新
                   inStore.reload();
            }, 1000*60);  //每隔 1 分钟
加在initComponent中。
g.record复选删除:
{ //实现复选删除
                xtype : ‘button‘,
                text : ‘删除‘,
                iconCls: ‘icon-delete‘,
                scope: this,
                handler: function (btn,pressed) {
                    var sm = btn.up(‘panel‘).getSelectionModel();
                    if (sm.hasSelection()) {
                            Ext.Msg.confirm("警告", "确定要删除吗?(确定则将邮件移入已删除邮件箱)", function (button) {
                            if (button == "yes") {
                                var selected = sm.getSelection();
                                var Ids = []; //要删除的id
                                Ext.each(selected, function (item) {
                                    Ids.push(item.get(‘messageId‘));
                                })
                                    //alert(Ids);
                                Ext.Ajax.request({
                                    url : ‘../mail/deleteMessages.dhtml‘,
                                    params : {
                                        ids : Ext.encode(Ids)
                                    },
                                    method : ‘POST‘,
                                    timeout : 2000,

                                    success: function (response, opts) {
                                        Ext.MessageBox.hide();
                                        if (response.responseText) {
                                            inStore.load();
                                            Ext.Msg.alert(‘系统提示‘, "删除成功");
                                        } else {
                                            Ext.Msg.alert("系统提示", ‘删除失败‘);
                                        }
                                    },
                                    failure: function () {
                                        Ext.Msg.alert(‘系统提示‘, ‘系统出错!‘);
                                    }
                                });
                            }
                        });
                    }
                    else {
                        Ext.Msg.alert("错误", "没有任何行被选中,无法进行删除操作!");
                    }
                }
            }
之前需在initComponent中定义复选模式:
var selModel = Ext.create(‘Ext.selection.CheckboxModel‘,{ checkOnly :true });//实现复选
this.selModel = selModel;
checkOnly为true是用来限定只点击选择框才能标记,否则可点击record任何地方,但是会影响选中多项。
h.分组:
this.features = [{//实现分组
            id: ‘group‘,
            ftype: ‘grouping‘,
            groupHeaderTpl: ‘<font color=blue>{name}</font> (共:{rows.length}封邮件)‘,
            hideGroupedHeader: true,
            enableGroupingMenu: false
        }];
在initComponent中设置,之前需要在store定义中设置:groupField: ‘groupName‘。
这些小功能的实现都是我在开发中收集整理的,希望能帮助到大家。
ZP的EXTJS学习笔记(三)——邮箱功能的开发(按钮事件、下拉框、分页、record小图标、整条数据格式处理、定时刷新、record复选删除、分组)
标签:style blog http io ar color os sp strong
原文地址:http://www.cnblogs.com/peachzhan/p/4107911.html