标签:des style blog http io ar color os 使用
Push的原理:

- (BOOL)application:(UIApplication *)application didFinishLaunchingWithOptions:(NSDictionary *)launchOptions
{
      //消息推送
    [self msgPush];

}

/**
    消息推送
 **/
- (void) msgPush
{
    //推送的形式:标记,声音,提示
    if (IS_IOS8) {
        //1.创建消息上面要添加的动作(按钮的形式显示出来)
        UIMutableUserNotificationAction *action = [[UIMutableUserNotificationAction alloc] init];
        action.identifier = @"action";//按钮的标示
        action.title=@"Accept";//按钮的标题
        action.activationMode = UIUserNotificationActivationModeForeground;//当点击的时候启动程序
        //    action.authenticationRequired = YES;
        //    action.destructive = YES;

        UIMutableUserNotificationAction *action2 = [[UIMutableUserNotificationAction alloc] init];
        action2.identifier = @"action2";
        action2.title=@"Reject";
        action2.activationMode = UIUserNotificationActivationModeBackground;//当点击的时候不启动程序,在后台处理
        action.authenticationRequired = YES;//需要解锁才能处理,如果action.activationMode = UIUserNotificationActivationModeForeground;则这个属性被忽略;
        action.destructive = YES;

        //2.创建动作(按钮)的类别集合
        UIMutableUserNotificationCategory *categorys = [[UIMutableUserNotificationCategory alloc] init];
        categorys.identifier = @"alert";//这组动作的唯一标示,推送通知的时候也是根据这个来区分
        [categorys setActions:@[action,action2] forContext:(UIUserNotificationActionContextMinimal)];

        //3.创建UIUserNotificationSettings,并设置消息的显示类类型
        UIUserNotificationSettings *notiSettings = [UIUserNotificationSettings settingsForTypes:(UIUserNotificationTypeBadge | UIUserNotificationTypeAlert | UIRemoteNotificationTypeSound) categories:[NSSet setWithObjects:categorys, nil]];
        [[UIApplication sharedApplication] registerUserNotificationSettings:notiSettings];
    }else{

        [[UIApplication sharedApplication] registerForRemoteNotificationTypes: UIRemoteNotificationTypeBadge |UIRemoteNotificationTypeSound | UIRemoteNotificationTypeAlert];
    }

}
- (void)application:(UIApplication *)application didRegisterUserNotificationSettings:(UIUserNotificationSettings *)notificationSettings
{
//注册远程通知
[application registerForRemoteNotifications];
}
2、 IOS跟APNS Server要deviceToken。应用程序接受deviceToken。【代码如下:】
3、应用程序将deviceToken发送给PUSH服务端程序
- (void)application:(UIApplication *)application didRegisterForRemoteNotificationsWithDeviceToken:(NSData *)deviceToken
{
    MyLog(@"myToken = %@",deviceToken);
    //保存token
    [Config saveToken:[NSString stringWithFormat:@"%@",deviceToken]];
//将deviceToken发送给服务器
[self initNetworkState:[NSString stringWithFormat:@"%@",deviceToken]];
}
-(void)initNetworkState:(NSString *)pToken
{
NSDictionary *dicJson = [PackJsonForMine packTokenJson:pToken];
NSError *error;
NSData *jsonData = [NSJSONSerialization dataWithJSONObject:dicJson options:NSJSONWritingPrettyPrinted error: &error];
NSMutableData *tempJsonData = [NSMutableData dataWithData:jsonData];
request = [ASIHTTPRequest requestWithURL:[NSURL URLWithString:IDS_URL_TOKEN]];
[request setRequestMethod:@"POST"];
[request setPostBody:tempJsonData];
[request setDelegate:self];
[request setDidFailSelector:@selector(requestLogFailed:)];
[request setDidFinishSelector:@selector(requestLogFinish:)];
[request startAsynchronous];
}
/**
发送token失败
**/
- (void)requestLogFailed:(ASIHTTPRequest *)requests
{
MyLog(@"发送token到服务器失败%@",[requests responseString]);
}
/**
发送token成功
**/
- (void)requestLogFinish:(ASIHTTPRequest *)requests
{
[Config saveTokenFlag];
}
#pragma mark - 处理推送的消息内容
- (void)application:(UIApplication *)application didReceiveRemoteNotification:(NSDictionary *)userInfo
{
    self.urlStr = [userInfo valueForKey:@"link"];
    self.message = [[userInfo objectForKey:@"aps"] objectForKey:@"alert"];

    [UIApplication sharedApplication].applicationIconBadgeNumber = [UIApplication sharedApplication].applicationIconBadgeNumber = [[[userInfo objectForKey:@"aps"] objectForKey:@"badge"] intValue];

    //注意:在打开应用的时候,是需要一个弹框提醒的,不然用户看不到推送消息
    if (application.applicationState == UIApplicationStateActive) {

        if (self.urlStr.length > 0) {

            CustomIOS7AlertView *alertView = [[CustomIOS7AlertView alloc] init];
            //自定义AlertView
            [alertView setContainerView:[self createView]];
            [alertView setButtonTitles:[NSMutableArray arrayWithObjects:@"关闭",@"查看", nil]];
            [alertView setBackgroundColor:[UIColor clearColor]];
            [alertView setDelegate:self];
            [alertView setUseMotionEffects:true];
            [alertView show];

        }else{

            CustomIOS7AlertView *alertView = [[CustomIOS7AlertView alloc] init];
            //自定义AlertView
            [alertView setContainerView:[self createView]];
            [alertView setButtonTitles:[NSMutableArray arrayWithObjects:@"关闭", nil]];
            [alertView setBackgroundColor:[UIColor clearColor]];
            [alertView setDelegate:self];
            [alertView setUseMotionEffects:true];
            [alertView show];
        }
    }else{
        if (self.urlStr.length > 0) {
            WebViewController *webViewC = [[WebViewController alloc] init];
            webViewC.link = self.urlStr;
            [Tool showHideToolBar:HIDE];
            [navIntergralController pushViewController:webViewC animated:YES];
        }

    }

}
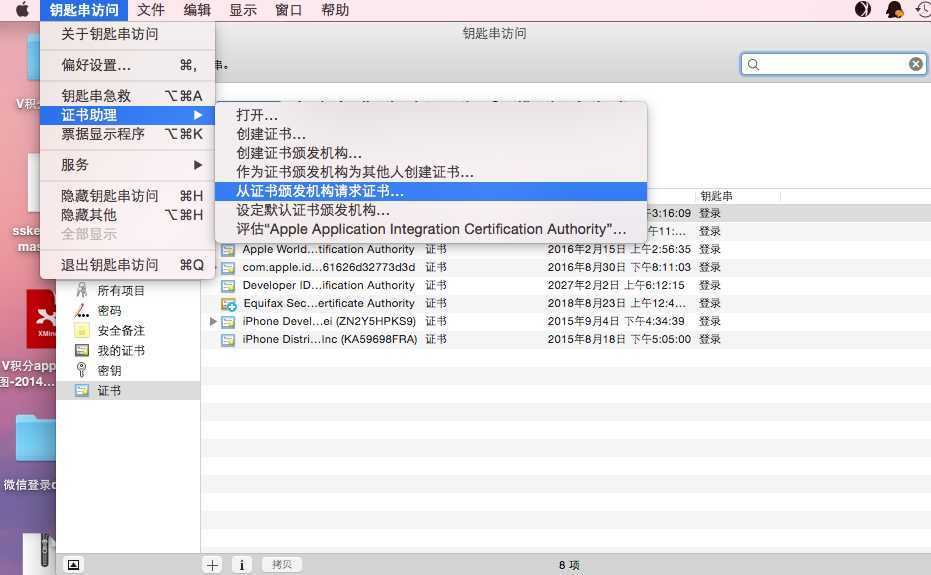
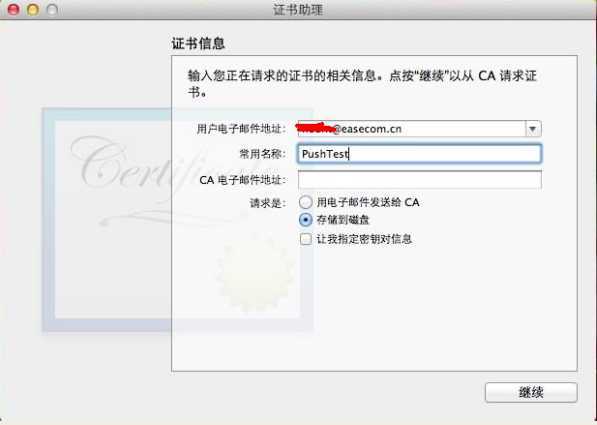
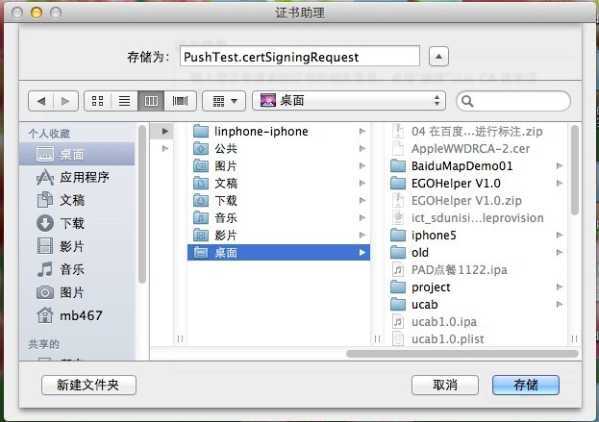
无论是iPhone客户端跟APNS,还是Provider和APNS都需要通过证书进行连接的。下面介绍一下所用到证书的制作。
一、CSR文件


标签:des style blog http io ar color os 使用
原文地址:http://www.cnblogs.com/yuanyuandachao/p/4113321.html