标签:android style blog http io ar color os 使用
Android中常常使用shape来定义控件的一些显示属性来美化UI;
shape的常用属性有:
(1)solid:填充,设置填充的颜色;
(2)stroke:描边,设置边界的宽度、颜色等;
(3)corners:圆角,五个属性,全部设置的话,会覆盖;
android:radius="20dp" 设置四个角的半径
android:topLeftRadius="20dp" 设置左上角的半径
android:topRightRadius="20dp" 设置右上角的半径
android:bottomLeftRadius="20dp" 设置右下角的半径
android:bottomRightRadius="20dp" 设置左下角的半径
(4)padding:定义内容离边界的距离,其中的属性类似于android:padding_left,android:padding_right;
(5)gradient:对应颜色渐变;当设置填充颜色后,无渐变效果,android:angle 是指从哪个角度开始变,angle的值必须是45的倍数(包括0),仅在type="linear"有效,不然会报错;
(6)size:设置大小;
例如:
activity_main.xml
<?xml version="1.0" encoding="utf-8"?>
<LinearLayout xmlns:android="http://schemas.android.com/apk/res/android"
    android:layout_width="match_parent"
    android:layout_height="match_parent"
    android:orientation="vertical" >

    <TextView
        android:layout_width="match_parent"
        android:layout_height="wrap_content"
        android:gravity="center"
        android:text="@string/hello_world"
        android:textSize="30sp" />

    <LinearLayout
        android:layout_width="match_parent"
        android:layout_height="match_parent"
        android:orientation="horizontal" >

        <Button
            android:id="@+id/roundButton"
            android:layout_width="wrap_content"
            android:layout_height="wrap_content"
            android:layout_marginLeft="15dp"
            android:background="@layout/shape1"
            android:text="@string/button1" />

        <Button
            android:layout_width="wrap_content"
            android:layout_height="wrap_content"
            android:layout_marginLeft="15dp"
            android:background="@layout/shape2"
            android:text="@string/button1" />

        <Button
            android:layout_width="wrap_content"
            android:layout_height="wrap_content"
            android:layout_marginLeft="15dp"
            android:background="@layout/shape3"
            android:text="@string/button1" />
    </LinearLayout>

</LinearLayout>
shape1.xml:
<?xml version="1.0" encoding="UTF-8"?>
<shape xmlns:android="http://schemas.android.com/apk/res/android"
android:shape="rectangle" >
<!-- 填充的颜色 -->
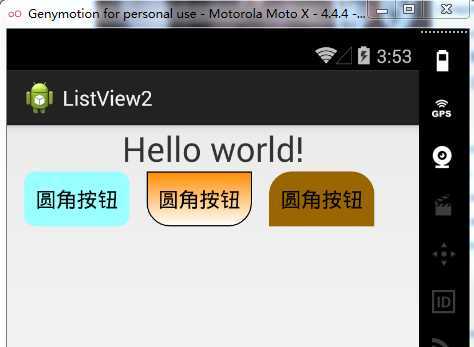
<solid android:color="#99FFFF" />
<!-- 设置按钮的四个角为弧形 -->
<corners android:radius="20dp" />
<!-- padding:Button里面的文字与Button边界的间隔 -->
<padding
android:bottom="10dp"
android:left="10dp"
android:right="10dp"
android:top="10dp" />
</shape>
shape2.xml
<?xml version="1.0" encoding="UTF-8"?>
<shape xmlns:android="http://schemas.android.com/apk/res/android"
    android:shape="rectangle" >

    <!-- 填充的颜色 -->

    <solid android:color="#FFCC66" />

    <!-- 设置按钮的左下角和右下角是圆形边框 -->

    <corners
        android:bottomLeftRadius="20dp"
        android:bottomRightRadius="20dp" />

    <!-- 描边 -->

    <stroke
        android:width="1dp"
        android:color="#000000" />

    <!-- padding:Button里面的文字与Button边界的间隔 -->

    <padding
        android:bottom="10dp"
        android:left="10dp"
        android:right="10dp"
        android:top="10dp" />

</shape>
shape3.xml
<?xml version="1.0" encoding="UTF-8"?>
<shape xmlns:android="http://schemas.android.com/apk/res/android"
    android:shape="rectangle" >

    <!-- 填充的颜色 -->

    <solid android:color="#996600" />

    <!-- 设置按钮的左上角和右上角为圆形边框 -->

    <corners
        android:topLeftRadius="20dp"
        android:topRightRadius="20dp"
        />

    <!-- padding:Button里面的文字与Button边界的间隔 -->

    <padding
        android:bottom="10dp"
        android:left="10dp"
        android:right="10dp"
        android:top="10dp" />

</shape>
MainActivity.java
package com.xiaozhang.listview2;

import android.app.Activity;
import android.os.Bundle;
import android.view.View;
import android.view.View.OnClickListener;
import android.widget.Button;
import android.widget.Toast;

public class MainActivity extends Activity {

    Button roundButton;

    @Override
    protected void onCreate(Bundle savedInstanceState) {
        super.onCreate(savedInstanceState);
        setContentView(R.layout.activity_main);
        roundButton = (Button) findViewById(R.id.roundButton);

        roundButton.setOnClickListener(new OnClickListener() {
            public void onClick(View v) {
                Toast.makeText(MainActivity.this, "你点击了圆角按钮", Toast.LENGTH_LONG)
                        .show();
            }
        });
    }
}
标签:android style blog http io ar color os 使用
原文地址:http://www.cnblogs.com/xiaozhang2014/p/4128223.html