标签:android style blog http io ar os 使用 sp
年末加班基本上一周都没什么时候回家写代码,回到家就想睡觉,周末难得有时间写个博客,上次写了一篇关于SlideMenu开源项目的导入问题,这次主要讲讲使用的问题,SlideMenu应用的广泛程度就不用说了,基本上是App的标配,关于SlideMenu的各种使用方法有很多,网上各种Demo也很多,想来想去还是按照自己本身的实战方式去写写吧,走过的坑希望大家基本上不会遇到,开始正题:
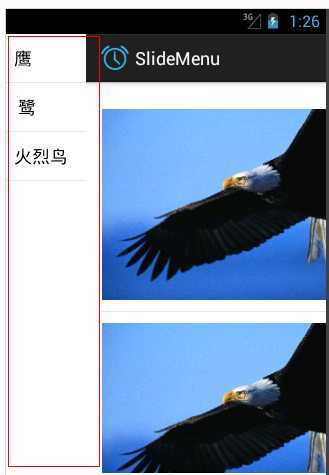
写布局文件之前先看下最终的效果图,昨天红色就是滑动出现的区域,右边的图片由左边的事件触发:

activity_main.xml中的布局:
<FrameLayout xmlns:android="http://schemas.android.com/apk/res/android"
    xmlns:tools="http://schemas.android.com/tools"
    android:id="@+id/main_frame"
    android:layout_width="match_parent"
    android:layout_height="match_parent"
    android:paddingBottom="@dimen/activity_vertical_margin"
    android:paddingLeft="@dimen/activity_horizontal_margin"
    android:paddingRight="@dimen/activity_horizontal_margin"
    android:paddingTop="@dimen/activity_vertical_margin"
    tools:context="com.example.slidemenu.MainActivity" >

    <ListView
        android:id="@+id/list_base"
        android:layout_width="match_parent"
        android:layout_height="match_parent" >
    </ListView>

</FrameLayout>
menu_frame.xml中主要是用于右边显示布局,单独写出来一个是为了方便以后的替换:
<?xml version="1.0" encoding="utf-8"?>
<FrameLayout xmlns:android="http://schemas.android.com/apk/res/android"
    android:layout_width="match_parent"
    android:layout_height="match_parent"
    android:id="@+id/menu_frame">


</FrameLayout>
slide_menu.xml中主要用来显示SlideMenu中的数据,最后通过代码区
<?xml version="1.0" encoding="utf-8"?>
<ListView xmlns:android="http://schemas.android.com/apk/res/android"
    android:id="@+id/list_slide"
    android:layout_width="match_parent"
    android:layout_height="match_parent">

</ListView>
list_item中的布局文件,之后自定义的Adapter会用到:
<?xml version="1.0" encoding="utf-8"?>
<LinearLayout xmlns:android="http://schemas.android.com/apk/res/android"
    android:layout_width="match_parent"
    android:layout_height="match_parent"
    android:orientation="horizontal" >

    <ImageView
        android:id="@+id/list_image"
       android:layout_width="wrap_content"
       android:layout_height="wrap_content"/>


</LinearLayout>
首先MainActivity导入开源项目包(如果导入有问题可以参考本人的上一篇文章)之后继承SlidingFragmentActivity;
自定义 实例化Slide_Menu.xml的类:
public class MyMenuFragment extends Fragment implements OnItemClickListener {

	private View view;
	private String[] listArrStrings=new String[]{"鹰"," 鹭","火烈鸟"};
	@Override
	public void onCreate(Bundle savedInstanceState) {
		// TODO Auto-generated method stub
		super.onCreate(savedInstanceState);
	}

	@Override
	public View onCreateView(LayoutInflater inflater, ViewGroup container,
			Bundle savedInstanceState) {
		// TODO Auto-generated method stub
		view=LayoutInflater.from(getActivity()).inflate(R.layout.slide_menu, null);
		return view;
	}

	@Override
	public void onActivityCreated(Bundle savedInstanceState) {
		// TODO Auto-generated method stub
		super.onActivityCreated(savedInstanceState);
		ListView  listView=(ListView) view.findViewById(R.id.list_slide);
		listView.setAdapter(new ArrayAdapter<String>(getActivity(),android.R.layout.simple_list_item_1, listArrStrings));
		listView.setOnItemClickListener(this);
	}


	@Override
	public void onItemClick(AdapterView<?> parent, View view, int position,
			long id) {
		// TODO Auto-generated method stub

		if(getActivity() instanceof MainActivity){
			((MainActivity)getActivity()).changeImage(position);
		}
	}

}
onCreate中方法中调用:
	super.onCreate(savedInstanceState);
		setBehindContentView(R.layout.menu_frame);
		setContentView(R.layout.activity_main);
		slidingMenu = getSlidingMenu();
		slidingMenu.setTouchModeAbove(SlidingMenu.TOUCHMODE_FULLSCREEN);
		slidingMenu.setMode(SlidingMenu.LEFT_RIGHT);
		slidingMenu.setBehindWidth(80);


		MyMenuFragment menuFragment = new MyMenuFragment();
		getSupportFragmentManager().beginTransaction()
				.replace(R.id.menu_frame, menuFragment, "MyMenu").commit();
MyMenuFragment中如果回调MainActivity调用的方法:
	public  void  changeImage(int index){
		ListView view=(ListView) findViewById(R.id.list_base);
		switch (index) {
		case 0:
			view.setAdapter(new MyListAdapter(this, R.drawable.eagle));
			break;
		case 1:
			view.setAdapter(new MyListAdapter(this, R.drawable.heron));
			break;
		case 2:
			view.setAdapter(new MyListAdapter(this, R.drawable.flamingo));
			break;
		default:
			break;
		}
	}
最后是自定义的MyListAdapter:
 public class MyListAdapter extends BaseAdapter{

	 private int resourceID;
	 private LayoutInflater inflater;
	public MyListAdapter(Context context,int resId){
		inflater=LayoutInflater.from(context);
		resourceID=resId;
	}
	@Override
	public int getCount() {
		// TODO Auto-generated method stub
		return 3;
	}

	@Override
	public Object getItem(int position) {
		// TODO Auto-generated method stub
		return null;
	}

	@Override
	public long getItemId(int position) {
		// TODO Auto-generated method stub
		return 0;
	}

	@Override
	public View getView(int position, View convertView, ViewGroup parent) {
		// TODO Auto-generated method stub
		View view=null;
		if (convertView==null) {
		  view=inflater.inflate(R.layout.list_item,null);
		}else{
			view=convertView;
		}
		ImageView imageView=(ImageView) view.findViewById(R.id.list_image);
		imageView.setImageResource(resourceID);
		return view;
	}

  }
本人只是设置左滑动,其实还是设置右滑动,设置左右滑动通过setSecondaryMenu设置;
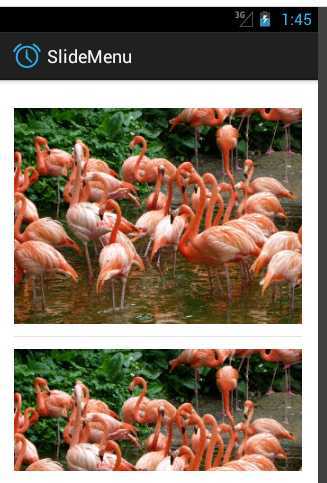
最后看下火烈鸟吧,老外还是比较爱护动物的,以上都是开源项目SlideMenu中的图片:

标签:android style blog http io ar os 使用 sp
原文地址:http://www.cnblogs.com/xiaofeixiang/p/4148837.html