标签:style blog http io ar os sp java strong
前提:
1.spring mvc环境已搭建好,能跑起来。
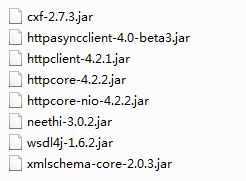
2.下载apache-cxf-2.7.3.zip的压缩包,解压apache-cxf-2.7.3.zip压缩包,拷贝如下几个jar包即可。

配置web.xml文件:
<context-param>
<param-name>contextConfigLocation</param-name>
<param-value>classpath:applicationContext.xml,classpath:cxf-services.xml</param-value>
</context-param>
<servlet>
<servlet-name>CXFServlet</servlet-name>
<servlet-class>org.apache.cxf.transport.servlet.CXFServlet</servlet-class>
<load-on-startup>2</load-on-startup>
</servlet>
<servlet-mapping>
<servlet-name>CXFServlet</servlet-name>
<url-pattern>/services/*</url-pattern>
</servlet-mapping>
java代码:
Service接口类:
import javax.jws.WebService;
@WebService
public interface CxfService {
public String sayHello(String username);
}
Service接口实现类:
import javax.jws.WebService;
@WebService(endpointInterface = "com.digitalchina.xcf.dao.CxfService", serviceName = "helloWorld", targetNamespace = "http://dao.cxf.ws.com/")
public class CxfServiceImpl {
public String sayHello(String username) {
return username + "hello world";
}
}
配置cxf-services.xml文件:
开头需要引入以下三个文件:
<import resource="classpath:META-INF/cxf/cxf.xml" />
<import resource="classpath:META-INF/cxf/cxf-extension-soap.xml" />
<import resource="classpath:META-INF/cxf/cxf-servlet.xml" />
<!-- 配置bean implementor表示要 暴露的bean,address表示wsdl的访问路径-->
<jaxws:endpoint id="helloWorld" implementor="com.digitalchina.xcf.dao.impl.CxfServiceImpl" address="/HelloWorld" />
页面访问路径:http://localhost:7002/card/services/HelloWorld?wsdl,如果能看到xml信息就说明配置成功了。
标签:style blog http io ar os sp java strong
原文地址:http://www.cnblogs.com/lucky-girl/p/4155173.html