标签:des winform style blog http io ar color os
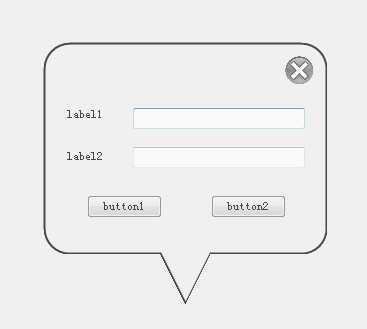
昨天分享了一个环形滚动条控件,今天分享一个提示框风格的窗体。代码如下:
/// <summary>
    /// 继承自Form,但将FormBorderStyle设置为None
    /// </summary>
    public partial class TipForm : Form
    {
        public TipForm()
        {
            InitializeComponent();
        }

        /// <summary>
        /// 鼠标按下位置,方便移动窗体
        /// </summary>
        private Point ptMouseDown;

        /// <summary>
        /// 窗体下部分尖头的坐标位置
        /// </summary>
        private Point position;
        public Point Position
        {
            get { return position; }
            set
            {
                position = value;
                SetPosition(position);
            }
        }

        /// <summary>
        /// 设置窗口的圆角半径
        /// </summary>
        private int radius = 50;
        public int Radius
        {
            get { return radius; }
            set { radius = value; }
        }

        /// <summary>
        /// 重写OnPaint方法以绘制窗体边框
        /// </summary>
        /// <param name="e"></param>
        protected override void OnPaint(PaintEventArgs e)
        {
            base.OnPaint(e);
            Graphics graph = e.Graphics;
            graph.SmoothingMode = SmoothingMode.AntiAlias;
            GraphicsPath path = GetTipPath(ClientRectangle);
            Rectangle rect = new Rectangle(ClientRectangle.X, ClientRectangle.Y,
                ClientRectangle.Width, ClientRectangle.Height);
            rect.Inflate(-1, -1);
            GraphicsPath border = GetTipPath(rect);
            GraphicsPath curve = new GraphicsPath();
            graph.DrawPath(new Pen(Color.Black,2), border);
            this.Region = new Region(path);
        }

        /// <summary>
        /// 根据窗体下部的顶点位置设置窗体位置
        /// </summary>
        /// <param name="pos">屏幕坐标点</param>
        public void SetPosition(Point pos)
        {
            this.Location = new Point(pos.X - Size.Width / 2,
                pos.Y - Size.Height);
        }

        /// <summary>
        /// 根据当前窗体的ClientRectangle属性获取Tip风格路径
        /// </summary>
        /// <param name="rect"></param>
        /// <returns></returns>
        private GraphicsPath GetTipPath(Rectangle rect)
        {
            GraphicsPath path = new GraphicsPath();
            int height = rect.Height - Radius;
            path.StartFigure();
            path.AddArc(rect.X, rect.Y, Radius, Radius, 270, -90);
            path.AddArc(rect.X, rect.Y + height - Radius, Radius, Radius,
                180, -90);
            path.AddLine(
                new Point(rect.X + Radius / 2, rect.Y + height),
                new Point(rect.X + rect.Width / 2 - Radius / 2,
                    rect.Y + height));
            path.AddLine(
               new Point(rect.X + rect.Width / 2 - Radius / 2,
                   rect.Y + height),
               new Point(rect.X + rect.Width / 2, rect.Y + height + Radius));
            path.AddLine(
               new Point(rect.X + rect.Width / 2, rect.Y + height + Radius),
               new Point(rect.X + rect.Width / 2 + Radius / 2,
                   rect.Y + height));
            path.AddLine(
                new Point(rect.X + rect.Width / 2 + Radius / 2,
                    rect.Y + height),
                new Point(rect.X + rect.Width - Radius / 2,
                    rect.Y + height));
            path.AddArc(rect.X + rect.Width - radius,
                rect.Y + height - Radius, Radius, Radius, 90, -90);
            path.AddArc(rect.X + rect.Width - Radius, rect.Y,
                Radius, Radius, 0, -90);
            path.AddLine(new Point(rect.X + rect.Width - Radius / 2, rect.Y),
                new Point(rect.X + Radius / 2, rect.Y));

            path.CloseFigure();
            return path;
        }

        private void button1_Click(object sender, EventArgs e)
        {
            Close();
        }

        /// <summary>
        /// 鼠标移动事件
        /// </summary>
        /// <param name="sender"></param>
        /// <param name="e"></param>
        private void TipForm_MouseMove(object sender, MouseEventArgs e)
        {
            if (e.Button == MouseButtons.Left)
            {
                Point pt = e.Location;
                Location = new Point(Location.X + pt.X - ptMouseDown.X,
                    Location.Y + pt.Y - ptMouseDown.Y);
            }
        }

        /// <summary>
        /// 鼠标按下事件
        /// </summary>
        /// <param name="sender"></param>
        /// <param name="e"></param>
        private void TipForm_MouseDown(object sender, MouseEventArgs e)
        {
            if (e.Button == MouseButtons.Left)
            {
                ptMouseDown = e.Location;
            }
        }

        private void btnClose_Click(object sender, EventArgs e)
        {
            Close();
        }

        private void TipForm_SizeChanged(object sender, EventArgs e)
        {
            Point pt = new Point(ClientRectangle.X + ClientRectangle.Width - Radius / 4 - 32,
                ClientRectangle.Y + Radius / 4);
            btnClose.Location = pt;
        }
    }
主要是通过创建一个表示窗体轮廓的路径,然后根据这个路径设置窗体的Region属性来完成的。下面是效果截图:

标签:des winform style blog http io ar color os
原文地址:http://www.cnblogs.com/lvniao/p/4156182.html