码迷,mamicode.com
首页 > 移动开发 > 详细

ios的文件加载和保存

时间:2014-12-11 12:31:31      阅读:219      评论:0      收藏:0      [点我收藏+]

标签:ios   plist   nscoding   归档反归档   编码解码   

最近,一直在看比较基础的知识,因为感觉自己需要整理一下最基层的东西,然后才能系统的结合起来,很多时候我们做项目都需要对文件加载和保存,我自己对已有知识整理了一下:


1、使用属性列表保存对象:
在Cocoa中,与一类名为属性列表的对象,常简称为plist。这些列表包含Cocoa知道如何操作的一组对象。具体来讲,Cocoa知道如何将它们保存到文件中并进行加载。属性列表类包括:NSArray,NSDictionary,NSString和NSData,以及它们的变体(Mutable)

  1. NSAutoreleasePool *pool = [[NSAutoreleasePool alloc] init];  
  2. NSArray *array = [NSArray arrayWithObjects:@"First",  
  3.                               @"second",@"third",@"fourth",@"fifth",nil];  
  4. [array writeToFile:@"array.plist" atomically:YES];


2、编码对象
遗憾的是,无法总是将对象信息表示为属性列表类。如果能将所有对象都表示为数组字典,我们就没有必要使用自己的类了。所幸,Cocoa具备一种机制来将对象自身转化为某种格式并保存到磁盘中。对象可以将它们的实例变量和其它数据编码为数据块,然后保存到磁盘中。遗憾将这些数据块读到内存中,并且还能基于保存的数据创建新对象。这个过程称为编码和解码,或称为序列化和反序列化。
    通过NSCoding协议,可以使用自己的对象实现相同功能,实现它的两个方法: 
- (void)encodeWithCoder:(NSCoder *)aCoder;
- (id)initWithCoder:(NSCoder *)aDecoder;
NSCoder是一个抽象类,定义一些有用的方法来在对象与NSData之间来回转换。完全不需要创建新NSCoder,因为它事件上并无多大作用。但是我们实际上要使用NSCoder的一些具体子类来编码解码对象。我们将使用其中两个子类NSKeyedArchiver和NSKeyedUnArchiver.
下面是一个例子:
头文件类BookObj.h的源码:


  1. //  
  2. //  BookObj.h  
  3.   
  4. //  
  5.   
  6. #import <Cocoa/Cocoa.h>  
  7. @interface BookObj:NSObject<NSCoding>{  
  8.     NSString *bookName;  
  9.     NSString *author;  
  10. }  
  11.   
  12. @property (copy) NSString *bookName;  
  13. @property (copy) NSString *author;  
  14.   
  15.   
  16. -(id)initWithName:(NSString *)name  
  17.            author:(NSString *) au ;  
  18.  

实现类BookObj.m的源码:


  1. //  
  2. //  BookObj.m  
  3.   
  4. //  
  5. #import "BookObj.h"  
  6.   
  7.   
  8. @implementation BookObj  
  9.   
  10. @synthesize bookName;  
  11. @synthesize author;  
  12. -(id)initWithName:(NSString *)name  
  13.            author:(NSString *) au{  
  14.     if (self = [super init]) {  
  15.         self.bookName = name;  
  16.         self.author = au;  
  17.     }  
  18.     return self;  
  19. }  
  20.   
  21. - (void)encodeWithCoder:(NSCoder *)aCoder{  
  22.     [aCoder encodeObject:self.bookName forKey:@"bookName"];  
  23.     [aCoder encodeObject:self.author    forKey:@"author"];  
  24. }  
  25. - (id)initWithCoder:(NSCoder *)aDecoder{  
  26.     if (self =[super init]) {  
  27.         self.bookName = [aDecoder decodeObjectForKey:@"bookName"];  
  28.         self.author = [aDecoder decodeObjectForKey:@"author"];  
  29.     }  
  30.     return self;  
  31. }  
  32.   
  33.   
  34. int main(int argc ,const char *argv[]){  
  35.     BookObj *bookObj = [[BookObj alloc] initWithName:@"iPhone编程指南"  
  36.                                               author:@"David"];  
  37.       
  38.     [NSKeyedArchiver archiveRootObject:bookObj toFile:@"bookObj.plist"];  
  39.     NSLog(@"Success to archive file bookObj.plist!");  
  40.     BookObj *bookOb =   [NSKeyedUnarchiver unarchiveObjectWithFile:@"bookObj.plist"];  
  41.       
  42.     NSLog(@"The book name is :%@",bookOb.author);  
  43.     return 0;  
  44. }  
  45. @end  

/==============================================================

下面镔哥具体介绍一下plist文件和NSCoding协议

在做iOS开发时,经常用到到plist文件,  那plist文件是什么呢? 它全名是:Property List,属性列表文件,它是一种用来存储串行化后的对象的文件。属性列表文件的扩展名为.plist ,因此通常被称为 plist文件。文件是xml格式的。

Plist文件通常用于储存用户设置,也可以用于存储捆绑的信息

1、创建项目Plistdemo


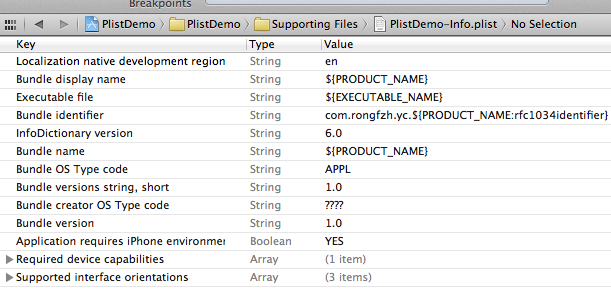
项目创建之后可以找到项目对应的plist文件,打开如下图所示:
bubuko.com,布布扣

在编辑器中显示类似与表格的形式,可以在plist上右键,用源码方式打开,就能看到plist文件的xml格式了。


2、创建plist文件。


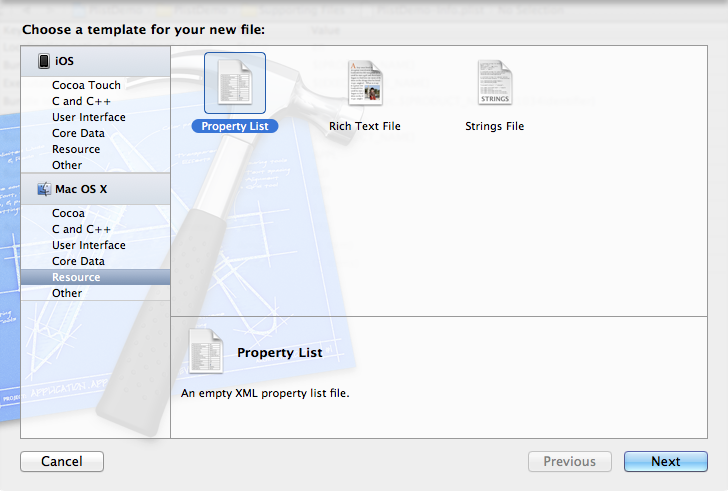
按command +N快捷键创建,或者File —> New —> New File,选择Mac OS X下的Property List
bubuko.com,布布扣

bubuko.com,布布扣

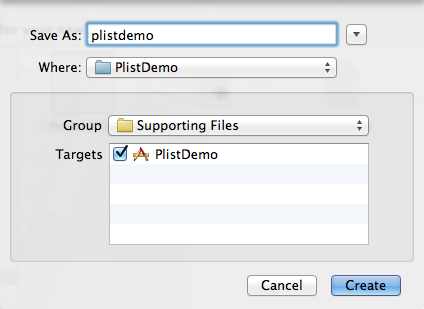
创建plist文件名为plistdemo。


打开plistdemo文件,在空白出右键,右键选择Add row 添加数据,添加成功一条数据后,在这条数据上右键看到 value Type选择Dictionary。点加号添加这个Dictionary下的数据

bubuko.com,布布扣

添加完key之后在后面添加Value的值,添加手机号和年龄


创建完成之后用source code查看到plist文件是这样的:


  1. <?xml version="1.0" encoding="UTF-8"?>  
  2. <!DOCTYPE plist PUBLIC "-//Apple//DTD PLIST 1.0//EN" "http://www.apple.com/DTDs/PropertyList-1.0.dtd">  
  3. <plist version="1.0">  
  4. <dict>  
  5.     <key>jack</key>  
  6.     <dict>  
  7.         <key>phone_num</key>  
  8.         <string>13801111111</string>  
  9.         <key>age</key>  
  10.         <string>22</string>  
  11.     </dict>  
  12.     <key>tom</key>  
  13.     <dict>  
  14.         <key>phone_num</key>  
  15.         <string>13901111111</string>  
  16.         <key>age</key>  
  17.         <string>36</string>  
  18.     </dict>  
  19. </dict>  
  20. </plist>  


  21. 3、读取plist文件的数据


    现在文件创建成功了,如何读取呢,实现代码如下:
    1. - (void)viewDidLoad  
    2. {  
    3.     [super viewDidLoad];  
    4.     //读取plist  
    5.   
    6.     NSString *plistPath = [[NSBundle mainBundle] pathForResource:@"plistdemo" ofType:@"plist"];  
    7.     NSMutableDictionary *data = [[NSMutableDictionary alloc] initWithContentsOfFile:plistPath];  
    8.     NSLog(@"%@", data);//直接打印数据。  
    9. }  

    打印出来的结果:

    1. PlistDemo[6822:f803] {  
    2.     jack =     {  
    3.         age = 22;  
    4.         "phone_num" = 13801111111;  
    5.     };  
    6.     tom =     {  
    7.         age = 36;  
    8.         "phone_num" = 13901111111;  
    9.     };  
    10. }  

    这样就把数据读取出来了。


4、创建和写入plist文件

在开发过程中,有时候需要把程序的一些配置保存下来,或者游戏数据等等。 这时候需要写入Plist数据。

写入的plist文件会生成在对应程序的沙盒目录里。

接着上面读取plist数据的代码,加入了写入数据的代码,


  1. <strong>- (void)viewDidLoad  
  2. {  
  3.     [super viewDidLoad];  
  4.     //读取plist  
  5.   
  6.     NSString *plistPath = [[NSBundle mainBundle] pathForResource:@"plistdemo" ofType:@"plist"];  
  7.     NSMutableDictionary *data = [[NSMutableDictionary alloc] initWithContentsOfFile:plistPath];  
  8.     NSLog(@"%@", data);  
  9.       
  10.     //添加一项内容  
  11.     [data setObject:@"add some content" forKey:@"c_key"];  
  12.       
  13.     //获取应用程序沙盒的Documents目录  
  14.     NSArray *paths=NSSearchPathForDirectoriesInDomains(NSDocumentDirectory,NSUserDomainMask,YES);  
  15.     NSString *plistPath1 = [paths objectAtIndex:0];  
  16.       
  17.     //得到完整的文件名  
  18.     NSString *filename=[plistPath1 stringByAppendingPathComponent:@"test.plist"];  
  19.    //输入写入  
  20.     [data writeToFile:filename atomically:YES];  
  21.       
  22.     //那怎么证明我的数据写入了呢?读出来看看  
  23.     NSMutableDictionary *data1 = [[NSMutableDictionary alloc] initWithContentsOfFile:filename];  
  24.     NSLog(@"%@", data1);  
  25.       
  26.       
  27.     // Do any additional setup after loading the view, typically from a nib.  
  28. }  
  29. </strong>  

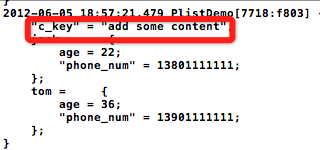
  30. 在获取到自己手工创建的plistdemo.plist数据后,在这些数据后面加了一项内容,证明输入写入了。

    怎么证明添加的内容写入了呢?下面是打印结果:

    bubuko.com,布布扣


    由于Sqlite数据库的blob数据和NSData的兼容比较好,我想尝试把一个NSArray存入Sqlite。Sqlite不支持数组的直接存储,所以我寻找了一些数组转化为NSData的方法。网上大多数的解决办法都是针对于字符数组,eg:
     NSArray*array01= [[NSArrayalloc]initWithObjects:@"1",@"2",@"3",nil];
    这种数组的解决办法很简单,循环遍历数组,然后把每次取出的NSString转码成NSData类型,然后对最终的NSData数据进行一次次的循环拼接,实现把数组中所有的字符串拼接成一个完整的NSData,eg:
     NSMutableData *data01 =[[NSMutableDataalloc]init];

        for (NSString *str in array01) {

           NSString*newStr = [str stringByAppendingString:@","];//添加间隔,为了区分数组的每个元素

           NSData *temp =[newStr dataUsingEncoding:NSASCIIStringEncoding];//创建中间变量存储将nsstring转码成nsdata的数据

           [data01 appendData:temp];//data数据拼接到最终数据data01

           [temp release];

        }

    这样就实现了一个NSArray字符数组到NSData的转换。转换回来也很简单,把NSData转换成NSString,然后将NSString分割(这也就是我们为str添加末尾“,”的原因),eg:


         NSString *string01 = [[NSString alloc]initWithData:data01 encoding:NSUTF8StringEncoding];//NSData数据转换成NSString类型数据

        NSArray *array02 = [string01 componentsSeparatedByString:@","];//字符串根据@“拆分成一个数组,将数组还原

            但是这样太麻烦了,经过了这么多次转换,我就在思考有没有更简单的方法,NSData和NSArray的直接转换。无意间看到了一个网站,我看到了一个方法,运用的是“归档”,下面我们来说一下这个方法的实现,eg:


    NSData *data02 = [NSKeyedArchiver archivedDataWithRootObject:array01];//通过归档对NSArray进行转码,保存了数组的序列

    一句代码就完成了!而且还保存了数组的有序性。转换回去也同样是一句话哦:),eg:


        NSArray *array02 = [NSKeyedUnarchiver unarchiveObjectWithData:data02];//通过发归档进行NSData反转码,返回有序列的数组

    是不是很方便呢??不是很,是太方便了吧。但是这个时候问题又来了,我如果在数组里存放的不是NSString类型的对象呢,如果存了自定义的类,是否也可以自动跳转呢?(有点异想天开。。),于是我自己创建了一个Student类,尝试相同的方式转换,发现程序无法运行了,问了同事,他告诉了我这个秘密。原来所有原生的类都是实现了NSCoding协议,在归档的过程中进行了转码,所以才可以归档成功。我研究了一下NSCoding协议,下面是API给我们的信息:


    NSCoding Protocol Reference

    encodeWithCoder:

    Encodes the receiver using a given archiver. (required)

    - (void)encodeWithCoder:(NSCoder *)encoder
    Parameters
    encoder

    An archiver object.

    Availability
    • Available in iOS 2.0 and later.
    Declared In
    NSObject.h

    initWithCoder:

    Returns an object initialized from data in a given unarchiver.(required)

    - (id)initWithCoder:(NSCoder *)decoder
    Parameters
    decoder

    An unarchiver object.

    Return Value

    self, initialized using the datain decoder.

    Availability
    • Available in iOS 2.0 and later.
    Declared In
    NSObject.h

    NSCoding协议中只有两个方法,都是require的方法,一个是把本身的类进行转码,一个是逆转换成类对象,返回一个对象,我们实战一下这个协议的用法,看看是否好用,首先写一个自定义Student类:

    @interfaceStudent : NSObject<NSCoding>

    @property (nonatomic, retain) NSString *name;

    @property (nonatomic, retain) NSString *ID;


    -(Student *)initWithName :(NSString*)newName 

                     and : (NSString *)newID;

    @end

    Student类需要实现协议NSCoding,.m文件中是这样的:


    @implementationStudent

    @synthesize name = _name,ID = _ID;


    //初始化学生类

    -(Student *)initWithName:(NSString *)newName and:(NSString *)newID{

       self = [super init];

       if (self) {

           self.name = newName;

           self.ID= newID;

        }

       return self;

    }

    //学生类内部的两个属性变量分别转码

    -(void)encodeWithCoder:(NSCoder *)aCoder{

       [aCoder encodeObject:self.name forKey:@"name"];

       [aCoder encodeObject:self.IDforKey:@"ID"];

    }

    //分别把两个属性变量根据关键字进行逆转码,最后返回一个Student类的对象

    -(id)initWithCoder:(NSCoder *)aDecoder{

       if (self = [super init]) {

           self.name = [aDecoder decodeObjectForKey:@"name"];

           self.ID= [aDecoder decodeObjectForKey:@"ID"];

        }

       return self;

    }


    @end


    自定义类Student实现了NSCoding协议以后,就可以进行归档转换了,具体实现:


       Student *stu1 = [[Student alloc]initWithName:@"124" and:@"111"];//学生对象stu1

       Student *stu2 = [[Student alloc]initWithName:@"223" and:@"222"];//学生对象stu2

       NSArray *stuArray =[NSArray arrayWithObjects:stu1,stu2, nil];//学生对象数组,里面包含stu1stu2


       NSData *stuData = [NSKeyedArchiver archivedDataWithRootObject:stuArray];//归档

       NSLog(@"data = %@",stuData);

       NSArray *stuArray2 =[NSKeyedUnarchiver unarchiveObjectWithData:stuData];//逆归档

       NSLog(@"array2 = %@",stuArray2);

    运行结果如下:


    2012-09-25 10:44:24.944MagazineDemo[720:f803] data = <62706c69 73743030d4010203 0405082b 2c542474 6f705824 6f626a65 63747358 2476657273696f6e 59246172 63686976 6572d106 0754726f 6f748001 aa090a1117181920 24252655 246e756c 6cd20b0c 0d105a4e 532e6f62 6a65637473562463 6c617373 a20e0f80 02800680 09d31213 0c141516 524944546e616d65 80048003 80055331 32345331 3131d21a 1b1c1f58 24636c6173736573 5a24636c 6173736e 616d65a2 1d1e5753 74756465 6e74584e534f626a 65637457 53747564 656e74d3 12130c21 22168008 8007800553323233 53323232 d21a1b27 2aa22829 574e5341 72726179 584e534f626a6563 74574e53 41727261 79120001 86a05f10 0f4e534b 6579656441726368 69766572 00080011 0016001f 00280032 0035003a 003c0047004d0052 005d0064 00670069 006b006d 00740077 007c007e 008000820086008a 008f0098 00a300a6 00ae00b7 00bf00c6 00c800ca 00cc00d000d400d9 00dc00e4 00ed00f5 00fa0000 00000000 02010000 00000000002d0000 00000000 00000000 00000000 010c>

    2012-09-25 10:44:24.944MagazineDemo[720:f803] array2 = (

       "<Student: 0x6883490>",

       "<Student: 0x68dd3c0>"

    )

    成功啦:)自定义类Student转码成功.


ios的文件加载和保存

标签:ios   plist   nscoding   归档反归档   编码解码   

原文地址:http://blog.csdn.net/sammyieveo/article/details/41862247

(0)
(0)
   
举报
评论 一句话评论(0
登录后才能评论!
© 2014 mamicode.com 版权所有  联系我们:gaon5@hotmail.com
迷上了代码!