标签:des style blog http io ar color os 使用
你是否每天使用着网页翻译工具?你是否遇到过这种情况,上网过程中遇到一个很长的单词但是又不能复制,要开两个浏览器,一个打开百度翻译,照着另一个网页输入单词?你安装了各种翻译软件后,又删除,只因忍受不了那每次弹出来的广告?其实我们想要的就是简单的翻译一个单词。今天就来使用百度翻译开放API,做一个属于自己的翻译工具,只有简单的翻译功能,至于外观自己根据自己的爱好,想做成什么样就做成什么样,终于可以任性一回了~~
下面先来看一下词典效果:
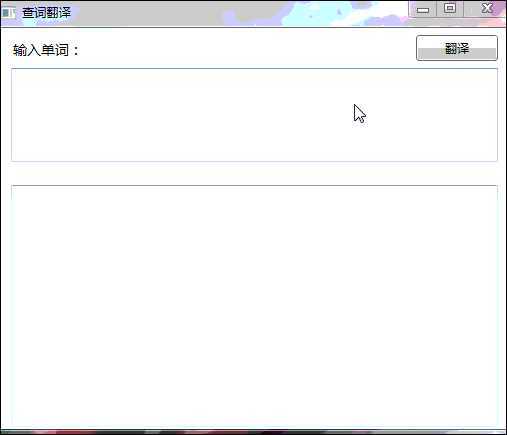
百度翻译可以通过HTTP访问,返回Json格式的翻译结果,其使用方法如下:
GET请求方式:
http://openapi.baidu.com/public/2.0/bmt/translate?client_id=YourApiKey&q=today&from=auto&to=auto
其中有一个client_id,就是你的APP ID,可以参考下面链接这个你可以在百度开发者平台申请。q=后面就是你要翻译的内容,from后面跟的是原来的语种,to表示翻译目标语种,auto表示自动识别。
如何获取api key:http://developer.baidu.com/wiki/index.php?title=%E5%B8%AE%E5%8A%A9%E6%96%87%E6%A1%A3%E9%A6%96%E9%A1%B5/%E7%BD%91%E7%AB%99%E6%8E%A5%E5%85%A5/%E5%85%A5%E9%97%A8%E6%8C%87%E5%8D%97

目前支持13中语种,如下图:
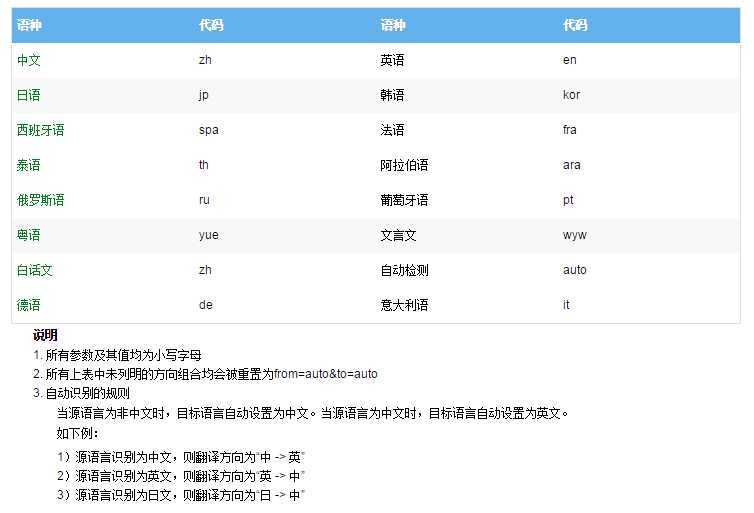
目前百度翻译api共分为4档,对普通开发者提供1000次/小时限制,支持扩容。每小时1000次,对于我们自己来说是够用了。
当然我们主要使用的是英文和中文,也可以使用auto。既然可以通过GET的方式请求,我们先来在浏览器中测试一下,这里我已经有ApiKey了,在浏览器中输入如下Url:

这里我们查询单词Hello,回车后可以看到浏览器输出如下内容:
{"from":"en","to":"zh","trans_result":[{"src":"Hello","dst":"\u4f60\u597d"}]}
是Json格式的,我们先用工具来校检一下,这里我在http://www.bejson.com/进行校检,得出结果如下:
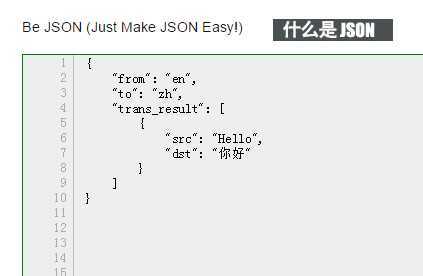
这下看清楚了吧,from,to的意思就是从英语翻译到中文,后面跟随着翻译结果,src后面的是原内容,dst后面的是翻译结果。好了,清楚了数据格式,下面我们开始编写自己的翻译工具。
更多内容请参见百度翻译官方API文档:http://developer.baidu.com/wiki/index.php?title=%E5%B8%AE%E5%8A%A9%E6%96%87%E6%A1%A3%E9%A6%96%E9%A1%B5/%E7%99%BE%E5%BA%A6%E7%BF%BB%E8%AF%91/%E7%BF%BB%E8%AF%91API
简单的了解了百度翻译API后,下面我们开始制作自己的翻译软件,这里为了演示,界面做的简单一点,新建WPF项目,名字就叫BaiduTrans吧,建完后,我们打开MainWindow.xaml搭建简单的页面,如图:
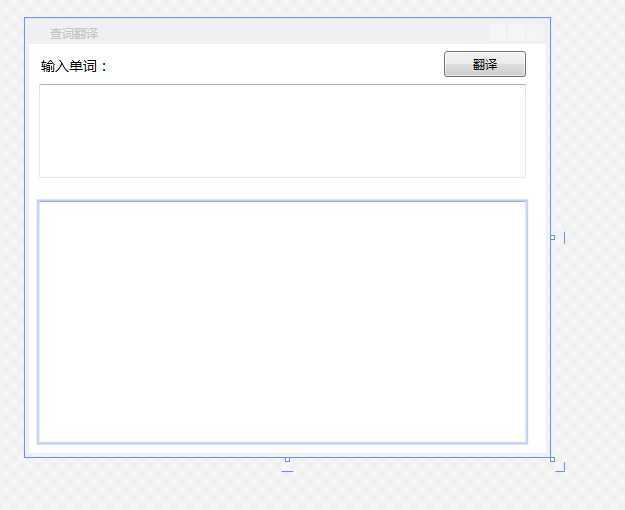
XAML代码如下:
<Window x:Class="BaiduTrans.MainWindow"
        xmlns="http://schemas.microsoft.com/winfx/2006/xaml/presentation"
        xmlns:x="http://schemas.microsoft.com/winfx/2006/xaml"
        Title="查词翻译" Height="439" Width="525" WindowStartupLocation="CenterScreen" KeyDown="Window_KeyDown">
    <Grid>
        <TextBlock Height="23" HorizontalAlignment="Left" Margin="12,12,0,0" FontSize="14" Name="textBlock1" Text="输入单词:" VerticalAlignment="Top" />
        <TextBox Height="94" HorizontalAlignment="Left" Margin="10,40,0,0" Name="txtWord" VerticalAlignment="Top" Width="487" />
        <Button Content="翻译" FontSize="12" Height="26" HorizontalAlignment="Left" Margin="415,7,0,0" Name="button1" VerticalAlignment="Top" Width="82" Click="button1_Click" />
        <TextBox Height="242" HorizontalAlignment="Left" Margin="10,157,0,0" Name="txtResult" VerticalAlignment="Top" Width="487" />
    </Grid>
</Window>
参考刚刚我们得到的Json格式和百度官方的翻译结果格式:
trans_result: [
{},
{},
{}
]
我们创建一个类,来存放反序列化后的翻译结果,类目就叫TransObj,代码如下:
using System;
using System.Collections.Generic;
using System.Linq;
using System.Text;

namespace BaiduTrans
{
   public class TransObj
   {
      public string from { get; set; }
      public string to { get; set; }
      public List<TransResult> trans_result { get; set; }
   }

   public class TransResult
   {
      public string src { get; set; }
      public string dst { get; set; }
   }
}
至于Json的反序列化,我们使用Newtonsoft.Json,没用过的可以参考Json序列化之.NET开源类库Newtonsoft.Json的研究这篇文章。我们使用Nugget安装Newtonsoft.Json,方法如下:

安装完成后,我们双击翻译按钮,添加代码如下:
using System;
using System.Collections.Generic;
using System.Linq;
using System.Text;
using System.Windows;
using System.Windows.Controls;
using System.Windows.Data;
using System.Windows.Documents;
using System.Windows.Input;
using System.Windows.Media;
using System.Windows.Media.Imaging;
using System.Windows.Navigation;
using System.Windows.Shapes;
using Newtonsoft.Json;
using System.Net;
using System.IO;

namespace BaiduTrans
{
   /// <summary>
   /// Interaction logic for MainWindow.xaml
   /// </summary>
   public partial class MainWindow : Window
   {
      public MainWindow()
      {
         InitializeComponent();
      }
      /// <summary>
      /// 1. + URL 中+号表示空格 %2B
      ///2. 空格 URL中的空格可以用+号或者编码 %20
      ///3. / 分隔目录和子目录 %2F
      ///4. ? 分隔实际的 URL 和参数 %3F
      ///5. % 指定特殊字符 %25
      ///6. # 表示书签 %23
      ///7. & URL 中指定的参数间的分隔符 %26
      ///8. = URL 中指定参数的值 %3D
      /// </summary>
      /// <param name="sender"></param>
      /// <param name="e"></param>
      private void button1_Click(object sender, RoutedEventArgs e)
      {
         WebClient client = new WebClient();
         string txtInput = txtWord.Text;
         txtInput = txtInput.Replace(@"#","%23");
         string url = string.Format("http://openapi.baidu.com/public/2.0/bmt/translate?client_id=YourApiKey&q={0}&from=auto&to=auto", txtInput);
         var buffer = client.DownloadData(url);
         string result = Encoding.UTF8.GetString(buffer);
         StringReader sr = new StringReader(result);
         JsonTextReader jsonReader = new JsonTextReader(sr);
         JsonSerializer serializer = new JsonSerializer();
         var r = serializer.Deserialize<TransObj>(jsonReader);
         txtResult.Text = r.trans_result[0].dst;
      }

      private void Window_KeyDown(object sender, KeyEventArgs e)
      {
          if(e.Key == Key.Enter)
          {
              button1_Click(null, null);
          }
      }
   }
}
这里请把client_id换成你们自己的,我们又添加了键盘事件,可以通过回车来进行查询显示查询结果,至于一些特殊的符号处理,我这里只处理了#号,如果大家需要,可以参考注释里面的进行处理,或者使用一些工具类。
下面我们来和网页版的百度翻译对比一下,我们的翻译结果如下:
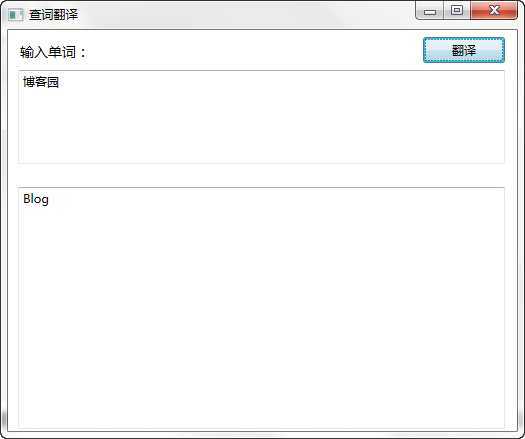
网页版翻译结果如下:

翻译结果一样,是吧~~ 到这里,简单的词典功能就完成了,更多功能大家可以自由发挥~~
作者:雲霏霏
QQ交流群:243633526
博客地址:http://www.cnblogs.com/yunfeifei/
声明:本博客原创文字只代表本人工作中在某一时间内总结的观点或结论,与本人所在单位没有直接利益关系。非商业,未授权,贴子请以现状保留,转载时必须保留此段声明,且在文章页面明显位置给出原文连接。
如果大家感觉我的博文对大家有帮助,请推荐支持一把,给我写作的动力。
标签:des style blog http io ar color os 使用
原文地址:http://www.cnblogs.com/yunfeifei/p/4158571.html