标签:des style blog http io ar color os 使用
前几篇文章都是从开发和使用的角度了解了MongoDB的各个知识点,这篇文章将从MongoDB管理的角度入手,了解MongoDB管理所要了解的基本知识。
在前面几篇文章中,已经接触了一些数据库命令,例如文档、索引的操作。
在MongoDB shell中,可以使用runCommand()来传入并执行一个命令文档。例如
> db.runCommand({"getLastError":1})
{ "n" : 0, "connectionId" : 1, "err" : null, "ok" : 1 }
>
MongoDB中的命令其实是作为一种特殊的查询来实现的,这些查询针对$cmd集合来执行。runCommand仅仅是接受命令文档,执行等价的查询操作。所以上面的操作等价于
> db.$cmd.findOne({"getLastError":1})
{ "n" : 0, "connectionId" : 1, "err" : null, "ok" : 1 }
>
但是,“db.$cmd.count()”的结果却总是为0,不知道是不是用户没有权限查看。
通过db.runCommand({"listCommands":1})可以得到MongoDB支持的命令集合。
通过db.help(),可以得到跟数据库相关的命令集合,例如添加删除用户,显示数据库名称,显示所有的collection等等。
> db.help()
DB methods:
        db.addUser(userDocument)
        db.adminCommand(nameOrDocument) - switches to ‘admin‘ db, and runs command [ just calls db.runCommand(...) ]
        db.auth(username, password)
        db.cloneDatabase(fromhost)
        db.commandHelp(name) returns the help for the command
        db.copyDatabase(fromdb, todb, fromhost)
        db.createCollection(name, { size : ..., capped : ..., max : ... } )
        db.currentOp() displays currently executing operations in the db
        db.dropDatabase()
        db.eval(func, args) run code server-side
        db.fsyncLock() flush data to disk and lock server for backups
        db.fsyncUnlock() unlocks server following a db.fsyncLock()
        db.getCollection(cname) same as db[‘cname‘] or db.cname
        db.getCollectionNames()
......
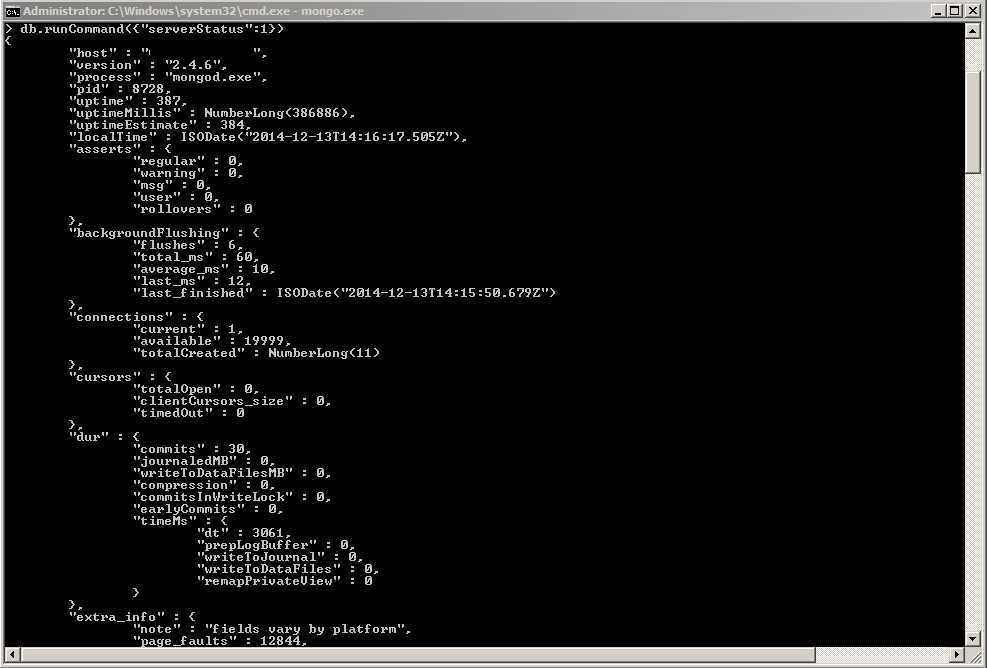
作为管理员,一定要监控服务器的运行状态。在MongDB中,有三种方式进行服务器状态监控
注:如果启动MongDB服务时,加上"--rest"选项,就可以使用状态监控页面中的链接,查看命令列表,查看副本集状态等等
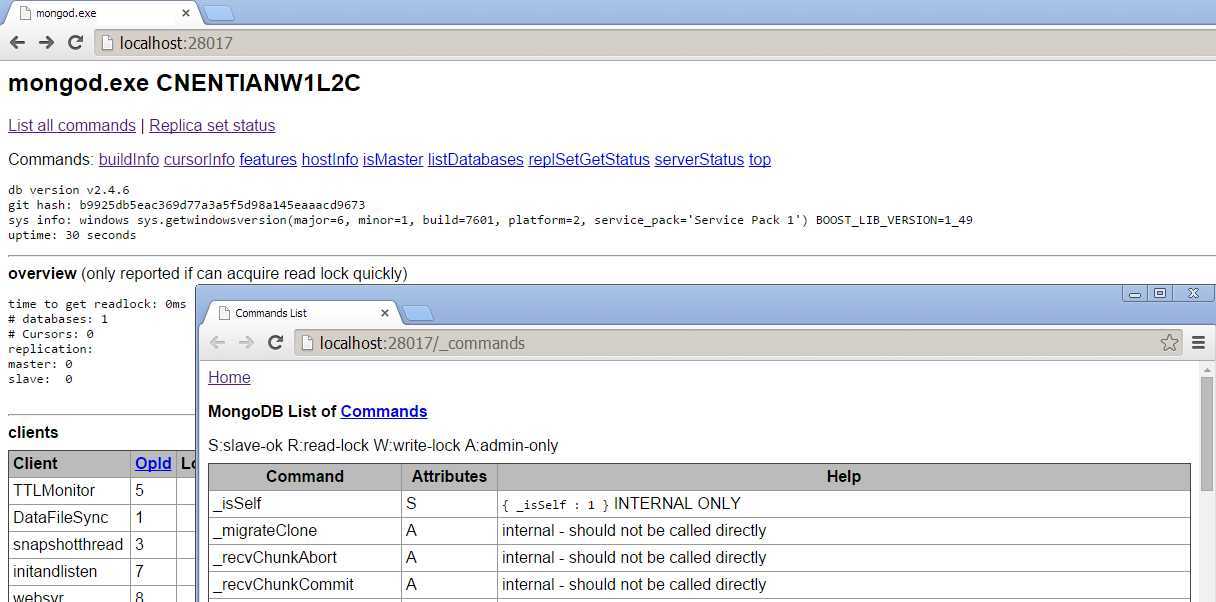
通过serverStatus命令得到的是一个静态结果。结果中的字段含义请参考MongoDB文档。
通过"mongostat.exe --help"可以查看它支持的参数选项
C:\mongodb\bin>mongostat.exe --help
View live MongoDB performance statistics.

usage: mongostat.exe [options] [sleep time]
sleep time: time to wait (in seconds) between calls
options:
  --help                                produce help message
  -v [ --verbose ]                      be more verbose (include multiple times
                                        for more verbosity e.g. -vvvvv)
  --version                             print the program‘s version and exit
  -h [ --host ] arg                     mongo host to connect to ( <set
                                        name>/s1,s2 for sets)
  --port arg                            server port. Can also use --host
                                        hostname:port
  --ipv6                                enable IPv6 support (disabled by
                                        default)
  -u [ --username ] arg                 username
  -p [ --password ] arg                 password
  --authenticationDatabase arg          user source (defaults to dbname)
  --authenticationMechanism arg (=MONGODB-CR)
                                        authentication mechanism
  --noheaders                           don‘t output column names
  -n [ --rowcount ] arg (=0)            number of stats lines to print (0 for
                                        indefinite)
  --http                                use http instead of raw db connection
  --discover                            discover nodes and display stats for
                                        all
  --all                                 all optional fields

......
在MongoDB中,每个数据库都对应不同的文件,所以可以很方便的管理每个数据库的权限。这里,我们就试试MongoDB的用户安全认证。
首先启动一个MongoDB实例,然后通过MongoDB shell建立两个数据库test1,test2,并且插入一些测试数据,
mongod.exe --dbpath="c:\mongodb\db\mtest"
> use test1
switched to db test1
> for(var i=0;i<10;i++){
...     var randAge = parseInt(5*Math.random()) + 20;
...     var gender = (randAge%2)?"Male":"Female";
...     db.student.insert({"sid":i, "name":"Will"+i, "gender": gender, "age": randAge});
... }
> use test2
switched to db test2
> for(var i=0;i<10;i++){
...     var randAge = parseInt(5*Math.random()) + 20;
...     var gender = (randAge%2)?"Male":"Female";
...     db.student.insert({"sid":i, "name":"Will"+i, "gender": gender, "age": randAge});
... }
> show dbs
local   0.078125GB
test1   0.203125GB
test2   0.203125GB
>
通过下面命令给各个数据库添加用户,其中addUser()的第三个参数表示,是否只有只读权限
use test1
db.addUser("Wilber1", "Wilber1", true)
db.addUser("Will1", "Will1")
use test2
db.addUser("Wilber2", "Wilber2", true)
db.addUser("Will2", "Will2")
接下来,重新启动MongoDB实例,这次需要加上"—auth"选项
mongod.exe --dbpath="c:\mongodb\db\mtest" –auth
通过下面一系列操作就可以验证上面新添加用户的权限了
C:\mongodb\bin>mongo.exe
MongoDB shell version: 2.4.6
connecting to: test
> use test1
switched to db test1
> db.student.find()
error: { "$err" : "not authorized for query on test1.student", "code" : 16550 }
> db.auth("Wilber1","Wilber1")
1
> db.student.find()
{ "_id" : ObjectId("548d74a241393de780336eb5"), "sid" : 0, "name" : "Will0", "gender" : "Female", "age" : 22 }
{ "_id" : ObjectId("548d74a241393de780336eb6"), "sid" : 1, "name" : "Will1", "gender" : "Male", "age" : 21 }
{ "_id" : ObjectId("548d74a241393de780336eb7"), "sid" : 2, "name" : "Will2", "gender" : "Male", "age" : 23 }
{ "_id" : ObjectId("548d74a241393de780336eb8"), "sid" : 3, "name" : "Will3", "gender" : "Female", "age" : 20 }
{ "_id" : ObjectId("548d74a241393de780336eb9"), "sid" : 4, "name" : "Will4", "gender" : "Female", "age" : 20 }
{ "_id" : ObjectId("548d74a241393de780336eba"), "sid" : 5, "name" : "Will5", "gender" : "Female", "age" : 24 }
{ "_id" : ObjectId("548d74a241393de780336ebb"), "sid" : 6, "name" : "Will6", "gender" : "Male", "age" : 23 }
{ "_id" : ObjectId("548d74a241393de780336ebc"), "sid" : 7, "name" : "Will7", "gender" : "Female", "age" : 24 }
{ "_id" : ObjectId("548d74a241393de780336ebd"), "sid" : 8, "name" : "Will8", "gender" : "Male", "age" : 21 }
{ "_id" : ObjectId("548d74a241393de780336ebe"), "sid" : 9, "name" : "Will9", "gender" : "Male", "age" : 21 }
> db.student.insert({"name":"July"})
not authorized for insert on test1.student
> db.auth("Will1","Will1")
1
> db.student.insert({"name":"July"})
> db.auth("Will2","Will2")
Error: 18 { code: 18, ok: 0.0, errmsg: "auth fails" }
0
> use test2
switched to db test2
> db.student.find()
error: { "$err" : "not authorized for query on test2.student", "code" : 16550 }
>
上面只是给各个数据库添加用户,我们也可以给这个MongoDB实例添加一个管理员。这个管理员对所有的数据库都有读写权限,并且可以管理各个数据库的用户。
use admin
db.addUser("root","root")
db.auth("root","root")
在数据库的使用过程中,会经常遇到需要备份、恢复数据库的情况。在MongoDB中,我们使用"mongodump.exe"和"mongorestore.exe"来分别完成MongoDB的备份和恢复工作。
通过"--help"来查看mongodump支持的参数
C:\mongodb\bin>mongodump --help
Export MongoDB data to BSON files.

options:
  --help                                produce help message
  -v [ --verbose ]                      be more verbose (include multiple times
                                        for more verbosity e.g. -vvvvv)
  --version                             print the program‘s version and exit
  -h [ --host ] arg                     mongo host to connect to ( <set
                                        name>/s1,s2 for sets)
  --port arg                            server port. Can also use --host
                                        hostname:port
  --ipv6                                enable IPv6 support (disabled by
                                        default)
  -u [ --username ] arg                 username
  -p [ --password ] arg                 password
  --authenticationDatabase arg          user source (defaults to dbname)
  --authenticationMechanism arg (=MONGODB-CR)
                                        authentication mechanism
  --dbpath arg                          directly access mongod database files
                                        in the given path, instead of
                                        connecting to a mongod  server - needs
                                        to lock the data directory, so cannot
                                        be used if a mongod is currently
                                        accessing the same path
  --directoryperdb                      each db is in a separate directly
                                        (relevant only if dbpath specified)
  --journal                             enable journaling (relevant only if
                                        dbpath specified)
  -d [ --db ] arg                       database to use
  -c [ --collection ] arg               collection to use (some commands)
  -o [ --out ] arg (=dump)              output directory or "-" for stdout
  -q [ --query ] arg                    json query
  --oplog                               Use oplog for point-in-time
                                        snapshotting
  --repair                              try to recover a crashed database
  --forceTableScan                      force a table scan (do not use
                                        $snapshot)
进入实验,通过mongodump来备份test1数据库到"C:\mongodb\db\backup"文件夹,由于我们前面设置了test1的访问权限,所以要加入用户登录信息进行数据库备份。实验中发现,当使用只读用户(Wilber1)进行数据库备份的时候,会遇到权限错误。
C:\mongodb\bin>mongodump -u Will1 -p Will1 -d test1 -o "c:\mongodb\db\backup"
connected to: 127.0.0.1
Sun Dec 14 20:11:54.442 DATABASE: test1  to     c:\mongodb\db\backup\test1
Sun Dec 14 20:11:54.444         test1.system.indexes to c:\mongodb\db\backup\test1\system.indexes.bson
Sun Dec 14 20:11:54.446                  3 objects
Sun Dec 14 20:11:54.448         test1.student to c:\mongodb\db\backup\test1\student.bson
Sun Dec 14 20:11:54.450                  11 objects
Sun Dec 14 20:11:54.451         Metadata for test1.student to c:\mongodb\db\backup\test1\student.metadata.json
Sun Dec 14 20:11:54.456         test1.system.users to c:\mongodb\db\backup\test1\system.users.bson
Sun Dec 14 20:11:54.458                  2 objects
Sun Dec 14 20:11:54.459         Metadata for test1.system.users to c:\mongodb\db\backup\test1\system.users.metadata.json
下面来进行数据库恢复,首先通过MongoDB shell把test1中的student表删除,然后恢复
> db.student.drop()
true
> show collections
system.indexes
system.users
C:\mongodb\bin>mongorestore -u Will1 -p Will1 -d test1 --drop "c:\mongodb\db\backup\test1"
connected to: 127.0.0.1
Sun Dec 14 20:29:52.285 c:\mongodb\db\backup\test1\student.bson
Sun Dec 14 20:29:52.287         going into namespace [test1.student]
Sun Dec 14 20:29:52.287          dropping
11 objects found
Sun Dec 14 20:29:52.293         Creating index: { key: { _id: 1 }, ns: "test1.student", name: "_id_" }
Sun Dec 14 20:29:52.296 c:\mongodb\db\backup\test1\system.users.bson
Sun Dec 14 20:29:52.296         going into namespace [test1.system.users]
2 objects found
Sun Dec 14 20:29:52.300         Creating index: { key: { _id: 1 }, ns: "test1.system.users", name: "_id_" }
Sun Dec 14 20:29:52.302         Creating index: { key: { user: 1, userSource: 1 }, unique: true, ns: "test1.system.users", name: "user_1_use
rSource_1" }
> show collections
system.indexes
system.users
> show collections
student
system.indexes
system.users
> db.student.find()
{ "_id" : ObjectId("548d74a241393de780336eb5"), "sid" : 0, "name" : "Will0", "gender" : "Female", "age" : 22 }
{ "_id" : ObjectId("548d74a241393de780336eb6"), "sid" : 1, "name" : "Will1", "gender" : "Male", "age" : 21 }
{ "_id" : ObjectId("548d74a241393de780336eb7"), "sid" : 2, "name" : "Will2", "gender" : "Male", "age" : 23 }
{ "_id" : ObjectId("548d74a241393de780336eb8"), "sid" : 3, "name" : "Will3", "gender" : "Female", "age" : 20 }
{ "_id" : ObjectId("548d74a241393de780336eb9"), "sid" : 4, "name" : "Will4", "gender" : "Female", "age" : 20 }
{ "_id" : ObjectId("548d74a241393de780336eba"), "sid" : 5, "name" : "Will5", "gender" : "Female", "age" : 24 }
{ "_id" : ObjectId("548d74a241393de780336ebb"), "sid" : 6, "name" : "Will6", "gender" : "Male", "age" : 23 }
{ "_id" : ObjectId("548d74a241393de780336ebc"), "sid" : 7, "name" : "Will7", "gender" : "Female", "age" : 24 }
{ "_id" : ObjectId("548d74a241393de780336ebd"), "sid" : 8, "name" : "Will8", "gender" : "Male", "age" : 21 }
{ "_id" : ObjectId("548d74a241393de780336ebe"), "sid" : 9, "name" : "Will9", "gender" : "Male", "age" : 21 }
{ "_id" : ObjectId("548d77b0e71a5046dd2ab620"), "name" : "July" }
>
mongodump和mongorestore比较好的是,它们可以支持在不停止数据库服务的情况下进行数据库的备份和恢复。但是,如果数据库在备份的过程中有新的数据插入数据库,或者缓存中的数据还没有及时的写入硬盘,则通过mongodump备份得到的数据可能已经不是最新的了。
为了解决这个问题,我们可以使用fsync。fsync命令会强制服务器将所有的缓冲区数据写入内存,这时我们还可以选择上锁来阻止对数据库的写操作,知道锁释放为止。
为了方便实验,重新启动MongoDB实例,去掉"--auth"选项。打开两个MongoDB shell,下面分别称为shell1和shell2。
> use admin
switched to db admin
> db.runCommand({"fsync":1,"lock":1})
{
        "info" : "now locked against writes, use db.fsyncUnlock() to unlock",
        "seeAlso" : "http://dochub.mongodb.org/core/fsynccommand",
        "ok" : 1
}
> use test1
switched to db test1
> for(var i=0;i<10;i++){
...     var randAge = parseInt(5*Math.random()) + 20;
...     var gender = (randAge%2)?"Male":"Female";
...     db.student.insert({"sid":i, "name":"Will"+i, "gender": gender, "age": randAge});
... }
> db.fsyncUnlock()
{ "ok" : 1, "info" : "unlock completed" }
> db.student.find()
{ "_id" : ObjectId("548d74a241393de780336eb5"), "sid" : 0, "name" : "Will0", "gender" : "Female", "age" : 22 }
{ "_id" : ObjectId("548d74a241393de780336eb6"), "sid" : 1, "name" : "Will1", "gender" : "Male", "age" : 21 }
{ "_id" : ObjectId("548d74a241393de780336eb7"), "sid" : 2, "name" : "Will2", "gender" : "Male", "age" : 23 }
{ "_id" : ObjectId("548d74a241393de780336eb8"), "sid" : 3, "name" : "Will3", "gender" : "Female", "age" : 20 }
{ "_id" : ObjectId("548d74a241393de780336eb9"), "sid" : 4, "name" : "Will4", "gender" : "Female", "age" : 20 }
{ "_id" : ObjectId("548d74a241393de780336eba"), "sid" : 5, "name" : "Will5", "gender" : "Female", "age" : 24 }
{ "_id" : ObjectId("548d74a241393de780336ebb"), "sid" : 6, "name" : "Will6", "gender" : "Male", "age" : 23 }
{ "_id" : ObjectId("548d74a241393de780336ebc"), "sid" : 7, "name" : "Will7", "gender" : "Female", "age" : 24 }
{ "_id" : ObjectId("548d74a241393de780336ebd"), "sid" : 8, "name" : "Will8", "gender" : "Male", "age" : 21 }
{ "_id" : ObjectId("548d74a241393de780336ebe"), "sid" : 9, "name" : "Will9", "gender" : "Male", "age" : 21 }
{ "_id" : ObjectId("548d77b0e71a5046dd2ab620"), "name" : "July" }
{ "_id" : ObjectId("548d856947119de938024cda"), "sid" : 0, "name" : "Will0", "gender" : "Male", "age" : 23 }
{ "_id" : ObjectId("548d856947119de938024cdb"), "sid" : 1, "name" : "Will1", "gender" : "Male", "age" : 21 }
{ "_id" : ObjectId("548d856947119de938024cdc"), "sid" : 2, "name" : "Will2", "gender" : "Female", "age" : 24 }
{ "_id" : ObjectId("548d856947119de938024cdd"), "sid" : 3, "name" : "Will3", "gender" : "Female", "age" : 24 }
{ "_id" : ObjectId("548d856947119de938024cde"), "sid" : 4, "name" : "Will4", "gender" : "Female", "age" : 24 }
{ "_id" : ObjectId("548d856947119de938024cdf"), "sid" : 5, "name" : "Will5", "gender" : "Female", "age" : 22 }
{ "_id" : ObjectId("548d856947119de938024ce0"), "sid" : 6, "name" : "Will6", "gender" : "Male", "age" : 21 }
{ "_id" : ObjectId("548d856947119de938024ce1"), "sid" : 7, "name" : "Will7", "gender" : "Male", "age" : 21 }
{ "_id" : ObjectId("548d856947119de938024ce2"), "sid" : 8, "name" : "Will8", "gender" : "Male", "age" : 23 }
Type "it" for more
> it
{ "_id" : ObjectId("548d856947119de938024ce3"), "sid" : 9, "name" : "Will9", "gender" : "Female", "age" : 20 }
>
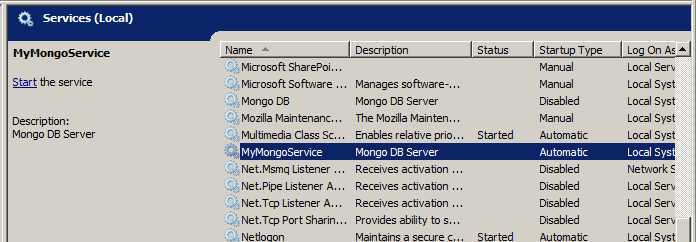
MongoDB支持以Windows service的方式运行,这样我们就没有必要每次都通过mongod来启动MongoDB实例了。
使用下面命令来新建一个MongoDB服务
C:\mongodb\bin>mongod.exe --dbpath="c:\mongodb\db\mtest" --logpath="c:\mongodb\db\mtest\mtestLog.txt"  --install --serviceName="MyMongo" --s
erviceDisplayName="MyMongoService"
Sun Dec 14 20:59:31.402 Trying to install Windows service ‘MyMongo‘
Sun Dec 14 20:59:31.449 Service ‘MyMongo‘ (MyMongoService) installed with command line ‘C:\mongodb\bin\mongod.exe --dbpath=c:\mongodb\db\mte
st --logpath=c:\mongodb\db\mtest\mtestLog.txt --service‘
Sun Dec 14 20:59:31.449 Service can be started from the command line with ‘net start MyMongo‘
参数的含义:
查看Windows service列表,可以看到已经安装的服务
接下来通过MongoDB shell来启动刚安装的service
C:\mongodb\bin>net start MyMongo

The MyMongoService service was started successfully.


C:\mongodb\bin>mongo.exe
MongoDB shell version: 2.4.6
connecting to: test
> use test1
switched to db test1
> db.student.count()
21
>
通过"net stop MyMongo"可以关闭service。
另外,通过"--remove"选项可以移除MongoDB service
C:\mongodb\bin>mongod.exe --remove --serviceName=MyMongo
Sun Dec 14 21:12:28.202 Trying to remove Windows service ‘MyMongo‘
Sun Dec 14 21:12:28.202 Service ‘MyMongo‘ removed
本篇文章主要介绍了MongDB管理中需要用到的基本知识。
Ps:例子中所有的命令都可以参考以下链接
http://files.cnblogs.com/wilber2013/management.js
标签:des style blog http io ar color os 使用
原文地址:http://www.cnblogs.com/wilber2013/p/4163053.html